
Protocol Function
Page 3
... bbbb: LampHour cc: source 00/01/02/03/04= None/VGA1/VGA2/ S-Video/Video dddd: FW version e : Display mode 0/1/2/3/4/5/6/7/8 None/Presentation/Bright/Movie/sRGB /User1/User2/Blackboard/Classroom ~XX151 1 7E 30 30 31 35 31 20 31 0D Model name OKn n:1/2=SVGA/XGA ~XX108 1 7E 30 30 31 30 38 20 31 0D Lamp Hours OKbbbb bbbb: LampHour ~XX108...
... bbbb: LampHour cc: source 00/01/02/03/04= None/VGA1/VGA2/ S-Video/Video dddd: FW version e : Display mode 0/1/2/3/4/5/6/7/8 None/Presentation/Bright/Movie/sRGB /User1/User2/Blackboard/Classroom ~XX151 1 7E 30 30 31 35 31 20 31 0D Model name OKn n:1/2=SVGA/XGA ~XX108 1 7E 30 30 31 30 38 20 31 0D Lamp Hours OKbbbb bbbb: LampHour ~XX108...
User's Manual
Page 1
...11 Connect to Video Sources 12 Powering the projector On / Off.........13 Powering On the Projector 13 Powering off the projector 14 Warning Indicator 14 Adjusting the Projected Image..........15 Adjusting the Projector's Height ........ 15 Adjusting the Projector's Focus.......... 16 Adjusting Projection Image Size......... 16 User Controls 18 Control Panel & Remote Control.......18 Control Panel 18 Remote Control 19 On-screen Display Menus 24 How to operate 24 Menu Tree 25 IMAGE 27 IMAGE | Advanced 29 DISPLAY 31 DISPLAY | 3D 33 SETUP 34 SETUP | Signal (RGB 37 SETUP | Security...
...11 Connect to Video Sources 12 Powering the projector On / Off.........13 Powering On the Projector 13 Powering off the projector 14 Warning Indicator 14 Adjusting the Projected Image..........15 Adjusting the Projector's Height ........ 15 Adjusting the Projector's Focus.......... 16 Adjusting Projection Image Size......... 16 User Controls 18 Control Panel & Remote Control.......18 Control Panel 18 Remote Control 19 On-screen Display Menus 24 How to operate 24 Menu Tree 25 IMAGE 27 IMAGE | Advanced 29 DISPLAY 31 DISPLAY | 3D 33 SETUP 34 SETUP | Signal (RGB 37 SETUP | Security...

User's Manual
Page 3
...; Warning- When switching the projector off, please ensure the cooling cycle has been completed before disconnecting power. Usage Notice Precautions Please follow all warnings, precautions and maintenance as recommended in operation. ▀■ Warning- Follow instructions as described on -screen display "OPTIONS | Lamp Settings" menu after replacing the lamp module (refer to cool down . ▀■ Warning- Do not use lens cap when projector is in this user's guide. ▀■ Warning...
...; Warning- When switching the projector off, please ensure the cooling cycle has been completed before disconnecting power. Usage Notice Precautions Please follow all warnings, precautions and maintenance as recommended in operation. ▀■ Warning- Follow instructions as described on -screen display "OPTIONS | Lamp Settings" menu after replacing the lamp module (refer to cool down . ▀■ Warning- Do not use lens cap when projector is in this user's guide. ▀■ Warning...
User's Manual
Page 13
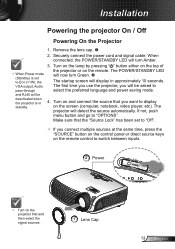
Turn on the lamp by pressing " " button either on the top of When Power mode (Standby) is set to Eco ( Remove the lens cap. 2. When connected, the POWER/STANDBY LED will turn Amber. 3. Securely connect the power cord and signal cable. Installation Powering the projector On / Off Powering On the Projector 1.
Turn on the lamp by pressing " " button either on the top of When Power mode (Standby) is set to Eco ( Remove the lens cap. 2. When connected, the POWER/STANDBY LED will turn Amber. 3. Securely connect the power cord and signal cable. Installation Powering the projector On / Off Powering On the Projector 1.
User's Manual
Page 14
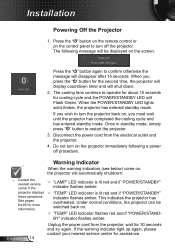
... the POWER/STANDBY LED lights solid Amber, the projector has entered standby mode. Do not turn on the control panel to restart the projector. 3. When you press the " " button for the second time, the projector will display countdown timer and will be switched back on , you wish to operate for about 10 seconds for more information. "TEMP" LED indicator is lit red and if "POWER/STANDBY" indicator flashes amber. Once in standby mode, simply press " " button to turn the projector...
... the POWER/STANDBY LED lights solid Amber, the projector has entered standby mode. Do not turn on the control panel to restart the projector. 3. When you press the " " button for the second time, the projector will display countdown timer and will be switched back on , you wish to operate for about 10 seconds for more information. "TEMP" LED indicator is lit red and if "POWER/STANDBY" indicator flashes amber. Once in standby mode, simply press " " button to turn the projector...
User's Manual
Page 25
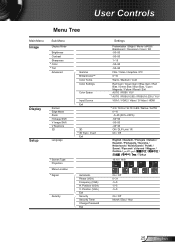
... Magyar / ýeština 0 Türkçe 16:10 / 16:9 On / Off 0~31 -5~5 -5~5 -5~5 ʳ On / Off Month / Day / Hour ʳ 25 English User Controls Menu Tree Main Menu Image Sub Menu Display Mode Brightness Contrast Sharpness #1 Color #1 Tint Advanced Display Setup Format Edge Mask Zoom H Image Shift V Image Shift V Keystone 3D Language Gamma BrilliantColor™ Color Temp. Position (VGA) V. Invert Exit #3 Screen Type Projection Menu Location #5 Signal Security Automatic Phase (VGA) Frequency (VGA) H. Color Settings Color Space Input Source Exit 3D #4 3D...
... Magyar / ýeština 0 Türkçe 16:10 / 16:9 On / Off 0~31 -5~5 -5~5 -5~5 ʳ On / Off Month / Day / Hour ʳ 25 English User Controls Menu Tree Main Menu Image Sub Menu Display Mode Brightness Contrast Sharpness #1 Color #1 Tint Advanced Display Setup Format Edge Mask Zoom H Image Shift V Image Shift V Keystone 3D Language Gamma BrilliantColor™ Color Temp. Position (VGA) V. Invert Exit #3 Screen Type Projection Menu Location #5 Signal Security Automatic Phase (VGA) Frequency (VGA) H. Color Settings Color Space Input Source Exit 3D #4 3D...

User's Manual
Page 26
English 26 User Controls Main Menu Setup Options Sub Menu Projector ID Mute Volume Audio Input Advanced RS232 Network Wireless Source Lock High Altitude Information Hide Keypad Lock Background Color Advanced Lamp Settings Reset Logo Logo Capture Exit Network State DHCP IP Address Subnet mask Gateway DNS Apply Exit Direct Power On Auto Power Off (min.) Sleep Timer (min.) Power Mode (Standby) Exit Lamp Hours Lamp Reminder Brightness Mode Lamp Reset Exit Settings 0~99 On / Off 0~10 Default / Audio1 / Audio2 / Audio3 Optoma / Neutral / User RS232 / Network Yes / No On...
English 26 User Controls Main Menu Setup Options Sub Menu Projector ID Mute Volume Audio Input Advanced RS232 Network Wireless Source Lock High Altitude Information Hide Keypad Lock Background Color Advanced Lamp Settings Reset Logo Logo Capture Exit Network State DHCP IP Address Subnet mask Gateway DNS Apply Exit Direct Power On Auto Power Off (min.) Sleep Timer (min.) Power Mode (Standby) Exit Lamp Hours Lamp Reminder Brightness Mode Lamp Reset Exit Settings 0~99 On / Off 0~10 Default / Audio1 / Audio2 / Audio3 Optoma / Neutral / User RS232 / Network Yes / No On...
User's Manual
Page 32
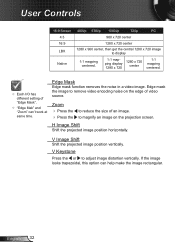
... image to magnify an image on the edge of "Edge Mask". "Edge Mak" and "Zoom" can help make the image rectangular. Edge mask the image to adjust image distortion vertically. H Image Shift Shift the projected image position horizontally. V Image Shift Shift the projected image position vertically. If the image looks trapezoidal, this option can 't work at same time. V Keystone Press the or to remove video encoding noise on the projection screen...
... image to magnify an image on the edge of "Edge Mask". "Edge Mak" and "Zoom" can help make the image rectangular. Edge mask the image to adjust image distortion vertically. H Image Shift Shift the projected image position horizontally. V Image Shift Shift the projected image position vertically. If the image looks trapezoidal, this option can 't work at same time. V Keystone Press the or to remove video encoding noise on the projection screen...
User's Manual
Page 35
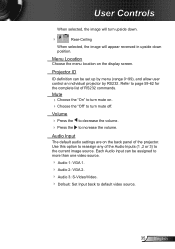
... of the Audio Inputs (1 ,2 or 3) to default video source. 35 English Audio Input The default audio settings are on . Choose the "Off" to turn upside down. Rear-Ceiling When selected, the image will appear reversed in upside down position. User Controls When selected, the image will turn mute on the back panel of the projector. Mute Choose the "On" to turn mute off. Menu Location Choose the menu location on the display screen. Volume ...
... of the Audio Inputs (1 ,2 or 3) to default video source. 35 English Audio Input The default audio settings are on . Choose the "Off" to turn upside down. Rear-Ceiling When selected, the image will appear reversed in upside down position. User Controls When selected, the image will turn mute on the back panel of the projector. Mute Choose the "On" to turn mute off. Menu Location Choose the menu location on the display screen. Volume ...
User's Manual
Page 38
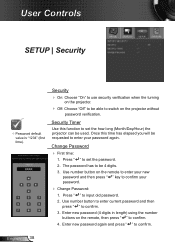
... your new password and then press " " key to set the how long (Month/Day/Hour) the projector can be 4 digits. 3. Press " " to confirm. 3. Once this function to confirm. Use number button on the projector without password verification. Change Password First time: 1. The password has to confirm. 4. Enter new password (4 digits in length) using the number buttons on the remote, then press " " to be used. Enter new password again and press " " to set the password. 2. User Controls SETUP | Security Password default...
... your new password and then press " " key to set the how long (Month/Day/Hour) the projector can be 4 digits. 3. Press " " to confirm. 3. Once this function to confirm. Use number button on the projector without password verification. Change Password First time: 1. The password has to confirm. 4. Enter new password (4 digits in length) using the number buttons on the remote, then press " " to be used. Enter new password again and press " " to set the password. 2. User Controls SETUP | Security Password default...

User's Manual
Page 42
... and press " " button to automatically assign an IP, or manually enter the required network information. 4. The following web page will display as shown in the projector's IP address from the OSD LAN screen. Category Item Crestron Control Projector Network Configuration User Password Admin Password IP Address IP ID Port Projector Name Location Assigned To DHCP (Enabled) IP Address Subnet Mask Default Gateway DNS Server Enabled New Password Confirm Enabled New Password Confirm Input-Length (characters...
... and press " " button to automatically assign an IP, or manually enter the required network information. 4. The following web page will display as shown in the projector's IP address from the OSD LAN screen. Category Item Crestron Control Projector Network Configuration User Password Admin Password IP Address IP ID Port Projector Name Location Assigned To DHCP (Enabled) IP Address Subnet Mask Default Gateway DNS Server Enabled New Password Confirm Enabled New Password Confirm Input-Length (characters...
User's Manual
Page 44
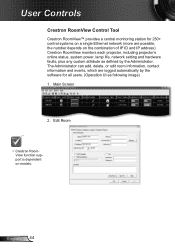
... support is dependent on models. The Administrator can add, delete, or edit room information, contact information and events, which are possible, the number depends on the combination of IP ID and IP address). English 44 Main Screen 2. Crestron RoomView monitors each projector, including projector's online status, system power, lamp life, network setting and hardware faults, plus any custom attribute as following image) 1. User Controls Crestron RoomView Control...
... support is dependent on models. The Administrator can add, delete, or edit room information, contact information and events, which are possible, the number depends on the combination of IP ID and IP address). English 44 Main Screen 2. Crestron RoomView monitors each projector, including projector's online status, system power, lamp life, network setting and hardware faults, plus any custom attribute as following image) 1. User Controls Crestron RoomView Control...
User's Manual
Page 48
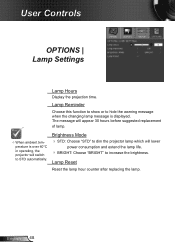
... STD automatically. The message will appear 30 hours before suggested replacement of lamp. When ambient temperature is over 40°C in operating, the projector will lower power consumption and extend the lamp life. BRIGHT: Choose "BRIGHT" to increase the brightness. Brightness Mode STD: Choose "STD" to dim the projector lamp which will switch to hide the warning message when the changing lamp message is displayed. User Controls OPTIONS | Lamp Settings Lamp Hours Display the projection time.
... STD automatically. The message will appear 30 hours before suggested replacement of lamp. When ambient temperature is over 40°C in operating, the projector will lower power consumption and extend the lamp life. BRIGHT: Choose "BRIGHT" to increase the brightness. Brightness Mode STD: Choose "STD" to dim the projector lamp which will switch to hide the warning message when the changing lamp message is displayed. User Controls OPTIONS | Lamp Settings Lamp Hours Display the projection time.

User's Manual
Page 49
...-SYNC" on the remote. If you are using . Select the "Settings" tab. 3. Click on the "Display" icon. 2. No image appears on . Please refer to the following information. Refer to the "Replacing the lamp" section. Make sure you have removed the lens cap and the projector is switched on. Ensure that your display resolution setting is not turned on -screen Ensure all the cables and power connections...
...-SYNC" on the remote. If you are using . Select the "Settings" tab. 3. Click on the "Display" icon. 2. No image appears on . Please refer to the following information. Refer to the "Replacing the lamp" section. Make sure you have removed the lens cap and the projector is switched on. Ensure that your display resolution setting is not turned on -screen Ensure all the cables and power connections...
User's Manual
Page 52
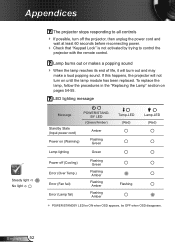
... make a loud popping sound. English 52 LED lighting message Message POWER/STANDBY LED (Green/Amber) Standby State (Input power cord) Amber Power on (Warming) Flashing Green Temp-LED (Red) Lamp-LED (Red) Lamp lighting Green Power off the projector, then unplug the power cord and wait at least 60 seconds before reconnecting power. Check that "Keypad Lock" is not activated by trying to control the projector with the remote control. Appendices The projector stops responding to all controls If possible, turn on until the lamp module has been replaced.
... make a loud popping sound. English 52 LED lighting message Message POWER/STANDBY LED (Green/Amber) Standby State (Input power cord) Amber Power on (Warming) Flashing Green Temp-LED (Red) Lamp-LED (Red) Lamp lighting Green Power off the projector, then unplug the power cord and wait at least 60 seconds before reconnecting power. Check that "Keypad Lock" is not activated by trying to control the projector with the remote control. Appendices The projector stops responding to all controls If possible, turn on until the lamp module has been replaced.
User's Manual
Page 53
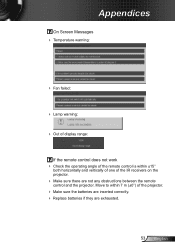
... batteries are inserted correctly. Replace batteries if they are not any obstructions between the remote control and the projector. Appendices On Screen Messages Temperature warning: Fan failed: Lamp warning: Out of display range: If the remote control does not work Check the operating angle of the remote control is within 7 m (±0°) of the IR receivers on the projector. Make sure there are...
... batteries are inserted correctly. Replace batteries if they are not any obstructions between the remote control and the projector. Appendices On Screen Messages Temperature warning: Fan failed: Lamp warning: Out of display range: If the remote control does not work Check the operating angle of the remote control is within 7 m (±0°) of the IR receivers on the projector. Make sure there are...

User's Manual
Page 61
... Source Lock On ~XX100 0 7E 30 30 31 30 30 20 30 0D Off (0/2 for backward compatible) ~XX100 3 7E 30 30 31 30 30 20 33 0D Next Source ~XX101 1 7E 30 30 31 30 31 20 31 0D High ...Color Blue ~XX104 2 7E 30 30 31 30 34 20 32 0D Black ~XX104 3 7E 30 30 31 30 34 20 33 0D Red ~XX104 4 7E 30 30 31 30 34 20 34 0D Green ~XX104 5 7E 30 30 31 30 34 20 35 0D White... for backward compatible) ~XX106 n 7E 30 30 31 30 36 20 a 0D Auto Power Off (min) n = 0 (a=30) ~ 180 (a=31 38 30) step:5 ~XX107 n 7E 30 30 31 30 37 20 a 0D Sleep Timer (min) n = 0 (a=30) ~ 995 (a=39 39 39) step:5 ~...
... Source Lock On ~XX100 0 7E 30 30 31 30 30 20 30 0D Off (0/2 for backward compatible) ~XX100 3 7E 30 30 31 30 30 20 33 0D Next Source ~XX101 1 7E 30 30 31 30 31 20 31 0D High ...Color Blue ~XX104 2 7E 30 30 31 30 34 20 32 0D Black ~XX104 3 7E 30 30 31 30 34 20 33 0D Red ~XX104 4 7E 30 30 31 30 34 20 34 0D Green ~XX104 5 7E 30 30 31 30 34 20 35 0D White... for backward compatible) ~XX106 n 7E 30 30 31 30 36 20 a 0D Auto Power Off (min) n = 0 (a=30) ~ 180 (a=31 38 30) step:5 ~XX107 n 7E 30 30 31 30 37 20 a 0D Sleep Timer (min) n = 0 (a=30) ~ 995 (a=39 39 39) step:5 ~...
Datasheet
Page 1
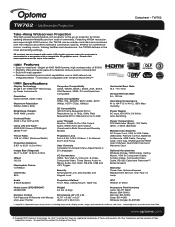
... Operating Temperature 41 to 104°F (5 to -read text - TW762 Take-Along Widescreen Projection This high-powered and feature-rich projector is connected to 480i Loop Through Monitor: D-Sub 15-Pin VGA Output Audio: Stereo Mini-Jack Output (Functional in Both Normal and Standby Modes) Projection Lens F=2.4-2.66, f=18.2-21.8mm, 1.2x Manual Zoom and Focus User Controls Complete On-Screen Menu Adjustments in 8-watt speaker Remote monitoring and control capabilities over the network...
... Operating Temperature 41 to 104°F (5 to -read text - TW762 Take-Along Widescreen Projection This high-powered and feature-rich projector is connected to 480i Loop Through Monitor: D-Sub 15-Pin VGA Output Audio: Stereo Mini-Jack Output (Functional in Both Normal and Standby Modes) Projection Lens F=2.4-2.66, f=18.2-21.8mm, 1.2x Manual Zoom and Focus User Controls Complete On-Screen Menu Adjustments in 8-watt speaker Remote monitoring and control capabilities over the network...

Brochure
Page 1
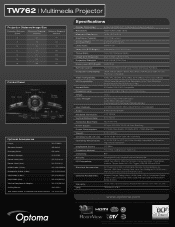
... extensive connection options. Connection compatible with active LCD shutter glasses when the projector is the go-to projector for more information. TW762 | Multimedia Projector Take-Along Widescreen Projection RJ-45 HDMI USB Composite +12V VGA-Out Video Stereo Trigger VGA1-In S-Video Audio-Out Power/Standby Left Mouse Source Page Up/Down Keystone Correction Brightness HDMI S-Video Freeze VGA Laser Mouse Controller/ Multi-Directional Selector Right Mouse Re-Sync Select/Help Volume Zoom AV Mute Video Menu AC Power...
... extensive connection options. Connection compatible with active LCD shutter glasses when the projector is the go-to projector for more information. TW762 | Multimedia Projector Take-Along Widescreen Projection RJ-45 HDMI USB Composite +12V VGA-Out Video Stereo Trigger VGA1-In S-Video Audio-Out Power/Standby Left Mouse Source Page Up/Down Keystone Correction Brightness HDMI S-Video Freeze VGA Laser Mouse Controller/ Multi-Directional Selector Right Mouse Re-Sync Select/Help Volume Zoom AV Mute Video Menu AC Power...
Brochure
Page 2
... Wireless Dongle: BI-EXTGB Power Cord (1m): BC-PUPIXY01 Power Cord (11m): BC-PUPIXY11 HDMI Cable (7.5m): BC-HMHMXX08 Composite Cable (1.8m): BC-COCOXX02 VGA Cable (1.8m): BC-VGVGXX02 VGA Cable (5m): BC-VGVGXX05 VGA to Component Adapter: BC-VGCRXY00 Ceiling Mount: BM-5001U 100" Matte White 4:3 Manual Pull Down Screen: DS-3100PMG+ Specifications Display Technology: Resolution: Maximum Resolution: Brightness (Typical): Contrast Ratio: Lamp Type: Lamp Life (STD/Bright)*: Throw Ratio: Image Size (Diagonal): Projection Distance: Noise Level (STD/Bright): Remote Control...
... Wireless Dongle: BI-EXTGB Power Cord (1m): BC-PUPIXY01 Power Cord (11m): BC-PUPIXY11 HDMI Cable (7.5m): BC-HMHMXX08 Composite Cable (1.8m): BC-COCOXX02 VGA Cable (1.8m): BC-VGVGXX02 VGA Cable (5m): BC-VGVGXX05 VGA to Component Adapter: BC-VGCRXY00 Ceiling Mount: BM-5001U 100" Matte White 4:3 Manual Pull Down Screen: DS-3100PMG+ Specifications Display Technology: Resolution: Maximum Resolution: Brightness (Typical): Contrast Ratio: Lamp Type: Lamp Life (STD/Bright)*: Throw Ratio: Image Size (Diagonal): Projection Distance: Noise Level (STD/Bright): Remote Control...


