User's Manual
Page 1
... the Projector...16 Warning Indicator...16 Adjusting the Projected Image 17 Adjusting the Projector's Height...17 Adjusting the Zoom / Focus...18 User Controls...19 Control Panel...19 Remote Control...20 On-screen Display Menus...22 How to operate...22 Menu Tree...23 Image...24 Display...29 Setup...31 Options...39 Appendices...44 Troubleshooting...44 Image Problems...44 Intermission Problems...46 Projector Status Indication...47 Remote Control Problems...48 Audio Problems...48 Replacing the Lamp...49 Cleaning the Projector...50 Compatibility Modes...51 Ceiling Installation...53 Optoma Global...
... the Projector...16 Warning Indicator...16 Adjusting the Projected Image 17 Adjusting the Projector's Height...17 Adjusting the Zoom / Focus...18 User Controls...19 Control Panel...19 Remote Control...20 On-screen Display Menus...22 How to operate...22 Menu Tree...23 Image...24 Display...29 Setup...31 Options...39 Appendices...44 Troubleshooting...44 Image Problems...44 Intermission Problems...46 Projector Status Indication...47 Remote Control Problems...48 Audio Problems...48 Replacing the Lamp...49 Cleaning the Projector...50 Compatibility Modes...51 Ceiling Installation...53 Optoma Global...

User's Manual
Page 2
.... Keep these instructions -before using this projector near any ventilation openings. Install in a position and location that may keep air from overheating, put it from flowing through its proper ventilation. Only use this projector. 2. r The projector has been exposed to constitute a risk of the Canadian Interference-Causing Equipment Regulations. Read these instructions -for future reference. 3. Follow all servicing to the presence of import operating and maintenance (servicing) instructions...
.... Keep these instructions -before using this projector near any ventilation openings. Install in a position and location that may keep air from overheating, put it from flowing through its proper ventilation. Only use this projector. 2. r The projector has been exposed to constitute a risk of the Canadian Interference-Causing Equipment Regulations. Read these instructions -for future reference. 3. Follow all servicing to the presence of import operating and maintenance (servicing) instructions...
User's Manual
Page 4
... injury to change the lamp when it shows warning messages. ▀■ Warning - To reduce the risk of its useful life" displays on -screen display "Options|Lamp Settings" menu after replacing the lamp module (see page 43). ▀■ Warning - The bright light may cause electric shock. ▀■ Warning - Please do not point the laser beam into the projector's lens when the lamp is in this user's guide. ▀■ Warning - See pages...
... injury to change the lamp when it shows warning messages. ▀■ Warning - To reduce the risk of its useful life" displays on -screen display "Options|Lamp Settings" menu after replacing the lamp module (see page 43). ▀■ Warning - The bright light may cause electric shock. ▀■ Warning - Please do not point the laser beam into the projector's lens when the lamp is in this user's guide. ▀■ Warning - See pages...

User's Manual
Page 6
... way to achieve this ensures that projectors are asked to point out something on the screen. ▀■ In order to minimize the lamp power needed, use room blinds to stare at the projector lamp. this is by ceilingmounting the projector rather than placing it on floor or table top. ▀■ When projector is recommended to avoid the...
... way to achieve this ensures that projectors are asked to point out something on the screen. ▀■ In order to minimize the lamp power needed, use room blinds to stare at the projector lamp. this is by ceilingmounting the projector rather than placing it on floor or table top. ▀■ When projector is recommended to avoid the...
User's Manual
Page 7
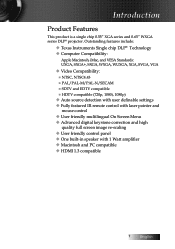
...+, SXGA, WXGA, WUXGA, XGA, SVGA, VGA u Video Compatibility: ■ NTSC, NTSC4.43 ■ PAL/PAL-M/PAL-N/SECAM ■ SDTV and EDTV compatible ■ HDTV compatible (720p, 1080i, 1080p) u Auto source detection with user definable settings u Fully featured IR remote control with laser pointer and mouse control u User friendly multilingual On Screen Menu u Advanced digital keystone correction and high quality full screen image re-scaling u User friendly control panel u One built-in...
...+, SXGA, WXGA, WUXGA, XGA, SVGA, VGA u Video Compatibility: ■ NTSC, NTSC4.43 ■ PAL/PAL-M/PAL-N/SECAM ■ SDTV and EDTV compatible ■ HDTV compatible (720p, 1080i, 1080p) u Auto source detection with user definable settings u Fully featured IR remote control with laser pointer and mouse control u User friendly multilingual On Screen Menu u Advanced digital keystone correction and high quality full screen image re-scaling u User friendly control panel u One built-in...
User's Manual
Page 15
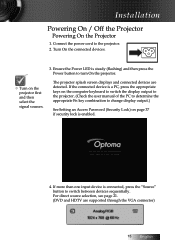
... switch the display output to the projector. (Check the user manual of the PC to determine the appropriate Fn key combination to turn On the projector. If more than one input device is steady (flashing) and then press the Power button to change display output.) See Setting an Access Password (Security Lock) on the projector first and then select the signal sources. Ensure the Power LED is connected, press the "Source" button to the projector. 2. Connect the power cord...
... switch the display output to the projector. (Check the user manual of the PC to determine the appropriate Fn key combination to turn On the projector. If more than one input device is steady (flashing) and then press the Power button to change display output.) See Setting an Access Password (Security Lock) on the projector first and then select the signal sources. Ensure the Power LED is connected, press the "Source" button to the projector. 2. Connect the power cord...

User's Manual
Page 16
... the projector. 5. v When the TEMP LED is on the projector's screen. 2. Once in conjunction with the LAMP LED blinking a single time, it has cooled down. See pages 54-55. Please contact your local reseller or service center. English 16 Do not turn off the projector lamp, a message displays on a steady (not flashing) orange, the projector will automatically shut itself down . v When the POWER LED repeatedly blinks six (6) times in standby mode, simply press POWER to turn on...
... the projector. 5. v When the TEMP LED is on the projector's screen. 2. Once in conjunction with the LAMP LED blinking a single time, it has cooled down. See pages 54-55. Please contact your local reseller or service center. English 16 Do not turn off the projector lamp, a message displays on a steady (not flashing) orange, the projector will automatically shut itself down . v When the POWER LED repeatedly blinks six (6) times in standby mode, simply press POWER to turn on...
User's Manual
Page 17
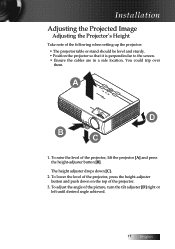
... the level of the picture, turn the tilt adjuster [D] right or left until desired angle achieved. 17 English Re-Sync AV-Mute Power Keystone+ Lamp Temp ZoFoocmus D B C 1. You could trip over them. The height adjuster drops down on the top of the projector. 3. A Enter Menu Power Source Keystone - To adjust the angle of the projector, lift the projector [A] and press the height-adjuster button [B]. Installation Adjusting the Projected Image Adjusting the Projector's Height Take note...
... the level of the picture, turn the tilt adjuster [D] right or left until desired angle achieved. 17 English Re-Sync AV-Mute Power Keystone+ Lamp Temp ZoFoocmus D B C 1. You could trip over them. The height adjuster drops down on the top of the projector. 3. A Enter Menu Power Source Keystone - To adjust the angle of the projector, lift the projector [A] and press the height-adjuster button [B]. Installation Adjusting the Projected Image Adjusting the Projector's Height Take note...

User's Manual
Page 18
Use the Image-focus control (on the projector only) to A resize the projected image and screen size [B]. 2. B 3. English 18 Use the Image-zoom control (on the projector only) to correct image distortion. Installation Adjusting the Zoom / Focus 1. Use the keystone buttons to sharpen the projected image [A]. They can be found on the remote control and on the projector's control panel.
Use the Image-focus control (on the projector only) to A resize the projected image and screen size [B]. 2. B 3. English 18 Use the Image-zoom control (on the projector only) to correct image distortion. Installation Adjusting the Zoom / Focus 1. Use the keystone buttons to sharpen the projected image [A]. They can be found on the remote control and on the projector's control panel.
User's Manual
Page 19
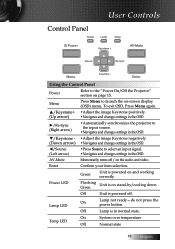
... System over temperature Temp LED Off Normal state 19 English On Lamp LED Lamp not ready-do not press the power button. AV-Mute Momentarily turns off . Off Lamp is powered on stand-by/cooling down. Green Unit is in normal state. Control Panel User Controls Using the Control Panel Power Refer to select an input signal. •Navigates and changes settings in the OSD. To exit OSD, Press Menu again. ▲/Keystone+ •Adjust the image Keystone positively...
... System over temperature Temp LED Off Normal state 19 English On Lamp LED Lamp not ready-do not press the power button. AV-Mute Momentarily turns off . Off Lamp is powered on stand-by/cooling down. Green Unit is in normal state. Control Panel User Controls Using the Control Panel Power Refer to select an input signal. •Navigates and changes settings in the OSD. To exit OSD, Press Menu again. ▲/Keystone+ •Adjust the image Keystone positively...
User's Manual
Page 30
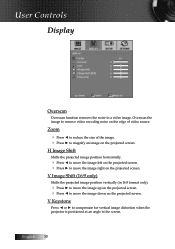
... the projected screen. V Image Shift (16:9 only) Shifts the projected image position vertically (in a video image. H Image Shift Shifts the projected image position horizontally. 4 Press ◄ to move the image left on the projected screen. 4 Press ► to magnify an image on the projected screen. V Keystone Press ◄ or ► to compensate for vertical image distortion when the projector is positioned at an angle to reduce the size of video source. Zoom 4 Press...
... the projected screen. V Image Shift (16:9 only) Shifts the projected image position vertically (in a video image. H Image Shift Shifts the projected image position horizontally. 4 Press ◄ to move the image left on the projected screen. 4 Press ► to magnify an image on the projected screen. V Keystone Press ◄ or ► to compensate for vertical image distortion when the projector is positioned at an angle to reduce the size of video source. Zoom 4 Press...
User's Manual
Page 34
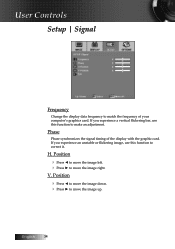
... move the image up. User Controls Setup | Signal Frequency Change the display data frequency to match the frequency of the display with the graphic card. V. English 34 If you experience a vertical flickering bar, use this function to move the image right. H. Phase Phase synchronizes the signal timing of your computer's graphics card. Position 4 Press ◄ to move the image down. 4 Press ► to make an adjustment.
... move the image up. User Controls Setup | Signal Frequency Change the display data frequency to match the frequency of the display with the graphic card. V. English 34 If you experience a vertical flickering bar, use this function to move the image right. H. Phase Phase synchronizes the signal timing of your computer's graphics card. Position 4 Press ◄ to move the image down. 4 Press ► to make an adjustment.

User's Manual
Page 35
... Security Timer or Security Setting are enabled. Enter the Months, Days, and hours that the projector can be used without entering the password. v No password is required. 35 English Exiting to the Setup menu activates the Security Timer. If the projector is in use and the Security Timer is active, the following screen displays 60 seconds before the password is required to the security menu. User Controls Setup | Security Security Timer...
... Security Timer or Security Setting are enabled. Enter the Months, Days, and hours that the projector can be used without entering the password. v No password is required. 35 English Exiting to the Setup menu activates the Security Timer. If the projector is in use and the Security Timer is active, the following screen displays 60 seconds before the password is required to the security menu. User Controls Setup | Security Security Timer...

User's Manual
Page 43
Select Yes to reset the lamp counter to accurately reflect the new lamp's life span. 1. Select Lamp Reset. A confirmation screen displays. 2. User Controls Options | Lamp Setting Lamp Reset After replacing the lamp, reset the lamp counter to zero. 43 English
Select Yes to reset the lamp counter to accurately reflect the new lamp's life span. 1. Select Lamp Reset. A confirmation screen displays. 2. User Controls Options | Lamp Setting Lamp Reset After replacing the lamp, reset the lamp counter to zero. 43 English
User's Manual
Page 44
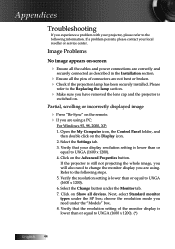
... x 1200). 4. Open the My Computer icon, the Control Panel folder, and then double click on Show all the pins of the monitor display is still not projecting the whole image, you will also need under the "Models" box. 8. Verify that the resolution setting of connectors are not bent or broken. 4 Check if the projection lamp has been securely installed. Select the Change button under the...
... x 1200). 4. Open the My Computer icon, the Control Panel folder, and then double click on Show all the pins of the monitor display is still not projecting the whole image, you will also need under the "Models" box. 8. Verify that the resolution setting of connectors are not bent or broken. 4 Check if the projection lamp has been securely installed. Select the Change button under the...

User's Manual
Page 46
... best image in 16:9 format in OSD. recommended. Lamp burns out or makes a popping sound 4 When the lamp reaches its end of life, it is centered on the screen and below the bottom of 4 Press [Keystone +/-] on the remote control until the sides are Keystone is reversed 4 Select Setup | Projection from the screen. 4 Press [Menu] button on the remote control or projector panel, go to all controls 4 If possible, turn on...
... best image in 16:9 format in OSD. recommended. Lamp burns out or makes a popping sound 4 When the lamp reaches its end of life, it is centered on the screen and below the bottom of 4 Press [Keystone +/-] on the remote control until the sides are Keystone is reversed 4 Select Setup | Projection from the screen. 4 Press [Menu] button on the remote control or projector panel, go to all controls 4 If possible, turn on...

User's Manual
Page 48
... the remote control. Appendices Message Reminders 4 Replacing the lamp: 4 Out of the audio source. 4 Check the audio cable connection. 4 Test the source audio output with other speakers. 4 Have the projector serviced. Move to within 7m (23 ft) of the projector. 4 Make sure the batteries are no sound 4 Adjust the volume on the remote control. 4 Adjust the volume of range: (see the following for more information) Remote Control Problems If the remote control does not work 4 Check the operating angle...
... the remote control. Appendices Message Reminders 4 Replacing the lamp: 4 Out of the audio source. 4 Check the audio cable connection. 4 Test the source audio output with other speakers. 4 Have the projector serviced. Move to within 7m (23 ft) of the projector. 4 Make sure the batteries are no sound 4 Adjust the volume on the remote control. 4 Adjust the volume of range: (see the following for more information) Remote Control Problems If the remote control does not work 4 Check the operating angle...
Datasheet
Page 1
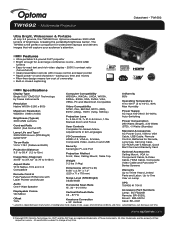
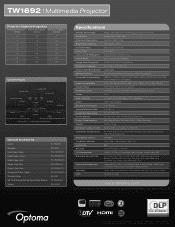
..., 1080i/p) Power Supply AC Input 100-240V, 50-60Hz, Brightness (Typical) 3000 ANSI Lumens Contrast Ratio 2500:1 (Full On/Full Off) Lamp Life and Type* 3000/2000 Hours (STD/Bright) 220W SHP Projection Lens F= 2.55-2.72, f= 21.3-24.5mm, 1.15x Manual Zoom and Focus User Controls Complete On-Screen Menu Adjustments in 22 Languages I/O Connectors HDMI v1.3, VGA-In, S-Video, Auto-Switching Power Consumption 280 Watts (Bright), 230 Watts (STD), TW1692 − Multimedia Projector Datasheet -
..., 1080i/p) Power Supply AC Input 100-240V, 50-60Hz, Brightness (Typical) 3000 ANSI Lumens Contrast Ratio 2500:1 (Full On/Full Off) Lamp Life and Type* 3000/2000 Hours (STD/Bright) 220W SHP Projection Lens F= 2.55-2.72, f= 21.3-24.5mm, 1.15x Manual Zoom and Focus User Controls Complete On-Screen Menu Adjustments in 22 Languages I/O Connectors HDMI v1.3, VGA-In, S-Video, Auto-Switching Power Consumption 280 Watts (Bright), 230 Watts (STD), TW1692 − Multimedia Projector Datasheet -
Brochure
Page 1
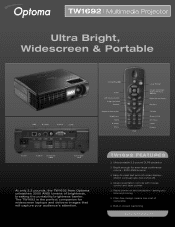
... DLP® projector ❏ Bright enough for widescreen laptops and delivers images that will capture your audience's attention. TW1692 | Multimedia Projector Ultra Bright, Widescreen & Portable USB S-Video VGA-In HDMI Power/Standby Enter Left Mouse Button Page Up/Down Source Keystone Correction Brightness HDMI S-Video Menu VGA Laser Pointer Mouse Controller/ Multi-Directional Selector Right Mouse Button Re-Sync Volume Zoom In/Out A/V Mute Video Freeze Power Audio-In Composite Video Kensington Lock At only 3.2 pounds, the TW1692 from Optoma unleashes...
... DLP® projector ❏ Bright enough for widescreen laptops and delivers images that will capture your audience's attention. TW1692 | Multimedia Projector Ultra Bright, Widescreen & Portable USB S-Video VGA-In HDMI Power/Standby Enter Left Mouse Button Page Up/Down Source Keystone Correction Brightness HDMI S-Video Menu VGA Laser Pointer Mouse Controller/ Multi-Directional Selector Right Mouse Button Re-Sync Volume Zoom In/Out A/V Mute Video Freeze Power Audio-In Composite Video Kensington Lock At only 3.2 pounds, the TW1692 from Optoma unleashes...
Brochure
Page 2
... Control Panel Power LED Power/Standby Lamp LED Temp LED AV Mute Menu Enter Source & Left Direction Key Re-Sync & Right Direction Key Keystone +/- & Up/Down Direction Key Optional Accessories Lamp: BL-FS220B Remote: BR-5028L VGA Cable (1.8m): BC-VGVGXX02 HDMI Cable (7.5m): BC-HMHMXX08 HDMI Cable (5m): BC-HMHMXX05 Power Cord (1m): BC-PUPNXY01 Power Cord (2m): BC-PUPNXY02 Composite Cable (1.8m): BC-COCOXX02 Carrying Case: BK-4021 80" 16:9 Manual Pull-Up Matte White Screen: DP-MW9080A Mount...
... Control Panel Power LED Power/Standby Lamp LED Temp LED AV Mute Menu Enter Source & Left Direction Key Re-Sync & Right Direction Key Keystone +/- & Up/Down Direction Key Optional Accessories Lamp: BL-FS220B Remote: BR-5028L VGA Cable (1.8m): BC-VGVGXX02 HDMI Cable (7.5m): BC-HMHMXX08 HDMI Cable (5m): BC-HMHMXX05 Power Cord (1m): BC-PUPNXY01 Power Cord (2m): BC-PUPNXY02 Composite Cable (1.8m): BC-COCOXX02 Carrying Case: BK-4021 80" 16:9 Manual Pull-Up Matte White Screen: DP-MW9080A Mount...


