
User Manual
Page 4
............. 17 Connecting the Projector to a Computer 18 Connecting the Cables 19 "Plug and Play" Function 19 Using the Adjustment Feet 20 Adjusting the Lens 21 Using the Lens Shift 21 Setting up the Screen 22 Screen Size and Projection Distance 23 Projection from behind the screen 25 Basic Operation Image Projection 28...
............. 17 Connecting the Projector to a Computer 18 Connecting the Cables 19 "Plug and Play" Function 19 Using the Adjustment Feet 20 Adjusting the Lens 21 Using the Lens Shift 21 Setting up the Screen 22 Screen Size and Projection Distance 23 Projection from behind the screen 25 Basic Operation Image Projection 28...
User Manual
Page 21
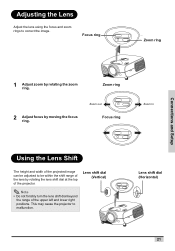
...Setup 1 Adjust zoom by moving the focus ring. Adjusting the Lens Adjust the lens using the focus and zoom rings to malfunction. Zoom ring 2 Adjust focus by rotating the zoom ring. Lens shift dial (Vertical) Note • Do not forcibly turn the lens shift dial beyond the range of the projector. Zoom out ...Focus ring Zoom in Using the Lens Shift The height and width of the projected image can be adjusted to be within the shift range of the lens by rotating the lens shift dial at the top of the upper left and lower right positions...
...Setup 1 Adjust zoom by moving the focus ring. Adjusting the Lens Adjust the lens using the focus and zoom rings to malfunction. Zoom ring 2 Adjust focus by rotating the zoom ring. Lens shift dial (Vertical) Note • Do not forcibly turn the lens shift dial beyond the range of the projector. Zoom out ...Focus ring Zoom in Using the Lens Shift The height and width of the projected image can be adjusted to be within the shift range of the lens by rotating the lens shift dial at the top of the upper left and lower right positions...
User Manual
Page 22
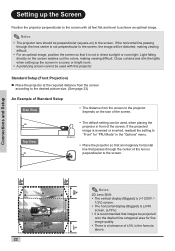
... / - 1/2V) screen. • The horizontal display (Biggest) is ±3/40 screen. (±15%) • It is recommended that passes through the lens center is not perpendicular to the screen, the image will be distorted, making viewing difficult. If the projected image is not in direct sunlight or... horizontal line that images be projected onto the dashed line octagonal area for fine image quality. • There is a tolerance of the lens is perpendicular to the screen. Standard Setup (Front Projection) „ Place the projector at the required distance from the screen according to ...
... / - 1/2V) screen. • The horizontal display (Biggest) is ±3/40 screen. (±15%) • It is recommended that passes through the lens center is not perpendicular to the screen, the image will be distorted, making viewing difficult. If the projected image is not in direct sunlight or... horizontal line that images be projected onto the dashed line octagonal area for fine image quality. • There is a tolerance of the lens is perpendicular to the screen. Standard Setup (Front Projection) „ Place the projector at the required distance from the screen according to ...

User Manual
Page 23
... 7'6" (2.3 m) 5'00" (1.5 m) Min 29'10" (9.1 m) 24'11" (7.6 m) 19'11" (6.1 m) 14'11" (4.6 m) 13'3" (4.0 m) 10'7" (3.2 m) 9'11" (3.0 m) 9'2" (2.8 m) 8'4" (2.5 m) 7'2" (2.2 m) 6'00" (1.8 m) 4'00" (1.2 m) Distance from lens center to the lower edge of the image upper lower 0" (0 cm) -12'3" (-374 cm) 0" (0 cm) -10'3" (-311 cm) 0" (0 cm) -8'2" (-249 cm) 0" (0 cm) -6'2" (-187 cm) 0" (0 cm...z2(lower)=1.245263549x x: Screen size (diag.) (meter) y: Projection distance (feet) z: Distance from the lens center to the lower edge of the image (centimeter) Notes • There is a tolerance of ±...
... 7'6" (2.3 m) 5'00" (1.5 m) Min 29'10" (9.1 m) 24'11" (7.6 m) 19'11" (6.1 m) 14'11" (4.6 m) 13'3" (4.0 m) 10'7" (3.2 m) 9'11" (3.0 m) 9'2" (2.8 m) 8'4" (2.5 m) 7'2" (2.2 m) 6'00" (1.8 m) 4'00" (1.2 m) Distance from lens center to the lower edge of the image upper lower 0" (0 cm) -12'3" (-374 cm) 0" (0 cm) -10'3" (-311 cm) 0" (0 cm) -8'2" (-249 cm) 0" (0 cm) -6'2" (-187 cm) 0" (0 cm...z2(lower)=1.245263549x x: Screen size (diag.) (meter) y: Projection distance (feet) z: Distance from the lens center to the lower edge of the image (centimeter) Notes • There is a tolerance of ±...

User Manual
Page 24
... 9'8" (2.9 m) 8'3" (2.5 m) 6'11" (2.1 m) 4'7" (1.4 m) Min 22'10" (7.0 m) 18'3" (5.6 m) 13'8" (4.2 m) 12'2" (3.7 m) 9'8" (3.0 m) 9'2" (2.8 m) 8'5" (2.6 m) 7'8" (2.3 m) 6'7" (2.0 m) 5'6" (1.7 m) 3'8" (1.1 m) Distance from lens center to the lower edge of the image upper lower 0" (0 cm) -9'5" (-286 cm) 0" (0 cm) -7'6" (-229 cm) 0" (0 cm) -5'8" (-171 cm) 0" (0 cm) -5'0" (-152 cm) 0" (0 cm) -4'0" (-121 cm...= 1.143x x: Screen size (diag.) (meter) y: Projection distance (feet) z: Distance from the lens center to the lower edge of the image (centimeter) Notes • There is a tolerance of ...
... 9'8" (2.9 m) 8'3" (2.5 m) 6'11" (2.1 m) 4'7" (1.4 m) Min 22'10" (7.0 m) 18'3" (5.6 m) 13'8" (4.2 m) 12'2" (3.7 m) 9'8" (3.0 m) 9'2" (2.8 m) 8'5" (2.6 m) 7'8" (2.3 m) 6'7" (2.0 m) 5'6" (1.7 m) 3'8" (1.1 m) Distance from lens center to the lower edge of the image upper lower 0" (0 cm) -9'5" (-286 cm) 0" (0 cm) -7'6" (-229 cm) 0" (0 cm) -5'8" (-171 cm) 0" (0 cm) -5'0" (-152 cm) 0" (0 cm) -4'0" (-121 cm...= 1.143x x: Screen size (diag.) (meter) y: Projection distance (feet) z: Distance from the lens center to the lower edge of the image (centimeter) Notes • There is a tolerance of ...
User Manual
Page 25
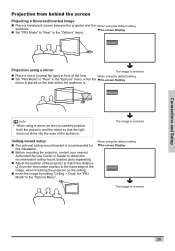
Projection using a mirror The image is recommended for "PRJ Mode" in front of the lens. Ceiling-mount setup „ The optional ceiling-mount bracket is reversed. „ Place a mirror (normal flat type) in the "Options Menu". When using the default ... the projector and the When using the default setting. „ Set "PRJ Mode" to "Rear" in the "Options" menu. Connections and Setup Projection from the lens center position to the lower edge of the image, when mounting the projector on the side where the audience is reversed. TOn-screen Display The...
Projection using a mirror The image is recommended for "PRJ Mode" in front of the lens. Ceiling-mount setup „ The optional ceiling-mount bracket is reversed. „ Place a mirror (normal flat type) in the "Options Menu". When using the default ... the projector and the When using the default setting. „ Set "PRJ Mode" to "Rear" in the "Options" menu. Connections and Setup Projection from the lens center position to the lower edge of the image, when mounting the projector on the side where the audience is reversed. TOn-screen Display The...

User Manual
Page 54
... cabinet and operation panel. „ Do not use any liquid cleaning agents, as they may wear off the coating film on the surface of the lens. Do not use volatile agents, such as insecticides, on the projector. „ Do not leave rubber or plastic objects in a neutral detergent diluted with..., warp or damage the coating on the projector before cleaning the projector. „ Avoid using . Strong cleaning detergents may damage the finish of the lens is easily damaged, do not to clean dust from the exhaust vent and the intake vent. 54 Appendix Cleaning Paper „ The surface of the...
... cabinet and operation panel. „ Do not use any liquid cleaning agents, as they may wear off the coating film on the surface of the lens. Do not use volatile agents, such as insecticides, on the projector. „ Do not leave rubber or plastic objects in a neutral detergent diluted with..., warp or damage the coating on the projector before cleaning the projector. „ Avoid using . Strong cleaning detergents may damage the finish of the lens is easily damaged, do not to clean dust from the exhaust vent and the intake vent. 54 Appendix Cleaning Paper „ The surface of the...


