
User Manual
Page 1
English Table of Contents Usage Notice Precautions ...2 Introduction Product Features ...4 Package Overview ...5 Product Overview ...6 Main Unit ...6 Control Panel ...7 Connection Ports ...8 Wireless Remote Control 9 Installation Connecting the Projector 10 Powering On/Off the Projector 11 Powering On the Projector 11 Powering Off the Projector 12 Adjusting the Projected Image 13 ... 18 How to Operate ...18 Menu Tree ...19 Picture ...20 Image ...22 System ...24 Display ...25 Appendices Troubleshooting ...27 Replacing the Lamp ...30 Ceiling Mount Installation 31 1
English Table of Contents Usage Notice Precautions ...2 Introduction Product Features ...4 Package Overview ...5 Product Overview ...6 Main Unit ...6 Control Panel ...7 Connection Ports ...8 Wireless Remote Control 9 Installation Connecting the Projector 10 Powering On/Off the Projector 11 Powering On the Projector 11 Powering Off the Projector 12 Adjusting the Projected Image 13 ... 18 How to Operate ...18 Menu Tree ...19 Picture ...20 Image ...22 System ...24 Display ...25 Appendices Troubleshooting ...27 Replacing the Lamp ...30 Ceiling Mount Installation 31 1
User Manual
Page 2
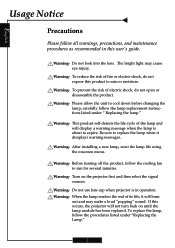
... life cycle of electric shock, do not expose this occurs, the projector will display a warning message when the lamp is in this user's guide. After installing a new lamp, reset the lamp life using the onscreen menu. Warning- Warning- Warning- Warning- Turn on until the lamp module has been replaced. To replace...
... life cycle of electric shock, do not expose this occurs, the projector will display a warning message when the lamp is in this user's guide. After installing a new lamp, reset the lamp life using the onscreen menu. Warning- Warning- Warning- Warning- Turn on until the lamp module has been replaced. To replace...
User Manual
Page 10
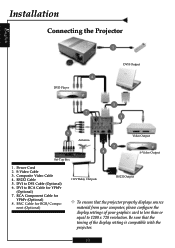
... sure that the projector properly displays source material from your graphics card to less than or equal to 1280 x 720 resolution. Composite Video Cable 4. English Installation Connecting the Projector 1 6 DVD Player DVI-I Output 5 7 3 8 Antenna 2 4 Video Output S-Video Output Set-Top Box 1.
... sure that the projector properly displays source material from your graphics card to less than or equal to 1280 x 720 resolution. Composite Video Cable 4. English Installation Connecting the Projector 1 6 DVD Player DVI-I Output 5 7 3 8 Antenna 2 4 Video Output S-Video Output Set-Top Box 1.
User Manual
Page 11
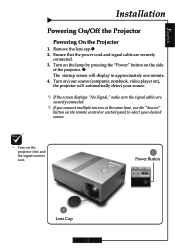
... pressing the "Power" button on your desired source. ™ Turn on the projector first and the signal sources next. 2 Power Button 1 Lens Cap 11 English Installation Powering On/Off the Projector Powering On the Projector 1. Turn on the side of the projector. Remove the lens cap.n 2. Ensure that the power cord...
... pressing the "Power" button on your desired source. ™ Turn on the projector first and the signal sources next. 2 Power Button 1 Lens Cap 11 English Installation Powering On/Off the Projector Powering On the Projector 1. Turn on the side of the projector. Remove the lens cap.n 2. Ensure that the power cord...
User Manual
Page 12
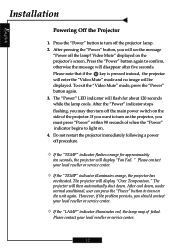
... illuminates red, the lamp may then turn off the lamp? To exit the "Video Mute" mode, press the "Power" button again. 3. After cool down . English Installation Powering Off the Projector 1. However, if the problem persists, you must press "Power" within 90 seconds of failed.
... illuminates red, the lamp may then turn off the lamp? To exit the "Video Mute" mode, press the "Power" button again. 3. After cool down . English Installation Powering Off the Projector 1. However, if the problem persists, you must press "Power" within 90 seconds of failed.
User Manual
Page 13
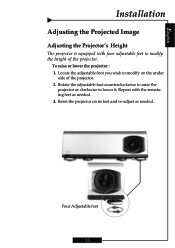
Repeat with four adjustable feet to lower it. Reset the projector on the under side of the projector. Rotate the adjustable foot counterclockwise to raise the projector or clockwise to modify the height of the projector. 2. To raise or lower the projector : 1. Locate the adjustable foot you wish to modify on its feet and re-adjust as needed . English Installation Adjusting the Projected Image Adjusting the Projector's Height The projector is equipped with the remaining feet as needed . 3. Four Adjustable feet 13
Repeat with four adjustable feet to lower it. Reset the projector on the under side of the projector. Rotate the adjustable foot counterclockwise to raise the projector or clockwise to modify the height of the projector. 2. To raise or lower the projector : 1. Locate the adjustable foot you wish to modify on its feet and re-adjust as needed . English Installation Adjusting the Projected Image Adjusting the Projector's Height The projector is equipped with the remaining feet as needed . 3. Four Adjustable feet 13
User Manual
Page 26
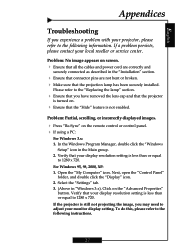
... incorrectly displayed images. 4 Press "Re-Sync" on screen. 4 Ensure that all the cables and power cord are correctly and securely connected as described in the "Installation" section. 4 Ensure that connector pins are not bent or broken. 4 Make sure that the projection lamp has been securely... installed. Select the "Settings" tab. 3. (Above in the Main group. 2. To do this, please refer to the following information. If a problem persists, please contact your local ...
... incorrectly displayed images. 4 Press "Re-Sync" on screen. 4 Ensure that all the cables and power cord are correctly and securely connected as described in the "Installation" section. 4 Ensure that connector pins are not bent or broken. 4 Make sure that the projection lamp has been securely... installed. Select the "Settings" tab. 3. (Above in the Main group. 2. To do this, please refer to the following information. If a problem persists, please contact your local ...
User Manual
Page 30
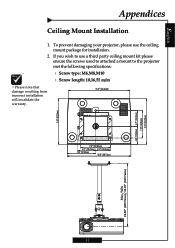
... damaging your projector, please use a third party ceiling mount kit please ensure the screws used to attached a mount to use the ceiling mount package for installation. 2. If you wish to the projector met the following specifications: 4 Screw type: M6,M8,M10 4 Screw length: 10,16,55 m/m ™...Please note that damage resulting from incorrect installation will invalidate the warranty. 16.31" (414.34mm) 4.80" (122.00mm) 4.17" (106.00mm) 7.28" (185.00mm) 12.14" (308.28mm) 12...
... damaging your projector, please use a third party ceiling mount kit please ensure the screws used to attached a mount to use the ceiling mount package for installation. 2. If you wish to the projector met the following specifications: 4 Screw type: M6,M8,M10 4 Screw length: 10,16,55 m/m ™...Please note that damage resulting from incorrect installation will invalidate the warranty. 16.31" (414.34mm) 4.80" (122.00mm) 4.17" (106.00mm) 7.28" (185.00mm) 12.14" (308.28mm) 12...


