
User Manual
Page 1
... Panel Control 6 Connection Ports 6 Full function wireless remote controller 7 Installation Connecting the Projector 8 Powering On/Off the Projector 9 Power On the Projector 9 Power Off the Projector 10 Adjusting the Projected Image 11 Adjusting the Projector Height 11 Adjusting the Projector Zoom/Focus 12 Adjusting Projection Image Size 12 User Controls Panel Control & Remote Control...18 Image-II (Computer mode 19 Image-II (Video mode 20 Audio 21 Language 21 Management 22 Appendices Troubleshooting 23 Changing the Lamp 25 Specifications 26 Compatibility Modes 27 English 1
... Panel Control 6 Connection Ports 6 Full function wireless remote controller 7 Installation Connecting the Projector 8 Powering On/Off the Projector 9 Power On the Projector 9 Power Off the Projector 10 Adjusting the Projected Image 11 Adjusting the Projector Height 11 Adjusting the Projector Zoom/Focus 12 Adjusting Projection Image Size 12 User Controls Panel Control & Remote Control...18 Image-II (Computer mode 19 Image-II (Video mode 20 Audio 21 Language 21 Management 22 Appendices Troubleshooting 23 Changing the Lamp 25 Specifications 26 Compatibility Modes 27 English 1

User Manual
Page 2
...dirt. - Warning- This product will burn out and may cause electric shock. v Use under "Changing the Lamp". If this happens, the projector will not turn on until the lamp module has been replaced. Don't: v Block the slots and openings on the remote control and do not ... be sure to computer, please turn back on the projector first. When connecting the projector to change the lamp when it will detect the life of the lamp itself. English Usage Notice Precautions Follow all changing instructions. When the lamp reaches the end of its life, it shows warning messages...
...dirt. - Warning- This product will burn out and may cause electric shock. v Use under "Changing the Lamp". If this happens, the projector will not turn on until the lamp module has been replaced. Don't: v Block the slots and openings on the remote control and do not ... be sure to computer, please turn back on the projector first. When connecting the projector to change the lamp when it will detect the life of the lamp itself. English Usage Notice Precautions Follow all changing instructions. When the lamp reaches the end of its life, it shows warning messages...

User Manual
Page 3
English Introduction Product Features This product is an XGA single chip 0.7" DLPTM projector. u HDTV compatible (480P,1080i,720P) u NTSC/NTSC4.43/PAL/PAL-M/PAL-N/SECAM and HDTV compatible u High-tech DVI connection for artifact-free film materials. The ... menu u Advanced electronic keystone correction u User friendly control panel u Luxurious carrying case included u SXGA compression and VGA, SVGA re-sizing u 200 Watts user replaceable UHP lamp u Mac compatible 3
English Introduction Product Features This product is an XGA single chip 0.7" DLPTM projector. u HDTV compatible (480P,1080i,720P) u NTSC/NTSC4.43/PAL/PAL-M/PAL-N/SECAM and HDTV compatible u High-tech DVI connection for artifact-free film materials. The ... menu u Advanced electronic keystone correction u User friendly control panel u Luxurious carrying case included u SXGA compression and VGA, SVGA re-sizing u 200 Watts user replaceable UHP lamp u Mac compatible 3
User Manual
Page 9
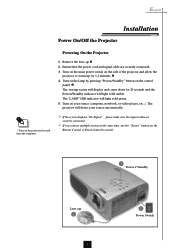
...the power cord and signal cable are securely connected. The "LAMP" LED indicator will detect your source automatically. Remove the lens cap.Π2. English Installation Power On/Off the Projector vTurn on the side of the projector and allow the projector to switch. 3 Power / Standby Lens cap 1 9 ...Signal" , please make sure the signal cables are securely connected. 3. Turn on your source (computer, notebook, or video player ,etc...) The projector will light solid green. 5. v If you connect multiple sources at the same time, use the "Source" button on the control panel. &#...
...the power cord and signal cable are securely connected. The "LAMP" LED indicator will detect your source automatically. Remove the lens cap.Π2. English Installation Power On/Off the Projector vTurn on the side of the projector and allow the projector to switch. 3 Power / Standby Lens cap 1 9 ...Signal" , please make sure the signal cables are securely connected. 3. Turn on your source (computer, notebook, or video player ,etc...) The projector will light solid green. 5. v If you connect multiple sources at the same time, use the "Source" button on the control panel. &#...

User Manual
Page 10
..." button to turn on the projector, you should contact your local dealer or Optoma service center. "Power/Standby" LED indicator will see a message "Over Temperature" on again for your presentation. Otherwise the message will automatically shut itself down. Do not turn off the projector lamp. 2. Under normal conditions, the projector can turn on -screen display...
..." button to turn on the projector, you should contact your local dealer or Optoma service center. "Power/Standby" LED indicator will see a message "Over Temperature" on again for your presentation. Otherwise the message will automatically shut itself down. Do not turn off the projector lamp. 2. Under normal conditions, the projector can turn on -screen display...
User Manual
Page 22
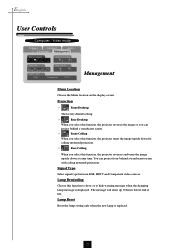
... this function, the projector reverses and turns the image upside down at same time. The message will show or to hide warning message when the changing lamp message is replaced. 22 English User Controls Computer / Video mode Image-I Image-II Audio Language Management Menu Location Lamp Reminding Projection Lamp Reset Signal Type RGB Component...
... this function, the projector reverses and turns the image upside down at same time. The message will show or to hide warning message when the changing lamp message is replaced. 22 English User Controls Computer / Video mode Image-I Image-II Audio Language Management Menu Location Lamp Reminding Projection Lamp Reset Signal Type RGB Component...
User Manual
Page 23
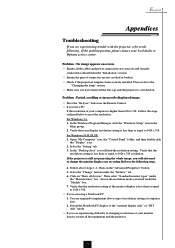
... only" mode. 4 If you are experiencing difficulty in changing resolutions or your local dealer or Optoma service center. English Appendices Troubleshooting If you are experiencing trouble with the projector, refer to the following steps. 4. Follow above steps of resolution setting of connectors are not ...crooked or broken. 4 Check if the projection lamp has been securely installed. Verify that the resolution setting is switched on screen. 4 Ensure all the equipment and the projector. 23 You are required to implement above steps 1~2. Problem : No ...
... only" mode. 4 If you are experiencing difficulty in changing resolutions or your local dealer or Optoma service center. English Appendices Troubleshooting If you are experiencing trouble with the projector, refer to the following steps. 4. Follow above steps of resolution setting of connectors are not ...crooked or broken. 4 Check if the projection lamp has been securely installed. Verify that the resolution setting is switched on screen. 4 Ensure all the equipment and the projector. 23 You are required to implement above steps 1~2. Problem : No ...

User Manual
Page 24
...not select 4:3 aspect ratio type on until the lamp module has been replaced. Problem : Lamp burns out or makes a popping sound 4 When the lamp reaches its end of life, it . 4 Change the monitor color setting from the projector. If the projector is still outstretched, you are using an Apple ..."Management" to make a loud popping sound. If this happens, the projector will burn out and may deactivate their own computers' screen when a second display device is in the "Changing the Lamp". 24 The projector itself will automatically detect 16:9 DVD and adjust the aspect ratio by ...
...not select 4:3 aspect ratio type on until the lamp module has been replaced. Problem : Lamp burns out or makes a popping sound 4 When the lamp reaches its end of life, it . 4 Change the monitor color setting from the projector. If the projector is still outstretched, you are using an Apple ..."Management" to make a loud popping sound. If this happens, the projector will burn out and may deactivate their own computers' screen when a second display device is in the "Changing the Lamp". 24 The projector itself will automatically detect 16:9 DVD and adjust the aspect ratio by ...
User Manual
Page 25
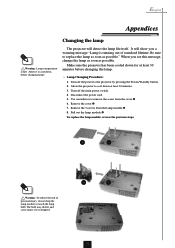
... it is dropped. 4 3 25 Allow the projector to the projector by pressing the Power/Standby button. 2. Remove the cover. 7. English Appendices Changing the lamp Warning : Lamp compartment is running out of personal injury, do not drop the lamp module or touch the lamp bulb. When you a warning message "Lamp is hot! Use screwdriver to cool down...
... it is dropped. 4 3 25 Allow the projector to the projector by pressing the Power/Standby button. 2. Remove the cover. 7. English Appendices Changing the lamp Warning : Lamp compartment is running out of personal injury, do not drop the lamp module or touch the lamp bulb. When you a warning message "Lamp is hot! Use screwdriver to cool down...


