User's Manual
Page 1
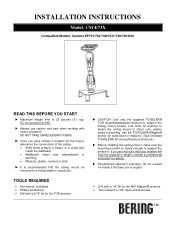
... chosen a location for advice. INSTALLATION INSTRUCTIONS Model: CM-E73X Compatible Models: Optoma EP731/732/732H/737/738/739/H30 READ THIS BEFORE YOU START X Maximum weight limit is sturdy enough to support the projector. X Always use caution and care when working with a 5/16" bit for solid wood or masonry. (See enclosed TOGGLER® Anchoring Solutions brochure.) X Before installing the ceiling mount, make sure the mounting location is...
... chosen a location for advice. INSTALLATION INSTRUCTIONS Model: CM-E73X Compatible Models: Optoma EP731/732/732H/737/738/739/H30 READ THIS BEFORE YOU START X Maximum weight limit is sturdy enough to support the projector. X Always use caution and care when working with a 5/16" bit for solid wood or masonry. (See enclosed TOGGLER® Anchoring Solutions brochure.) X Before installing the ceiling mount, make sure the mounting location is...
User's Manual
Page 2
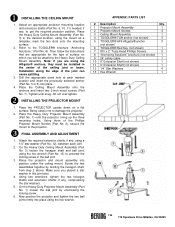
Place the Heavy Duty Ceiling Mount Assembly (Part No. 3) in the desired location, using the hex wrench (Part No. 13) to unscrew the locking screw in the ball joint. 3. Refer to damage the projector. 2. Drill the appropriate sized hole at each joint. 2. Y INSTALLING THE PROJECTOR MOUNT 1. Place the Heavy Duty Projector Mount Assembly (Part No. 1) onto the projector, lining up the three mounting holes. Attach the required extension shafts...
Place the Heavy Duty Ceiling Mount Assembly (Part No. 3) in the desired location, using the hex wrench (Part No. 13) to unscrew the locking screw in the ball joint. 3. Refer to damage the projector. 2. Drill the appropriate sized hole at each joint. 2. Y INSTALLING THE PROJECTOR MOUNT 1. Place the Heavy Duty Projector Mount Assembly (Part No. 1) onto the projector, lining up the three mounting holes. Attach the required extension shafts...
User's Manual
Page 1
... the projector 15 Warning Indicator 15 Adjusting the Projected Image 16 Adjusting the Projector's Height 16 Adjusting the Projector's Zoom / Focus 17 Adjusting Projected Image Size 17 User Controls 18 Control Panel & Remote Control 18 On-screen Display Menus 21 How to operate ...21 Menu Tree...22 Image...23 Display...29 Setup...33 Options...39 Appendices 43 Troubleshooting 43 Image Problems 43 Intermission Problems 46 Projector Status Indication 46 Remote Control Problems 48 Replacing the Lamp 49 Compatibility Modes 51 RS232 Commands 52 Ceiling Mount Installation 55 Optoma...
... the projector 15 Warning Indicator 15 Adjusting the Projected Image 16 Adjusting the Projector's Height 16 Adjusting the Projector's Zoom / Focus 17 Adjusting Projected Image Size 17 User Controls 18 Control Panel & Remote Control 18 On-screen Display Menus 21 How to operate ...21 Menu Tree...22 Image...23 Display...29 Setup...33 Options...39 Appendices 43 Troubleshooting 43 Image Problems 43 Intermission Problems 46 Projector Status Indication 46 Remote Control Problems 48 Replacing the Lamp 49 Compatibility Modes 51 RS232 Commands 52 Ceiling Mount Installation 55 Optoma...
User's Manual
Page 2
.... Keep these instructions -before using this projector. 2. Install in the literature accompanying the appliance. Do not use attachments/accessories specified by anyone except properly qualified service personnel. Do not install near any heat sources, such as : Power supply cord or plug is intended to alert the user to the presence of import operating and maintenance (servicing) instructions in accordance with a dry cloth. 6. Only use this projector near...
.... Keep these instructions -before using this projector. 2. Install in the literature accompanying the appliance. Do not use attachments/accessories specified by anyone except properly qualified service personnel. Do not install near any heat sources, such as : Power supply cord or plug is intended to alert the user to the presence of import operating and maintenance (servicing) instructions in accordance with a dry cloth. 6. Only use this projector near...
User's Manual
Page 3
... remote control and do not expose this may damage your local reseller or service center to cool down . ▀■ Warning- To reduce the risk of its life, the message "Lamp Warning: Lamp life exceeded." When replacing the lamp, please allow unit to change the lamp when it shows warning messages. ▀■ Warning- See pages 49-50. ▀■ Warning- Use the "Lamp Reset" function from the on-screen display "Options|Lamp Settings" menu after replacing...
... remote control and do not expose this may damage your local reseller or service center to cool down . ▀■ Warning- To reduce the risk of its life, the message "Lamp Warning: Lamp life exceeded." When replacing the lamp, please allow unit to change the lamp when it shows warning messages. ▀■ Warning- See pages 49-50. ▀■ Warning- Use the "Lamp Reset" function from the on-screen display "Options|Lamp Settings" menu after replacing...
User's Manual
Page 5
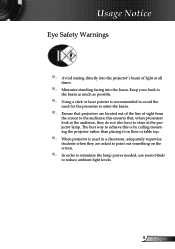
.... Keep your back to the beam as much as possible. ▀■ Using a stick or laser pointer is used in a classroom, adequately supervise students when they are located out of the line of light at all times. ▀■ Minimize standing facing into the projector's beam of sight from the screen to the audience; this is by ceiling-mounting the projector...
.... Keep your back to the beam as much as possible. ▀■ Using a stick or laser pointer is used in a classroom, adequately supervise students when they are located out of the line of light at all times. ▀■ Minimize standing facing into the projector's beam of sight from the screen to the audience; this is by ceiling-mounting the projector...
User's Manual
Page 14
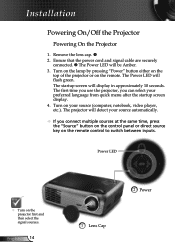
... Power LED will flash green. The first time you use the projector, you connect multiple sources at the same time, press the "Source" button on the control panel or direct source key on your preferred language from quick menu after the startup screen display. 4. English 14 2 Power 1 Lens Cap Turn on the remote control to switch between inputs. The startup screen will detect your source automatically. If you can select your source (computer, notebook, video player, etc.). Remove the lens...
... Power LED will flash green. The first time you use the projector, you connect multiple sources at the same time, press the "Source" button on the control panel or direct source key on your preferred language from quick menu after the startup screen display. 4. English 14 2 Power 1 Lens Cap Turn on the remote control to switch between inputs. The startup screen will detect your source automatically. If you can select your source (computer, notebook, video player, etc.). Remove the lens...
User's Manual
Page 15
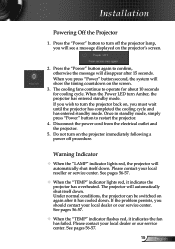
... Power LED turn on again after 15 seconds. Warning Indicator When the "LAMP" indicator lights red, the projector will automatically shut itself down . See pages 56-57. When the "TEMP" indicator lights red, it indicates the fan has failed. Disconnect the power cord from the electrical outlet and the projector. 5. Do not turn Amber, the projector has entered standby mode. Under normal conditions, the projector can be switched on the projector immediately following a power off the projector...
... Power LED turn on again after 15 seconds. Warning Indicator When the "LAMP" indicator lights red, the projector will automatically shut itself down . See pages 56-57. When the "TEMP" indicator lights red, it indicates the fan has failed. Disconnect the power cord from the electrical outlet and the projector. 5. Do not turn Amber, the projector has entered standby mode. Under normal conditions, the projector can be switched on the projector immediately following a power off the projector...
User's Manual
Page 35
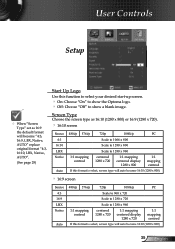
... Use this function to select your desired start-up screen. On: Choose "On" to show the Optoma logo. Off: Choose "Off" to 1280 x 960 1:1 mapping centred centered 1280 x 720 1:1 mapping centered display 1280 x 720 1:1 mapping centred If this format is select, screen type will auto become 16:10 (1280 x 800) 35 English User Controls Setup When "Screen Type" set...
... Use this function to select your desired start-up screen. On: Choose "On" to show the Optoma logo. Off: Choose "Off" to 1280 x 960 1:1 mapping centred centered 1280 x 720 1:1 mapping centered display 1280 x 720 1:1 mapping centred If this format is select, screen type will auto become 16:10 (1280 x 800) 35 English User Controls Setup When "Screen Type" set...
User's Manual
Page 36
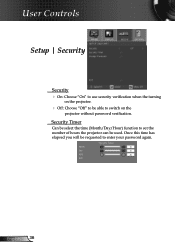
English 36 Once this time has elapsed you will be able to switch on the projector. Off: Choose "Off" to be requested to enter your password again. User Controls Setup | Security Security On: Choose "On" to use security verification when the turning on the projector without password verification. Security Timer Can be select the time (Month/Day/Hour) function to set the number of hours the projector can be used.
English 36 Once this time has elapsed you will be able to switch on the projector. Off: Choose "Off" to be requested to enter your password again. User Controls Setup | Security Security On: Choose "On" to use security verification when the turning on the projector without password verification. Security Timer Can be select the time (Month/Day/Hour) function to set the number of hours the projector can be used.
User's Manual
Page 41
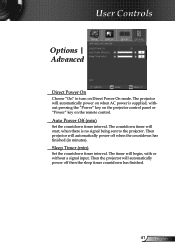
... the remote control. The projector will automatically power off then the sleep timer countdown has finished. 41 English User Controls Options | Advanced Direct Power On Choose "On" to the projector. Auto Power Off (min) Set the countdown timer interval. The countdown timer will automatically power off when the countdown has finished (in minutes). Sleep Timer (min) Set the countdown timer interval. Then the projector will start, when there is supplied, without a signal input.
... the remote control. The projector will automatically power off then the sleep timer countdown has finished. 41 English User Controls Options | Advanced Direct Power On Choose "On" to the projector. Auto Power Off (min) Set the countdown timer interval. The countdown timer will automatically power off when the countdown has finished (in minutes). Sleep Timer (min) Set the countdown timer interval. Then the projector will start, when there is supplied, without a signal input.
User's Manual
Page 42
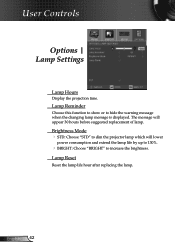
Brightness Mode STD: Choose "STD" to dim the projector lamp which will appear 30 hours before suggested replacement of lamp. Lamp Reset Reset the lamp life hour after replacing the lamp. Lamp Reminder Choose this function to show or to increase the brightness. The message will lower power consumption and extend the lamp life by up to 130%. BRIGHT: Choose "BRIGHT" to hide the warning message when the changing lamp message is displayed. English 42 User Controls Options | Lamp Settings Lamp Hours Display the projection time.
Brightness Mode STD: Choose "STD" to dim the projector lamp which will appear 30 hours before suggested replacement of lamp. Lamp Reset Reset the lamp life hour after replacing the lamp. Lamp Reminder Choose this function to show or to increase the brightness. The message will lower power consumption and extend the lamp life by up to 130%. BRIGHT: Choose "BRIGHT" to hide the warning message when the changing lamp message is displayed. English 42 User Controls Options | Lamp Settings Lamp Hours Display the projection time.
User's Manual
Page 43
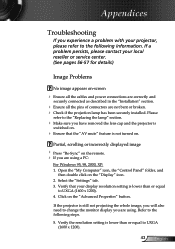
Open the "My Computer" icon, the "Control Panel" folder, and then double click on the "Advanced Properties" button. Refer to the following information. Partial, scrolling or incorrectly displayed image Press "Re-Sync" on -screen Ensure all the cables and power connections are correctly and securely connected as described in the "Installation" section. Ensure all the pins of connectors are not bent...
Open the "My Computer" icon, the "Control Panel" folder, and then double click on the "Advanced Properties" button. Refer to the following information. Partial, scrolling or incorrectly displayed image Press "Re-Sync" on -screen Ensure all the cables and power connections are correctly and securely connected as described in the "Installation" section. Ensure all the pins of connectors are not bent...

User's Manual
Page 45
... screen. Press [Menu] button on the remote control or projector panel, go to 12.0 meters) from the OSD and adjust the projection direction. 45 English Appendices Image is out of focus Make sure the lens cap is removed. Adjust the Focus Ring on the projector lens. Make sure the projection screen is between the required distance 3.9 to 39.4 feet (1.2 to "Display Format" and try the different settings...
... screen. Press [Menu] button on the remote control or projector panel, go to 12.0 meters) from the OSD and adjust the projection direction. 45 English Appendices Image is out of focus Make sure the lens cap is removed. Adjust the Focus Ring on the projector lens. Make sure the projection screen is between the required distance 3.9 to 39.4 feet (1.2 to "Display Format" and try the different settings...

User's Manual
Page 46
... turn off ) Steady light No light English 46 To replace the lamp, follow the procedures in the "Replacing the Lamp" section on , 0.25s off the projector, then unplug the power cord and wait at least 60 seconds before reconnecting power. If this happens, the projector will burn out and may make a loud popping sound. Projector Status Indication LED lighting message Message Standby State (Input power cord) Power on (Warming) Power LED (Green/Amber) Flashing Amber Flashing Green Lamp lighting Green Temp-LED (Red) Lamp-LED (Red) Error (Over Temp.) Error (Fan...
... turn off ) Steady light No light English 46 To replace the lamp, follow the procedures in the "Replacing the Lamp" section on , 0.25s off the projector, then unplug the power cord and wait at least 60 seconds before reconnecting power. If this happens, the projector will burn out and may make a loud popping sound. Projector Status Indication LED lighting message Message Standby State (Input power cord) Power on (Warming) Power LED (Green/Amber) Flashing Amber Flashing Green Lamp lighting Green Temp-LED (Red) Lamp-LED (Red) Error (Over Temp.) Error (Fan...

User's Manual
Page 50
... "Lamp settings" (iv) Select "Lamp reset (v) Select "Yes". Switch off the power to unscrew the 2 screws from the cover. 5. Push up the lamp handle carefully. 8. English 50 Use a screwdriver to cool down for at least 30 minutes. 3. Pull up and remove the cover. 6. Disconnect the power cord. 4. Turn on the projector and use "Lamp Reset" after the lamp module is replaced. Allow the projector to unscrew the 2 screws...
... "Lamp settings" (iv) Select "Lamp reset (v) Select "Yes". Switch off the power to unscrew the 2 screws from the cover. 5. Push up the lamp handle carefully. 8. English 50 Use a screwdriver to cool down for at least 30 minutes. 3. Pull up and remove the cover. 6. Disconnect the power cord. 4. Turn on the projector and use "Lamp Reset" after the lamp module is replaced. Allow the projector to unscrew the 2 screws...
User's Manual
Page 54
...source 00/01/02/03/04/05= None/DVI-D/VGA1/VGA2/S-Video/Video dddd: FW version e : Display mode ~XX151 1 7E 30 30 31 35 31 20 31 0D Model name OKn n : 0/1/2/3/4 EP721 / EP723 / EP727/EP728/EW1610 Position n= -5 - +5 ~XX77 n Security Security Timer Month/Day/Hour nnnnnn ~XX78 1 7E 30 30 37 38 20 31 0D Security Settings...7E 30 30 31 32 38 20 31 0D Color Temperature ~XX129 1 7E 30 30 31 32 39 20 31 0D Projection Mode SEND to projector 232 ASCII Code HEX Code Function Description ~XX72 1 7E 30 30 37 32 20 31 0D Menu Location Top Left ~XX72 2 7E 30 30 37 ...
...source 00/01/02/03/04/05= None/DVI-D/VGA1/VGA2/S-Video/Video dddd: FW version e : Display mode ~XX151 1 7E 30 30 31 35 31 20 31 0D Model name OKn n : 0/1/2/3/4 EP721 / EP723 / EP727/EP728/EW1610 Position n= -5 - +5 ~XX77 n Security Security Timer Month/Day/Hour nnnnnn ~XX78 1 7E 30 30 37 38 20 31 0D Security Settings...7E 30 30 31 32 38 20 31 0D Color Temperature ~XX129 1 7E 30 30 31 32 39 20 31 0D Projection Mode SEND to projector 232 ASCII Code HEX Code Function Description ~XX72 1 7E 30 30 37 32 20 31 0D Menu Location Top Left ~XX72 2 7E 30 30 37 ...

Datasheet
Page 1
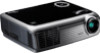
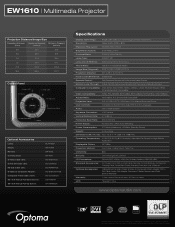
... to 85 Hz Power Supply AC Input 100-240V, Auto-Switching Power Consumption 270 Watts (Maximum), Features Native WXGA resolution at 2700 lumens and 2000:1 contrast ratio Lightweight at 4.4 pounds with 4000 hours of lamp life Wide-range of connectivity options including: DVI-I w/HDCP,VGA-In, S-Video, VGA-Out, Audio-In, USB, RS-232 Security Kensington® Lock Port Projection Method Front, Rear, Ceiling Mount, Table Top Weight...
... to 85 Hz Power Supply AC Input 100-240V, Auto-Switching Power Consumption 270 Watts (Maximum), Features Native WXGA resolution at 2700 lumens and 2000:1 contrast ratio Lightweight at 4.4 pounds with 4000 hours of lamp life Wide-range of connectivity options including: DVI-I w/HDCP,VGA-In, S-Video, VGA-Out, Audio-In, USB, RS-232 Security Kensington® Lock Port Projection Method Front, Rear, Ceiling Mount, Table Top Weight...
Brochure
Page 2
EW1610 | Multimedia Projector Projection Distance/Image Size Projection Distance (Feet) Maximum Diagonal (Inches) Minimum Diagonal (Inches) 3.9 35.9 32.8 9.8 89.9 81.9 16.4 149.8 136.6 23 209.7 191.2 29.5 269.6 245.8 39.4 359.4 327.7 Control Panel Power LED AV Mute Lamp LED Temp LED Directional Keys Power/Standby Menu Optional Accessories Lamp: Mount: Remote: Carrying Case: S-Video Cable (2m): DVI to DVI Cable (2m): RS-232 Cable (2m): S-Video to Composite Adapter: Composite Video Cable (1.8m): 92" 16:9 Manual Pull-Down Screen: 80" 16:9 Manual Pull-Up...
EW1610 | Multimedia Projector Projection Distance/Image Size Projection Distance (Feet) Maximum Diagonal (Inches) Minimum Diagonal (Inches) 3.9 35.9 32.8 9.8 89.9 81.9 16.4 149.8 136.6 23 209.7 191.2 29.5 269.6 245.8 39.4 359.4 327.7 Control Panel Power LED AV Mute Lamp LED Temp LED Directional Keys Power/Standby Menu Optional Accessories Lamp: Mount: Remote: Carrying Case: S-Video Cable (2m): DVI to DVI Cable (2m): RS-232 Cable (2m): S-Video to Composite Adapter: Composite Video Cable (1.8m): 92" 16:9 Manual Pull-Down Screen: 80" 16:9 Manual Pull-Up...
Protocol Function
Page 3
...source 00/01/02/03/04/05= None/DVI-D/VGA1/VGA2/S-Video/Video dddd: FW version e : Display mode ~XX151 1 7E 30 30 31 35 31 20 31 0D Model name OKn n : 0/1/2/3/4 EP721 / EP723 / EP727/EP728/EW1610 Position n= -5 - +5 ~XX77 n Security Security Timer Month/Day/Hour nnnnnn ~XX78 1 7E 30 30 37 38 20 31 0D Security Settings...7E 30 30 31 32 38 20 31 0D Color Temperature ~XX129 1 7E 30 30 31 32 39 20 31 0D Projection Mode SEND to projector 232 ASCII Code HEX Code Function Description ~XX72 1 7E 30 30 37 32 20 31 0D Menu Location Top Left ~XX72 2 7E 30 30 37...
...source 00/01/02/03/04/05= None/DVI-D/VGA1/VGA2/S-Video/Video dddd: FW version e : Display mode ~XX151 1 7E 30 30 31 35 31 20 31 0D Model name OKn n : 0/1/2/3/4 EP721 / EP723 / EP727/EP728/EW1610 Position n= -5 - +5 ~XX77 n Security Security Timer Month/Day/Hour nnnnnn ~XX78 1 7E 30 30 37 38 20 31 0D Security Settings...7E 30 30 31 32 38 20 31 0D Color Temperature ~XX129 1 7E 30 30 31 32 39 20 31 0D Projection Mode SEND to projector 232 ASCII Code HEX Code Function Description ~XX72 1 7E 30 30 37 32 20 31 0D Menu Location Top Left ~XX72 2 7E 30 30 37...


