

User Manual
Page 3
... Height 11 ------- On-Screen Display Menus 15 ------- Image-I (Video mode 17 ------- Audio 20 ------- Compatibility Modes 26 English 1 Power On the Projector 9 ------- Adjusting the Projector Zoom/Focus 12 ------- Image-II (Computer mode 18 ------- Language 20 ------- Troubleshooting 22... Pointer Caution 7 Installation ------- How to Operate 15 ------- Adjusting the Projected Image 11 ------- Main Unit 5 ------- Powering On/Off the Projector 9 ------- Precautions 2 Introduction ------- Usage Notice ------- Image-II (Video mode 19 -------
... Height 11 ------- On-Screen Display Menus 15 ------- Image-I (Video mode 17 ------- Audio 20 ------- Compatibility Modes 26 English 1 Power On the Projector 9 ------- Adjusting the Projector Zoom/Focus 12 ------- Image-II (Computer mode 18 ------- Language 20 ------- Troubleshooting 22... Pointer Caution 7 Installation ------- How to Operate 15 ------- Adjusting the Projected Image 11 ------- Main Unit 5 ------- Powering On/Off the Projector 9 ------- Precautions 2 Introduction ------- Usage Notice ------- Image-II (Video mode 19 -------

User Manual
Page 4
... all changing instructions. Do: v Turn off the product, please keep the cooling fan running for ventilation. The bright light may hurt your cleaning. v Disconnect the power plug from OSD menu. Near any appliance generating a strong magnetic field. - Please do not expose this may make a loud popping sound. This product will burn...
... all changing instructions. Do: v Turn off the product, please keep the cooling fan running for ventilation. The bright light may hurt your cleaning. v Disconnect the power plug from OSD menu. Near any appliance generating a strong magnetic field. - Please do not expose this may make a loud popping sound. This product will burn...

User Manual
Page 6
Check to D-Sub Cable Remote Mouse Y Cable Remote Control with all the items shown below. Contact your unit is missing. 1 2 Projector with lens cap 3 Power Cord 4 VGA Cable 5 S-Video Cable 6 Audio Cable Jack/RCA 7 Composite Video Cable DVI to make sure your dealer immediately if anything is complete. English Introduction Package Overview This projector comes with Mouse Function and Laser Pointer User's Guide Quick Start Card Warranty Card Carrying Case 4 Battery x 2
Check to D-Sub Cable Remote Mouse Y Cable Remote Control with all the items shown below. Contact your unit is missing. 1 2 Projector with lens cap 3 Power Cord 4 VGA Cable 5 S-Video Cable 6 Audio Cable Jack/RCA 7 Composite Video Cable DVI to make sure your dealer immediately if anything is complete. English Introduction Package Overview This projector comes with Mouse Function and Laser Pointer User's Guide Quick Start Card Warranty Card Carrying Case 4 Battery x 2

User Manual
Page 7
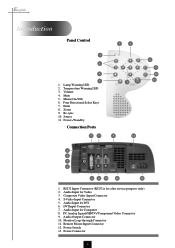
Zoom Lens 6. Remote Control Receiver 9. Elevator Button 10. Speaker 8. Connection Ports 4. Zoom Ring 7. Elevator Foot 5 Focus Ring 5. Power Connector & Power Switch 3. Panel Control 2. English Product Overview Main Unit 7 Introduction 1 2 6 3 5 4 8 9 10 1.
Zoom Lens 6. Remote Control Receiver 9. Elevator Button 10. Speaker 8. Connection Ports 4. Zoom Ring 7. Elevator Foot 5 Focus Ring 5. Power Connector & Power Switch 3. Panel Control 2. English Product Overview Main Unit 7 Introduction 1 2 6 3 5 4 8 9 10 1.
User Manual
Page 8
... Connection Ports 5 7 2 6 7 9 12 8 9 10 11 1 2 3 4 6 8 10 11 13 1 RS232 Input Connector (RS232 is for Computer 8. Volume 4. Four Directional Select Keys 7. Re-sync 10. Power Switch 13. Composite Video Input Connector 4. Audio Input for after service purpose only) 2. Remote Mouse Input Connector 12. Monitor Loop-through Connector 11. Menu (On/...
... Connection Ports 5 7 2 6 7 9 12 8 9 10 11 1 2 3 4 6 8 10 11 13 1 RS232 Input Connector (RS232 is for Computer 8. Volume 4. Four Directional Select Keys 7. Re-sync 10. Power Switch 13. Composite Video Input Connector 4. Audio Input for after service purpose only) 2. Remote Mouse Input Connector 12. Monitor Loop-through Connector 11. Menu (On/...
User Manual
Page 9
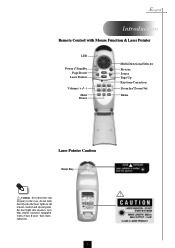
This remote control is equipped with Mouse Function & Laser Pointer LED Power / Standby Page Down Laser Pointer Volume ( + / - ) Mute Freeze Multi-Directional Selector Re-sync Source Page Up Keystone Correction Zoom In / Zoom Out Menu Laser Pointer Caution Enter Key Caution : To reduce the risk of injury to the eyes, do not look directly into the laser light on the remote control and do not point the laser light into anyone's eyes. English Introduction Remote Control with a Class II laser that emits radiation. 7
This remote control is equipped with Mouse Function & Laser Pointer LED Power / Standby Page Down Laser Pointer Volume ( + / - ) Mute Freeze Multi-Directional Selector Re-sync Source Page Up Keystone Correction Zoom In / Zoom Out Menu Laser Pointer Caution Enter Key Caution : To reduce the risk of injury to the eyes, do not look directly into the laser light on the remote control and do not point the laser light into anyone's eyes. English Introduction Remote Control with a Class II laser that emits radiation. 7

User Manual
Page 10
S-Video Cable 4. English Installation Connecting the Projector Digital Tuner Output Video Output 4 5 3 1. Power Cord 2. Refer to D-Sub Cable 7. Remote Mouse Y Cable 8. Audio Cable Jack/RCA 5. Make sure timing of the display mode is compatible with your computer, please ...
S-Video Cable 4. English Installation Connecting the Projector Digital Tuner Output Video Output 4 5 3 1. Power Cord 2. Refer to D-Sub Cable 7. Remote Mouse Y Cable 8. Audio Cable Jack/RCA 5. Make sure timing of the display mode is compatible with your computer, please ...

User Manual
Page 11
... automatically. The projector will light solid amber. vTurn on the Remote Control or Panel Control to warm up for 20 seconds and the Power/Standby indicator will detect your source (computer, notebook, or video player ,etc.). v If you connect multiple sources at the same time...the screen displays "No Signal" , please make sure the signal cables are securely connected. 3. Ensure that the power cord and signal cable are securely connected. Turn on the main power switch on the panel control. Ž The startup screen will light solid green. 5. Remove the lens cap.Œ...
... automatically. The projector will light solid amber. vTurn on the Remote Control or Panel Control to warm up for 20 seconds and the Power/Standby indicator will detect your source (computer, notebook, or video player ,etc.). v If you connect multiple sources at the same time...the screen displays "No Signal" , please make sure the signal cables are securely connected. 3. Ensure that the power cord and signal cable are securely connected. Turn on the main power switch on the panel control. Ž The startup screen will light solid green. 5. Remove the lens cap.Œ...
User Manual
Page 12
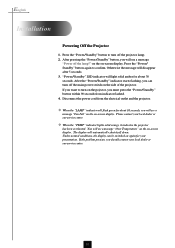
..." button again to turn off the projector lamp. 2. Please contact your local dealer or our service center. 10 "Power/Standby" LED indicator will see a message "Power off the lamp?" v When the "LAMP" indicator will flash green for about 30 seconds. on the on again for about... 10 seconds, you will light solid amber for your presentation. Otherwise the message will automatically shut itself down. After pressing the "Power/Standby" button, you will see a message "Fan Fail" on the on -screen display. You will see a message "Over Temperature" on ...
..." button again to turn off the projector lamp. 2. Please contact your local dealer or our service center. 10 "Power/Standby" LED indicator will see a message "Power off the lamp?" v When the "LAMP" indicator will flash green for about 30 seconds. on the on again for about... 10 seconds, you will light solid amber for your presentation. Otherwise the message will automatically shut itself down. After pressing the "Power/Standby" button, you will see a message "Fan Fail" on the on -screen display. You will see a message "Over Temperature" on ...
User Manual
Page 15
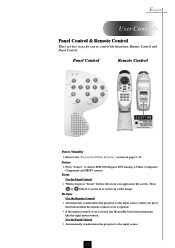
... to choose RGB, DVI-Digital, DVI-Analog, S-Video, Composite, Component and HDTV sources. Source 4 Press "Source" to the input source. 13 Panel Control Remote Control Power / Standby 4 Refer to control the functions: Remote Control and Panel Control. English User Controls Panel Control & Remote Control There are two ways for you to...
... to choose RGB, DVI-Digital, DVI-Analog, S-Video, Composite, Component and HDTV sources. Source 4 Press "Source" to the input source. 13 Panel Control Remote Control Power / Standby 4 Refer to control the functions: Remote Control and Panel Control. English User Controls Panel Control & Remote Control There are two ways for you to...
User Manual
Page 24
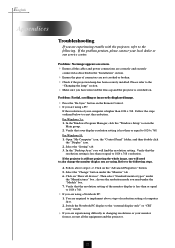
... crooked or broken. 4 Check if the projection lamp has been securely installed. For Windows 3.x: 1. Problem : No image appears on screen. 4 Ensure all the cables and power connections are using a Notebook PC: 1. Select the "Setting" tab. 3. In the Windows Program Manager, click the "Windows Setup" icon in the Main group. 2. Verify that...
... crooked or broken. 4 Check if the projection lamp has been securely installed. For Windows 3.x: 1. Problem : No image appears on screen. 4 Ensure all the cables and power connections are using a Notebook PC: 1. Select the "Setting" tab. 3. In the Windows Program Manager, click the "Windows Setup" icon in the Main group. 2. Verify that...
User Manual
Page 26
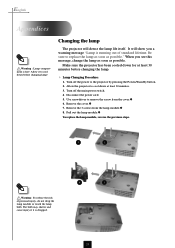
...To replace the lamp module, reverse the previous steps. 2 1 Warning : To reduce the risk of standard lifetime. Turn off the main power switch. 4. Disconnect the power cord. 5. The bulb may shatter and cause injury if it to cool down before changing the lamp. 4 Lamp Changing Procedure: 1. Remove... changing lamp! Remove the 3 screws from the cover.Œ 6. Allow the projector to replace the lamp as soon as possible. Turn off the power to remove the screw from the lamp module.Ž 8. When you a warning message "Lamp is dropped. 4 3 24 English Appendices Warning : Lamp...
...To replace the lamp module, reverse the previous steps. 2 1 Warning : To reduce the risk of standard lifetime. Turn off the main power switch. 4. Disconnect the power cord. 5. The bulb may shatter and cause injury if it to cool down before changing the lamp. 4 Lamp Changing Procedure: 1. Remove... changing lamp! Remove the 3 screws from the cover.Œ 6. Allow the projector to replace the lamp as soon as possible. Turn off the power to remove the screw from the lamp module.Ž 8. When you a warning message "Lamp is dropped. 4 3 24 English Appendices Warning : Lamp...
User Manual
Page 27
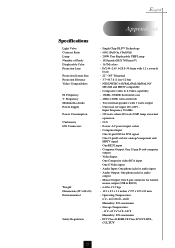
...) - 6.4 lbs / 2.9 kgs - 10.9 x 8.9 x 3.3 inches / 277 x 225 x 85 mm - Frequency V. Computer Output: One 15-pin D-sub computer output - Frequency Multimedia Audio Power Supply Power Consumption Uniformity I/O Connectors Weight Dimensions (W x H x D) Environmental Safety Regulation - Power: AC power input socket - Computer Input: One 30-pin DVI for DVI signal One 15-pin D-sub for audio input - FCC Class...
...) - 6.4 lbs / 2.9 kgs - 10.9 x 8.9 x 3.3 inches / 277 x 225 x 85 mm - Frequency V. Computer Output: One 15-pin D-sub computer output - Frequency Multimedia Audio Power Supply Power Consumption Uniformity I/O Connectors Weight Dimensions (W x H x D) Environmental Safety Regulation - Power: AC power input socket - Computer Input: One 30-pin DVI for DVI signal One 15-pin D-sub for audio input - FCC Class...


