

User Manual
Page 1
... Connecting the Projector 9 Powering On/Off the Projector 10 Powering On the Projector 10 Powering off the projector 11 Warning Indicator ...11 Adjusting the Projected Image 12 Adjusting the Projector Height 12 Adjusting the Projector Zoom / ...Focus 13 Adjusting Projection Image Size 13 User Controls 14 Panel Control & Remote Control 14 On-Screen Display Menus 16 How to operate ...16 Language ...17 All Images ...18 Computer Image ...20 Video Image ...21 Management ...22 PIP ...24 Appendices 25 Troubleshooting 25 Changing the lamp...
... Connecting the Projector 9 Powering On/Off the Projector 10 Powering On the Projector 10 Powering off the projector 11 Warning Indicator ...11 Adjusting the Projected Image 12 Adjusting the Projector Height 12 Adjusting the Projector Zoom / ...Focus 13 Adjusting Projection Image Size 13 User Controls 14 Panel Control & Remote Control 14 On-Screen Display Menus 16 How to operate ...16 Language ...17 All Images ...18 Computer Image ...20 Video Image ...21 Management ...22 PIP ...24 Appendices 25 Troubleshooting 25 Changing the lamp...
User Manual
Page 2
... the procedures listed under “Changing the Lamp”. 2 Warning- Warning- If this product to rain or moisture. Warning- Warning- When switching the projector off, please ensure the projector completes its life, it shows warning messages. Warning- When changing the lamp, please allow unit to change the lamp when it will burn out and may...
... the procedures listed under “Changing the Lamp”. 2 Warning- Warning- If this product to rain or moisture. Warning- Warning- When switching the projector off, please ensure the projector completes its life, it shows warning messages. Warning- When changing the lamp, please allow unit to change the lamp when it will burn out and may...
User Manual
Page 4
... correction and high quality full screen re-scaling image u User friendly control panel u SXGA compression and VGA, SVGA re-sizing u 120 Watts user replaceable P-VIP lamp u Mac compatible 4 English Introduction Product Features This product is an XGA single chip 0.7” DLPTM...
... correction and high quality full screen re-scaling image u User friendly control panel u SXGA compression and VGA, SVGA re-sizing u 120 Watts user replaceable P-VIP lamp u Mac compatible 4 English Introduction Product Features This product is an XGA single chip 0.7” DLPTM...
User Manual
Page 10
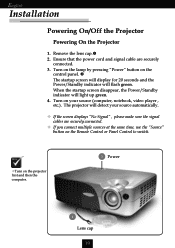
... seconds and the Power/Standby indicator will flash green. Remove the lens cap.Œ 2. Turn on the lamp by pressing “Power” button on the Remote Control or Panel Control to switch. The projector will light up green. 4. vTurn on your source automatically. v If the screen displays “No Signal”...
... seconds and the Power/Standby indicator will flash green. Remove the lens cap.Œ 2. Turn on the lamp by pressing “Power” button on the Remote Control or Panel Control to switch. The projector will light up green. 4. vTurn on your source automatically. v If the screen displays “No Signal”...
User Manual
Page 11
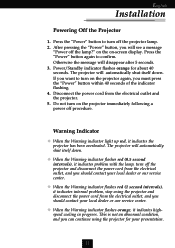
... Warning indicator flashes red (0.5 second intervals), it indicates internal problem, stop using the projector for about 40 seconds. Press the “Power” button again to turn off the lamp?” on the on the projector immediately following a power off the projector lamp. 2. Warning Indicator v When the Warning indicator light up red, it indicates highspeed...
... Warning indicator flashes red (0.5 second intervals), it indicates internal problem, stop using the projector for about 40 seconds. Press the “Power” button again to turn off the lamp?” on the on the projector immediately following a power off the projector lamp. 2. Warning Indicator v When the Warning indicator light up red, it indicates highspeed...
User Manual
Page 22
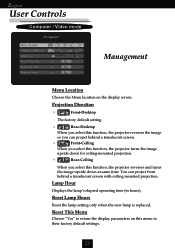
... only when the new lamp is replaced. Lamp Hour Displays the lamp’s elapsed operating time (in hours). English User Controls Computer / Video mode Management Menu Location Choose the Menu location on this function, the projector reverses and turns the image upside down for ceiling-mounted projection. 4 Rear-Ceiling When you select this function...
... only when the new lamp is replaced. Lamp Hour Displays the lamp’s elapsed operating time (in hours). English User Controls Computer / Video mode Management Menu Location Choose the Menu location on this function, the projector reverses and turns the image upside down for ceiling-mounted projection. 4 Rear-Ceiling When you select this function...
User Manual
Page 25
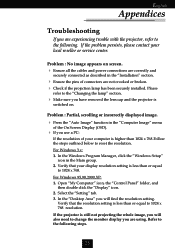
... less than or equal to the following steps. 25 Refer to the “Changing the lamp” section. 4 Make sure you have removed the lens cap and the projector is switched on screen. 4 Ensure all the cables and power connections are correctly and securely connected as described in ...the On Screen Display (OSD). 4 If you use a PC: If the resolution of connectors are not crooked or broken. 4 Check if the projection lamp has been securely installed. Verify that your local reseller or service center. Select the “Setting” tab. 3. English Appendices Troubleshooting If you are...
... less than or equal to the following steps. 25 Refer to the “Changing the lamp” section. 4 Make sure you have removed the lens cap and the projector is switched on screen. 4 Ensure all the cables and power connections are correctly and securely connected as described in ...the On Screen Display (OSD). 4 If you use a PC: If the resolution of connectors are not crooked or broken. 4 Check if the projection lamp has been securely installed. Verify that your local reseller or service center. Select the “Setting” tab. 3. English Appendices Troubleshooting If you are...
User Manual
Page 27
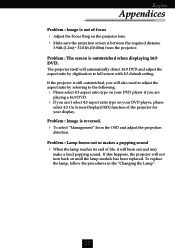
...type on your display. Problem : Image is outstretched when displaying 16:9 DVD. To replace the lamp, follow the procedures in the “Changing the Lamp”. 27 If this happens, the projector will automatically detect 16:9 DVD and adjust the aspect ratio by referring to full screen with 4:3 ... please select 4:3 On Screen-Display(OSD) function of focus 4 Adjust the Focus Ring on until the lamp module has been replaced. The projector itself will not turn back on the projector lens. 4 Make sure the projection screen is between the required distance 3.94ft.(1.2m)~ 32.81ft.(10.00m...
...type on your display. Problem : Image is outstretched when displaying 16:9 DVD. To replace the lamp, follow the procedures in the “Changing the Lamp”. 27 If this happens, the projector will automatically detect 16:9 DVD and adjust the aspect ratio by referring to full screen with 4:3 ... please select 4:3 On Screen-Display(OSD) function of focus 4 Adjust the Focus Ring on until the lamp module has been replaced. The projector itself will not turn back on the projector lens. 4 Make sure the projection screen is between the required distance 3.94ft.(1.2m)~ 32.81ft.(10.00m...
User Manual
Page 28
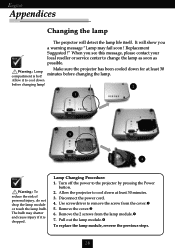
...hot! Turn off the power to the projector by pressing the Power button. 2. Pull out the lamp module. To replace the lamp module, reverse the previous steps. 28 The bulb may fail soon ! Warning : Lamp compartment is dropped. Lamp Changing Procedure: 1. Disconnect the power cord.... 4. Use screwdriver to remove the screw from the lamp module.Ž 7. English Appendices Changing the lamp The projector will show you see this message, please contact your...
...hot! Turn off the power to the projector by pressing the Power button. 2. Pull out the lamp module. To replace the lamp module, reverse the previous steps. 28 The bulb may fail soon ! Warning : Lamp compartment is dropped. Lamp Changing Procedure: 1. Disconnect the power cord.... 4. Use screwdriver to remove the screw from the lamp module.Ž 7. English Appendices Changing the lamp The projector will show you see this message, please contact your...


