

User Manual
Page 1
... Ports ...7 Remote Control ...8 Installation 9 Connecting the Projector 9 Powering On/Off the Projector 10 Powering On the Projector 10 Powering off the projector 11 Warning Indicator ...11 Adjusting the Projected Image 12 Adjusting the Projector Height 12 Adjusting the Projector Zoom / Focus 13 Adjusting Projection Image Size 13 User Controls 14 Panel Control & Remote Control 14 On-Screen Display Menus 16 How to operate ...16 Language ...17 All Images ...18 Computer Image ...20 Video Image ...21 Management ...22 PIP ...24 Appendices 25 Troubleshooting 25 Changing the lamp...
... Ports ...7 Remote Control ...8 Installation 9 Connecting the Projector 9 Powering On/Off the Projector 10 Powering On the Projector 10 Powering off the projector 11 Warning Indicator ...11 Adjusting the Projected Image 12 Adjusting the Projector Height 12 Adjusting the Projector Zoom / Focus 13 Adjusting Projection Image Size 13 User Controls 14 Panel Control & Remote Control 14 On-Screen Display Menus 16 How to operate ...16 Language ...17 All Images ...18 Computer Image ...20 Video Image ...21 Management ...22 PIP ...24 Appendices 25 Troubleshooting 25 Changing the lamp...
User Manual
Page 2
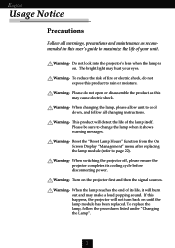
... signal sources. Please be sure to page 22). Turn on . Warning- Warning- When switching the projector off, please ensure the projector completes its life, it shows warning messages. Warning- English Usage Notice Precautions Follow all changing instructions. The bright light may make a loud popping sound. Warning- This product will not turn back on until the lamp module has been replaced. Reset the “Reset Lamp Hours” function from the On Screen Display “Management” menu...
... signal sources. Please be sure to page 22). Turn on . Warning- Warning- When switching the projector off, please ensure the projector completes its life, it shows warning messages. Warning- English Usage Notice Precautions Follow all changing instructions. The bright light may make a loud popping sound. Warning- This product will not turn back on until the lamp module has been replaced. Reset the “Reset Lamp Hours” function from the On Screen Display “Management” menu...
User Manual
Page 4
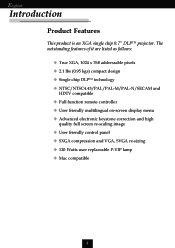
... projector. The outstanding features of it are listed as follows: u True XGA, 1024 x 768 addressable pixels u 2.1 lbs (0.95 kgs) compact design u Single chip DLPTM technology u NTSC/NTSC4.43/PAL/PAL-M/PAL-N/SECAM and HDTV compatible u Full function remote controller u User friendly multilingual on-screen display menu u Advanced electronic keystone correction and high quality full screen re-scaling image u User friendly control panel u SXGA compression and VGA, SVGA re-sizing...
... projector. The outstanding features of it are listed as follows: u True XGA, 1024 x 768 addressable pixels u 2.1 lbs (0.95 kgs) compact design u Single chip DLPTM technology u NTSC/NTSC4.43/PAL/PAL-M/PAL-N/SECAM and HDTV compatible u Full function remote controller u User friendly multilingual on-screen display menu u Advanced electronic keystone correction and high quality full screen re-scaling image u User friendly control panel u SXGA compression and VGA, SVGA re-sizing...

User Manual
Page 7
Menu (On/Off) Connection Ports 2 34 5 6 1 1. S-Video Input Connector 5. Panel Control 1 2 English Introduction 7 3 4 5 6 1. Power 4. Source 5. KeysingtonTM Lock Hole 7 Remote Control Receiver 6. Keystone Correction 7. Directional Select and Enter Keys 6. Power Connector 2 PC Analog Signal/HDTV/Component Video Connector 3. Power/Standby Indicator 2. Composite Video Input Connector 4. Warning Indicator 3.
Menu (On/Off) Connection Ports 2 34 5 6 1 1. S-Video Input Connector 5. Panel Control 1 2 English Introduction 7 3 4 5 6 1. Power 4. Source 5. KeysingtonTM Lock Hole 7 Remote Control Receiver 6. Keystone Correction 7. Directional Select and Enter Keys 6. Power Connector 2 PC Analog Signal/HDTV/Component Video Connector 3. Power/Standby Indicator 2. Composite Video Input Connector 4. Warning Indicator 3.

User Manual
Page 8
English Introduction Remote Control 1 8 2 3 9 4 10 5 6 7 1. Keystone Correction 5. Picture In Picture 9. Zoom In/Zoom Out 6. Power 3. Transmit Indicator Light 2. Hide 10. Freeze 8 Source 4. Menu Keys 8. Four Directional Select Keys 7.
English Introduction Remote Control 1 8 2 3 9 4 10 5 6 7 1. Keystone Correction 5. Picture In Picture 9. Zoom In/Zoom Out 6. Power 3. Transmit Indicator Light 2. Hide 10. Freeze 8 Source 4. Menu Keys 8. Four Directional Select Keys 7.
User Manual
Page 10
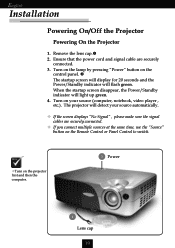
... source automatically. Remove the lens cap.Œ 2. Ensure that the power cord and signal cable are securely connected. The projector will flash green. vTurn on the Remote Control or Panel Control to switch. English Installation Powering On/Off the Projector Powering On the Projector 1. v If the screen displays “No Signal” , please make sure the signal cables are securely connected. 3. When the startup screen disappear, the Power/Standby indicator will light up green. 4. v If you connect multiple sources at the same time, use the “Source” button...
... source automatically. Remove the lens cap.Œ 2. Ensure that the power cord and signal cable are securely connected. The projector will flash green. vTurn on the Remote Control or Panel Control to switch. English Installation Powering On/Off the Projector Powering On the Projector 1. v If the screen displays “No Signal” , please make sure the signal cables are securely connected. 3. When the startup screen disappear, the Power/Standby indicator will light up green. 4. v If you connect multiple sources at the same time, use the “Source” button...
User Manual
Page 11
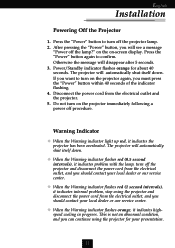
... Warning Indicator v When the Warning indicator light up red, it indicates highspeed cooling in progress. v When the Warning indicator flashes orange, it indicates the projector has been overheated. After pressing the “Power” button, you must press the “Power” button within 40 seconds of the indicator flashing. 4. Do not turn off procedure. This is not an abnormal condition, and you want to turn off the lamp?” on the on-screen display...
... Warning Indicator v When the Warning indicator light up red, it indicates highspeed cooling in progress. v When the Warning indicator flashes orange, it indicates the projector has been overheated. After pressing the “Power” button, you must press the “Power” button within 40 seconds of the indicator flashing. 4. Do not turn off procedure. This is not an abnormal condition, and you want to turn off the lamp?” on the on-screen display...

User Manual
Page 13
Focus Ring Zoom Ring Adjusting Projection Image Size 267.2"(678.7cm) 213.8"(543.0cm) 229.8" (583.7cm) 183.8"....3" (407.2cm) 137.9" (350.2cm) 213.8" (543.0cm) 183.8" (466.9cm) 267.2" (678.7cm) 229.8" (583.7cm) Screen Size Max.(WxH) 25.68" x 19.26" 64.16" x 48.12" 106.88" x 80.16" 128.24" x 96.18"... is clear. English Installation Adjusting the Projector Zoom / Focus You may adjust zoom ring to 10.0m). The projector will focus at distances from 3.94 feet to 32.81 feet (1.2m to zoom in / out. To focus the image, rotate the focus ring until the image is for user’s reference only....
Focus Ring Zoom Ring Adjusting Projection Image Size 267.2"(678.7cm) 213.8"(543.0cm) 229.8" (583.7cm) 183.8"....3" (407.2cm) 137.9" (350.2cm) 213.8" (543.0cm) 183.8" (466.9cm) 267.2" (678.7cm) 229.8" (583.7cm) Screen Size Max.(WxH) 25.68" x 19.26" 64.16" x 48.12" 106.88" x 80.16" 128.24" x 96.18"... is clear. English Installation Adjusting the Projector Zoom / Focus You may adjust zoom ring to 10.0m). The projector will focus at distances from 3.94 feet to 32.81 feet (1.2m to zoom in / out. To focus the image, rotate the focus ring until the image is for user’s reference only....

User Manual
Page 14
... ways for 14 Panel Control Remote Control Use the Panel Control Power 4 Refer to control the functions: Remote Control and Panel Control. To exit OSD, press the “Menu” button again. Keystone 4 Adjust image distortion caused by tilting the projector. (±16 degrees) Directional Select 4 Use to select items or use your selection of items. to make adjustments for you to the “Power On/Off the Projector” section on -screen display (OSD) menus...
... ways for 14 Panel Control Remote Control Use the Panel Control Power 4 Refer to control the functions: Remote Control and Panel Control. To exit OSD, press the “Menu” button again. Keystone 4 Adjust image distortion caused by tilting the projector. (±16 degrees) Directional Select 4 Use to select items or use your selection of items. to make adjustments for you to the “Power On/Off the Projector” section on -screen display (OSD) menus...

User Manual
Page 15
...;Hide” button to hide the image, press again to still the screen image. Freeze 4 Press the “Freeze” button to resume display of the image. Source 4 Press “Source” to choose RGB, Component-p, Component-i, S-Video, Composite Video and HDTV sources. Four Directional Select Keys 4 Use your selection. English User Controls Use the Remote Control Power 4 Refer to the “Power On/Off the Projector” section on -screen display (OSD...
...;Hide” button to hide the image, press again to still the screen image. Freeze 4 Press the “Freeze” button to resume display of the image. Source 4 Press “Source” to choose RGB, Component-p, Component-i, S-Video, Composite Video and HDTV sources. Four Directional Select Keys 4 Use your selection. English User Controls Use the Remote Control Power 4 Refer to the “Power On/Off the Projector” section on -screen display (OSD...
User Manual
Page 16
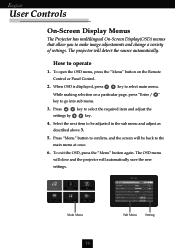
... the next item to be back to make image adjustments and change a variety of settings. The OSD menu will close and the projector will detect the source automatically. Press key to operate 1. To exit the OSD, press the “Menu” button again. Main Menu 16 Sub Menu Setting English User Controls On-Screen Display Menus The Projector has multilingual On-Screen Display(OSD) menus that allow you to the...
... the next item to be back to make image adjustments and change a variety of settings. The OSD menu will close and the projector will detect the source automatically. Press key to operate 1. To exit the OSD, press the “Menu” button again. Main Menu 16 Sub Menu Setting English User Controls On-Screen Display Menus The Projector has multilingual On-Screen Display(OSD) menus that allow you to the...

User Manual
Page 18
... User Controls Computer / Video mode All Images Brightness Adjusting the brightness of the projection screen. The contrast controls the degree of difference between the lightest and darkest parts of black and white in the image. 4 Press the to decrease the contrast. 4 Press the to darken image. Adjusting the contrast changes the amount of the picture. with the lower temperature, the screen looks warmer. With the higher temperature, the screen looks...
... User Controls Computer / Video mode All Images Brightness Adjusting the brightness of the projection screen. The contrast controls the degree of difference between the lightest and darkest parts of black and white in the image. 4 Press the to decrease the contrast. 4 Press the to darken image. Adjusting the contrast changes the amount of the picture. with the lower temperature, the screen looks warmer. With the higher temperature, the screen looks...
User Manual
Page 20
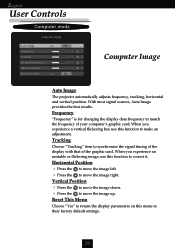
... for changing the display data frequency to synchronize the signal timing of the display with that of your computer’s graphic card. Horizontal Position 4 Press the to move the image left. 4 Press the to correct it. Reset This Menu Choose “Yes” to return the display parameters on this function to move the image up. English User Controls Computer mode Computer Image Auto Image The projector automatically adjusts...
... for changing the display data frequency to synchronize the signal timing of the display with that of your computer’s graphic card. Horizontal Position 4 Press the to move the image left. 4 Press the to correct it. Reset This Menu Choose “Yes” to return the display parameters on this function to move the image up. English User Controls Computer mode Computer Image Auto Image The projector automatically adjusts...

User Manual
Page 21
... increase the amount of red in the image. Video mode English User Controls Video Image Color Saturation The color setting adjusts a video image from black and white to fully saturated color. 4 Press the 4 Press the Sharpness to decrease the amount of the image. 4 Press the 4 Press the Tint to decrease the sharpness. Reset This Menu Choose “Yes” to return the display parameters on this menu to increase the sharpness...
... increase the amount of red in the image. Video mode English User Controls Video Image Color Saturation The color setting adjusts a video image from black and white to fully saturated color. 4 Press the 4 Press the Sharpness to decrease the amount of the image. 4 Press the 4 Press the Tint to decrease the sharpness. Reset This Menu Choose “Yes” to return the display parameters on this menu to increase the sharpness...
User Manual
Page 22
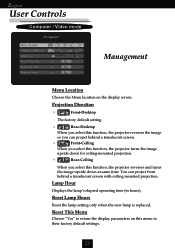
... screen with ceiling mounted projection. Lamp Hour Displays the lamp’s elapsed operating time (in hours). Reset This Menu Choose “Yes” to return the display parameters on the display screen. Projection Direction 4 Front-Desktop The factory default setting. 4 Rear-Desktop When you select this function, the projector reverses the image so you select this menu to their factory default settings. 22 English User Controls Computer / Video mode Management Menu Location Choose the Menu location on this function, the projector reverses and turns the image upside...
... screen with ceiling mounted projection. Lamp Hour Displays the lamp’s elapsed operating time (in hours). Reset This Menu Choose “Yes” to return the display parameters on the display screen. Projection Direction 4 Front-Desktop The factory default setting. 4 Rear-Desktop When you select this function, the projector reverses the image so you select this menu to their factory default settings. 22 English User Controls Computer / Video mode Management Menu Location Choose the Menu location on this function, the projector reverses and turns the image upside...
User Manual
Page 24
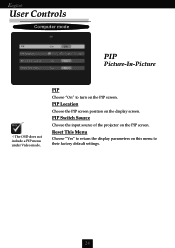
Reset This Menu Choose “Yes” to return the display parameters on this menu to turn on the PIP screen. English User Controls Computer mode PIP Picture-In-Picture vThe OSD does not include a PIP menu under Video mode. PIP Location Choose the PIP screen position on the PIP screen. PIP Switch Source Choose the input source of the projector on the display screen. PIP Choose “On” to their factory default settings. 24
Reset This Menu Choose “Yes” to return the display parameters on this menu to turn on the PIP screen. English User Controls Computer mode PIP Picture-In-Picture vThe OSD does not include a PIP menu under Video mode. PIP Location Choose the PIP screen position on the PIP screen. PIP Switch Source Choose the input source of the projector on the display screen. PIP Choose “On” to their factory default settings. 24
User Manual
Page 25
... removed the lens cap and the projector is higher than or equal to 1024 x 768 resolution. Refer to the following steps. 25 Problem : No image appears on . Open “My Computer” icon, the “Control Panel” folder, and then double click the “Display” icon. 2. In the Windows Program Manager, click the “Windows Setup” icon in the “Installation...
... removed the lens cap and the projector is higher than or equal to 1024 x 768 resolution. Refer to the following steps. 25 Problem : No image appears on . Open “My Computer” icon, the “Control Panel” folder, and then double click the “Display” icon. 2. In the Windows Program Manager, click the “Windows Setup” icon in the “Installation...
User Manual
Page 26
...: In Control Panels, open the PowerBook Display to your computer’s documentation for detailed information. 4 If you are experiencing difficulty in use. Problem : Image has vertical flickering bar 4 Use “Frequency” to be reactivated. Follow above steps of resolution setting of them has a different way to make an adjustment. 4 Check and reconfigure the display mode of the Notebook or PowerBook computer is in changing resolutions or...
...: In Control Panels, open the PowerBook Display to your computer’s documentation for detailed information. 4 If you are experiencing difficulty in use. Problem : Image has vertical flickering bar 4 Use “Frequency” to be reactivated. Follow above steps of resolution setting of them has a different way to make an adjustment. 4 Check and reconfigure the display mode of the Notebook or PowerBook computer is in changing resolutions or...
User Manual
Page 27
... has been replaced. To replace the lamp, follow the procedures in the “Changing the Lamp”. 27 Problem : Image is outstretched when displaying 16:9 DVD. The projector itself will automatically detect 16:9 DVD and adjust the aspect ratio by referring to full screen with 4:3 default setting. Problem : Lamp burns out or makes a popping sound 4 When the lamp reaches its end of life, it will not turn back on...
... has been replaced. To replace the lamp, follow the procedures in the “Changing the Lamp”. 27 Problem : Image is outstretched when displaying 16:9 DVD. The projector itself will automatically detect 16:9 DVD and adjust the aspect ratio by referring to full screen with 4:3 default setting. Problem : Lamp burns out or makes a popping sound 4 When the lamp reaches its end of life, it will not turn back on...
User Manual
Page 28
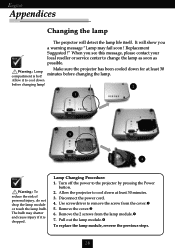
.... 3. Disconnect the power cord. 4. Remove the cover. 6. The bulb may fail soon ! Allow it is hot! Remove the 2 screws from the cover.Π5. Pull out the lamp module. To replace the lamp module, reverse the previous steps. 28 Allow the projector to the projector by pressing the Power button. 2. Warning : Lamp compartment is dropped. Turn off the power to cool down at least 30 minutes before changing lamp! 2 1 3 4 Warning : To...
.... 3. Disconnect the power cord. 4. Remove the cover. 6. The bulb may fail soon ! Allow it is hot! Remove the 2 screws from the cover.Π5. Pull out the lamp module. To replace the lamp module, reverse the previous steps. 28 Allow the projector to the projector by pressing the Power button. 2. Warning : Lamp compartment is dropped. Turn off the power to cool down at least 30 minutes before changing lamp! 2 1 3 4 Warning : To...


