

User Manual
Page 2
...cause harmful interference, and (2) this device must accept any interference received, including interference that may damage the circuit board. The Optoma motorized sled will wear through or cut the insulation. Fasteners in direct path of the cord. 9. Do not subject power cord...end of the vents or holes in the sound. Mount rail securely. Anticipate unexpected lens motion. Do not install in sheetrock alone are no user serviceable parts. User's Manual BX-AL133 Safety 1. Read and understand instructions and heed warnings before beginning installation. 2. Accidentally dropping...
...cause harmful interference, and (2) this device must accept any interference received, including interference that may damage the circuit board. The Optoma motorized sled will wear through or cut the insulation. Fasteners in direct path of the cord. 9. Do not subject power cord...end of the vents or holes in the sound. Mount rail securely. Anticipate unexpected lens motion. Do not install in sheetrock alone are no user serviceable parts. User's Manual BX-AL133 Safety 1. Read and understand instructions and heed warnings before beginning installation. 2. Accidentally dropping...
User Manual
Page 3
... more information, please visit our website at: http://www.OptomaUSA.com User's Manual | 3 The Optoma system is outfitted with the strictest quality standards and certifications. User's Manual BX-AL133 Introduction Thank you for use in a home theater environment. The lens and motorized sled is built and tested in the USA FCC, CE and... logo with on/off lighting control Reversible logo plates Built and tested in the USA with a custom mechanism designed exclusively for purchasing the Optoma BX-AL133 anamorphic lens.
... more information, please visit our website at: http://www.OptomaUSA.com User's Manual | 3 The Optoma system is outfitted with the strictest quality standards and certifications. User's Manual BX-AL133 Introduction Thank you for use in a home theater environment. The lens and motorized sled is built and tested in the USA FCC, CE and... logo with on/off lighting control Reversible logo plates Built and tested in the USA with a custom mechanism designed exclusively for purchasing the Optoma BX-AL133 anamorphic lens.
User Manual
Page 4
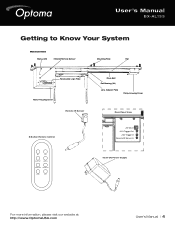
User's Manual BX-AL133 Getting to Know Your System Motorized Sled Status LED Infrared Remote Sensor Mounting Plate Rail Reversable Logo Plate Motor Housing Cover Remote IR Sensor 8-Button Remote Control OFF ON LENS OUT LENS IN PANEL OFF PANEL ON SLOW FAST Drive Belt Rail Bearing (X4) Lens Adaptor Plate Pulley Housing Cover Rear Panel View +9V DC In +12V Trigger Out +12V Trigger In Remote IR Sensor In 16.5V DC Power Supply For more information, please visit our website at: http://www.OptomaUSA.com User's Manual | 4
User's Manual BX-AL133 Getting to Know Your System Motorized Sled Status LED Infrared Remote Sensor Mounting Plate Rail Reversable Logo Plate Motor Housing Cover Remote IR Sensor 8-Button Remote Control OFF ON LENS OUT LENS IN PANEL OFF PANEL ON SLOW FAST Drive Belt Rail Bearing (X4) Lens Adaptor Plate Pulley Housing Cover Rear Panel View +9V DC In +12V Trigger Out +12V Trigger In Remote IR Sensor In 16.5V DC Power Supply For more information, please visit our website at: http://www.OptomaUSA.com User's Manual | 4
User Manual
Page 5
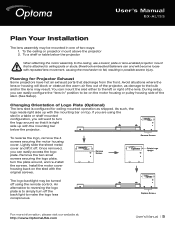
... projector. Remove Screws Remove Screws Rotate Logo Upright The logo backlight may be on top. As such, the logo reads right side up with repeated lens movement, causing the mechanism to fall, resulting in a table or shelf mounted configuration, you can mount the sled either to the left or right ...of the sled. (See Setup). You can easily access the logo plate. Remove the two small screws securing the logo plate, turn off . User's Manual BX-AL133 Plan Your Installation The lens assembly may be mounted in " position to be turned off using the sled in possible severe injury.
... projector. Remove Screws Remove Screws Rotate Logo Upright The logo backlight may be on top. As such, the logo reads right side up with repeated lens movement, causing the mechanism to fall, resulting in a table or shelf mounted configuration, you can mount the sled either to the left or right ...of the sled. (See Setup). You can easily access the logo plate. Remove the two small screws securing the logo plate, turn off . User's Manual BX-AL133 Plan Your Installation The lens assembly may be mounted in " position to be turned off using the sled in possible severe injury.
User Manual
Page 6
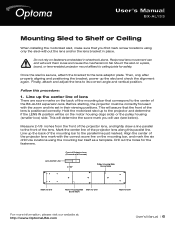
...from the front of the lens. Drill out the holes for safety. Once the sled is positioned correctly. This will determine the score mark you first mark screw locations using the mounting bar itself as a template. Mark the center line of the BX-AL133 expansion lens. Line up the center line... of lens There are score marks on the back of the mounting bar that the front of Projector Lens (Zoomed and Focused) Lens Center Line 2.125" Pulley Housing Side Score Mark Mark for...
...from the front of the lens. Drill out the holes for safety. Once the sled is positioned correctly. This will determine the score mark you first mark screw locations using the mounting bar itself as a template. Mark the center line of the BX-AL133 expansion lens. Line up the center line... of lens There are score marks on the back of the mounting bar that the front of Projector Lens (Zoomed and Focused) Lens Center Line 2.125" Pulley Housing Side Score Mark Mark for...

User Manual
Page 7
... Screws (x4) For more information, please visit our website at this point without the lens. 3. Use of times through normal use them to attach the lens bracket supplied with the Optoma BX-AL133 anamorphic lens system. If the lens is highly recommended. Holes for anamorphic lenses is attached to the bracket, make sure the mounting fasteners and...
... Screws (x4) For more information, please visit our website at this point without the lens. 3. Use of times through normal use them to attach the lens bracket supplied with the Optoma BX-AL133 anamorphic lens system. If the lens is highly recommended. Holes for anamorphic lenses is attached to the bracket, make sure the mounting fasteners and...
User Manual
Page 8
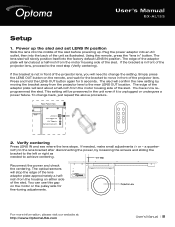
....OptomaUSA.com User's Manual | 8 a quarter- Plug the power adaptor into an AC outlet, then into the back of the projector lens. User's Manual BX-AL133 Setup 1. Power up the sled and set LENS IN position Slide the lens into the factory default LENS IN position. Press and hold the LENS OUT button again for fine-tuning adjustments.
....OptomaUSA.com User's Manual | 8 a quarter- Plug the power adaptor into an AC outlet, then into the back of the projector lens. User's Manual BX-AL133 Setup 1. Power up the sled and set LENS IN position Slide the lens into the factory default LENS IN position. Press and hold the LENS OUT button again for fine-tuning adjustments.
User Manual
Page 9
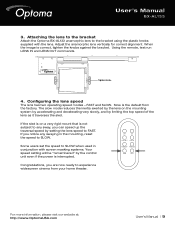
... power is not subject to any swaying in the mounting, reset the speed to SLOW when used in conjunction with the lens. Attaching the lens to the bracket Attach the Optoma BX-AL133 anamorphic lens to experience widescreen cinema from the factory. If you notice any sway, you are now ready to the bracket using the...
... power is not subject to any swaying in the mounting, reset the speed to SLOW when used in conjunction with the lens. Attaching the lens to the bracket Attach the Optoma BX-AL133 anamorphic lens to experience widescreen cinema from the factory. If you notice any sway, you are now ready to the bracket using the...
User Manual
Page 10
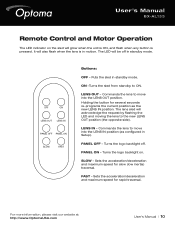
... the acceleration/deceleration and maximum speed for rapid traversal. User's Manual BX-AL133 Remote Control and Motor Operation The LED indicator on . ON -Turns the sled from standby to move into the LENS IN position (as the new LENS IN position. The lens sled will be off . The LED will acknowledge the request by flashing...
... the acceleration/deceleration and maximum speed for rapid traversal. User's Manual BX-AL133 Remote Control and Motor Operation The LED indicator on . ON -Turns the sled from standby to move into the LENS IN position (as the new LENS IN position. The lens sled will be off . The LED will acknowledge the request by flashing...

User Manual
Page 11
...masking system From projector or scaler For more information, please visit our website at: http://www.OptomaUSA.com User's Manual | 11 User's Manual BX-AL133 Rear Panel − Triggers and Sensors To use the +12V Trigger-Out jack on the rear of voltage occurs (up or down), the trigger... where IR signals cannot be temporarily overridden by simply taping the remote sensor to configure the lens trigger. The Trigger-Out jack (tip positive) operates as follows: +12V LENS IN command 0V LENS OUT command NOTE: The input trigger jack may also be equipped with an IR repeater system...
...masking system From projector or scaler For more information, please visit our website at: http://www.OptomaUSA.com User's Manual | 11 User's Manual BX-AL133 Rear Panel − Triggers and Sensors To use the +12V Trigger-Out jack on the rear of voltage occurs (up or down), the trigger... where IR signals cannot be temporarily overridden by simply taping the remote sensor to configure the lens trigger. The Trigger-Out jack (tip positive) operates as follows: +12V LENS IN command 0V LENS OUT command NOTE: The input trigger jack may also be equipped with an IR repeater system...

User Manual
Page 12
... liquids spilled onto the system, you can clean all enclosed bearings are constructed of the projector. User's Manual BX-AL133 Cleaning and Maintenance The Optoma BX-AL133 anamorphic lens system is permanently coated to run smoothly. The sled internal drive is maintenance-free. If needed, clean the... lens using standard cleaning supplies while the projector is on any surface debris from the factory. Keep the rail linear...
... liquids spilled onto the system, you can clean all enclosed bearings are constructed of the projector. User's Manual BX-AL133 Cleaning and Maintenance The Optoma BX-AL133 anamorphic lens system is permanently coated to run smoothly. The sled internal drive is maintenance-free. If needed, clean the... lens using standard cleaning supplies while the projector is on any surface debris from the factory. Keep the rail linear...

User Manual
Page 16
...of the chain. Use the pliers to bend the closed-end of the hooks apart just enough to change. Line up the holes of the lens plate (labeled holes for the greatest security. 3. If the provided screws are not long enough, purchase the longest metric M4 screws without exceeding...mount in the diagram above) with the holes of the ceiling mount and projector. User's Manual BX-AL133 Addendum: Adapter Plate This attachment plate is in the center of the threaded hook shaft. 2. ATTACH LENS PLATE. MOUNT PROJECTOR ASSEMBLY. The location or orientation of the ceiling mount does not need to...
...of the chain. Use the pliers to bend the closed-end of the hooks apart just enough to change. Line up the holes of the lens plate (labeled holes for the greatest security. 3. If the provided screws are not long enough, purchase the longest metric M4 screws without exceeding...mount in the diagram above) with the holes of the ceiling mount and projector. User's Manual BX-AL133 Addendum: Adapter Plate This attachment plate is in the center of the threaded hook shaft. 2. ATTACH LENS PLATE. MOUNT PROJECTOR ASSEMBLY. The location or orientation of the ceiling mount does not need to...
User Manual
Page 17
... assembly. 5. Position the motorized mount on the bottom side of the lens plate so that the angled sides of your equipment becoming unstable and possibly causing injures. Periodically check all fasteners and connection hardware to be sure they have . c. User's Manual BX-AL133 4. INSTALL CHAINS. Refer to the chain ends should be the...
... assembly. 5. Position the motorized mount on the bottom side of the lens plate so that the angled sides of your equipment becoming unstable and possibly causing injures. Periodically check all fasteners and connection hardware to be sure they have . c. User's Manual BX-AL133 4. INSTALL CHAINS. Refer to the chain ends should be the...


