IR-500 Reference Manual (English)
Page 7
... card 30 Inserting the battery and card 31 Charging the battery 33 Power on/off 36 How to use the multi-swing display 37 Setting the date and time 38 Chapter 3: Basic shooting and playback 41 Holding the camera correctly 41 Easy shooting with P-AUTO (Program Auto) mode 42 Composing the image and taking a shot 42 Subjects that are difficult to focus on using the AF (Auto Focus 44 Recomposing the shot after locking the focus (Focus Lock 45 Recording movies 46 Viewing/Erasing the shot images...
... card 30 Inserting the battery and card 31 Charging the battery 33 Power on/off 36 How to use the multi-swing display 37 Setting the date and time 38 Chapter 3: Basic shooting and playback 41 Holding the camera correctly 41 Easy shooting with P-AUTO (Program Auto) mode 42 Composing the image and taking a shot 42 Subjects that are difficult to focus on using the AF (Auto Focus 44 Recomposing the shot after locking the focus (Focus Lock 45 Recording movies 46 Viewing/Erasing the shot images...
IR-500 Reference Manual (English)
Page 8
... (Telephoto) or out (Wide angle) (W/T 50 Using the flash u 51 Taking close-up pictures (macro/super macro 54 Using the self-timer Y 55 Selecting a scene mode according to the subject (SCENE SELECT 57 Selecting the record mode (D 65 Sequential shooting (j 69 Adjusting the settings to suit a bright/dark subject (F 71 Enabling the digital zoom (DIGITAL ZOOM 73 Selecting the white balance according to the surrounding lighting (WB) 5 3 1 76 When the brightness of...
... (Telephoto) or out (Wide angle) (W/T 50 Using the flash u 51 Taking close-up pictures (macro/super macro 54 Using the self-timer Y 55 Selecting a scene mode according to the subject (SCENE SELECT 57 Selecting the record mode (D 65 Sequential shooting (j 69 Adjusting the settings to suit a bright/dark subject (F 71 Enabling the digital zoom (DIGITAL ZOOM 73 Selecting the white balance according to the surrounding lighting (WB) 5 3 1 76 When the brightness of...
IR-500 Reference Manual (English)
Page 10
Table of contents Setting the operation sound (BEEP 162 Checking the picture you have just taken (REC VIEW 163 Setting serial numbers for file names (FILE NAME 164 Adjusting the CCD and image processing functions (PIXEL MAPPING 166 Adjusting the brightness of the monitor (s 167 Setting the playback sound volume (VOLUME 168 Selecting the video signal type (VIDEO OUT 170 Resetting the settings to default (MODE RESET 171 Formatting a card (FORMAT 172 Using various clock functions from the clock menu 174 Choosing...
Table of contents Setting the operation sound (BEEP 162 Checking the picture you have just taken (REC VIEW 163 Setting serial numbers for file names (FILE NAME 164 Adjusting the CCD and image processing functions (PIXEL MAPPING 166 Adjusting the brightness of the monitor (s 167 Setting the playback sound volume (VOLUME 168 Selecting the video signal type (VIDEO OUT 170 Resetting the settings to default (MODE RESET 171 Formatting a card (FORMAT 172 Using various clock functions from the clock menu 174 Choosing...
IR-500 Reference Manual (English)
Page 65
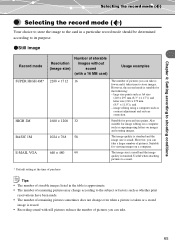
... for viewing images on images and rotating images. The image size is small and the image quality is fewer and it takes time to store images. Chapter 4: Setting according to shooting conditions Selecting the record mode (D) Selecting the record mode (D) Your choice to store the image to the card in the table is approximate. • The number of remaining pictures may change according to the subject or factors such as whether print...
... for viewing images on images and rotating images. The image size is small and the image quality is fewer and it takes time to store images. Chapter 4: Setting according to shooting conditions Selecting the record mode (D) Selecting the record mode (D) Your choice to store the image to the card in the table is approximate. • The number of remaining pictures may change according to the subject or factors such as whether print...
IR-500 Reference Manual (English)
Page 75
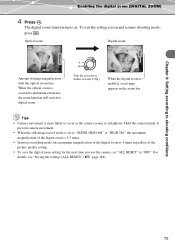
... image record mode is set to digital zoom. Chapter 4: Setting according to "OFF." To exit the setting screen and resume shooting mode, press p. T Turn the zoom lever further towards T (U). W 4M When the digital zoom is 4 times regardless of image magnification with the optical zoom lens. Tips • Camera movement is zoomed to maximum extension, the zoom function will switch to "SUPER HIGH 4M" or "HIGH 2M," the maximum magnification of the digital zoom is 5.5 times. • In movie recording mode...
... image record mode is set to digital zoom. Chapter 4: Setting according to "OFF." To exit the setting screen and resume shooting mode, press p. T Turn the zoom lever further towards T (U). W 4M When the digital zoom is 4 times regardless of image magnification with the optical zoom lens. Tips • Camera movement is zoomed to maximum extension, the zoom function will switch to "SUPER HIGH 4M" or "HIGH 2M," the maximum magnification of the digital zoom is 5.5 times. • In movie recording mode...
IR-500 Reference Manual (English)
Page 127
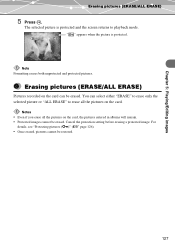
... "Protecting pictures (0)" (g page 126). • Once erased, pictures cannot be erased. Erasing pictures (ERASE/ALL ERASE) Pictures recorded on the card can select either "ERASE" to erase only the selected picture or "ALL ERASE" to playback mode. 100-0009 "9" appears when the picture is protected and the screen returns to erase all the pictures on the card. Notes • Even if you erase all the pictures on the card, the pictures entered in albums will remain. • Protected images cannot...
... "Protecting pictures (0)" (g page 126). • Once erased, pictures cannot be erased. Erasing pictures (ERASE/ALL ERASE) Pictures recorded on the card can select either "ERASE" to erase only the selected picture or "ALL ERASE" to playback mode. 100-0009 "9" appears when the picture is protected and the screen returns to erase all the pictures on the card. Notes • Even if you erase all the pictures on the card, the pictures entered in albums will remain. • Protected images cannot...
IR-500 Reference Manual (English)
Page 171
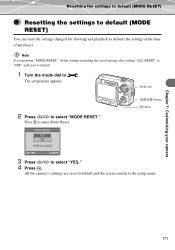
... "MODE RESET." The setup menu appears. POWER Mode dial QVIUEIWCK 2 Press a/c to q. OK OPEN OPEN abcd buttons 9 button MODE RESET YES NO RESET ALL MODE SELECT GO 3 Press a/c to the setup menu. 171 All the camera's settings are reset to default and the screen returns to select "YES." 4 Press 9. Press d to default (the settings at the time of purchase). Chapter 7: Customizing your camera Resetting the settings to default (MODE RESET) Resetting the settings to default (MODE RESET) You can reset the settings changed for shooting and playback to enter Mode Reset.
... "MODE RESET." The setup menu appears. POWER Mode dial QVIUEIWCK 2 Press a/c to q. OK OPEN OPEN abcd buttons 9 button MODE RESET YES NO RESET ALL MODE SELECT GO 3 Press a/c to the setup menu. 171 All the camera's settings are reset to default and the screen returns to select "YES." 4 Press 9. Press d to default (the settings at the time of purchase). Chapter 7: Customizing your camera Resetting the settings to default (MODE RESET) Resetting the settings to default (MODE RESET) You can reset the settings changed for shooting and playback to enter Mode Reset.
IR-500 Reference Manual (English)
Page 203
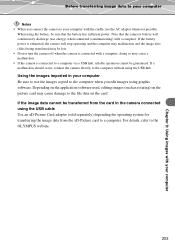
... edit images using the battery, be sure that the camera's battery will stop operating and the computer may malfunction and the image data (files) being transferred may be lost. • Do not turn the camera off when the camera is connected to a computer via a USB hub, reliable operation cannot be transferred from the xD-Picture card to a computer. When using graphic software. Note that the battery has sufficient power. Using the images imported in the camera connected using the USB...
... edit images using the battery, be sure that the camera's battery will stop operating and the computer may malfunction and the image data (files) being transferred may be lost. • Do not turn the camera off when the camera is connected to a computer via a USB hub, reliable operation cannot be transferred from the xD-Picture card to a computer. When using graphic software. Note that the battery has sufficient power. Using the images imported in the camera connected using the USB...
IR-500 Reference Manual (English)
Page 204
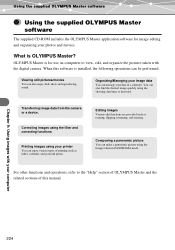
Transferring image data from the camera or a device. Chapter 9: Using images with the digital camera. Viewing still pictures/movies You can also find the desired image quickly using the shooting date/time or keyword. When this manual. Organizing/Managing your image data You can manage your printer You can enjoy various types of this software is installed, the following operations can make a panoramic picture using your data in PANORAMA mode. What is for image editing and organizing your computer 204 OLYMPUS Master is OLYMPUS Master...
Transferring image data from the camera or a device. Chapter 9: Using images with the digital camera. Viewing still pictures/movies You can also find the desired image quickly using the shooting date/time or keyword. When this manual. Organizing/Managing your image data You can manage your printer You can enjoy various types of this software is installed, the following operations can make a panoramic picture using your data in PANORAMA mode. What is for image editing and organizing your computer 204 OLYMPUS Master is OLYMPUS Master...
IR-500 Reference Manual (English)
Page 222
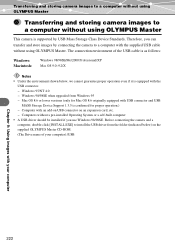
... supported by connecting the camera to a computer with the supplied USB cable without a pre-installed Operating System or a self-built computer • A USB driver should be installed if you can transfer and store images by USB Mass Storage Class Device Standards. Before connecting the camera and a computer, double-click [INSTALL.EXE] to install the USB driver from Windows 95 - Transferring and storing camera images to a computer without using OLYMPUS Master Transferring and storing camera images to a computer without using OLYMPUS Master. Mac...
... supported by connecting the camera to a computer with the supplied USB cable without a pre-installed Operating System or a self-built computer • A USB driver should be installed if you can transfer and store images by USB Mass Storage Class Device Standards. Before connecting the camera and a computer, double-click [INSTALL.EXE] to install the USB driver from Windows 95 - Transferring and storing camera images to a computer without using OLYMPUS Master Transferring and storing camera images to a computer without using OLYMPUS Master. Mac...
IR-500 Reference Manual (English)
Page 231
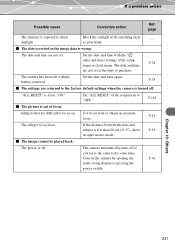
... focus on the camera by opening the P.36 multi-swing display or pressing the power switch. Turn on Use focus lock to "ON." ( The picture is exposed to "OFF." page The monitor is out of the setup menu to direct sunlight. If the distance between the lens and subject is wrong. Set "ALL RESET" of focus. The subject is set at the time of the setup P.38 menu or clock menu. P.38 battery removed. ( The settings...
... focus on the camera by opening the P.36 multi-swing display or pressing the power switch. Turn on Use focus lock to "ON." ( The picture is exposed to "OFF." page The monitor is out of the setup menu to direct sunlight. If the distance between the lens and subject is wrong. Set "ALL RESET" of focus. The subject is set at the time of the setup P.38 menu or clock menu. P.38 battery removed. ( The settings...
IR-500 Reference Manual (English)
Page 232
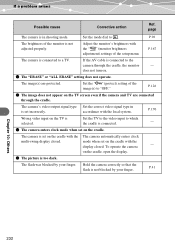
... shooting mode. P.170 Wrong video input on . ( The "ERASE" or "ALL ERASE" setting does not operate. Chapter 10: Others 232 Adjust the monitor's brightness with the - does not turn on the TV is too dark. the cradle is connected. ( The camera enters clock mode when set on the cradle, open the display. ( The picture is selected. To operate the camera on the cradle. Set the "0" (protect) setting of the image(s) to which - Set...
... shooting mode. P.170 Wrong video input on . ( The "ERASE" or "ALL ERASE" setting does not operate. Chapter 10: Others 232 Adjust the monitor's brightness with the - does not turn on the TV is too dark. the cradle is connected. ( The camera enters clock mode when set on the cradle, open the display. ( The picture is selected. To operate the camera on the cradle. Set the "0" (protect) setting of the image(s) to which - Set...
IR-500 Reference Manual (English)
Page 235
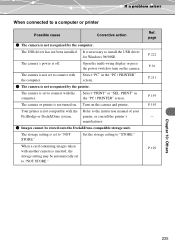
... setting is not compatible with the Refer to connect with another camera is not turned on the camera and printer. It is not set to install the USB driver for Windows 98/98SE. The USB driver has not been installed. The camera is necessary to "NOT STORE." When a card containing images taken with Select "PC" in the "PC / PRINTER" screen. Open the multi-swing display or press the power switch to "STORE." The camera or printer...
... setting is not compatible with the Refer to connect with another camera is not turned on the camera and printer. It is not set to install the USB driver for Windows 98/98SE. The USB driver has not been installed. The camera is necessary to "NOT STORE." When a card containing images taken with Select "PC" in the "PC / PRINTER" screen. Open the multi-swing display or press the power switch to "STORE." The camera or printer...
IR-500 Dock and Done 2.0 Supplement (English)
Page 3
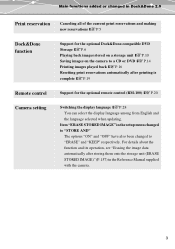
... Printing images played back gP.16 Resetting print reservations automatically after storing them onto the storage unit (ERASE STORED IMAGE)" (P.157) in Dock&Done 2.0 Print reservation Canceling all of the current print reservations and making new reservations gP.5 Dock&Done function Remote control Camera setting Support for the optional remote control (RM-100) gP.20 Switching the display language gP.28 You can select the display language among from English and the language selected when updating...
... Printing images played back gP.16 Resetting print reservations automatically after storing them onto the storage unit (ERASE STORED IMAGE)" (P.157) in Dock&Done 2.0 Print reservation Canceling all of the current print reservations and making new reservations gP.5 Dock&Done function Remote control Camera setting Support for the optional remote control (RM-100) gP.20 Switching the display language gP.28 You can select the display language among from English and the language selected when updating...
IR-500 Dock and Done 2.0 Supplement (English)
Page 4
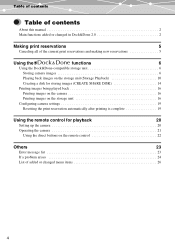
... Playback 10 Creating a disk for storing images (CREATE SHARE DISK 14 Printing images being played back 16 Printing images on the camera 16 Printing images on the storage unit 16 Configuring camera settings 19 Resetting the print reservation automatically after printing is complete 19 Using the remote control for playback 20 Setting up the camera 20 Operating the camera 21 Using the direct buttons on the remote control 22 Others 23 Error message list 23 If a problem arises 24 List of added or changed menu...
... Playback 10 Creating a disk for storing images (CREATE SHARE DISK 14 Printing images being played back 16 Printing images on the camera 16 Printing images on the storage unit 16 Configuring camera settings 19 Resetting the print reservation automatically after printing is complete 19 Using the remote control for playback 20 Setting up the camera 20 Operating the camera 21 Using the direct buttons on the remote control 22 Others 23 Error message list 23 If a problem arises 24 List of added or changed menu...
IR-500 Dock and Done 2.0 Supplement (English)
Page 20
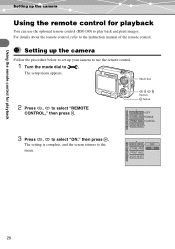
... play back and print images. REMOTE CONTROL OFF STORE AND ON PRINT AND MODE RESET 20 Setting up the camera Follow the procedure below to set up the camera Using the remote control for playback You can use the remote control. 1 Turn the mode dial to select "ON," then press 9. The setup menu appears. OK OPEN OPEN a b c d buttons 9 button REMOTE CONTROL OFF STORE AND ERASE PRINT AND CANCEL MODE RESET 3 Press a, c to q. POWER QVIUEIWCK Mode dial 2 Press a, c to the instruction manual of the remote control. For details about the remote control...
... play back and print images. REMOTE CONTROL OFF STORE AND ON PRINT AND MODE RESET 20 Setting up the camera Follow the procedure below to set up the camera Using the remote control for playback You can use the remote control. 1 Turn the mode dial to select "ON," then press 9. The setup menu appears. OK OPEN OPEN a b c d buttons 9 button REMOTE CONTROL OFF STORE AND ERASE PRINT AND CANCEL MODE RESET 3 Press a, c to q. POWER QVIUEIWCK Mode dial 2 Press a, c to the instruction manual of the remote control. For details about the remote control...
IR-500 Dock and Done 2.0 Supplement (English)
Page 21
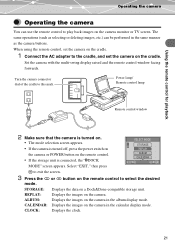
...: Displays the images on the camera. Using the remote control for playback Operating the camera Operating the camera You can be performed in the same manner as selecting or deleting images, etc.) can use the remote control to play back images on the camera monitor or TV screen. CALENDAR: Displays the images on a Dock&Done-compatible storage unit. STORAGE: Displays the data on the camera in the calendar display mode. When using the remote control, set the camera on the cradle. 1 Connect the AC adapter...
...: Displays the images on the camera. Using the remote control for playback Operating the camera Operating the camera You can be performed in the same manner as selecting or deleting images, etc.) can use the remote control to play back images on the camera monitor or TV screen. CALENDAR: Displays the images on a Dock&Done-compatible storage unit. STORAGE: Displays the data on the camera in the calendar display mode. When using the remote control, set the camera on the cradle. 1 Connect the AC adapter...
IR-500 Dock and Done 2.0 Supplement (English)
Page 22
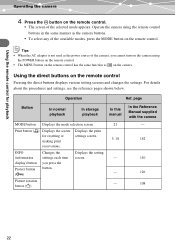
... remote control for playback Operating the camera 4 Press the 9 button on the remote control Pressing the direct buttons displays various setting screens and changes the settings. Print button ( Using the direct buttons on the remote control. • The screen of the selected mode appears. page Button In normal playback In storage playback In this manual MODE button Displays the mode selection screen. For details about the procedures and settings, see the reference pages shown below. Tips • When the AC adapter is not used as the power...
... remote control for playback Operating the camera 4 Press the 9 button on the remote control Pressing the direct buttons displays various setting screens and changes the settings. Print button ( Using the direct buttons on the remote control. • The screen of the selected mode appears. page Button In normal playback In storage playback In this manual MODE button Displays the mode selection screen. For details about the procedures and settings, see the reference pages shown below. Tips • When the AC adapter is not used as the power...
IR-500 Basic Manual (English, Français, Español)
Page 28
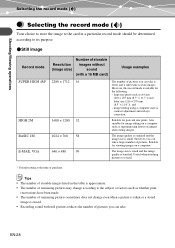
... viewing images on images and rotating images. Suitable for image editing on a computer such as contrast adjustment and red-eye correction. Useful when attaching pictures to e-mail. * Default setting at the time of purchase Tips • The number of storable images listed in a particular record mode should be determined according to its purpose. (Still image Record mode Resolution (image size) Number of storable images without sound (with still pictures reduces the number of remaining pictures may change even when a picture...
... viewing images on images and rotating images. Suitable for image editing on a computer such as contrast adjustment and red-eye correction. Useful when attaching pictures to e-mail. * Default setting at the time of purchase Tips • The number of storable images listed in a particular record mode should be determined according to its purpose. (Still image Record mode Resolution (image size) Number of storable images without sound (with still pictures reduces the number of remaining pictures may change even when a picture...
IR-500 Basic Manual (English, Français, Español)
Page 29
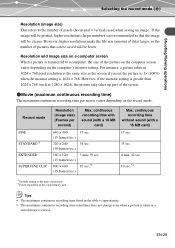
...(image size) (Frames per movie varies depending on the record mode. Shooting/Viewing operations Selecting the record mode (D) Resolution (image size) This refers to the number of the picture on the computer screen varies depending on the computer's monitor setting. EN-29 However, higher resolutions make the file size (amount of data) larger, so the number of the screen. (Movie (maximum continuous recording time) The maximum continuous recording time per second) Max. Resolution and image size on a computer screen When a picture is erased. continuous recording time with sound...
...(image size) (Frames per movie varies depending on the record mode. Shooting/Viewing operations Selecting the record mode (D) Resolution (image size) This refers to the number of the picture on the computer screen varies depending on the computer's monitor setting. EN-29 However, higher resolutions make the file size (amount of data) larger, so the number of the screen. (Movie (maximum continuous recording time) The maximum continuous recording time per second) Max. Resolution and image size on a computer screen When a picture is erased. continuous recording time with sound...

