
E-620 Instruction Manual (English)
Page 1
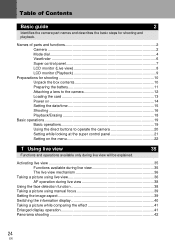
... Contents P. 24 z Thank you start to use your new camera, please read these instructions carefully to your camera before taking important photographs. Before you for future reference. If there are based on firmware version 1.0 for this camera. z The contents in this manual in a safe place for purchasing an Olympus digital camera. DIGITAL CAMERA INSTRUCTION MANUAL Basic guide P. 2 Review the...
... Contents P. 24 z Thank you start to use your new camera, please read these instructions carefully to your camera before taking important photographs. Before you for future reference. If there are based on firmware version 1.0 for this camera. z The contents in this manual in a safe place for purchasing an Olympus digital camera. DIGITAL CAMERA INSTRUCTION MANUAL Basic guide P. 2 Review the...
E-620 Instruction Manual (English)
Page 4
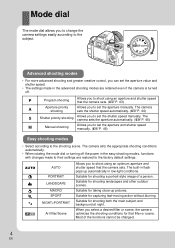
P Program shooting Allows you to shoot using an aperture and shutter speed that the camera sets. (gP. 43) A Aperture priority shooting Allows you to shoot using an optimum aperture and shutter speed that filter or scene. The built-in flash pops up pictures. Suitable for shooting... both the main subject and background at night. Suitable for capturing fast-moving action without blurring. Suitable for that the camera sets. Most of...
P Program shooting Allows you to shoot using an aperture and shutter speed that the camera sets. (gP. 43) A Aperture priority shooting Allows you to shoot using an optimum aperture and shutter speed that filter or scene. The built-in flash pops up pictures. Suitable for shooting... both the main subject and background at night. Suitable for capturing fast-moving action without blurring. Suitable for that the camera sets. Most of...

E-620 Instruction Manual (English)
Page 5
... the picture may be emphasized depending on the type of parts and functions 5 EN Press i to display the scene menu. 1 POP ART 1 CHILDREN i h SET SET 2 Use fg to select the filter or scene. 3 Press the i button. • To change the setting, press the i button again to g. • The art filter menu...
... the picture may be emphasized depending on the type of parts and functions 5 EN Press i to display the scene menu. 1 POP ART 1 CHILDREN i h SET SET 2 Use fg to select the filter or scene. 3 Press the i button. • To change the setting, press the i button again to g. • The art filter menu...
E-620 Instruction Manual (English)
Page 6
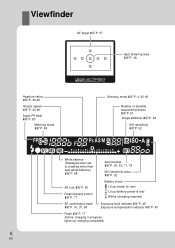
... value gP. 52 AE lock gP. 50 Flash intensity control gP. 77 AF confirmation mark gP. 16, 37, 60 Battery check Lit up (ready for use) Lit up (battery power is low) Blinks (charging required) Exposure level indicator gP. 46 Exposure compensation indicator gP. 49 Flash gP. 77 (blinks: charging in...
... value gP. 52 AE lock gP. 50 Flash intensity control gP. 77 AF confirmation mark gP. 16, 37, 60 Battery check Lit up (ready for use) Lit up (battery power is low) Blinks (charging required) Exposure level indicator gP. 46 Exposure compensation indicator gP. 49 Flash gP. 77 (blinks: charging in...
E-620 Instruction Manual (English)
Page 8
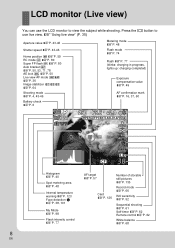
.... LCD monitor (Live view) You can use the LCD monitor to use live view" (P. 35) Aperture value gP. 43-46 Shutter speed gP. 43-46 Home position p gP. 59 RC mode q gP. 80 Super FP flash s gP. ...
.... LCD monitor (Live view) You can use the LCD monitor to use live view" (P. 35) Aperture value gP. 43-46 Shutter speed gP. 43-46 Home position p gP. 59 RC mode q gP. 80 Super FP flash s gP. ...
E-620 Instruction Manual (English)
Page 9
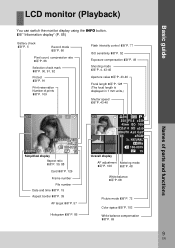
LCD monitor (Playback) Basic guide You can switch the monitor display using the INFO button. g"Information display" (P. 85) Battery check gP. 6 Record mode gP. 66 Pixel count, compression rate gP. 66 Selection check mark gP. 90, 91, ...
LCD monitor (Playback) Basic guide You can switch the monitor display using the INFO button. g"Information display" (P. 85) Battery check gP. 6 Record mode gP. 66 Pixel count, compression rate gP. 66 Selection check mark gP. 90, 91, ...

E-620 Instruction Manual (English)
Page 11
Unloading the battery Press the battery lock to close the battery compartment cover. • When using the camera, be sure to unlock the battery. Preparing the battery Basic guide 1 Charging the battery W BLS-1 Lithium ion battery Charging indicator Amber light... 2 W 2 AC wall outlet Direction indicating mark Battery 3 1 compartment lock 3 Close the battery compartment cover and slide the battery compartment lock in use drains. 11 EN Battery lock Preparations for shooting It is recommended to set aside a backup battery for prolonged shooting in case the battery in the...
Unloading the battery Press the battery lock to close the battery compartment cover. • When using the camera, be sure to unlock the battery. Preparing the battery Basic guide 1 Charging the battery W BLS-1 Lithium ion battery Charging indicator Amber light... 2 W 2 AC wall outlet Direction indicating mark Battery 3 1 compartment lock 3 Close the battery compartment cover and slide the battery compartment lock in use drains. 11 EN Battery lock Preparations for shooting It is recommended to set aside a backup battery for prolonged shooting in case the battery in the...

E-620 Instruction Manual (English)
Page 14
... Mode dial Set the mode dial to OFF. Dust reduction function operation The dust reduction function is automatically activated when the camera is displayed on . Power on 1 Set the camera's ON/OFF switch to ON • To turn off the power, set the ON/OFF switch to AUTO. Adjusting ...the viewfinder's diopter Adjust the viewfinder's diopter in accordance with your vision. Ultrasonic vibrations are used to remove dust and dirt from the image...
... Mode dial Set the mode dial to OFF. Dust reduction function operation The dust reduction function is automatically activated when the camera is displayed on . Power on 1 Set the camera's ON/OFF switch to ON • To turn off the power, set the ON/OFF switch to AUTO. Adjusting ...the viewfinder's diopter Adjust the viewfinder's diopter in accordance with your vision. Ultrasonic vibrations are used to remove dust and dirt from the image...

E-620 Instruction Manual (English)
Page 15
s j±0 k±0 REC VIEW 5SEC cMENU DISPLAY OFF FIRMWARE BACK SET 3 Use fg to select [X], then press i CANCEL SET • The time is recorded on ...Arrow pad fghi 5 Repeat this procedure until the date and time are completely set 2 Use fg to set the correct date and time before using the camera. MENU button 1 Press the MENU button • The menu screen is also included ...guide Date and time information is displayed in the 24-hour format. 6 Use fg to select the date format Y M D TIME 2009 03 01 14 00 Y/M/D Preparations for shooting Y M D TIME ...
s j±0 k±0 REC VIEW 5SEC cMENU DISPLAY OFF FIRMWARE BACK SET 3 Use fg to select [X], then press i CANCEL SET • The time is recorded on ...Arrow pad fghi 5 Repeat this procedure until the date and time are completely set 2 Use fg to set the correct date and time before using the camera. MENU button 1 Press the MENU button • The menu screen is also included ...guide Date and time information is displayed in the 24-hour format. 6 Use fg to select the date format Y M D TIME 2009 03 01 14 00 Y/M/D Preparations for shooting Y M D TIME ...

E-620 Instruction Manual (English)
Page 17
..., q button, etc.). g"BACKLIT LCD (Backlight timer)" (P. 100), "SLEEP" (P. 100) 17 EN When the camera stops operating If no operations are performed for approximately 8 seconds while the camera is on, the monitor backlight turns off to take the picture • The picture is lit). Shutter button P ...250 F5.6 I-AF LN 38 u button 2 Press the shutter button to save battery power (when the super control panel is taken with the focus adjusted. g"Using live view...
..., q button, etc.). g"BACKLIT LCD (Backlight timer)" (P. 100), "SLEEP" (P. 100) 17 EN When the camera stops operating If no operations are performed for approximately 8 seconds while the camera is on, the monitor backlight turns off to take the picture • The picture is lit). Shutter button P ...250 F5.6 I-AF LN 38 u button 2 Press the shutter button to save battery power (when the super control panel is taken with the focus adjusted. g"Using live view...

E-620 Instruction Manual (English)
Page 18
... the image you turn the control dial towards U, the image is stored 10 frames ahead Each time you want to erase and press the D button. Use fg to select [YES] and press the i button to 14×. q button Displays the frame that is stored 10 frames back Displays the previous frame...
... the image you turn the control dial towards U, the image is stored 10 frames ahead Each time you want to erase and press the D button. Use fg to select [YES] and press the i button to 14×. q button Displays the frame that is stored 10 frames back Displays the previous frame...
E-620 Instruction Manual (English)
Page 19
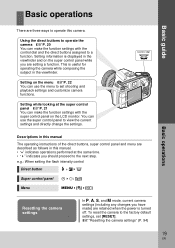
Setting information is displayed in the viewfinder and on the super control panel while you are retained when the power is useful for operating the camera while composing the subject in this manual. • "+" indicates operations performed at the super control panel gP. 21 You can make...super control panel and menu are described as follows in the viewfinder. g"Resetting the camera settings" (P. 94) 19 EN Setting on the LCD monitor. Using the direct buttons to operate the camera gP. 20 You can use the super control panel to the next step. Setting while looking at the same ...
Setting information is displayed in the viewfinder and on the super control panel while you are retained when the power is useful for operating the camera while composing the subject in this manual. • "+" indicates operations performed at the super control panel gP. 21 You can make...super control panel and menu are described as follows in the viewfinder. g"Resetting the camera settings" (P. 94) 19 EN Setting on the LCD monitor. Using the direct buttons to operate the camera gP. 20 You can use the super control panel to the next step. Setting while looking at the same ...
E-620 Instruction Manual (English)
Page 20
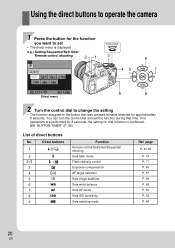
... 1 If no operations are performed for 8 seconds, the setting for that function is displayed. g"BUTTON TIMER" (P. 98) List of direct buttons No. Using the direct buttons to operate the camera 1 Press the button for the function you want to the button that was pressed remains selected for approximately 8 seconds. e.g.) Setting Sequential/Self...
... 1 If no operations are performed for 8 seconds, the setting for that function is displayed. g"BUTTON TIMER" (P. 98) List of direct buttons No. Using the direct buttons to operate the camera 1 Press the button for the function you want to the button that was pressed remains selected for approximately 8 seconds. e.g.) Setting Sequential/Self...

E-620 Instruction Manual (English)
Page 21
INFO button Control dial j 2009. 03.16 AF OFF arge Normal i button p Arrow pad 2 Press the i button 3 Use p to move the cursor to the function you want to set with the control dial ISO METERING Cursor lights arge Normal OFF Displays the selected ... Direct menu METERING SELECT SET Press the i button to "Super control panel" (gP. 7). 21 EN Basic operations For details on the functions that can also use the direct menu to change the setting with the super control panel, refer to display the direct menu indicated at the super control panel 1 Press...
INFO button Control dial j 2009. 03.16 AF OFF arge Normal i button p Arrow pad 2 Press the i button 3 Use p to move the cursor to the function you want to set with the control dial ISO METERING Cursor lights arge Normal OFF Displays the selected ... Direct menu METERING SELECT SET Press the i button to "Super control panel" (gP. 7). 21 EN Basic operations For details on the functions that can also use the direct menu to change the setting with the super control panel, refer to display the direct menu indicated at the super control panel 1 Press...
E-620 Instruction Manual (English)
Page 22
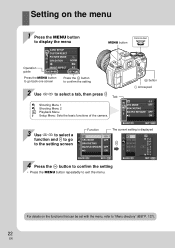
...exit the menu. i button p Arrow pad 0.0 RC MODE OFF BRACKETING MULTIPLE EXPOSURE OFF 8 ON BACK SET 3 Use fg to select a function and i to go back one screen Press the i button to confirm the setting 2 Use fg to select a tab, then press i Tab W Shooting Menu 1 X Shooting Menu 2 q Playback Menu d... Setup Menu: Sets the basic functions of the camera. Setting on the functions that can be set with the menu, refer to "Menu...
...exit the menu. i button p Arrow pad 0.0 RC MODE OFF BRACKETING MULTIPLE EXPOSURE OFF 8 ON BACK SET 3 Use fg to select a function and i to go back one screen Press the i button to confirm the setting 2 Use fg to select a tab, then press i Tab W Shooting Menu 1 X Shooting Menu 2 q Playback Menu d... Setup Menu: Sets the basic functions of the camera. Setting on the functions that can be set with the menu, refer to "Menu...

E-620 Instruction Manual (English)
Page 23
s j±0 k±0 REC VIEW 5SEC cMENU DISPLAY OFF FIRMWARE BACK SET 3 Use fg to select [c MENU DISPLAY], then press i 4 Use fg to frequent changing. c Custom Menu: Customizes shooting functions. They are for setting both simple and advanced shooting functions. Basic operations... Menu is added when [c MENU DISPLAY] in the Setup Menu is more than adequate for customizing the camera to suit your camera" (gP. 95) 1 Press the MENU button to display the menu 2 Use fg to "Customizing your personal preferences or needs. Basic guide Displaying the Custom Menu You can...
s j±0 k±0 REC VIEW 5SEC cMENU DISPLAY OFF FIRMWARE BACK SET 3 Use fg to select [c MENU DISPLAY], then press i 4 Use fg to frequent changing. c Custom Menu: Customizes shooting functions. They are for setting both simple and advanced shooting functions. Basic operations... Menu is added when [c MENU DISPLAY] in the Setup Menu is more than adequate for customizing the camera to suit your camera" (gP. 95) 1 Press the MENU button to display the menu 2 Use fg to "Customizing your personal preferences or needs. Basic guide Displaying the Custom Menu You can...
E-620 Instruction Manual (English)
Page 24
... the battery 11 Attaching a lens to the camera 12 Loading the card 13 Power on ...14 Setting the date/time 15 Shooting ...16 Playback/Erasing 18 Basic operations ...19 Basic operations 19 Using the direct buttons to operate the camera 20 Setting while looking at the super control ...panel 21 Setting on the menu 22 1 Using live view 35 Functions and operations available only during live view 38...
... the battery 11 Attaching a lens to the camera 12 Loading the card 13 Power on ...14 Setting the date/time 15 Shooting ...16 Playback/Erasing 18 Basic operations ...19 Basic operations 19 Using the direct buttons to operate the camera 20 Setting while looking at the super control ...panel 21 Setting on the menu 22 1 Using live view 35 Functions and operations available only during live view 38...
E-620 Instruction Manual (English)
Page 25
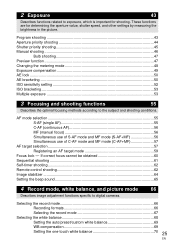
... mode selection ...55 S-AF (single AF 55 C-AF (continuous AF 56 MF (manual focus 56 Simultaneous use of S-AF mode and MF mode (S-AF+MF 56 Simultaneous use of C-AF mode and MF mode (C-AF+MF 57 AF target selection...57 Registering an AF target mode ...50 ISO sensitivity setting 52 ISO bracketing ...53 Multiple exposure ...53 3 Focusing and shooting functions 55 Describes the optimal focusing methods according to digital cameras. 2 Exposure 43 Describes functions related to exposure, which is important for determining the aperture value, shutter speed, and other settings by measuring...
... mode selection ...55 S-AF (single AF 55 C-AF (continuous AF 56 MF (manual focus 56 Simultaneous use of S-AF mode and MF mode (S-AF+MF 56 Simultaneous use of C-AF mode and MF mode (C-AF+MF 57 AF target selection...57 Registering an AF target mode ...50 ISO sensitivity setting 52 ISO bracketing ...53 Multiple exposure ...53 3 Focusing and shooting functions 55 Describes the optimal focusing methods according to digital cameras. 2 Exposure 43 Describes functions related to exposure, which is important for determining the aperture value, shutter speed, and other settings by measuring...

E-620 Instruction Manual (English)
Page 26
... bracketing ...71 Picture mode ...72 Gradation...73 5 Flash shooting 74 Describes how to shoot with the Olympus wireless RC flash system 80 Using commercially available flashes 81 6 Playback functions 82 Describes the functions for using the camera. Flash mode setting ...74 Built-in flash shooting 77 Flash intensity control 77 Flash bracketing ...78 External... Menu ...93 X (Date/time setting 93 W (Changing the display language 93 s (Monitor brightness adjustment 93 REC VIEW 93 c MENU DISPLAY 93 FIRMWARE 94 Resetting the camera settings 94 26 EN
... bracketing ...71 Picture mode ...72 Gradation...73 5 Flash shooting 74 Describes how to shoot with the Olympus wireless RC flash system 80 Using commercially available flashes 81 6 Playback functions 82 Describes the functions for using the camera. Flash mode setting ...74 Built-in flash shooting 77 Flash intensity control 77 Flash bracketing ...78 External... Menu ...93 X (Date/time setting 93 W (Changing the display language 93 s (Monitor brightness adjustment 93 REC VIEW 93 c MENU DISPLAY 93 FIRMWARE 94 Resetting the camera settings 94 26 EN
E-620 Instruction Manual (English)
Page 29
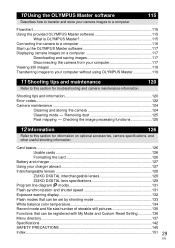
... Formatting the card 126 Battery and charger 127 Using your computer without using OLYMPUS Master 119 11 Shooting tips and maintenance Refer to this section for troubleshooting and camera maintenance information. 120 Shooting tips and information 120 Error codes ...122 Camera maintenance 124 Cleaning and storing the camera 124 Cleaning mode k Removing dust 125 Pixel mapping...
... Formatting the card 126 Battery and charger 127 Using your computer without using OLYMPUS Master 119 11 Shooting tips and maintenance Refer to this section for troubleshooting and camera maintenance information. 120 Shooting tips and information 120 Error codes ...122 Camera maintenance 124 Cleaning and storing the camera 124 Cleaning mode k Removing dust 125 Pixel mapping...


