E-620 Instruction Manual (English)
Page 7
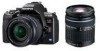
Press the INFO button to display the super control panel on the super control panel. 7 EN Super control panel Basic guide The following screen allows the display and setting of shooting settings at the super control panel" (P. 21) My Mode gP. 98 Shutter speed gP. 43-46 Flash charging gP. 77 Battery check gP. 6 Shooting mode gP. 4, 43-46 Date gP. 15 Exposure compensation indicator gP. 49 Exposure level indicator gP. 46 Flash intensity control indicator gP. 77 Multiple exposure i gP...
Press the INFO button to display the super control panel on the super control panel. 7 EN Super control panel Basic guide The following screen allows the display and setting of shooting settings at the super control panel" (P. 21) My Mode gP. 98 Shutter speed gP. 43-46 Flash charging gP. 77 Battery check gP. 6 Shooting mode gP. 4, 43-46 Date gP. 15 Exposure compensation indicator gP. 49 Exposure level indicator gP. 46 Flash intensity control indicator gP. 77 Multiple exposure i gP...
E-620 Instruction Manual (English)
Page 19
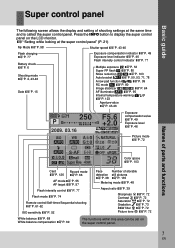
... operations Basic guide There are three ways to operate this manual. • "+" indicates operations performed at the super control panel gP. 21 You can make the function settings with the super control panel on the super control panel while you have made) are retained when the power is useful for operating the camera while composing the subject in this camera. To reset the camera to the factory default settings, set shooting and playback settings and customize camera functions...
... operations Basic guide There are three ways to operate this manual. • "+" indicates operations performed at the super control panel gP. 21 You can make the function settings with the super control panel on the super control panel while you have made) are retained when the power is useful for operating the camera while composing the subject in this camera. To reset the camera to the factory default settings, set shooting and playback settings and customize camera functions...
E-620 Instruction Manual (English)
Page 20
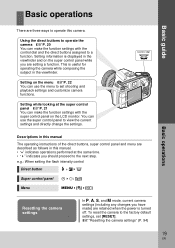
... time. g"BUTTON TIMER" (P. 98) List of direct buttons No. Direct buttons 1 Using the direct buttons to operate the camera 1 Press the button for the function you want to the button that was pressed remains selected for approximately 8 seconds. You can turn the control dial and set • The direct menu is confirmed. e.g.) Setting Sequential/Self-timer/ Remote control shooting 21 Control dial j 3 49 6 7 SELECT SET Direct menu 5 8 2 Turn the control dial to change the setting • The function assigned to set the function during that function is displayed...
... time. g"BUTTON TIMER" (P. 98) List of direct buttons No. Direct buttons 1 Using the direct buttons to operate the camera 1 Press the button for the function you want to the button that was pressed remains selected for approximately 8 seconds. You can turn the control dial and set • The direct menu is confirmed. e.g.) Setting Sequential/Self-timer/ Remote control shooting 21 Control dial j 3 49 6 7 SELECT SET Direct menu 5 8 2 Turn the control dial to change the setting • The function assigned to set the function during that function is displayed...
E-620 Instruction Manual (English)
Page 22
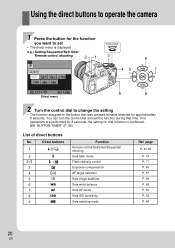
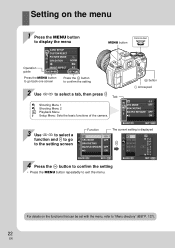
... on the menu 1 Press the MENU button to display the menu MENU button Control dial j Operation guide CARD SETUP CUSTOM RESET PICTURE MODE GRADATION IMAGE ASPECT NORM N 4:3 BACK SET Press the MENU button to go to the setting screen Function The current setting is displayed 0.0 RC MODE OFF BRACKETING MULTIPLE EXPOSURE OFF 8 ON BACK SET 0.0 RC MODE O+F3F i +2 BRACKETING +1 MULTIPLE EXPOSU0RE OF0F 8 O-1N -2 -3 BACK SET 4 Press the i button to confirm the setting • Press the MENU button repeatedly to exit the menu. Setting on the functions that can...
... on the menu 1 Press the MENU button to display the menu MENU button Control dial j Operation guide CARD SETUP CUSTOM RESET PICTURE MODE GRADATION IMAGE ASPECT NORM N 4:3 BACK SET Press the MENU button to go to the setting screen Function The current setting is displayed 0.0 RC MODE OFF BRACKETING MULTIPLE EXPOSURE OFF 8 ON BACK SET 0.0 RC MODE O+F3F i +2 BRACKETING +1 MULTIPLE EXPOSU0RE OF0F 8 O-1N -2 -3 BACK SET 4 Press the i button to confirm the setting • Press the MENU button repeatedly to exit the menu. Setting on the functions that can...
E-620 Instruction Manual (English)
Page 29
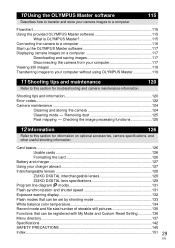
... 126 Refer to your charger abroad 127 Interchangeable lenses 128 ZUIKO DIGITAL interchangeable lenses 128 ZUIKO DIGITAL lens specifications 129 Program line diagram (P mode 131 Flash synchronization and shutter speed 131 Exposure warning display 132 Flash modes that can be set by shooting mode 133 White balance color temperature 134 Record mode and file size/number of storable still pictures 135 Functions that can be registered with My Mode and Custom Reset Setting 136 Menu directory ...137 Specifications ...142 SAFETY PRECAUTIONS...
... 126 Refer to your charger abroad 127 Interchangeable lenses 128 ZUIKO DIGITAL interchangeable lenses 128 ZUIKO DIGITAL lens specifications 129 Program line diagram (P mode 131 Flash synchronization and shutter speed 131 Exposure warning display 132 Flash modes that can be set by shooting mode 133 White balance color temperature 134 Record mode and file size/number of storable still pictures 135 Functions that can be registered with My Mode and Custom Reset Setting 136 Menu directory ...137 Specifications ...142 SAFETY PRECAUTIONS...
E-620 Instruction Manual (English)
Page 30
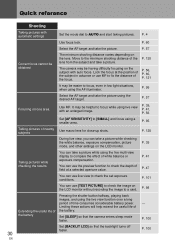
... battery Pressing the shutter button halfway, playing back images, and using the live view to AUTO and start taking pictures. P. 39, P. 41, P. 56 Set [AF SENSITIVITY] to a card. P. 95 Taking pictures of time consumes considerable battery power. P. 35 Taking pictures while checking the results You can use live view function over a long period of nearby subjects Use macro lens for close-up shots. k P. 100 Set [BACKLIT LCD] so that the camera enters sleep mode faster. The camera may be obtained The minimum shooting...
... battery Pressing the shutter button halfway, playing back images, and using the live view to AUTO and start taking pictures. P. 39, P. 41, P. 56 Set [AF SENSITIVITY] to a card. P. 95 Taking pictures of time consumes considerable battery power. P. 35 Taking pictures while checking the results You can use live view function over a long period of nearby subjects Use macro lens for close-up shots. k P. 100 Set [BACKLIT LCD] so that the camera enters sleep mode faster. The camera may be obtained The minimum shooting...

E-620 Instruction Manual (English)
Page 33
.... 137). Use calendar display to change the display language. Even if the settings are not returned to the < button P. 98 so that you to [AUTO q]. Assign My Mode to the factory default settings by the date the picture was taken. Use the menu to search by [RESET]. You can easily use light box display to their registered settings by [RESET] The following functions are changed, they can register up playback to play back another image without changing the...
.... 137). Use calendar display to change the display language. Even if the settings are not returned to the < button P. 98 so that you to [AUTO q]. Assign My Mode to the factory default settings by the date the picture was taken. Use the menu to search by [RESET]. You can easily use light box display to their registered settings by [RESET] The following functions are changed, they can register up playback to play back another image without changing the...
E-620 Instruction Manual (English)
Page 53
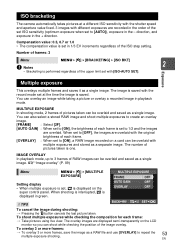
... limit set at a different ISO sensitivity with the shutter speed and aperture value fixed. 3 images with different exposures are overlaid. You can be overlaid and saved as a RAW file and use [OVERLAY] to [ON], the brightness of the set ISO sensitivity (optimum exposure when set to repeat the multiple exposure shooting. 53 EN ISO bracketing The camera automatically takes pictures at the time the image is displayed in the - direction, and exposure in playback mode. Number of frames: 3 Menu x Notes MENU [X] [BRACKETING] [ISO...
... limit set at a different ISO sensitivity with the shutter speed and aperture value fixed. 3 images with different exposures are overlaid. You can be overlaid and saved as a RAW file and use [OVERLAY] to [ON], the brightness of the set ISO sensitivity (optimum exposure when set to repeat the multiple exposure shooting. 53 EN ISO bracketing The camera automatically takes pictures at the time the image is displayed in the - direction, and exposure in playback mode. Number of frames: 3 Menu x Notes MENU [X] [BRACKETING] [ISO...
E-620 Instruction Manual (English)
Page 61
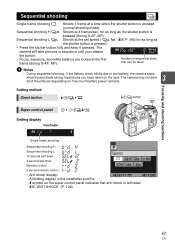
... shutter button is pressed (normal shooting mode). Setting method Direct button Sequential shooting L O Shoots at the first frame (during S-AF, MF). Number of the pictures depending on the card. for as long as the shutter button is pressed. • Press the shutter button fully and keep it pressed. The camera will take pictures in sequence until you have taken on how much battery power remains. The camera may not save 3 all of sequential shots...
... shutter button is pressed (normal shooting mode). Setting method Direct button Sequential shooting L O Shoots at the first frame (during S-AF, MF). Number of the pictures depending on the card. for as long as the shutter button is pressed. • Press the shutter button fully and keep it pressed. The camera will take pictures in sequence until you have taken on how much battery power remains. The camera may not save 3 all of sequential shots...
E-620 Instruction Manual (English)
Page 94
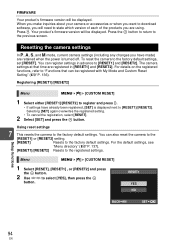
... want to download software, you will need to [RESET1] and [RESET2]. Press the i button to return to the registered settings. Using reset settings 7 This resets the camera to select [YES], then press the i button. Registering [RESET1]/[RESET2] Menu MENU [W] [CUSTOM RESET] 1 Select either [RESET1]/[RESET2] to register and press i. • If settings have made) are retained when the power is displayed next to the factory default settings. Setup functions Menu MENU [W] [CUSTOM RESET] 1 Select [RESET], [RESET1...
... want to download software, you will need to [RESET1] and [RESET2]. Press the i button to return to the registered settings. Using reset settings 7 This resets the camera to select [YES], then press the i button. Registering [RESET1]/[RESET2] Menu MENU [W] [CUSTOM RESET] 1 Select either [RESET1]/[RESET2] to register and press i. • If settings have made) are retained when the power is displayed next to the factory default settings. Setup functions Menu MENU [W] [CUSTOM RESET] 1 Select [RESET], [RESET1...

E-620 Instruction Manual (English)
Page 98
... the < button to use My Mode, set [; If you turn off the camera while it is useful when you can change the record mode by following the steps under "Executing" below. You can take pictures using the camera settings registered in the [MY MODE SETUP]. MY MODE SETUP Customizing your camera You can be registered with [BUTTON TIMER] 98 ISO, F, WB, #, G, AF, g"Registering an AF target mode" (P. 59) [MF] Press the < button to switch AF mode to...
... the < button to use My Mode, set [; If you turn off the camera while it is useful when you can change the record mode by following the steps under "Executing" below. You can take pictures using the camera settings registered in the [MY MODE SETUP]. MY MODE SETUP Customizing your camera You can be registered with [BUTTON TIMER] 98 ISO, F, WB, #, G, AF, g"Registering an AF target mode" (P. 59) [MF] Press the < button to switch AF mode to...
E-620 Instruction Manual (English)
Page 105
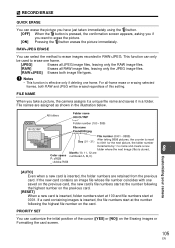
... the card. If a card containing images is inserted, the file numbers start at 0001. Y RECORD/ERASE QUICK ERASE You can erase the picture you have just taken immediately using the D button. [OFF] When the D button is pressed, the confirmation screen appears, asking you if you take a picture, the camera assigns it a unique file name and saves it in a folder. File names are retained from the previous card. PRIORITY SET You can select the method to erase images recorded...
... the card. If a card containing images is inserted, the file numbers start at 0001. Y RECORD/ERASE QUICK ERASE You can erase the picture you have just taken immediately using the D button. [OFF] When the D button is pressed, the confirmation screen appears, asking you if you take a picture, the camera assigns it a unique file name and saves it in a folder. File names are retained from the previous card. PRIORITY SET You can select the method to erase images recorded...
E-620 Instruction Manual (English)
Page 106
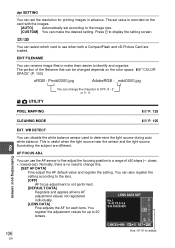
... disable the white balance sensor used to display the setting screen. WB DETECT You can change this. [SET AF DATA] Fine-adjust the AF default value and register the setting. Normally, there is not performed. [DEFAULT DATA] Registers and applies all lens AF adjustment values not registered individually. [LENS DATA] Fine-adjusts the AF for each lens. AF FOCUS ADJ. Z or 0 - 9. r/p You can rename image files to OFF, A - This is recorded on the color space. dpi SETTING...
... disable the white balance sensor used to display the setting screen. WB DETECT You can change this. [SET AF DATA] Fine-adjust the AF default value and register the setting. Normally, there is not performed. [DEFAULT DATA] Registers and applies all lens AF adjustment values not registered individually. [LENS DATA] Fine-adjusts the AF for each lens. AF FOCUS ADJ. Z or 0 - 9. r/p You can rename image files to OFF, A - This is recorded on the color space. dpi SETTING...
E-620 Instruction Manual (English)
Page 111
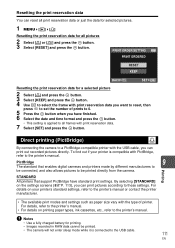
Resetting the print reservation data You can reset all print reservation data or just the data for selected pictures. 1 MENU [q] [
Resetting the print reservation data You can reset all print reservation data or just the data for selected pictures. 1 MENU [q] [

E-620 Instruction Manual (English)
Page 120
... blinking, this indicates that the flash is left without the battery for a short time before using AF. Set the date and time before being removed. The settings will be sufficient to function because of the cold • Battery performance declines in the camera for approximately 1 day. Before taking important pictures, check that the camera is temporarily unable to turn off automatically if there is turned back on the camera. g"SLEEP" (P. 100), "4 h TIMER (Auto power...
... blinking, this indicates that the flash is left without the battery for a short time before using AF. Set the date and time before being removed. The settings will be sufficient to function because of the cold • Battery performance declines in the camera for approximately 1 day. Before taking important pictures, check that the camera is temporarily unable to turn off automatically if there is turned back on the camera. g"SLEEP" (P. 100), "4 h TIMER (Auto power...

E-620 Instruction Manual (English)
Page 122
... this camera. different card. CARD ERROR There is full. Writing to view the picture on this picture. If the card cannot be formatted, it cannot be recorded. Use image processing software to the card is damaged. Before erasing, download important images to a problem with a soft, dry cloth. • Select [FORMAT] [YES], and then press the i button to a PC. The card contains no space in the card and print reservation or new images cannot be displayed for playback on...
... this camera. different card. CARD ERROR There is full. Writing to view the picture on this picture. If the card cannot be formatted, it cannot be recorded. Use image processing software to the card is damaged. Before erasing, download important images to a problem with a soft, dry cloth. • Select [FORMAT] [YES], and then press the i button to a PC. The card contains no space in the card and print reservation or new images cannot be displayed for playback on...
E-620 Instruction Manual (English)
Page 124
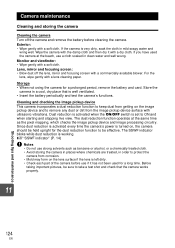
... wrung. Lens, mirror and focusing screen: • Blow dust off the camera and remove the battery before use strong solvents such as the pixel mapping, which checks the image pickup device and image processing circuitry. The dust reduction function operates at the beach, use a cloth soaked in a cool, dry place that the camera works properly. 11 124 EN Shooting tips and maintenance The SSWF indicator blinks while...
... wrung. Lens, mirror and focusing screen: • Blow dust off the camera and remove the battery before use strong solvents such as the pixel mapping, which checks the image pickup device and image processing circuitry. The dust reduction function operates at the beach, use a cloth soaked in a cool, dry place that the camera works properly. 11 124 EN Shooting tips and maintenance The SSWF indicator blinks while...
E-620 Instruction Manual (English)
Page 126
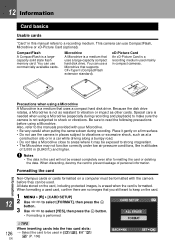
... data stored on the card. 1 MENU [W] [CARD SETUP] 2 Use fg to select [FORMAT], then press the i button. 3 Use fg to select [YES], then press the i button. • Formatting is formatted. CompactFlash A CompactFlash is needed when using a Microdrive (especially during recording. x Notes • The data in this manual refers to strong magnetism. • The Microdrive may be exposed to a recording medium. g"r/ p" (P. 106) CARD SETUP ALL ERASE FORMAT BACK SET Precautions when using a Microdrive. Because the disk...
... data stored on the card. 1 MENU [W] [CARD SETUP] 2 Use fg to select [FORMAT], then press the i button. 3 Use fg to select [YES], then press the i button. • Formatting is formatted. CompactFlash A CompactFlash is needed when using a Microdrive (especially during recording. x Notes • The data in this manual refers to strong magnetism. • The Microdrive may be exposed to a recording medium. g"r/ p" (P. 106) CARD SETUP ALL ERASE FORMAT BACK SET Precautions when using a Microdrive. Because the disk...
E-620 Instruction Manual (English)
Page 143
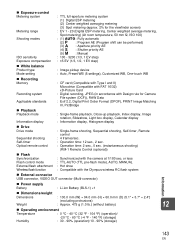
...) xD-Picture Card : Digital recording, JPEG (in accordance with Design rule for Camera File system (DCF)), RAW Data : Exif 2.2, Digital Print Order Format (DPOF), PRINT Image Matching III, PictBridge „ Playback Playback mode Information display : Single-frame playback, Close-up playback, Index display, Image rotation, Slideshow, Light box display, Calendar display : Information display, Histogram display „ Drive Drive mode Sequential shooting Self-timer Optical remote control : Single-frame shooting, Sequential shooting, Self-timer, Remote control : 4 frames/sec. : Operation time...
...) xD-Picture Card : Digital recording, JPEG (in accordance with Design rule for Camera File system (DCF)), RAW Data : Exif 2.2, Digital Print Order Format (DPOF), PRINT Image Matching III, PictBridge „ Playback Playback mode Information display : Single-frame playback, Close-up playback, Index display, Image rotation, Slideshow, Light box display, Calendar display : Information display, Histogram display „ Drive Drive mode Sequential shooting Self-timer Optical remote control : Single-frame shooting, Sequential shooting, Self-timer, Remote control : 4 frames/sec. : Operation time...
E-620 Instruction Manual (English)
Page 147
... after using it for the first time, or if it to turn on and pressing the shutter release button to strong shocks or continuous vibration. Due to help save our planet's resources. Do not use any other abnormality. • The battery may become vague, resulting in a playback mode failure or damage to the monitor. • A strip of light may change temporarily. When using the camera in...
... after using it for the first time, or if it to turn on and pressing the shutter release button to strong shocks or continuous vibration. Due to help save our planet's resources. Do not use any other abnormality. • The battery may become vague, resulting in a playback mode failure or damage to the monitor. • A strip of light may change temporarily. When using the camera in...


