E-10 Instructions (English)
Page 2
... benefit expected by erasing picture image data. Only the included USB cable should be determined by turning the equipment off and on, the user is connected. • Consult the dealer or an experienced radio/TV technician for purchasing the Camedia E-10. This Class B digital apparatus meets all requirements of Conformity Model Number: E-10 Trade Name: OLYMPUS Responsible Party: Olympus America lnc. Thank you for help. Copyright ©...
... benefit expected by erasing picture image data. Only the included USB cable should be determined by turning the equipment off and on, the user is connected. • Consult the dealer or an experienced radio/TV technician for purchasing the Camedia E-10. This Class B digital apparatus meets all requirements of Conformity Model Number: E-10 Trade Name: OLYMPUS Responsible Party: Olympus America lnc. Thank you for help. Copyright ©...
E-10 Instructions (English)
Page 4
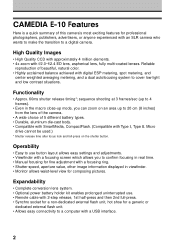
... confirm focusing in real time. • Manual focusing for fine adjustment with a focusing ring. • Shutter speed, aperture value, other image information displayed in the macro close-up mode, you to a digital camera. Operability • Easy to use . • Remote cable with 2-step release, 1st half-press and then 2nd full-press. • Synchro socket for a non-dedicated external flash unit, hot shoe for a generic or dedicated external flash unit. • Allows easy connectivity...
... confirm focusing in real time. • Manual focusing for fine adjustment with a focusing ring. • Shutter speed, aperture value, other image information displayed in the macro close-up mode, you to a digital camera. Operability • Easy to use . • Remote cable with 2-step release, 1st half-press and then 2nd full-press. • Synchro socket for a non-dedicated external flash unit, hot shoe for a generic or dedicated external flash unit. • Allows easy connectivity...

E-10 Instructions (English)
Page 13
...and Shutter Speed Manually 76 Selecting the Metering Method 78 Using Exposure Compensation 79 AE Lock ...80 Bracketing a Shot with Three Automatic Exposures 81 Changing the ISO Setting 83 Taking Pictures: Using a Flash 85 Selecting a Flash Mode 86 Using Flash Control Compensation 90 Using the Optional Dedicated External Flash FL-40 92 Using Other Flash Units with the Camera 94 Taking Pictures: Color and Quality 97 Achieving Natural Color (White Balance 98 Using White Balance 100 Using Quick Reference White Balance 101 Using Preset White Balance 102 Selecting Image...
...and Shutter Speed Manually 76 Selecting the Metering Method 78 Using Exposure Compensation 79 AE Lock ...80 Bracketing a Shot with Three Automatic Exposures 81 Changing the ISO Setting 83 Taking Pictures: Using a Flash 85 Selecting a Flash Mode 86 Using Flash Control Compensation 90 Using the Optional Dedicated External Flash FL-40 92 Using Other Flash Units with the Camera 94 Taking Pictures: Color and Quality 97 Achieving Natural Color (White Balance 98 Using White Balance 100 Using Quick Reference White Balance 101 Using Preset White Balance 102 Selecting Image...

E-10 Instructions (English)
Page 14
... Lens 133 Playing Back Images for Viewing 137 Displaying Image Information 138 Automatic Playback (Slide Show 140 Displaying Images on a TV Screen 142 Adjusting Monitor Brightness 144 Managing Stored Pictures 145 Copying Images to Another Card 146 Deleting All Images 150 Formatting a Memory Card 152 Naming Image Files 154 Selecting Pictures for Printing 157 Selecting Pictures and Number of Copies for Printing 158 Selecting All Pictures on a Card for Printing 160 Setting Up Index Printing 162 Selecting Pictures for Date or Time Stamping 164 Printing with Olympus Printers...
... Lens 133 Playing Back Images for Viewing 137 Displaying Image Information 138 Automatic Playback (Slide Show 140 Displaying Images on a TV Screen 142 Adjusting Monitor Brightness 144 Managing Stored Pictures 145 Copying Images to Another Card 146 Deleting All Images 150 Formatting a Memory Card 152 Naming Image Files 154 Selecting Pictures for Printing 157 Selecting Pictures and Number of Copies for Printing 158 Selecting All Pictures on a Card for Printing 160 Setting Up Index Printing 162 Selecting Pictures for Date or Time Stamping 164 Printing with Olympus Printers...
E-10 Instructions (English)
Page 33
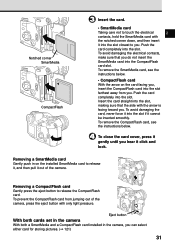
... be inserted smoothly. To remove the SmartMedia card, see the instructions below . • CompactFlash card With the arrow on the installed SmartMedia card to release the CompactFlash card. Insert the card straight into the slot, making sure that you hear it click and lock. Eject button With both cards set in the camera With both a SmartMedia and a CompactFlash card installed in on the card facing you . Push...
... be inserted smoothly. To remove the SmartMedia card, see the instructions below . • CompactFlash card With the arrow on the installed SmartMedia card to release the CompactFlash card. Insert the card straight into the slot, making sure that you hear it click and lock. Eject button With both cards set in the camera With both a SmartMedia and a CompactFlash card installed in on the card facing you . Push...

E-10 Instructions (English)
Page 42
... error message summary. Control panel Memory gauge 40 Appendix 5: Camera Error Messages (© 189) Four segments lit in the viewfinder, refer to a Computer (© 167) • Deleting All Images (© 150) Viewfinder Control panel If you cannot take another picture until at least one of the SmartMedia or CompactFlash card, and the record mode setting. One segment lights for every image that is divided into 4 segments. If nothing displayed...
... error message summary. Control panel Memory gauge 40 Appendix 5: Camera Error Messages (© 189) Four segments lit in the viewfinder, refer to a Computer (© 167) • Deleting All Images (© 150) Viewfinder Control panel If you cannot take another picture until at least one of the SmartMedia or CompactFlash card, and the record mode setting. One segment lights for every image that is divided into 4 segments. If nothing displayed...
E-10 Instructions (English)
Page 170
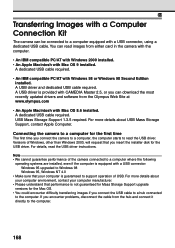
Transferring Images with a Computer Connection Kit The camera can download the most recently updated drivers and software from either card in the camera with the computer. • An IBM compatible PC/AT with Windows 2000 installed. • An Apple Macintosh with Mac OS 9 installed. A dedicated USB cable required. • An IBM compatible PC/AT with a USB connector: Windows 95 upgraded to the computer. A dedicated USB cable required. Connecting the camera to a computer for the first time The...
Transferring Images with a Computer Connection Kit The camera can download the most recently updated drivers and software from either card in the camera with the computer. • An IBM compatible PC/AT with Windows 2000 installed. • An Apple Macintosh with Mac OS 9 installed. A dedicated USB cable required. • An IBM compatible PC/AT with a USB connector: Windows 95 upgraded to the computer. A dedicated USB cable required. Connecting the camera to a computer for the first time The...
E-10 Instructions (English)
Page 171
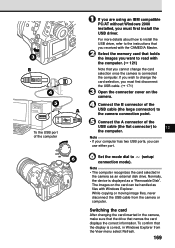
... IBM compatible PC/AT without Windows 2000 installed, you must first disconnect the USB cable. (© 171) 3 Open the connector cover on the card can use either port. 6 Set the mode dial to connection mode). (setup/ Note • The computer recognizes the card selected in the camera, make sure that the drive that you cannot change the card selection, you must first install the USB driver. If you wish to change the card...
... IBM compatible PC/AT without Windows 2000 installed, you must first disconnect the USB cable. (© 171) 3 Open the connector cover on the card can use either port. 6 Set the mode dial to connection mode). (setup/ Note • The computer recognizes the card selected in the camera, make sure that the drive that you cannot change the card selection, you must first install the USB driver. If you wish to change the card...

E-10 Instructions (English)
Page 178
... (unprocessed, uncompressed) data. Monitor Menus (continued) Playback mode menu Slide show (Automatic playback). OFF © 131 2/2 Switches histogram on prints. OFF © 164 Select or cancel all pictures for index printing. − © 162 Setup/connection mode menu 1/2 Determines whether conversion lens Macro selected is selected when marcro button without conversion © 133 is pressed. After you replace a memory card, you can restart file numbering (RESET) or continue sequential file numbering (AUTO). OFF © 108 176 Set current date and time.
... (unprocessed, uncompressed) data. Monitor Menus (continued) Playback mode menu Slide show (Automatic playback). OFF © 131 2/2 Switches histogram on prints. OFF © 164 Select or cancel all pictures for index printing. − © 162 Setup/connection mode menu 1/2 Determines whether conversion lens Macro selected is selected when marcro button without conversion © 133 is pressed. After you replace a memory card, you can restart file numbering (RESET) or continue sequential file numbering (AUTO). OFF © 108 176 Set current date and time.
E-10 Instructions (English)
Page 180
... compose pictures, just like the viewfinder. Appendix 1: Specifications Product type SLR digital camera (recording, playback) Recording system Digital recording, JPEG, in accordance with Type I and II. TFT color liquid crystal display Operation : Used to 35~140 mm lens on standard SLR 35 mm camera) Filter diameter 62 mm Metering system Digital ESP (Electro Selective Pattern) metering, Center weighted averaging metering, Spot metering Exposure control P (Program mode), A (Aperture priority), S (Shutter priority), M (Manual mode) Aperture WIDE...
... compose pictures, just like the viewfinder. Appendix 1: Specifications Product type SLR digital camera (recording, playback) Recording system Digital recording, JPEG, in accordance with Type I and II. TFT color liquid crystal display Operation : Used to 35~140 mm lens on standard SLR 35 mm camera) Filter diameter 62 mm Metering system Digital ESP (Electro Selective Pattern) metering, Center weighted averaging metering, Spot metering Exposure control P (Program mode), A (Aperture priority), S (Shutter priority), M (Manual mode) Aperture WIDE...
E-10 Instructions (English)
Page 181
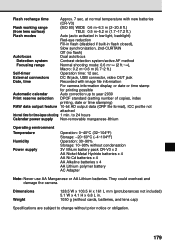
..., USB connector, video OUT jack Date, time Recorded with new batteries (CR-V3) Flash working range (ISO 80) WIDE 0.6 m~6.3 m (2~20.8 ft.) (from lens surface) TELE 0.5 m~5.2 m (1.7~17.2 ft.) Flash modes Auto (auto activated in low light, backlight) Red-eye reduction Fill-in flash (disabled if built-in . 1050 g (without cards, batteries, and lens cap) Specifications are subject to year 2030 Print reserve selection DPOF standard (setting number of copies, index printing, date or time stamping) RAW data output feature 10-bit AD output data (ORF file format...
..., USB connector, video OUT jack Date, time Recorded with new batteries (CR-V3) Flash working range (ISO 80) WIDE 0.6 m~6.3 m (2~20.8 ft.) (from lens surface) TELE 0.5 m~5.2 m (1.7~17.2 ft.) Flash modes Auto (auto activated in low light, backlight) Red-eye reduction Fill-in flash (disabled if built-in . 1050 g (without cards, batteries, and lens cap) Specifications are subject to year 2030 Print reserve selection DPOF standard (setting number of copies, index printing, date or time stamping) RAW data output feature 10-bit AD output data (ORF file format...

E-10 Instructions (English)
Page 198
... connecting to TV screen .......... 142 holding 36 important features 2 parts names 14, 15 setting date and time 126 setting operation warning sound ... 124 setting shutter release sound ... 122 setting sleep mode 128 specifications 178, 179 switching off 52 switching on 32 card CompactFlash 30 copying images to another card . 146 deleting all images from 150 formatting 152 full warning 35 inserting 30 Index naming files on 154 naming folders on 154 not formatted warning 35 number of storable pictures ....... 34 protecting...
... connecting to TV screen .......... 142 holding 36 important features 2 parts names 14, 15 setting date and time 126 setting operation warning sound ... 124 setting shutter release sound ... 122 setting sleep mode 128 specifications 178, 179 switching off 52 switching on 32 card CompactFlash 30 copying images to another card . 146 deleting all images from 150 formatting 152 full warning 35 inserting 30 Index naming files on 154 naming folders on 154 not formatted warning 35 number of storable pictures ....... 34 protecting...
E-10 Instructions (English)
Page 199
... fill-in flash 16 flash intensity control 16 image adjustment (sharpness, contrast) .. 16 ISO 16 ISO setting 83 location 14 macro 16 manual focus 16 memory gauge 16 metering mode 16 number of storable pictures ....... 16 quality 16 red-eye reduction 16 remote control 16 selected memory card 16 self-timer 16 sequential mode mark 112 sequential shooting 16 shutter speed 16, 75, 76 slow synchro 16 SM: SmartMedia card 121 spot metering 16 summary 16 white balance 16, 102...
... fill-in flash 16 flash intensity control 16 image adjustment (sharpness, contrast) .. 16 ISO 16 ISO setting 83 location 14 macro 16 manual focus 16 memory gauge 16 metering mode 16 number of storable pictures ....... 16 quality 16 red-eye reduction 16 remote control 16 selected memory card 16 self-timer 16 sequential mode mark 112 sequential shooting 16 shutter speed 16, 75, 76 slow synchro 16 SM: SmartMedia card 121 spot metering 16 summary 16 white balance 16, 102...
E-10 Instructions (English)
Page 200
... selecting shooting mode 70 monitor adjusting brightness 144 displaying image information .... 138 enlarged display 48 framing a picture 37 index display 48 location 14, 15 metering mark 78 multiple playback 48 white balance 99, 102 monitor button location 15 monitor lock/release button location 15 multiple exposures setting camera for 112 multiple-exposure with time-lapse photography .... 119 N night scenes ISO setting 60 manual focus 60 shooting 60, 61 shutter speed 60 NO CARD monitor message 147, 149 number of storable pictures mark in control...
... selecting shooting mode 70 monitor adjusting brightness 144 displaying image information .... 138 enlarged display 48 framing a picture 37 index display 48 location 14, 15 metering mark 78 multiple playback 48 white balance 99, 102 monitor button location 15 monitor lock/release button location 15 multiple exposures setting camera for 112 multiple-exposure with time-lapse photography .... 119 N night scenes ISO setting 60 manual focus 60 shooting 60, 61 shutter speed 60 NO CARD monitor message 147, 149 number of storable pictures mark in control...

E-10 Instructions (English)
Page 201
... viewing pictures 46 with histogram 109 portraits aperture value 54 shooting 54 power auto power off after 1 hour ....... 128 switching camera off 52 switching on camera 32 power switch location 14 switching camera off 52 switching on camera 32 preset white balance described 98 mark in viewfinder 17 procedure 102 Print reserve mode menu menu summary 176 print selected displaying current setting ......... 139 printing cancelling index printing 163 cancelling printing all images ... 161 cancelling selections for 159 changing number of copies ...... 159 date stamping 164 printer...
... viewing pictures 46 with histogram 109 portraits aperture value 54 shooting 54 power auto power off after 1 hour ....... 128 switching camera off 52 switching on camera 32 power switch location 14 switching camera off 52 switching on camera 32 preset white balance described 98 mark in viewfinder 17 procedure 102 Print reserve mode menu menu summary 176 print selected displaying current setting ......... 139 printing cancelling index printing 163 cancelling printing all images ... 161 cancelling selections for 159 changing number of copies ...... 159 date stamping 164 printer...

E-10 Instructions (English)
Page 202
... 34 time displaying time picture taken .... 139 setting date and time 126 time stamping for prints 164 viewing current time setting ..... 126 time-lapse photography actual time interval 120 cancelling 119 described 118 multiple exposures 119 setting eyepiece shutter lever .. 118 setting timer interval 118 setting up 118 slow shutter speed 119 using flash 119 viewing pictures already taken .. 119 transferring images to a computer 168 USB driver 169 what you need 168 tripod socket location 15 troubleshooting camera will not operate 182 colors are odd 188 control panel...
... 34 time displaying time picture taken .... 139 setting date and time 126 time stamping for prints 164 viewing current time setting ..... 126 time-lapse photography actual time interval 120 cancelling 119 described 118 multiple exposures 119 setting eyepiece shutter lever .. 118 setting timer interval 118 setting up 118 slow shutter speed 119 using flash 119 viewing pictures already taken .. 119 transferring images to a computer 168 USB driver 169 what you need 168 tripod socket location 15 troubleshooting camera will not operate 182 colors are odd 188 control panel...
E-10 Quick Start Guide (English)
Page 1
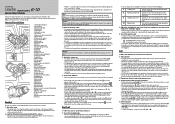
...J Card cover lock K SM/CF memory card button L Card access lamp M Light button N AE lock button O Power switch P Mode dial b Q White balance mode button R Sub dial S Control panel T Record mode button a U Flash mode button ` V Hot shoe W Video OUT jack ] X USB connector Y Monitor lock/release button Z INFO button [ Protect button \ Erase button ] Arrow pad j ^ OK button a Menu button i b Monitor button c Shutter button d Remote control receiver/self-timer lamp h e Strap eyelet f Battery compartment g Tripod socket h Lens i Quick reference white balance button...
...J Card cover lock K SM/CF memory card button L Card access lamp M Light button N AE lock button O Power switch P Mode dial b Q White balance mode button R Sub dial S Control panel T Record mode button a U Flash mode button ` V Hot shoe W Video OUT jack ] X USB connector Y Monitor lock/release button Z INFO button [ Protect button \ Erase button ] Arrow pad j ^ OK button a Menu button i b Monitor button c Shutter button d Remote control receiver/self-timer lamp h e Strap eyelet f Battery compartment g Tripod socket h Lens i Quick reference white balance button...
E-10 Quick Start Guide (English)
Page 2
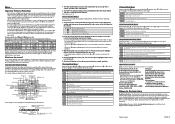
...are provided: Shooting Mode, Playback Mode, Print Reserve Mode, and Setup/ Connection Mode. 1 To open a menu, set current date and time. Flash off Record mode Image Red-eye reduction Slow adjustment synchro ISO Manual focus 2nd-curtain Flash intensity control Shutter speed Aperture value Remote control Macro Auto bracket White balance Metering mode Exposure compensation/ Exposure level Memory gauge Conversion lens Battery Card error Self-timer check Number of the menus and how to store more than the capacity indicated in the viewfinder when you delete one image from the...
...are provided: Shooting Mode, Playback Mode, Print Reserve Mode, and Setup/ Connection Mode. 1 To open a menu, set current date and time. Flash off Record mode Image Red-eye reduction Slow adjustment synchro ISO Manual focus 2nd-curtain Flash intensity control Shutter speed Aperture value Remote control Macro Auto bracket White balance Metering mode Exposure compensation/ Exposure level Memory gauge Conversion lens Battery Card error Self-timer check Number of the menus and how to store more than the capacity indicated in the viewfinder when you delete one image from the...
Auto-Connect USB Instructions for E-10 (English)
Page 1
...-and-drop procedures. If the menu does not start, go to install drivers (except for Windows 98) since the camera is no need to Start>Run. This feature makes it simple to copy the pictures to reboot the computer. These models use a standard USB driver. For example: c:\windows\temp. 3) Using Windows Explorer, open the folder you have a Camedia Master 4.0 CD-ROM 1) Download the USB Auto-Connect Driver for Windows 98 NOTE: A USB driver only needs to a computer. Double-click...
...-and-drop procedures. If the menu does not start, go to install drivers (except for Windows 98) since the camera is no need to Start>Run. This feature makes it simple to copy the pictures to reboot the computer. These models use a standard USB driver. For example: c:\windows\temp. 3) Using Windows Explorer, open the folder you have a Camedia Master 4.0 CD-ROM 1) Download the USB Auto-Connect Driver for Windows 98 NOTE: A USB driver only needs to a computer. Double-click...
Auto-Connect USB Instructions for E-10 (English)
Page 3
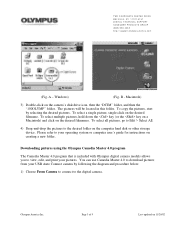
... the pictures to view, edit, and print your operating system or computer user's guide for instructions on the computer hard disk or other storage device. To copy the pictures, start by following the diagram and procedure below: 1) Choose From Camera to connect to your pictures. Page 3 of 9 Last updated on the desired filename. Downloading pictures using the Olympus Camedia Master 4.0 program The Camedia Master 4.0 program that is included with Olympus digital camera models...
... the pictures to view, edit, and print your operating system or computer user's guide for instructions on the computer hard disk or other storage device. To copy the pictures, start by following the diagram and procedure below: 1) Choose From Camera to connect to your pictures. Page 3 of 9 Last updated on the desired filename. Downloading pictures using the Olympus Camedia Master 4.0 program The Camedia Master 4.0 program that is included with Olympus digital camera models...


