D-150/C-1 Zoom Reference Manual (2.7MB)
Page 12
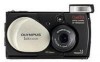
...be confirmed on the monitor as well as in the viewfinder. ⅷ Optical zoom lets you magnify the image up to 3X. ⅷ Digital zoom lets you magnify the image by up to 2X (or up to 6X with This Camera 1 Shooting ⅷ Simply press the shutter button to about 24 images*1. &#... Viewing options ⅷ Images can be displayed on photographic paper using the video cable. ⅷ Images can be printed on a TV screen using the optional Olympus P-400/P-200/ P-330N(E) printers. Images can also be printed on ink-jet or laser type printers. ⅷ Images saved on a SmartMedia card can be...
...be confirmed on the monitor as well as in the viewfinder. ⅷ Optical zoom lets you magnify the image up to 3X. ⅷ Digital zoom lets you magnify the image by up to 2X (or up to 6X with This Camera 1 Shooting ⅷ Simply press the shutter button to about 24 images*1. &#... Viewing options ⅷ Images can be displayed on photographic paper using the video cable. ⅷ Images can be printed on a TV screen using the optional Olympus P-400/P-200/ P-330N(E) printers. Images can also be printed on ink-jet or laser type printers. ⅷ Images saved on a SmartMedia card can be...
D-150/C-1 Zoom Reference Manual (2.7MB)
Page 16
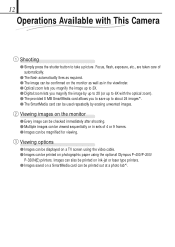
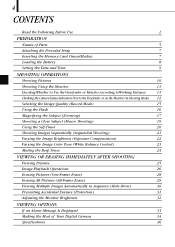
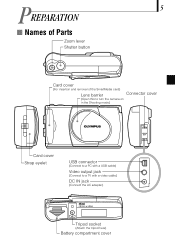
16 PREPARATION Names of Parts Zoom lever Shutter button Card cover (For insertion and removal of the SmartMedia card) Lens barrier Connector cover (Open this to turn the camera on in the Shooting mode) Card cover Strap eyelet USB connector (Connect to a PC with a USB cable) Video output jack (Connect to a TV with a video cable) DC IN jack (Connect the AC adapter) Tripod socket (Attach the tripod here) Battery compartment cover
16 PREPARATION Names of Parts Zoom lever Shutter button Card cover (For insertion and removal of the SmartMedia card) Lens barrier Connector cover (Open this to turn the camera on in the Shooting mode) Card cover Strap eyelet USB connector (Connect to a PC with a USB cable) Video output jack (Connect to a TV with a video cable) DC IN jack (Connect the AC adapter) Tripod socket (Attach the tripod here) Battery compartment cover
D-150/C-1 Zoom Reference Manual (2.7MB)
Page 30
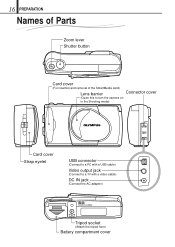
...off by closing the lens barrier. ⅷ When you don't expect to use the camera for 1 minute with a finger. To save battery power Sleep mode: When no operation...the lens barrier and open , the camera enters the Sleep mode. To start shooting: Open the lens barrier until the flash pops... up. [The camera turns on the card are saved even after the camera turns off . Press the flash down with the ...shooting When ending shooting 1. To end shooting: Close the lens barrier. [The camera turns off or the batteries are replaced. ⅷ Try to minimize power ...
...off by closing the lens barrier. ⅷ When you don't expect to use the camera for 1 minute with a finger. To save battery power Sleep mode: When no operation...the lens barrier and open , the camera enters the Sleep mode. To start shooting: Open the lens barrier until the flash pops... up. [The camera turns on the card are saved even after the camera turns off . Press the flash down with the ...shooting When ending shooting 1. To end shooting: Close the lens barrier. [The camera turns off or the batteries are replaced. ⅷ Try to minimize power ...
D-150/C-1 Zoom Reference Manual (2.7MB)
Page 39
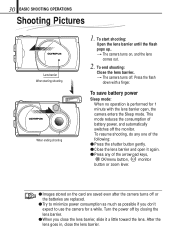
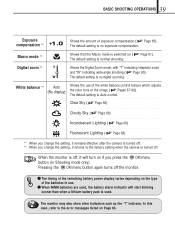
...sooner than when a lithium battery pack is turned off. *2 When you press the OK/menu button (in Shooting mode only). Digital zoom *2 T W Shows the Digital Zoom mode, with "T" indicating telephoto zoom and "W" indicating wide-angle shooting ( Page 60). The default setting is normal shooting. Macro mode *2 Shows that the Macro ... Exposure compensation *2 +1.0 Shows the amount of exposure compensation ( Page 65). In this case, refer to the factory setting when the camera is turned off , it remains effective after the camera is used. The default setting is Auto control.
...sooner than when a lithium battery pack is turned off. *2 When you press the OK/menu button (in Shooting mode only). Digital zoom *2 T W Shows the Digital Zoom mode, with "T" indicating telephoto zoom and "W" indicating wide-angle shooting ( Page 60). The default setting is normal shooting. Macro mode *2 Shows that the Macro ... Exposure compensation *2 +1.0 Shows the amount of exposure compensation ( Page 65). In this case, refer to the factory setting when the camera is turned off , it remains effective after the camera is used. The default setting is Auto control.
D-150/C-1 Zoom Reference Manual (2.7MB)
Page 61
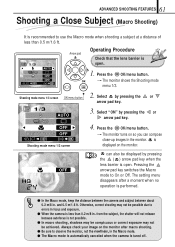
...be conspicuous or correct exposure may not be possible due to errors in focus and exposure. ⅷ When the camera is less than 0.5 m/1.6 ft. 1/3 AUTO OFF DIGITAL ZOOM OFF SELECT END OK Arrow pad Operating Procedure Check that the lens barrier is open . Select "ON" by ...sure to observe the monitor, not the viewfinder, in the Macro mode. ⅷ The Macro mode is automaticaly canceled when the camera is tured off. OFF DIGITAL ZOOM OFF SELECT END OK Shooting mode menu 1/3 screen 4. 61 ADVANCED SHOOTING FEATURES Shooting a Close Subject (Macro Shooting) It is recommended...
...be conspicuous or correct exposure may not be possible due to errors in focus and exposure. ⅷ When the camera is less than 0.5 m/1.6 ft. 1/3 AUTO OFF DIGITAL ZOOM OFF SELECT END OK Arrow pad Operating Procedure Check that the lens barrier is open . Select "ON" by ...sure to observe the monitor, not the viewfinder, in the Macro mode. ⅷ The Macro mode is automaticaly canceled when the camera is tured off. OFF DIGITAL ZOOM OFF SELECT END OK Shooting mode menu 1/3 screen 4. 61 ADVANCED SHOOTING FEATURES Shooting a Close Subject (Macro Shooting) It is recommended...
D-150/C-1 Zoom Reference Manual (2.7MB)
Page 62
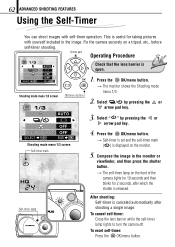
...Shooting mode menu 1/3 screen OK/menu button 1/3 AUTO OFF DIGITAL ZOOM OFF SELECT END OK Shooting mode menu 1/3 screen Self-timer... image. To cancel self-timer: Close the lens barrier while the self-timer lamp lights to turn the camera off. This is displayed on a tripod, etc., before self-timer shooting. Self-timer lamp After shooting...: Self-timer is canceled automatically after which the shutter is open. 1. Fix the camera securely on the monitor. 5. Press the OK/menu button. [The monitor shows the Shooting mode menu 1/3. 2. ...
...Shooting mode menu 1/3 screen OK/menu button 1/3 AUTO OFF DIGITAL ZOOM OFF SELECT END OK Shooting mode menu 1/3 screen Self-timer... image. To cancel self-timer: Close the lens barrier while the self-timer lamp lights to turn the camera off. This is displayed on a tripod, etc., before self-timer shooting. Self-timer lamp After shooting...: Self-timer is canceled automatically after which the shutter is open. 1. Fix the camera securely on the monitor. 5. Press the OK/menu button. [The monitor shows the Shooting mode menu 1/3. 2. ...
D-150/C-1 Zoom Reference Manual (2.7MB)
Page 65
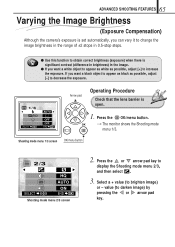
65 ADVANCED SHOOTING FEATURES Varying the Image Brightness (Exposure Compensation) Although the camera's exposure is set automatically, you can vary it to change the image brightness in the range of ±2 stops in 0.5-stop steps. ⅷ Use this ... then select . 3. If you want a black object to appear as black as possible, adjust [+] to increase the exposure. value (to decrease the exposure. 1/3 AUTO OFF DIGITAL ZOOM OFF SELECT END OK Arrow pad Operating Procedure Check that the lens barrier is open. 1.
65 ADVANCED SHOOTING FEATURES Varying the Image Brightness (Exposure Compensation) Although the camera's exposure is set automatically, you can vary it to change the image brightness in the range of ±2 stops in 0.5-stop steps. ⅷ Use this ... then select . 3. If you want a black object to appear as black as possible, adjust [+] to increase the exposure. value (to decrease the exposure. 1/3 AUTO OFF DIGITAL ZOOM OFF SELECT END OK Arrow pad Operating Procedure Check that the lens barrier is open. 1.
D-150/C-1 Zoom Reference Manual (2.7MB)
Page 67
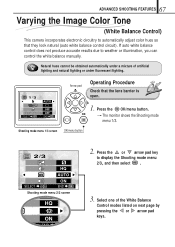
...illumination, you can control the white balance manually. 67 ADVANCED SHOOTING FEATURES Varying the Image Color Tone (White Balance Control) This camera incorporates electronic circuitry to automatically adjust color hues so that the lens barrier is open. 1. Shooting mode menu 1/3 screen OK/...OK Shooting mode menu 2/3 screen HQ ON END OK 2. Natural hues cannot be obtained automatically under fluorescent lighting. 1/3 AUTO OFF DIGITAL ZOOM OFF SELECT END OK Arrow pad Operating Procedure Check that they look natural (auto white balance control circuit). Press the OK/menu button...
...illumination, you can control the white balance manually. 67 ADVANCED SHOOTING FEATURES Varying the Image Color Tone (White Balance Control) This camera incorporates electronic circuitry to automatically adjust color hues so that the lens barrier is open. 1. Shooting mode menu 1/3 screen OK/...OK Shooting mode menu 2/3 screen HQ ON END OK 2. Natural hues cannot be obtained automatically under fluorescent lighting. 1/3 AUTO OFF DIGITAL ZOOM OFF SELECT END OK Arrow pad Operating Procedure Check that they look natural (auto white balance control circuit). Press the OK/menu button...
D-150/C-1 Zoom Reference Manual (2.7MB)
Page 69
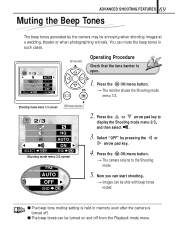
... you can start shooting. [Images can be shot with beep tones muted. ⅷ The beep tone muting setting is held in such cases. 1/3 AUTO OFF DIGITAL ZOOM OFF SELECT END OK Arrow pad Operating Procedure Check that the lens barrier is turned off. ⅷ The beep tones can mute the beep tones... in memory even after the camera is open. 1. 69 ADVANCED SHOOTING FEATURES Muting the Beep Tones The beep tones generated by pressing the or arrow pad key. 4. Press the OK/...
... you can start shooting. [Images can be shot with beep tones muted. ⅷ The beep tone muting setting is held in such cases. 1/3 AUTO OFF DIGITAL ZOOM OFF SELECT END OK Arrow pad Operating Procedure Check that the lens barrier is turned off. ⅷ The beep tones can mute the beep tones... in memory even after the camera is open. 1. 69 ADVANCED SHOOTING FEATURES Muting the Beep Tones The beep tones generated by pressing the or arrow pad key. 4. Press the OK/...
D-150/C-1 Zoom Reference Manual (2.7MB)
Page 104
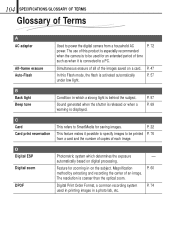
D Digital ESP Digital zoom DPOF Photometric system which a strong light is connected to power the digital camera from a card and the number of copies of each image. Feature for saving images. Digital Print Order Format, a common recording system used for an extended period of time such as... of an image. P. 47 In this product is especially recommended when the camera is activated automatically P. 57 under low light. Magnification method by extracting and recording the center of the images saved on digital processing. B Back light Beep tone Condition in a photo lab, etc....
D Digital ESP Digital zoom DPOF Photometric system which a strong light is connected to power the digital camera from a card and the number of copies of each image. Feature for saving images. Digital Print Order Format, a common recording system used for an extended period of time such as... of an image. P. 47 In this product is especially recommended when the camera is activated automatically P. 57 under low light. Magnification method by extracting and recording the center of the images saved on digital processing. B Back light Beep tone Condition in a photo lab, etc....
D-150/C-1 Zoom Reference Manual (2.7MB)
Page 106
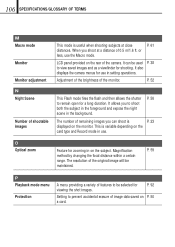
This is useful when shooting subjects at a distance of 0.5 m/1.6 ft. O Optical zoom Feature for P. 92 viewing the shot images. It also displays the camera menus for use the Macro mode. Magnification P. 59 method by changing the focal distance within a certain range. ...38 to prevent accidental erasure of features to remain open for shooting. When you shoot at close P. 61 distances. Adjustment of the brightness of the camera. It can shoot is P. 23 displayed on P. 50 a card. P Playback mode menu Protection A menu providing a variety of image data saved...
This is useful when shooting subjects at a distance of 0.5 m/1.6 ft. O Optical zoom Feature for P. 92 viewing the shot images. It also displays the camera menus for use the Macro mode. Magnification P. 59 method by changing the focal distance within a certain range. ...38 to prevent accidental erasure of features to remain open for shooting. When you shoot at close P. 61 distances. Adjustment of the brightness of the camera. It can shoot is P. 23 displayed on P. 50 a card. P Playback mode menu Protection A menu providing a variety of image data saved...
D-150/C-1 Zoom Quick Start Guide (324KB)
Page 1
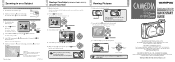
...(First 30 days after purchase) Tel. 1-631-844-5520 (After 30 days) (E-Mail) distec@olympus.com OLYMPUS OPTICAL CO. (EUROPA) GMBH. (Premises/Goods delivery) Wendenstraße 14-18, 20097 Hamburg,...digital zoom. 5. Slide the zoom lever to to zoom in . Press the OK/menu button. Arrow pad C-1 Zoom D-150 Zoom Using this camera for a moment. To view other images, press the arrow pad key. Zooming in on a Subject To use the digital zoom 1. Check that the lens barrier is open . 2. Slide the zoom lever to to zoom in Japan Digital Zoom T Appears only when using digital zooming...
...(First 30 days after purchase) Tel. 1-631-844-5520 (After 30 days) (E-Mail) distec@olympus.com OLYMPUS OPTICAL CO. (EUROPA) GMBH. (Premises/Goods delivery) Wendenstraße 14-18, 20097 Hamburg,...digital zoom. 5. Slide the zoom lever to to zoom in . Press the OK/menu button. Arrow pad C-1 Zoom D-150 Zoom Using this camera for a moment. To view other images, press the arrow pad key. Zooming in on a Subject To use the digital zoom 1. Check that the lens barrier is open . 2. Slide the zoom lever to to zoom in Japan Digital Zoom T Appears only when using digital zooming...
D-150/C-1 Zoom Quick Start Guide (324KB)
Page 2
... out of the arrow w. 3. Insert the card completely until the flash pops up ; Hold the camera, and look through the viewfinder. 3. Displayed menu Arrow pad 1/3 AUTO OFF DIGITAL ZOOM OFF SELECT END OK Monitor 3. Select by pressing the or arrow pad key. Select one of the...menu button. Press the OK/menu button. The default setting is set . Viewfinder Green lamp 4. Each time you have made your local Olympus representative immediately. If anything is displayed on the monitor for SmartMedia (4 pieces) Attaching the Provided Strap Loading the Battery and Card (SmartMedia...
... out of the arrow w. 3. Insert the card completely until the flash pops up ; Hold the camera, and look through the viewfinder. 3. Displayed menu Arrow pad 1/3 AUTO OFF DIGITAL ZOOM OFF SELECT END OK Monitor 3. Select by pressing the or arrow pad key. Select one of the...menu button. Press the OK/menu button. The default setting is set . Viewfinder Green lamp 4. Each time you have made your local Olympus representative immediately. If anything is displayed on the monitor for SmartMedia (4 pieces) Attaching the Provided Strap Loading the Battery and Card (SmartMedia...
D-150/C-1 Zoom Basic Manual (2.5MB)
Page 4
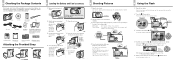
... Using the Monitor 11 Deciding Whether to Use the Viewfinder or Monitor According to Working Distance 11 Checking the Camera Status Indication Next to the Viewfinder or on the Monitor (in Shooting Mode) 12 Selecting the Image Quality... (Record Mode) 15 Using the Flash 16 Magnifying the Subject (Zooming) 17 Shooting a Close Subject (Macro Shooting) 19 Using the Self-Timer 20 Shooting Images Sequentially (Sequential Shooting) ...If an Alarm Message Is Displayed 33 Making the Most of Your Digital Camera 34 Specifications 36
... Using the Monitor 11 Deciding Whether to Use the Viewfinder or Monitor According to Working Distance 11 Checking the Camera Status Indication Next to the Viewfinder or on the Monitor (in Shooting Mode) 12 Selecting the Image Quality... (Record Mode) 15 Using the Flash 16 Magnifying the Subject (Zooming) 17 Shooting a Close Subject (Macro Shooting) 19 Using the Self-Timer 20 Shooting Images Sequentially (Sequential Shooting) ...If an Alarm Message Is Displayed 33 Making the Most of Your Digital Camera 34 Specifications 36
D-150/C-1 Zoom Basic Manual (2.5MB)
Page 5
PREPARATION 5 í Names of Parts Zoom lever Shutter button Card cover (For insertion and removal of the SmartMedia card) Lens barrier Connector cover (Open this to turn the camera on in the Shooting mode) Card cover Strap eyelet USB connector (Connect to a PC with a USB cable) Video output jack (Connect to a TV with a video cable) DC IN jack (Connect the AC adapter) Tripod socket (Attach the tripod here) Battery compartment cover
PREPARATION 5 í Names of Parts Zoom lever Shutter button Card cover (For insertion and removal of the SmartMedia card) Lens barrier Connector cover (Open this to turn the camera on in the Shooting mode) Card cover Strap eyelet USB connector (Connect to a PC with a USB cable) Video output jack (Connect to a TV with a video cable) DC IN jack (Connect the AC adapter) Tripod socket (Attach the tripod here) Battery compartment cover
D-150/C-1 Zoom Basic Manual (2.5MB)
Page 14
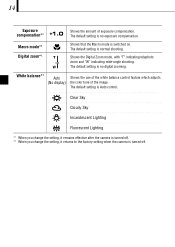
... Exposure compensation*2 +1.0 Shows the amount of the image. Macro mode*2 Digital zoom*2 T W Shows that the Macro mode is turned off . *2 When you change the setting, it remains effective after the camera is turned off . White balance*2 Auto (No display) Shows the use...*1 When you change the setting, it returns to the factory setting when the camera is switched on. Shows the Digital Zoom mode, with "T" indicating telephoto zoom and "W" indicating wide-angle shooting. The default setting is no digital zooming. The default setting is no exposure compensation.
... Exposure compensation*2 +1.0 Shows the amount of the image. Macro mode*2 Digital zoom*2 T W Shows that the Macro mode is turned off . *2 When you change the setting, it remains effective after the camera is turned off . White balance*2 Auto (No display) Shows the use...*1 When you change the setting, it returns to the factory setting when the camera is switched on. Shows the Digital Zoom mode, with "T" indicating telephoto zoom and "W" indicating wide-angle shooting. The default setting is no digital zooming. The default setting is no exposure compensation.
D-150/C-1 Zoom Basic Manual (2.5MB)
Page 20
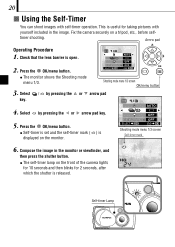
Fix the camera securely on the monitor. 1/3 AUTO OFF DIGITAL ZOOM OFF SELECT END OK Shooting mode menu 1/3 screen Self-timer mark 6. Self-timer Lamp Check that the lens barrier is released. Press the OK/menu button. ¼ The monitor shows the Shooting mode menu 1/3. 1/3 AUTO OFF DIGITAL ZOOM OFF SELECT... included in the monitor or viewfinder, and then press the shutter button. ¼ The self-timer lamp on the front of the camera lights for 10 seconds and then blinks for taking pictures with self-timer operation. This is useful for 2 seconds, after which the ...
Fix the camera securely on the monitor. 1/3 AUTO OFF DIGITAL ZOOM OFF SELECT END OK Shooting mode menu 1/3 screen Self-timer mark 6. Self-timer Lamp Check that the lens barrier is released. Press the OK/menu button. ¼ The monitor shows the Shooting mode menu 1/3. 1/3 AUTO OFF DIGITAL ZOOM OFF SELECT... included in the monitor or viewfinder, and then press the shutter button. ¼ The self-timer lamp on the front of the camera lights for 10 seconds and then blinks for taking pictures with self-timer operation. This is useful for 2 seconds, after which the ...
D-150/C-1 Zoom Basic Manual (2.5MB)
Page 22
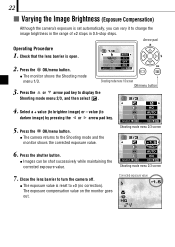
... while maintaining the corrected exposure value. Shooting mode menu 1/3 screen OK/menu button 3. Press the OK/menu button. ¼ The camera returns to change the image brightness in the range of ±2 stops in 0.5-stop steps. SELECT HQ AUTO ON END OK Shooting mode...value on the monitor goes out. Close the lens barrier to turn the camera off. ¼ The exposure value is open. 1/3 AUTO 2. Arrow pad Operating Procedure 1. Select a + value (to ±0 (no correction). OFF DIGITAL ZOOM OFF SELECT END OK ¼ The monitor shows the Shooting mode menu ...
... while maintaining the corrected exposure value. Shooting mode menu 1/3 screen OK/menu button 3. Press the OK/menu button. ¼ The camera returns to change the image brightness in the range of ±2 stops in 0.5-stop steps. SELECT HQ AUTO ON END OK Shooting mode...value on the monitor goes out. Close the lens barrier to turn the camera off. ¼ The exposure value is open. 1/3 AUTO 2. Arrow pad Operating Procedure 1. Select a + value (to ±0 (no correction). OFF DIGITAL ZOOM OFF SELECT END OK ¼ The monitor shows the Shooting mode menu ...
D-150/C-1 Zoom Basic Manual (2.5MB)
Page 23
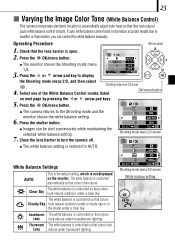
... look Lamp natural under a clear sky. Shooting mode menu 1/3 screen 4. Press the OK/menu button. 2/3 ¼ The camera returns to display OFF DIGITAL ZOOM OFF SELECT END OK the Shooting mode menu 2/3, and then select . SELECT ON END OK Shooting mode menu 2/3 screen White balance...Balance Control modes listed OK/menu button on the monitor. 23 í Varying the Image Color Tone (White Balance Control) This camera incorporates electronic circuitry to automatically adjust color hues so that they look natural. Press the shutter button. ¼ Images can control...
... look Lamp natural under a clear sky. Shooting mode menu 1/3 screen 4. Press the OK/menu button. 2/3 ¼ The camera returns to display OFF DIGITAL ZOOM OFF SELECT END OK the Shooting mode menu 2/3, and then select . SELECT ON END OK Shooting mode menu 2/3 screen White balance...Balance Control modes listed OK/menu button on the monitor. 23 í Varying the Image Color Tone (White Balance Control) This camera incorporates electronic circuitry to automatically adjust color hues so that they look natural. Press the shutter button. ¼ Images can control...
D-150/C-1 Zoom Basic Manual (2.5MB)
Page 24
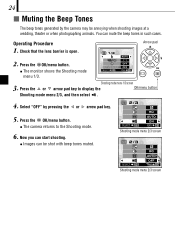
... the lens barrier is open. 1/3 AUTO Arrow pad 2. Press the OK/menu button. ¼ The monitor shows the Shooting mode menu 1/3. OFF DIGITAL ZOOM OFF SELECT END OK Shooting mode menu 1/3 screen 3. Now you can start shooting. ¼ Images can mute the beep tones in such cases.... You can be annoying when shooting images at a wedding, theater or when photographing animals. Press the OK/menu button. ¼ The camera returns to display the OK/menu button Shooting mode menu 2/3, and then select . 4. Press the or arrow pad key to the Shooting mode. 6....
... the lens barrier is open. 1/3 AUTO Arrow pad 2. Press the OK/menu button. ¼ The monitor shows the Shooting mode menu 1/3. OFF DIGITAL ZOOM OFF SELECT END OK Shooting mode menu 1/3 screen 3. Now you can start shooting. ¼ Images can mute the beep tones in such cases.... You can be annoying when shooting images at a wedding, theater or when photographing animals. Press the OK/menu button. ¼ The camera returns to display the OK/menu button Shooting mode menu 2/3, and then select . 4. Press the or arrow pad key to the Shooting mode. 6....


