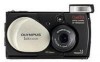
D-150/C-1 Zoom Reference Manual (2.7MB)
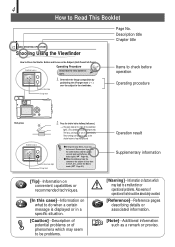
Page 2
... the user's authority to operate this equipment does cause harmful interference to radio or television reception, which can radiate radio frequency energy and, if not installed and used to connect the camera to correct the interference by the manufacturer may be determined by turning the equipment off and on the product names, model numbers, etc., please consult authorized Olympus service center...
... the user's authority to operate this equipment does cause harmful interference to radio or television reception, which can radiate radio frequency energy and, if not installed and used to connect the camera to correct the interference by the manufacturer may be determined by turning the equipment off and on the product names, model numbers, etc., please consult authorized Olympus service center...
D-150/C-1 Zoom Reference Manual (2.7MB)
Page 4
... the green lamp blinks, focus may lead to a malfunction or operational problems. Also warns of the viewfinder lights. (This condition is called half-pressed.) The focus and exposure are locked as long as a remark or proviso. Green lamp 1. Press the shutter button halfway (half-press). [The green lamp on the right of operations that the lens barrier is open. Release your finger from the shutter button, hold the camera...
... the green lamp blinks, focus may lead to a malfunction or operational problems. Also warns of the viewfinder lights. (This condition is called half-pressed.) The focus and exposure are locked as long as a remark or proviso. Green lamp 1. Press the shutter button halfway (half-press). [The green lamp on the right of operations that the lens barrier is open. Release your finger from the shutter button, hold the camera...
D-150/C-1 Zoom Reference Manual (2.7MB)
Page 39
.../menu button (in use of the white balance control feature which adjusts (No display) the color tone of exposure compensation ( Page 65). In this case, refer to the factory setting when the camera is turned off the monitor. ⅷ The timing of the remaining battery power display varies depending on if you change the setting, it remains effective after the camera is turned off , it returns to the error messages listed on ( The default setting is switched...
.../menu button (in use of the white balance control feature which adjusts (No display) the color tone of exposure compensation ( Page 65). In this case, refer to the factory setting when the camera is turned off the monitor. ⅷ The timing of the remaining battery power display varies depending on if you change the setting, it remains effective after the camera is turned off , it returns to the error messages listed on ( The default setting is switched...
D-150/C-1 Zoom Reference Manual (2.7MB)
Page 47
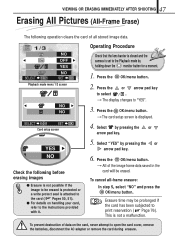
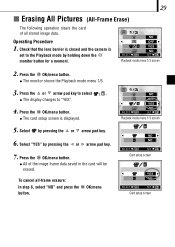
... image data. 1/3 NO OFF YES SELECT NO SET OK Playback mode menu 1/3 screen NO NO SELECT SET OK Card setup screen Operating Procedure Check that the lens barrier is closed and the camera is set to the Playback mode by holding down the monitor button for a moment. 1. 47 VIEWING OR ERASING IMMEDIATELY AFTER SHOOTING Erasing All Pictures (All-Frame Erase) The following before erasing images ⅷ Erasure is not possible if the image to be erased is protected or a write protect...
... image data. 1/3 NO OFF YES SELECT NO SET OK Playback mode menu 1/3 screen NO NO SELECT SET OK Card setup screen Operating Procedure Check that the lens barrier is closed and the camera is set to the Playback mode by holding down the monitor button for a moment. 1. 47 VIEWING OR ERASING IMMEDIATELY AFTER SHOOTING Erasing All Pictures (All-Frame Erase) The following before erasing images ⅷ Erasure is not possible if the image to be erased is protected or a write protect...
D-150/C-1 Zoom Reference Manual (2.7MB)
Page 55
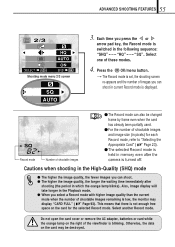
... current Record mode is set, the shooting screen re-appears and the number of images you select a Record mode with higher image quality than the current mode when the number of shootable images and image size (in pixels) for the selected Record mode. Press the OK/menu button. [The Record mode is displayed. 55 ADVANCED SHOOTING FEATURES 2/3 HQ AUTO SELECT ON END OK Shooting mode menu 2/3 screen SQ AUTO 3. Select another Record mode. Do not open the card cover or remove the AC adapter, batteries or card...
... current Record mode is set, the shooting screen re-appears and the number of images you select a Record mode with higher image quality than the current mode when the number of shootable images and image size (in pixels) for the selected Record mode. Press the OK/menu button. [The Record mode is displayed. 55 ADVANCED SHOOTING FEATURES 2/3 HQ AUTO SELECT ON END OK Shooting mode menu 2/3 screen SQ AUTO 3. Select another Record mode. Do not open the card cover or remove the AC adapter, batteries or card...
D-150/C-1 Zoom Reference Manual (2.7MB)
Page 68
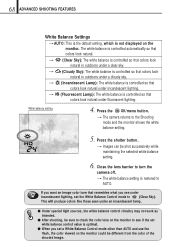
... an image color tone that colors look natural under incandescent lighting, set a White Balance Control mode other than AUTO and use the flash, the color viewed on the monitor. Close the lens barrier to turn the camera off. [The white balance setting is restored to the Shooting mode and the monitor shows the white balance setting. Press the OK/menu button. [The camera returns to AUTO. HQ 5. Press the shutter button. [Images can be shot successively while maintaining the selected white balance setting. 6. The white balance is controlled automatically...
... an image color tone that colors look natural under incandescent lighting, set a White Balance Control mode other than AUTO and use the flash, the color viewed on the monitor. Close the lens barrier to turn the camera off. [The white balance setting is restored to the Shooting mode and the monitor shows the white balance setting. Press the OK/menu button. [The camera returns to AUTO. HQ 5. Press the shutter button. [Images can be shot successively while maintaining the selected white balance setting. 6. The white balance is controlled automatically...
D-150/C-1 Zoom Reference Manual (2.7MB)
Page 76
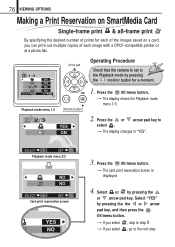
... multiple copies of each of prints for each image with a DPOF-compatible printer or at a photo lab. 1/3 SELECT NO OFF NO NO SET OK Playback mode menu 1/3 Arrow pad OK/menu button Operating Procedure Check that the camera is displayed. 4. Select "YES" by pressing the or arrow pad key. Press the OK/menu button. [The display shows the Playback mode menu 1/3. 2/3 YES ON 2. 76 VIEWING OPTIONS Making a Print Reservation on SmartMedia Card Single-frame print & all-frame print...
... multiple copies of each of prints for each image with a DPOF-compatible printer or at a photo lab. 1/3 SELECT NO OFF NO NO SET OK Playback mode menu 1/3 Arrow pad OK/menu button Operating Procedure Check that the camera is displayed. 4. Select "YES" by pressing the or arrow pad key. Press the OK/menu button. [The display shows the Playback mode menu 1/3. 2/3 YES ON 2. 76 VIEWING OPTIONS Making a Print Reservation on SmartMedia Card Single-frame print & all-frame print...
D-150/C-1 Zoom Reference Manual (2.7MB)
Page 80
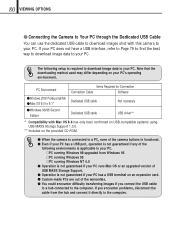
... running Windows NT 4.0 ⅷ Operation is not guaranteed if your PC runs Mac OS or an upgraded version of USB MASS Storage Support. ⅷ Operation is required to download image data to your PC. 80 VIEWING OPTIONS ⅷ Connecting the Camera to Your PC through the Dedicated USB Cable You can use the dedicated USB cable to download images shot with Mac OS 8.6 has only been confirmed on USB-compatible systems using USB MASS Storage Support 1.3.5. ** Included...
... running Windows NT 4.0 ⅷ Operation is not guaranteed if your PC runs Mac OS or an upgraded version of USB MASS Storage Support. ⅷ Operation is required to download image data to your PC. 80 VIEWING OPTIONS ⅷ Connecting the Camera to Your PC through the Dedicated USB Cable You can use the dedicated USB cable to download images shot with Mac OS 8.6 has only been confirmed on USB-compatible systems using USB MASS Storage Support 1.3.5. ** Included...
D-150/C-1 Zoom Reference Manual (2.7MB)
Page 92
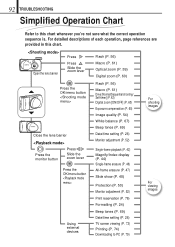
...menu button Flash (P. 56) Macro (P. 61) Drive [Normal/Sequential shooting/ Self-timer] (P. 62) Digital zoom [ON/OFF] (P. 60) Exposure compensation (P. 65) Image quality (P. 54) White balance (P. 67) Beep tones (P. 69) Date/time setting (P. 26) Monitor adjustment (P. 52) Single-frame playback (P. 42) Magnify/Index display (P. 44) Single-frame erasure (P. 46) All-frame erasure (P. 47) Slide show (P. 48) Protection (P. 50) Monitor adjustment (P. 52) For shooting images For viewing images Print reservation (P. 76) Formatting (P. 24) Using external devices Beep tones (P. 69) Date/time setting...
...menu button Flash (P. 56) Macro (P. 61) Drive [Normal/Sequential shooting/ Self-timer] (P. 62) Digital zoom [ON/OFF] (P. 60) Exposure compensation (P. 65) Image quality (P. 54) White balance (P. 67) Beep tones (P. 69) Date/time setting (P. 26) Monitor adjustment (P. 52) Single-frame playback (P. 42) Magnify/Index display (P. 44) Single-frame erasure (P. 46) All-frame erasure (P. 47) Slide show (P. 48) Protection (P. 50) Monitor adjustment (P. 52) For shooting images For viewing images Print reservation (P. 76) Formatting (P. 24) Using external devices Beep tones (P. 69) Date/time setting...
D-150/C-1 Zoom Reference Manual (2.7MB)
Page 95
... P. 19 blinking to indicate that data is being written to the Insert a new card or remove the write protect P. 22 card or no card is inserted in the card. Open the lens barrier. If the subject is full. Check the error message. The remaining battery power is in the card, wait until the orange lamp goes out before retrying shooting. Replace the card, erase unnecessary image P. 46 frames or download images to the Macro mode, and...
... P. 19 blinking to indicate that data is being written to the Insert a new card or remove the write protect P. 22 card or no card is inserted in the card. Open the lens barrier. If the subject is full. Check the error message. The remaining battery power is in the card, wait until the orange lamp goes out before retrying shooting. Replace the card, erase unnecessary image P. 46 frames or download images to the Macro mode, and...
D-150/C-1 Zoom Reference Manual (2.7MB)
Page 96
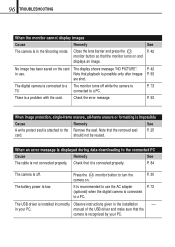
... a The monitor turns off . It is recommended to use . P. 42 in the Shooting mode. Press the monitor button to a PC. manual of the USB driver and make sure that the removed seal P. 25 card. 96 TROUBLESHOOTING When the monitor cannot display images Cause Remedy See The camera is low. connected to the connected PC Cause Remedy See The cable is displayed during data downloading to a PC. When an error message is not connected properly.
... a The monitor turns off . It is recommended to use . P. 42 in the Shooting mode. Press the monitor button to a PC. manual of the USB driver and make sure that the removed seal P. 25 card. 96 TROUBLESHOOTING When the monitor cannot display images Cause Remedy See The camera is low. connected to the connected PC Cause Remedy See The cable is displayed during data downloading to a PC. When an error message is not connected properly.
D-150/C-1 Zoom Reference Manual (2.7MB)
Page 98
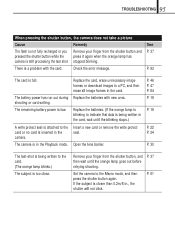
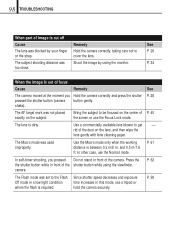
... shutter button while using the monitor. Use the Macro mode only when the working P. 61 distance is required. In self-timer shooting, you Hold the camera correctly and press the shutter P. 28 pressed the shutter button (camera button gently. camera. 98 TROUBLESHOOTING When part of image is cut off Cause Remedy See The lens was blocked by using the viewfinder. P. 34 too close. rid of P. 40 the screen or use the Normal mode. The Flash mode was Shoot...
... shutter button while using the monitor. Use the Macro mode only when the working P. 61 distance is required. In self-timer shooting, you Hold the camera correctly and press the shutter P. 28 pressed the shutter button (camera button gently. camera. 98 TROUBLESHOOTING When part of image is cut off Cause Remedy See The lens was blocked by using the viewfinder. P. 34 too close. rid of P. 40 the screen or use the Normal mode. The Flash mode was Shoot...
D-150/C-1 Zoom Reference Manual (2.7MB)
Page 99
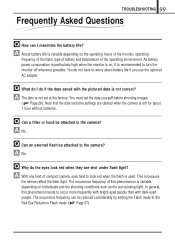
... the surrounding light. Note that the date and time settings are shot under flash light? A With any kind of compact camera, eyes tend to worry about 1 hour without batteries. You do the eyes look red when the flash is left for about battery life if you use the optional AC adapter. Q Can an external flash be attached to the Red-Eye Reduction Flash mode ( Page 57). You must set at the factory. Q Why...
... the surrounding light. Note that the date and time settings are shot under flash light? A With any kind of compact camera, eyes tend to worry about 1 hour without batteries. You do the eyes look red when the flash is left for about battery life if you use the optional AC adapter. Q Can an external flash be attached to the Red-Eye Reduction Flash mode ( Page 57). You must set at the factory. Q Why...
D-150/C-1 Zoom Reference Manual (2.7MB)
Page 102
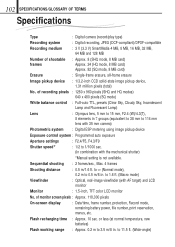
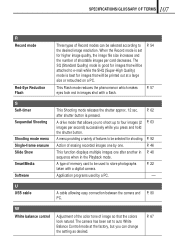
...) Sequential shooting : 2 frames/sec., Max. 4 frames Shooting distance : 0.5 m/1.6 ft. to 3.5 m/8 in. Flash recharging time : Approx. 10 sec. 102 SPECIFICATIONS/GLOSSARY OF TERMS Specifications Type : Digital camera (record/play type) Recording system : Digital recording, JPEG (DCF-compliant)/DPOF-compatible Recording medium : 3 V (3.3 V) SmartMedia 4 MB, 8 MB, 16 MB, 32 MB, 64 MB and 128 MB Number of monitor screen pixels : Approx. 118,000 pixels On-screen display : Date/time, frame number, protection, Record mode, remaining battery power, file number, print reservation...
...) Sequential shooting : 2 frames/sec., Max. 4 frames Shooting distance : 0.5 m/1.6 ft. to 3.5 m/8 in. Flash recharging time : Approx. 10 sec. 102 SPECIFICATIONS/GLOSSARY OF TERMS Specifications Type : Digital camera (record/play type) Recording system : Digital recording, JPEG (DCF-compliant)/DPOF-compatible Recording medium : 3 V (3.3 V) SmartMedia 4 MB, 8 MB, 16 MB, 32 MB, 64 MB and 128 MB Number of monitor screen pixels : Approx. 118,000 pixels On-screen display : Date/time, frame number, protection, Record mode, remaining battery power, file number, print reservation...
D-150/C-1 Zoom Reference Manual (2.7MB)
Page 106
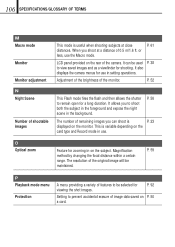
... Record mode in setting operations. Setting to view saved images and as a viewfinder for a long duration. Adjustment of the brightness of shootable images This Flash mode fires the flash and then allows the shutter P. 58 to be maintained. P. 52 N Night Scene Number of the monitor. or less, use in use. P Playback mode menu Protection A menu providing a variety of the camera. It can shoot is variable depending on the subject. O Optical zoom Feature for P. 92 viewing the shot images. LCD...
... Record mode in setting operations. Setting to view saved images and as a viewfinder for a long duration. Adjustment of the brightness of shootable images This Flash mode fires the flash and then allows the shutter P. 58 to be maintained. P. 52 N Night Scene Number of the monitor. or less, use in use. P Playback mode menu Protection A menu providing a variety of the camera. It can shoot is variable depending on the subject. O Optical zoom Feature for P. 92 viewing the shot images. LCD...
D-150/C-1 Zoom Reference Manual (2.7MB)
Page 107
... after shutter button is set to store photographs P. 22 taken with a flash. U USB cable A cable allowing easy connection between the camera and P. 80 PC. Application programs used to auto White Balance Control mode at a large size or retouched on a PC. The camera has been set for shooting. A drive mode that the colors P. 67 look red in the Playback mode. P. 46 This function displays multiple images one . P. 62 after another in P. 48 sequence when in images shot with a digital camera. When the Record mode is pressed. W White balance control Adjustment...
... after shutter button is set to store photographs P. 22 taken with a flash. U USB cable A cable allowing easy connection between the camera and P. 80 PC. Application programs used to auto White Balance Control mode at a large size or retouched on a PC. The camera has been set for shooting. A drive mode that the colors P. 67 look red in the Playback mode. P. 46 This function displays multiple images one . P. 62 after another in P. 48 sequence when in images shot with a digital camera. When the Record mode is pressed. W White balance control Adjustment...
D-150/C-1 Zoom Quick Start Guide (324KB)
Page 2
...) Write-protect seals for a short time. Insert the card as far as key is open, slide it clicks. the camera will come out. 2. Monitor Using the Flash 1. Card cover Lens barrier Battery compartment cover If the lens barrier is pressed. Shooting Pictures 1. Push down the flash to take the picture. The insertion direction is set . Select one of these modes. 1/3 AUTO Display changes as it in low light situations (when AUTO is indicated on and the lens...
...) Write-protect seals for a short time. Insert the card as far as key is open, slide it clicks. the camera will come out. 2. Monitor Using the Flash 1. Card cover Lens barrier Battery compartment cover If the lens barrier is pressed. Shooting Pictures 1. Push down the flash to take the picture. The insertion direction is set . Select one of these modes. 1/3 AUTO Display changes as it in low light situations (when AUTO is indicated on and the lens...
D-150/C-1 Zoom Basic Manual (2.5MB)
Page 4
... (Zooming) 17 Shooting a Close Subject (Macro Shooting) 19 Using the Self-Timer 20 Shooting Images Sequentially (Sequential Shooting) 21 Varying the Image Brightness (Exposure Compensation) 22 Varying the Image Color Tone (White Balance Control) 23 Muting the Beep Tones 24 VIEWING OR ERASING IMMEDIATELY AFTER SHOOTING Viewing Pictures 25 Image Playback Operations 26 Erasing Pictures (One-Frame Erase) 28 Erasing All Pictures (All-Frame Erase) 29 Viewing Multiple Images Automatically in Sequence (Slide Show) 30 Preventing Accidental Erasure (Protection) 31 Adjusting...
... (Zooming) 17 Shooting a Close Subject (Macro Shooting) 19 Using the Self-Timer 20 Shooting Images Sequentially (Sequential Shooting) 21 Varying the Image Brightness (Exposure Compensation) 22 Varying the Image Color Tone (White Balance Control) 23 Muting the Beep Tones 24 VIEWING OR ERASING IMMEDIATELY AFTER SHOOTING Viewing Pictures 25 Image Playback Operations 26 Erasing Pictures (One-Frame Erase) 28 Erasing All Pictures (All-Frame Erase) 29 Viewing Multiple Images Automatically in Sequence (Slide Show) 30 Preventing Accidental Erasure (Protection) 31 Adjusting...
D-150/C-1 Zoom Basic Manual (2.5MB)
Page 29
... stored image data. Check that the lens barrier is closed and the camera is displayed. 5. Press the or arrow pad key to select / . ¼ The display changes to the Playback mode by holding down the monitor button for a moment. 1/3 SELECT NO OFF YES NO SET OK Playback mode menu 1/3 screen 2. Press the OK/menu button. ¼ The card setup screen is set to "YES". 4. 29 í Erasing All Pictures (All-Frame Erase) The following operation...
... stored image data. Check that the lens barrier is closed and the camera is displayed. 5. Press the or arrow pad key to select / . ¼ The display changes to the Playback mode by holding down the monitor button for a moment. 1/3 SELECT NO OFF YES NO SET OK Playback mode menu 1/3 screen 2. Press the OK/menu button. ¼ The card setup screen is set to "YES". 4. 29 í Erasing All Pictures (All-Frame Erase) The following operation...
D-150/C-1 Zoom Basic Manual (2.5MB)
Page 35
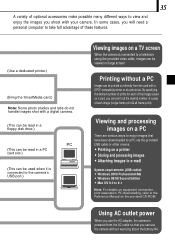
... on equipment connection, print reservation, PC downloading, refer to the Reference Manual on a card, you use the AC adapter, the camera is connected to take full advantage of each image (single-frame print & all-frame print). In some cases, you will need a personal computer to a television using the provided video cable, images can print out the desired number of copies of these features. (Use a dedicated printer.) (Bring the SmartMedia card.) Note: Some photo studios and...
... on equipment connection, print reservation, PC downloading, refer to the Reference Manual on a card, you use the AC adapter, the camera is connected to take full advantage of each image (single-frame print & all-frame print). In some cases, you will need a personal computer to a television using the provided video cable, images can print out the desired number of copies of these features. (Use a dedicated printer.) (Bring the SmartMedia card.) Note: Some photo studios and...


