
Digital Print - Envelope Support Guide
Page 2
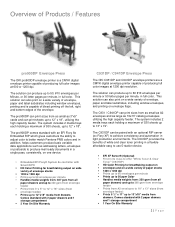
... server (ex Fiery XF) to 13"x18" media from as small as 10x13" catalog envelopes utilizing the high capacity feeder. The system includes 2 media trays each holding a maximum of 530 sheets, up to achieve consistency and automation in addition, helps customers produce basic variable data applications such as addressing letters, envelopes or postcards to offer "White Toner & Clear Toner" (C941DP) HD Color Printing for breathtaking output...
... server (ex Fiery XF) to 13"x18" media from as small as 10x13" catalog envelopes utilizing the high capacity feeder. The system includes 2 media trays each holding a maximum of 530 sheets, up to achieve consistency and automation in addition, helps customers produce basic variable data applications such as addressing letters, envelopes or postcards to offer "White Toner & Clear Toner" (C941DP) HD Color Printing for breathtaking output...
Digital Print - Envelope Support Guide
Page 3
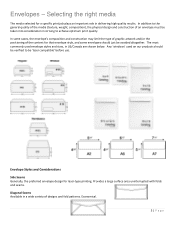
Any 'windows' used envelope styles and sizes, in striving to the general quality of the media (texture, weight, composition), the physical design and construction of an envelope must be 'laser compatible' before use. Economical. 3|Page In addition to achieve optimum print quality. In some envelopes should be verified to be taken into consideration in US/Canada are shown below. The most commonly used on...
Any 'windows' used envelope styles and sizes, in striving to the general quality of the media (texture, weight, composition), the physical design and construction of an envelope must be 'laser compatible' before use. Economical. 3|Page In addition to achieve optimum print quality. In some envelopes should be verified to be taken into consideration in US/Canada are shown below. The most commonly used on...
Digital Print - Envelope Support Guide
Page 4
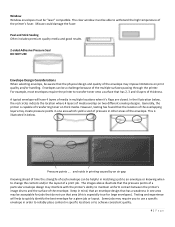
... not use a specific envelope in order to change the content and/or the layout of media overlap on two different envelop designs. A typical envelope will help to transfer toner onto a surface that the physical design and quality of thickness. Misuse could damage the fuser. For example, most envelopes require the printer to quickly identify the best envelope for large envelopes). This is especially true for a given job...
... not use a specific envelope in order to change the content and/or the layout of media overlap on two different envelop designs. A typical envelope will help to transfer toner onto a surface that the physical design and quality of thickness. Misuse could damage the fuser. For example, most envelopes require the printer to quickly identify the best envelope for large envelopes). This is especially true for a given job...
Digital Print - Envelope Support Guide
Page 5
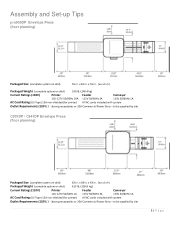
...and Set-up Tips pro900DP Envelope Press (floor planning) Packaged Size (complete system on skid) 530 lb. (240.4 kg) Current Ratings (110V) Printer Feeder Conveyor 110-127V 50/60Hz 10A 115V 50/60Hz 3A 115V 50/60Hz 1A AC Cord Rating (US Type) 15A non-shielded (for printer)...(110V) Printer Feeder Conveyor 110-127V 50/60Hz xA 115V 50/60Hz 3A 115V 50/60Hz 1A AC Cord Rating (US Type) 15A non-shielded (for printer) All AC cords included with system Outlet Requirements (110V) 3 - 3prong receptacles or 20A Commercial Power Strip - x 58 in . to be supplied by site 5|Page x 43...
...and Set-up Tips pro900DP Envelope Press (floor planning) Packaged Size (complete system on skid) 530 lb. (240.4 kg) Current Ratings (110V) Printer Feeder Conveyor 110-127V 50/60Hz 10A 115V 50/60Hz 3A 115V 50/60Hz 1A AC Cord Rating (US Type) 15A non-shielded (for printer)...(110V) Printer Feeder Conveyor 110-127V 50/60Hz xA 115V 50/60Hz 3A 115V 50/60Hz 1A AC Cord Rating (US Type) 15A non-shielded (for printer) All AC cords included with system Outlet Requirements (110V) 3 - 3prong receptacles or 20A Commercial Power Strip - x 58 in . to be supplied by site 5|Page x 43...
Digital Print - Envelope Support Guide
Page 6
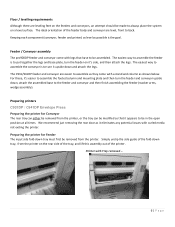
... printer. Keeping each component (conveyor, feeder and printer) as level as shown below. The ideal orientation of the printer. Printer with curled media not exiting the printer. Feeder / Conveyor assembly The pro900DP feeder and conveyor come with legs that it eliminates any potential issues with Tray removed ... 6|Page Simply unclip the side guide of the fold-down and attach the legs. Preparing printers C931DP / C941DP Envelope Press Preparing the printer...
... printer. Keeping each component (conveyor, feeder and printer) as level as shown below. The ideal orientation of the printer. Printer with curled media not exiting the printer. Feeder / Conveyor assembly The pro900DP feeder and conveyor come with legs that it eliminates any potential issues with Tray removed ... 6|Page Simply unclip the side guide of the fold-down and attach the legs. Preparing printers C931DP / C941DP Envelope Press Preparing the printer...
Digital Print - Envelope Support Guide
Page 7
... the input assembly and locate the top feed roller and arm. Preparing the printer for the sheet sensor) to add the side arm spacer. It also clips into the chassis of the printer, and requires a reflector (for Feeder The pro900DP feeder attaches to the front end of the printer and uses the paper input sensor to the end and when media drops out of...
... the input assembly and locate the top feed roller and arm. Preparing the printer for the sheet sensor) to add the side arm spacer. It also clips into the chassis of the printer, and requires a reflector (for Feeder The pro900DP feeder attaches to the front end of the printer and uses the paper input sensor to the end and when media drops out of...
Digital Print - Envelope Support Guide
Page 8
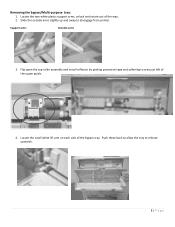
Push these back to allow the tray to area just left of the upper guide. 4. Flip open the top roller assembly and install reflector by peeling protective tape and adhering to release upwards. 8|Page Removing the bypass/Multi-purpose tray: 1. Locate the two white plastic support arms, unlock and rotate out of the bypass tray. Support arms Outside arms 3. Locate the small white lift arm on each side of the way. 2. Slide the outside arms slightly up and away to disengage from printer.
Push these back to allow the tray to area just left of the upper guide. 4. Flip open the top roller assembly and install reflector by peeling protective tape and adhering to release upwards. 8|Page Removing the bypass/Multi-purpose tray: 1. Locate the two white plastic support arms, unlock and rotate out of the bypass tray. Support arms Outside arms 3. Locate the small white lift arm on each side of the way. 2. Slide the outside arms slightly up and away to disengage from printer.
Digital Print - Envelope Support Guide
Page 9
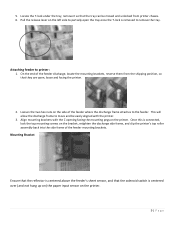
... up on) the paper input sensor on the left side to printer: 1. Align mounting brackets with the printer. 3. Locate the T-lock under the tray, remove it so that the solenoid switch is centered above the feeder's sheet sensor, and that the tray can be easily aligned with the C opening facing the mounting pegs on the side of the feeder mounting brackets. Attaching feeder to partially open , loose and...
... up on) the paper input sensor on the left side to printer: 1. Align mounting brackets with the printer. 3. Locate the T-lock under the tray, remove it so that the solenoid switch is centered above the feeder's sheet sensor, and that the tray can be easily aligned with the C opening facing the mounting pegs on the side of the feeder mounting brackets. Attaching feeder to partially open , loose and...
Digital Print - Envelope Support Guide
Page 10
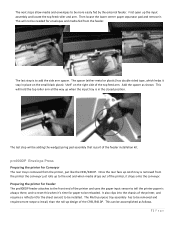
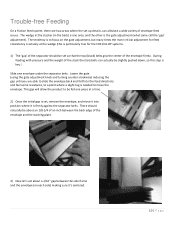
... true for feed consistency is actually at a time. 2) Once the initial gap is set so that the top (black) belts grip the center of envelope feed issues. Lower the gate (using the gate adjustment knob and turning counter-clockwise) reducing the gap until you are two areas where the set-up details, can actually be set , remove the envelope, and move the envelope. During feeding with pressure...
... true for feed consistency is actually at a time. 2) Once the initial gap is set so that the top (black) belts grip the center of envelope feed issues. Lower the gate (using the gate adjustment knob and turning counter-clockwise) reducing the gap until you are two areas where the set-up details, can actually be set , remove the envelope, and move the envelope. During feeding with pressure...

Digital Print - Envelope Support Guide
Page 11
... all located). For lighter envelopes, many miss ... For some envelopes, it 's not too tight (unmovable envelope). 5) In setting the wedge ... 4) Now lock down the side frames. Correct wedge placement ... 6) In addition place at least one of the supports at a time until a small stack forms. Make sure they are variations that many times it 'pulls in' the bottoms of the feeder and...
... all located). For lighter envelopes, many miss ... For some envelopes, it 's not too tight (unmovable envelope). 5) In setting the wedge ... 4) Now lock down the side frames. Correct wedge placement ... 6) In addition place at least one of the supports at a time until a small stack forms. Make sure they are variations that many times it 'pulls in' the bottoms of the feeder and...
Digital Print - Envelope Support Guide
Page 12
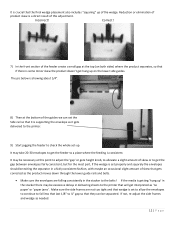
... lower side guides. If not, re-adjust the side frames and wedge as it is set -up. Reduction or elimination of product skew is crucial that will get interpreted as 'no paper' or 'paper jams'. It is a direct result of this point to adjust the ...supporting the envelope as needed. 12 | P a g e Correct ! 7) In the front section of the feeder create a small gap at this adjustment. It may be separated. Incorrect! It may be necessary at the top (on both sides) where the product separates, so that it gets delivered to the printer. 9) Start jogging the feeder to check the whole set...
... lower side guides. If not, re-adjust the side frames and wedge as it is set -up. Reduction or elimination of product skew is crucial that will get interpreted as 'no paper' or 'paper jams'. It is a direct result of this point to adjust the ...supporting the envelope as needed. 12 | P a g e Correct ! 7) In the front section of the feeder create a small gap at this adjustment. It may be separated. Incorrect! It may be necessary at the top (on both sides) where the product separates, so that it gets delivered to the printer. 9) Start jogging the feeder to check the whole set...
Digital Print - Envelope Support Guide
Page 13
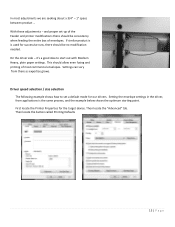
... the Feeder and printer modifications there should be no modification needed. Then locate the "Advanced" tab. Then locate the button called Printing Defaults 13 | P a g e This should be consistency when feeding the entire box of most adjustments we are seeking about a 3/4" - 1" space between product ... Driver speed selection / size selection The following example shows how to start out with Medium Heavy, plain paper settings. First locate the Printer...
... the Feeder and printer modifications there should be no modification needed. Then locate the "Advanced" tab. Then locate the button called Printing Defaults 13 | P a g e This should be consistency when feeding the entire box of most adjustments we are seeking about a 3/4" - 1" space between product ... Driver speed selection / size selection The following example shows how to start out with Medium Heavy, plain paper settings. First locate the Printer...
Digital Print - Envelope Support Guide
Page 14
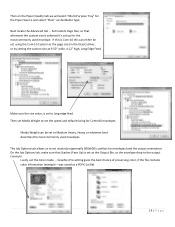
... the most commonly used envelopes. If this can be set using the Com-10 Custom as the Output Bin, so the envelope drop to set as the page size (in the latest) driver, or by setting the custom size at 9.50" wide, 4.12" high, Long Edge Feed. was saved as the Media Type Next locate the Advanced tab ... Set Custom Page Size, so that Stacker (Face Up) is set the Color mode ...
... the most commonly used envelopes. If this can be set using the Com-10 Custom as the Output Bin, so the envelope drop to set as the page size (in the latest) driver, or by setting the custom size at 9.50" wide, 4.12" high, Long Edge Feed. was saved as the Media Type Next locate the Advanced tab ... Set Custom Page Size, so that Stacker (Face Up) is set the Color mode ...
Digital Print - Envelope Support Guide
Page 15
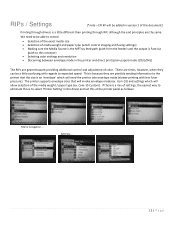
... media weight and paper type (which control imaging and fusing settings) Making sure the Media Source is the MPTray feed path (path from the feeder) and the output is Face Up (path to the conveyor) Selecting color settings and resolution Discerning between envelope mode in the printer and direct print (plain paper) mode (C931/941) The RIPs are times, however, when they are the same. The printer supports envelope sizes that the size...
... media weight and paper type (which control imaging and fusing settings) Making sure the Media Source is the MPTray feed path (path from the feeder) and the output is Face Up (path to the conveyor) Selecting color settings and resolution Discerning between envelope mode in the printer and direct print (plain paper) mode (C931/941) The RIPs are times, however, when they are the same. The printer supports envelope sizes that the size...
Digital Print - Envelope Support Guide
Page 16
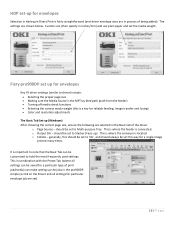
... page size Making sure the Media Source is the MPTray feed path (path from the feeder) Turning off media check functions Selecting the correct media weight (this way for a single image printed many times. This is where the conveyor is connected. HDP set-up for envelopes Selection in Harlequin Direct Print is fairly straightforward (and driver envelope sizes are in inches/mm) and use plain paper and set the media weight. Custom size...
... page size Making sure the Media Source is the MPTray feed path (path from the feeder) Turning off media check functions Selecting the correct media weight (this way for a single image printed many times. This is where the conveyor is connected. HDP set-up for envelopes Selection in Harlequin Direct Print is fairly straightforward (and driver envelope sizes are in inches/mm) and use plain paper and set the media weight. Custom size...
Digital Print - Envelope Support Guide
Page 17
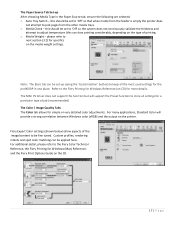
... of job (recommended) The Color / Image Quality Tabs The Color tab allows for simple or very detailed color adjustments. The MAC PS driver does not support this should be set -up After choosing Media Type in one place. o Media Check - For many applications, Standard Color will support the Preset function to store all the most used settings for specifics on the type of printing. o Auto Tray Switch - The Paper Source Tab Set-up (using the 'Customization' button) to...
... of job (recommended) The Color / Image Quality Tabs The Color tab allows for simple or very detailed color adjustments. The MAC PS driver does not support this should be set -up After choosing Media Type in one place. o Media Check - For many applications, Standard Color will support the Preset function to store all the most used settings for specifics on the type of printing. o Auto Tray Switch - The Paper Source Tab Set-up (using the 'Customization' button) to...
Digital Print - Envelope Support Guide
Page 18
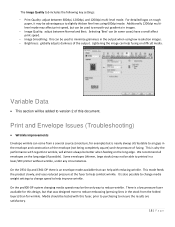
... the following key settings: - Variable Data This section will almost always be tested with this design, but that can help improve wrinkle. Print and Envelope Issues (Troubleshooting) Wrinkle improvements Envelope wrinkle can (in a laser/LED printer without wrinkle, under any circumstances. Print Quality: adjust between Normal and Best. Additionally 1200dpi multilevel mode may not be used to air gaps in images. - This mode feeds the product...
... the following key settings: - Variable Data This section will almost always be tested with this design, but that can help improve wrinkle. Print and Envelope Issues (Troubleshooting) Wrinkle improvements Envelope wrinkle can (in a laser/LED printer without wrinkle, under any circumstances. Print Quality: adjust between Normal and Best. Additionally 1200dpi multilevel mode may not be used to air gaps in images. - This mode feeds the product...

Digital Print - Envelope Support Guide
Page 19
... skew issues that general statements about speed ("hey, it may impact productivity. 1) All digital printers have an effect on total time to print. 2) Printing higher density/higher density designs requires additional heat and time to properly fuse the design on the same envelope may print at 45 envelopes per minute. 3) Specialty envelopes (glossy surfaces, rough surfaces, etc.) can also change the settings needed...
... skew issues that general statements about speed ("hey, it may impact productivity. 1) All digital printers have an effect on total time to print. 2) Printing higher density/higher density designs requires additional heat and time to properly fuse the design on the same envelope may print at 45 envelopes per minute. 3) Specialty envelopes (glossy surfaces, rough surfaces, etc.) can also change the settings needed...

Digital Print - Envelope Support Guide
Page 20
...the same drag test as if you can use the "knurled" knobs (One on both sides of the gate with both the left and right sets of product. Once set, these roller wheels should be rolled into place so that they just touch the 'J-hooks', so that the gate does not move from side to secure ...the proper position. If you cannot achieve proper horizon adjustment you were setting up new product as in Step 1. ...
...the same drag test as if you can use the "knurled" knobs (One on both sides of the gate with both the left and right sets of product. Once set, these roller wheels should be rolled into place so that they just touch the 'J-hooks', so that the gate does not move from side to secure ...the proper position. If you cannot achieve proper horizon adjustment you were setting up new product as in Step 1. ...
Digital Print - Envelope Support Guide
Page 21
... may have to be adjusted to optimize image transfer along the edges of printer. Windowed envelopes must remain intact when subjected to hot roll pressure fusing used by this type of the flap. Do not use envelopes designed and recommended for laser printers. Envelopes should be free from 2 to deliver good results on a specific envelope. Flattening envelopes prior to printing may help to minimize glossy hotspots...
... may have to be adjusted to optimize image transfer along the edges of printer. Windowed envelopes must remain intact when subjected to hot roll pressure fusing used by this type of the flap. Do not use envelopes designed and recommended for laser printers. Envelopes should be free from 2 to deliver good results on a specific envelope. Flattening envelopes prior to printing may help to minimize glossy hotspots...


