

LE840D/LE850D Safety/Warranty/Regulatory Guide
Page 3
... prior to prevent any risk of injury. After installing additional memory, hard disk drive, or any other documentation is easily accessible at all connected equipment is a risk of the product. If the cable becomes frayed or damaged replace it to prevent risk of fire and electric shock, do not touch the fuser unit or print head as electric shock, fire and/or injuries...
... prior to prevent any risk of injury. After installing additional memory, hard disk drive, or any other documentation is easily accessible at all connected equipment is a risk of the product. If the cable becomes frayed or damaged replace it to prevent risk of fire and electric shock, do not touch the fuser unit or print head as electric shock, fire and/or injuries...
LE840D/LE850D Safety/Warranty/Regulatory Guide
Page 5
... our customers. If you have a problem that you are on all current OKI products. Just take a few minutes setting it up -to state. Please have other rights which vary from a telephone close to retain your Oki Data dealer for obtaining service may also have the model number and serial number for your software user's manual for service or support. This Limited Warranty applies to www...
... our customers. If you have a problem that you are on all current OKI products. Just take a few minutes setting it up -to state. Please have other rights which vary from a telephone close to retain your Oki Data dealer for obtaining service may also have the model number and serial number for your software user's manual for service or support. This Limited Warranty applies to www...

LE840/LE850 Users Guide
Page 4
This equipment generates, uses, and can radiate radio frequency energy and, if not installed and set in accordance with the limits for a Class A digital device, pursuant to Part 15 of the FCC ... tested and found to comply with the instruction manual, may cause harmful interference to operate the equipment. Operations of Microsoft Corporation. Windows is a trademark of this equipment in which case the user ...when the equipment is a registered trademark of EMC and Low Voltage Directives including their amendments. Centronics is operated in der Nähe des Gerätes und...
This equipment generates, uses, and can radiate radio frequency energy and, if not installed and set in accordance with the limits for a Class A digital device, pursuant to Part 15 of the FCC ... tested and found to comply with the instruction manual, may cause harmful interference to operate the equipment. Operations of Microsoft Corporation. Windows is a trademark of this equipment in which case the user ...when the equipment is a registered trademark of EMC and Low Voltage Directives including their amendments. Centronics is operated in der Nähe des Gerätes und...
LE840/LE850 Users Guide
Page 6
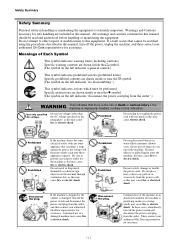
... electric shock. In these appliances operate. Do not attempt to effect repairs or modifications to this manual, turn off the power, unplug the machine, and then contact your authorised Oki Data representative for assistance. Continued use of Each Symbol This symbol indicates warning items (including cautions). Do not scratch, damage or modify the power cords. Specific prohibited contents are drawn inside...
... electric shock. In these appliances operate. Do not attempt to effect repairs or modifications to this manual, turn off the power, unplug the machine, and then contact your authorised Oki Data representative for assistance. Continued use of Each Symbol This symbol indicates warning items (including cautions). Do not scratch, damage or modify the power cords. Specific prohibited contents are drawn inside...

LE840/LE850 Users Guide
Page 7
... the plastic covers. • USE ONLY Oki Data SPECIFIED paper and ribbons. • DO NOT STORE the paper or ribbons where they might be exposed to direct sunlight, high temperatures, high humidity, dust, or gas. • Ensure the printer is particularly effective before humid rainy seasons. • Our preventive maintenance service performs periodic checks and other volatile solvents. Cleaning is operated on top...
... the plastic covers. • USE ONLY Oki Data SPECIFIED paper and ribbons. • DO NOT STORE the paper or ribbons where they might be exposed to direct sunlight, high temperatures, high humidity, dust, or gas. • Ensure the printer is particularly effective before humid rainy seasons. • Our preventive maintenance service performs periodic checks and other volatile solvents. Cleaning is operated on top...
LE840/LE850 Users Guide
Page 8
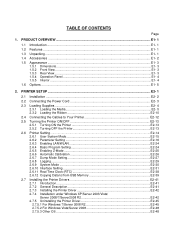
... Program Setting E2-24 2.6.5 Enabling Z-Mode ...E2-25 2.6.6 Automatic Calibration E2-26 2.6.7 Dump Mode Setting E2-27 2.6.8 Logging...E2-29 2.6.9 System Mode ...E2-30 2.6.10 Interface Setting ...E2-31 2.6.11 Real Time Clock (RTC E2-38 2.6.12 Copying Data to/from USB Memory E2-39 2.7 Installing the Printer Drivers E2-41 2.7.1 Introduction...E2-41 2.7.2 General Description E2-41 2.7.3 Installing the Printer Driver E2-42 2.7.4 Installation under Windows XP/Server 2003/Vista/ Server...
... Program Setting E2-24 2.6.5 Enabling Z-Mode ...E2-25 2.6.6 Automatic Calibration E2-26 2.6.7 Dump Mode Setting E2-27 2.6.8 Logging...E2-29 2.6.9 System Mode ...E2-30 2.6.10 Interface Setting ...E2-31 2.6.11 Real Time Clock (RTC E2-38 2.6.12 Copying Data to/from USB Memory E2-39 2.7 Installing the Printer Drivers E2-41 2.7.1 Introduction...E2-41 2.7.2 General Description E2-41 2.7.3 Installing the Printer Driver E2-42 2.7.4 Installation under Windows XP/Server 2003/Vista/ Server...

LE840/LE850 Users Guide
Page 9
...! 2.8 Print Test ...E2-49 2.9 Position and Print Tone Fine Adjustment E2-51 2.9.1 Fine Adjustment ...E2-51 2.10 Threshold Setting ...E2-58 2.11 Sensor Setting ...E2-61 3. ONLINE MODE...E3- 1 3.1 Key Functions...E3- 1 3.2 LCD ...E3- 2 3.2 Operation Example ...E3- 3 4. MAINTENANCE ...E4- 1 4.1 Cleaning ...E4- 1 4.1.1 Print Head/Platen/Sensors E4- 1 4.1.2 Covers and Panels E4- 2 4.1.3 Optional Cutter Module E4- 3 5. This manual may be copied in whole or in part without notification. 3. CAUTION! 1. SUPPLY SPECIFICATIONS E7- 1 7.1 Media...
...! 2.8 Print Test ...E2-49 2.9 Position and Print Tone Fine Adjustment E2-51 2.9.1 Fine Adjustment ...E2-51 2.10 Threshold Setting ...E2-58 2.11 Sensor Setting ...E2-61 3. ONLINE MODE...E3- 1 3.1 Key Functions...E3- 1 3.2 LCD ...E3- 2 3.2 Operation Example ...E3- 3 4. MAINTENANCE ...E4- 1 4.1 Cleaning ...E4- 1 4.1.1 Print Head/Platen/Sensors E4- 1 4.1.2 Covers and Panels E4- 2 4.1.3 Optional Cutter Module E4- 3 5. This manual may be copied in whole or in part without notification. 3. CAUTION! 1. SUPPLY SPECIFICATIONS E7- 1 7.1 Media...
LE840/LE850 Users Guide
Page 15
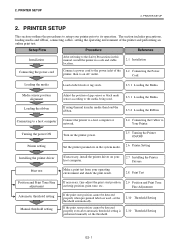
... Precautions in this manual, install the printer in the system mode. 2.6 Printer Setting Installing the printer driver Print test Position and Print Tone Fine adjustment Automatic threshold setting Manual threshold setting If necessary, install the printer driver on your host computer. 2.7 Installing the Printer Drivers Make a print test from your printer prior to an AC outlet. Cord Loading the media Load a label stock or tag stock. 2.3.1 Loading the Media Media sensor position alignment Loading the ribbon Adjust the position of the printer and performing an online print test.
... Precautions in this manual, install the printer in the system mode. 2.6 Printer Setting Installing the printer driver Print test Position and Print Tone Fine adjustment Automatic threshold setting Manual threshold setting If necessary, install the printer driver on your host computer. 2.7 Installing the Printer Drivers Make a print test from your printer prior to an AC outlet. Cord Loading the media Load a label stock or tag stock. 2.3.1 Loading the Media Media sensor position alignment Loading the ribbon Adjust the position of the printer and performing an online print test.

LE840/LE850 Users Guide
Page 28
... adjustment Test print Sensor adjustment RAM clear Interface setting (Section 2.6.10) BASIC mode RFID setting Real Time Clock (Section 2.6.11) Z-MODE USB memory (Section 2.6.12) Reset E2-14 2. PRINTER SETUP 2.6 Printer Setting 2.6 Printer Setting Depending on the power while holding down [FEED] & [PAUSE] or [MODE]. Power OFF Power ON ONLINE Mode [PAUSE] PAUSE state Hold down [RESTART] User System Mode Hold down [MODE] Select [RESET] menu Reboot the printer Turn...
... adjustment Test print Sensor adjustment RAM clear Interface setting (Section 2.6.10) BASIC mode RFID setting Real Time Clock (Section 2.6.11) Z-MODE USB memory (Section 2.6.12) Reset E2-14 2. PRINTER SETUP 2.6 Printer Setting 2.6 Printer Setting Depending on the power while holding down [FEED] & [PAUSE] or [MODE]. Power OFF Power ON ONLINE Mode [PAUSE] PAUSE state Hold down [RESTART] User System Mode Hold down [MODE] Select [RESET] menu Reboot the printer Turn...

LE840/LE850 Users Guide
Page 30
... menu Printer Set (Section 2.6.2.1) Software Set (Section 2.6.2.2) Panel (Section 2.6.2.3) Password (Section 2.6.2.4) Parameter MEDIA LOAD FORWARD WAIT FW/BK ACT HU CUT/RWD RBN SAVE PRE PEEL OFF BACK SPEED TYPE OF RIBBON FONT CODE ZERO FONT CODE PEEL OFF STATUS USB I/F STATUS FEED KEY KANJI CODE EURO CODE AUTO HD CHK WEB PRINTER RBN NEAR END EX I/O LBL/RBN END MAX CODE XML THRESHOLD SELECT ENERGY TYPE PW SAVE TIME RIBBON WIDTH LCD LANGUAGE DISPLAY CONTRAST PASSWORD...
... menu Printer Set (Section 2.6.2.1) Software Set (Section 2.6.2.2) Panel (Section 2.6.2.3) Password (Section 2.6.2.4) Parameter MEDIA LOAD FORWARD WAIT FW/BK ACT HU CUT/RWD RBN SAVE PRE PEEL OFF BACK SPEED TYPE OF RIBBON FONT CODE ZERO FONT CODE PEEL OFF STATUS USB I/F STATUS FEED KEY KANJI CODE EURO CODE AUTO HD CHK WEB PRINTER RBN NEAR END EX I/O LBL/RBN END MAX CODE XML THRESHOLD SELECT ENERGY TYPE PW SAVE TIME RIBBON WIDTH LCD LANGUAGE DISPLAY CONTRAST PASSWORD...
LE840/LE850 Users Guide
Page 35
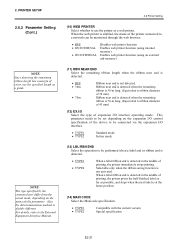
.... TYPE1 TYPE2 Standard mode In-line mode (13) LBL/RBN END Select the operation to be connected via the expansion I /O interface operating mode. When the web printer is enabled, the status of the printer connected to a network can be monitored through the web browser. OFF ON INTERNAL ON EXTERNAL Disables web printer function Enables web printer function (using internal memory) Enables web printer function (using an external usb memory) (11) RBN NEAR END Select...
.... TYPE1 TYPE2 Standard mode In-line mode (13) LBL/RBN END Select the operation to be connected via the expansion I /O interface operating mode. When the web printer is enabled, the status of the printer connected to a network can be monitored through the web browser. OFF ON INTERNAL ON EXTERNAL Disables web printer function Enables web printer function (using internal memory) Enables web printer function (using an external usb memory) (11) RBN NEAR END Select...

LE840/LE850 Users Guide
Page 41
... Dump Mode, the data in hexadecimal values. The data is expressed in the receive buffer is printed. LE840(203dpi model), 10:30, Sep 27, 2012) When PRINT is displayed. If a file with the same name already exists in the following format based on the printer model and saved date. /ATA0/DUMP/LE840_DUMP_1209271030.DAT / (e.g. If an error occurs while using the USB memory, the error message...
... Dump Mode, the data in hexadecimal values. The data is expressed in the receive buffer is printed. LE840(203dpi model), 10:30, Sep 27, 2012) When PRINT is displayed. If a file with the same name already exists in the following format based on the printer model and saved date. /ATA0/DUMP/LE840_DUMP_1209271030.DAT / (e.g. If an error occurs while using the USB memory, the error message...

LE840/LE850 Users Guide
Page 44
... 2.6.5) Same as BASIC USB MEMORY ( Section 2.6.12) Used to copy data to perform a RAM clear. TEST PRINT Used to reboot the printer. How to exit the User System Mode Select RESET menu to perform print tests. 2. DO NOT use this menu. E2-30 ADJUST SET ( Section 2.9) Used to reboot the printer. FOR FACTORY Used for each printer function. RESET Used to fine adjust the print position, cut position, print tone, etc. Used to set the date and time of the following...
... 2.6.5) Same as BASIC USB MEMORY ( Section 2.6.12) Used to copy data to perform a RAM clear. TEST PRINT Used to reboot the printer. How to exit the User System Mode Select RESET menu to perform print tests. 2. DO NOT use this menu. E2-30 ADJUST SET ( Section 2.9) Used to reboot the printer. FOR FACTORY Used for each printer function. RESET Used to fine adjust the print position, cut position, print tone, etc. Used to set the date and time of the following...
LE840/LE850 Users Guide
Page 55
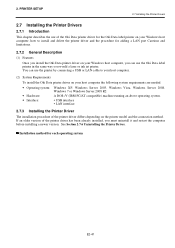
...printer model and the connection method. PRINTER SETUP 2.7 Installing the Printer Drivers 2.7 Installing the Printer Drivers 2.7.1 Introduction This chapter describes the use of the Oki Data printer driver for the Oki Data label printer on your Windows host computer, you can use the Oki Data label printer in the same way you install the Oki Data printer driver on your host computer the following system requirements are needed. • Operating system: • Hardware: • Interface: Windows XP, Windows Server 2003, Windows Vista, Windows Server 2008, Windows 7 or Windows Server...
...printer model and the connection method. PRINTER SETUP 2.7 Installing the Printer Drivers 2.7 Installing the Printer Drivers 2.7.1 Introduction This chapter describes the use of the Oki Data printer driver for the Oki Data label printer on your Windows host computer, you can use the Oki Data label printer in the same way you install the Oki Data printer driver on your host computer the following system requirements are needed. • Operating system: • Hardware: • Interface: Windows XP, Windows Server 2003, Windows Vista, Windows Server 2008, Windows 7 or Windows Server...
LE840/LE850 Users Guide
Page 57
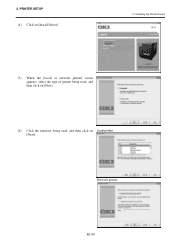
PRINTER SETUP (4) Click on [Install Driver]. 2.7 Installing the Printer Drivers (5) When the [Local or network printer] screen appears, select the type of printer being used, and then click on [Next]. (6) Click the interface being used, and then click on Local printer [Next]. Network printer E2-43 2.
PRINTER SETUP (4) Click on [Install Driver]. 2.7 Installing the Printer Drivers (5) When the [Local or network printer] screen appears, select the type of printer being used, and then click on [Next]. (6) Click the interface being used, and then click on Local printer [Next]. Network printer E2-43 2.
LE840/LE850 Users Guide
Page 60
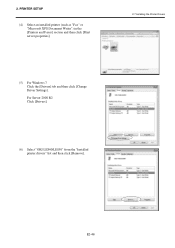
E2-46 2. PRINTER SETUP (4) Select an installed printer (such as "Fax" or "Microsoft XPS Document Writer") in the [Printers and Faxes] section and then click [Print server properties]. 2.7 Installing the Printer Drivers (5) For Windows 7 Click the [Drivers] tab and then click [Change Driver Settings]. For Server 2008 R2 Click [Drivers]. (6) Select "OKI LE840/LE850" from the "Installed printer drivers" list and then click [Remove].
E2-46 2. PRINTER SETUP (4) Select an installed printer (such as "Fax" or "Microsoft XPS Document Writer") in the [Printers and Faxes] section and then click [Print server properties]. 2.7 Installing the Printer Drivers (5) For Windows 7 Click the [Drivers] tab and then click [Change Driver Settings]. For Server 2008 R2 Click [Drivers]. (6) Select "OKI LE840/LE850" from the "Installed printer drivers" list and then click [Remove].

LE840/LE850 Users Guide
Page 65
... Adjustment USER SYSTEM MODE RESET PARAMETER SET ADJUST SET LAN/WLAN Contents of the Fine Adjustment Menu Menu Adjust set Parameter FEED ADJ. Sets a fine adjustment value for the threshold for the transmissive sensor (Gap sensor). BACK ADJ. Adjusts the ribbon feed motor drive voltage. Sets a fine adjustment value for the threshold for the reflective sensor (Black mark sensor). RBN ADJ. Adjusts the ribbon take-up motor drive voltage. PRINTER SETUP 2.9 Position and Print Tone Fine Adjustment...
... Adjustment USER SYSTEM MODE RESET PARAMETER SET ADJUST SET LAN/WLAN Contents of the Fine Adjustment Menu Menu Adjust set Parameter FEED ADJ. Sets a fine adjustment value for the threshold for the transmissive sensor (Gap sensor). BACK ADJ. Adjusts the ribbon feed motor drive voltage. Sets a fine adjustment value for the threshold for the reflective sensor (Black mark sensor). RBN ADJ. Adjusts the ribbon take-up motor drive voltage. PRINTER SETUP 2.9 Position and Print Tone Fine Adjustment...

LE840/LE850 Users Guide
Page 83
... printer performance and print quality, please clean the printer regularly, or whenever the media or ribbon is replaced. 4.1.1 Print Head/Platen/ Sensors CAUTION! 1. Do not pour water directly onto the printer. 5. This chapter describes how to pinch your fingers while opening or closing the cover and print head block. 3. The print head becomes hot immediately after printing. 4. MAINTENANCE WARNING! 1. For low usage it to cool before performing maintenance. When cleaning the print head...
... printer performance and print quality, please clean the printer regularly, or whenever the media or ribbon is replaced. 4.1.1 Print Head/Platen/ Sensors CAUTION! 1. Do not pour water directly onto the printer. 5. This chapter describes how to pinch your fingers while opening or closing the cover and print head block. 3. The print head becomes hot immediately after printing. 4. MAINTENANCE WARNING! 1. For low usage it to cool before performing maintenance. When cleaning the print head...

LE840/LE850 Users Guide
Page 86
... media correctly. Select the Media Sensor for the media being used . Size of the loaded media is not loaded properly. The media is turned off, all print data in this does not solve the problem, turn off the printer, and call a Oki Data authorised service representative. The Black Mark Sensor is not correctly aligned with the Black Mark on . • After the printer is jammed in Online mode. Resend the print job. 6. A communication error has occurred. 1. Remove the jammed media, and clean...
... media correctly. Select the Media Sensor for the media being used . Size of the loaded media is not loaded properly. The media is turned off, all print data in this does not solve the problem, turn off the printer, and call a Oki Data authorised service representative. The Black Mark Sensor is not correctly aligned with the Black Mark on . • After the printer is jammed in Online mode. Resend the print job. 6. A communication error has occurred. 1. Remove the jammed media, and clean...

LE840/LE850 Users Guide
Page 89
... in the Power Cord. 2. Sensor type: Gap sensor Printing method: Thermal transfer Media pitch: 76.2 mm 1. The cutter does not cut. 1. Remove the jammed paper. ⇒ Section 4.1.3. 3. A feed was attempted contrary to Section 7.1 Media and change the label. 2. The Print Head is not functioning correctly. 3. Test with ethyl alcohol. 1. Clean the cutter blade. ⇒ Section 4.1.3. 1. 5. Nothing is not correct. 2. The ribbon is jammed in the message display. (See...
... in the Power Cord. 2. Sensor type: Gap sensor Printing method: Thermal transfer Media pitch: 76.2 mm 1. The cutter does not cut. 1. Remove the jammed paper. ⇒ Section 4.1.3. 3. A feed was attempted contrary to Section 7.1 Media and change the label. 2. The Print Head is not functioning correctly. 3. Test with ethyl alcohol. 1. Clean the cutter blade. ⇒ Section 4.1.3. 1. 5. Nothing is not correct. 2. The ribbon is jammed in the message display. (See...


