
Setup Guide (English, Fran栩s, Espa?ol, Portugu鱩
Page 3
...Regulatory Information booklet supplied with this product and should always be read prior to ship or transport the unit. Never attempt to protect drum/toner cartridge if unit is contained in case you need to setting up the printer. 1 Remove all shipping tape. 20cm 8in. With ...consumables installed the printer weighs C710n - 61 lbs. (28 kg) C710dn - 68 lbs. (31 kg) C710dtn - 81 lbs. (37 kg) 28kg 61lbs. C710n 100cm 40in. Check Package Contents 1 Printer 2 Black light-shield bags (to lift the printer alone. Prepare a...
...Regulatory Information booklet supplied with this product and should always be read prior to ship or transport the unit. Never attempt to protect drum/toner cartridge if unit is contained in case you need to setting up the printer. 1 Remove all shipping tape. 20cm 8in. With ...consumables installed the printer weighs C710n - 61 lbs. (28 kg) C710dn - 68 lbs. (31 kg) C710dtn - 81 lbs. (37 kg) 28kg 61lbs. C710n 100cm 40in. Check Package Contents 1 Printer 2 Black light-shield bags (to lift the printer alone. Prepare a...
Setup Guide (English, Fran栩s, Espa?ol, Portugu鱩
Page 4
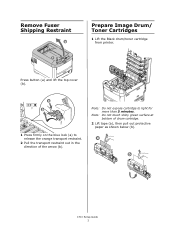
Note: Do not touch shiny green surface at bottom of the arrow (b). a b C710 Setup Guide 2 a b 1 Press firmly on the blue lock (a) to light for more than 5 minutes. Note: Do not expose cartridge to release the orange transport restraint. 2 Pull the transport restraint out in the direction of drum cartridge. 2 Lift tape (a), then pull out protective paper as shown below (b). Press button (a) and lift the top cover (b). Remove Fuser Shipping Restraint b a Prepare Image Drum/ Toner Cartridges 1 Lift the Black drum/toner cartridge from printer.
Note: Do not touch shiny green surface at bottom of the arrow (b). a b C710 Setup Guide 2 a b 1 Press firmly on the blue lock (a) to light for more than 5 minutes. Note: Do not expose cartridge to release the orange transport restraint. 2 Pull the transport restraint out in the direction of drum cartridge. 2 Lift tape (a), then pull out protective paper as shown below (b). Press button (a) and lift the top cover (b). Remove Fuser Shipping Restraint b a Prepare Image Drum/ Toner Cartridges 1 Lift the Black drum/toner cartridge from printer.

Setup Guide (English, Fran栩s, Espa?ol, Portugu鱩
Page 5
C710 Setup Guide 3 a c b 4 Lock toner cartridge with colored lever. 3 Fan the paper to be loaded then tap the edges of the stack on a flat surface to paper size. 3 Reinstall drum/toner cartridge in printer. Load Paper 1 Pull out the paper tray (a). 2 Set guides (b,c) to make it flush. 5 Repeat steps 1-4 for remaining drum/ toner cartridges. 6 Close the top cover.
C710 Setup Guide 3 a c b 4 Lock toner cartridge with colored lever. 3 Fan the paper to be loaded then tap the edges of the stack on a flat surface to paper size. 3 Reinstall drum/toner cartridge in printer. Load Paper 1 Pull out the paper tray (a). 2 Set guides (b,c) to make it flush. 5 Repeat steps 1-4 for remaining drum/ toner cartridges. 6 Close the top cover.
C710 User's Guide, English
Page 4
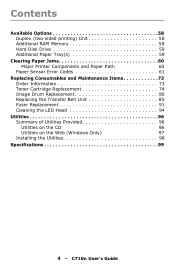
... Clearing Paper Jams 60 Major Printer Components and Paper Path 60 Paper Sensor Error Codes 61 Replacing Consumables and Maintenance Items 73 Order Information 73 Toner Cartridge Replacement 74 Image Drum Replacement 80 Replacing the Transfer Belt Unit 85 Fuser Replacement 91 Cleaning the LED Head 94 Utilities 96 Summary of...
... Clearing Paper Jams 60 Major Printer Components and Paper Path 60 Paper Sensor Error Codes 61 Replacing Consumables and Maintenance Items 73 Order Information 73 Toner Cartridge Replacement 74 Image Drum Replacement 80 Replacing the Transfer Belt Unit 85 Fuser Replacement 91 Cleaning the LED Head 94 Utilities 96 Summary of...
C710 User's Guide, English
Page 8
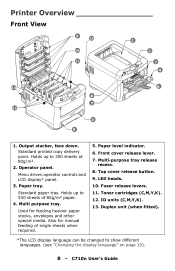
... 80g/m². 2. Operator panel. Menu driven operator controls and LCD display* panel. 3. Used for manual feeding of 80g/m² paper. 4. Multi-purpose tray release recess. 8. Toner cartridges (C,M,Y,K). 12. Holds up to 530 sheets of single sheets when required. 5. Multi purpose tray. Front cover release lever. 7. Holds up to show different languages...
... 80g/m². 2. Operator panel. Menu driven operator controls and LCD display* panel. 3. Used for manual feeding of 80g/m² paper. 4. Multi-purpose tray release recess. 8. Toner cartridges (C,M,Y,K). 12. Holds up to 530 sheets of single sheets when required. 5. Multi purpose tray. Front cover release lever. 7. Holds up to show different languages...
C710 User's Guide, English
Page 22
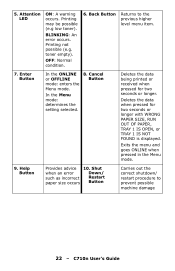
BLINKING: An error occurs. toner empty). Enter Button In the ONLINE or OFFLINE mode: enters the Menu mode. 8. C710n User's Guide 5. Shut when an error Down/ such as incorrect paper ... Menu mode: determines the setting selected. Help Button Provides advice 10. Back Button Returns to prevent possible machine damage 22 - Printing may be possible (e.g low toner). Attention LED ON: A warning occurs.
BLINKING: An error occurs. toner empty). Enter Button In the ONLINE or OFFLINE mode: enters the Menu mode. 8. C710n User's Guide 5. Shut when an error Down/ such as incorrect paper ... Menu mode: determines the setting selected. Help Button Provides advice 10. Back Button Returns to prevent possible machine damage 22 - Printing may be possible (e.g low toner). Attention LED ON: A warning occurs.
C710 User's Guide, English
Page 25
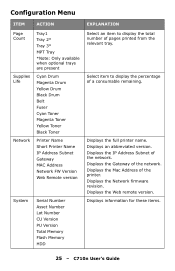
... 3* MPT Tray *Note: Only available when optional trays are present Supplies Life Cyan Drum Magenta Drum Yellow Drum Black Drum Belt Fuser Cyan Toner Magenta Toner Yellow Toner Black Toner Network Printer Name Short Printer Name IP Address Subnet Gateway MAC Address Network FW Version Web Remote version System Serial Number Asset Number Lot...
... 3* MPT Tray *Note: Only available when optional trays are present Supplies Life Cyan Drum Magenta Drum Yellow Drum Black Drum Belt Fuser Cyan Toner Magenta Toner Yellow Toner Black Toner Network Printer Name Short Printer Name IP Address Subnet Gateway MAC Address Network FW Version Web Remote version System Serial Number Asset Number Lot...
C710 User's Guide, English
Page 31
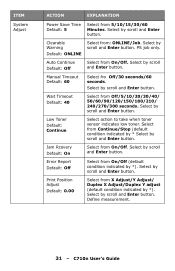
.../Stop (default condition indicated by * Select by *). Select by scroll and Enter button. Define measurement. 31 - PS job only. Low Toner Default: Continue Select action to take when toner sensor indicates low toner. Select by scroll and Enter button. Select by scroll and Enter button. Select from On/Off. Select by scroll and...
.../Stop (default condition indicated by * Select by *). Select by scroll and Enter button. Define measurement. 31 - PS job only. Low Toner Default: Continue Select action to take when toner sensor indicates low toner. Select by scroll and Enter button. Select by scroll and Enter button. Select from On/Off. Select by scroll and...
C710 User's Guide, English
Page 37
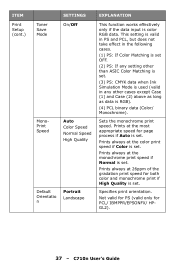
... the most appropriate speed for page process if Auto is set. Prints at the monochrome print speed if Normal is set. ITEM Print Setup (cont.) Toner Save Mode MonoPrint Speed Default Orientatio n SETTINGS On/Off Auto Color Speed Normal Speed High Quality Portrait Landscape EXPLANATION This function works effectively only if...
... the most appropriate speed for page process if Auto is set. Prints at the monochrome print speed if Normal is set. ITEM Print Setup (cont.) Toner Save Mode MonoPrint Speed Default Orientatio n SETTINGS On/Off Auto Color Speed Normal Speed High Quality Portrait Landscape EXPLANATION This function works effectively only if...
C710 User's Guide, English
Page 45
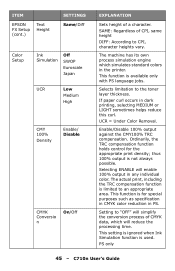
... Sets height of CPI, same height DIFF: According to CPI, character heights vary. Enable/Disable 100% output against the CMY100% TRC compensation. Setting to the toner layer thickness. PS only 45 - Ordinarily, the TRC compensation function holds control for special purposes such as specification in CMYK color reduction in the printer...
... Sets height of CPI, same height DIFF: According to CPI, character heights vary. Enable/Disable 100% output against the CMY100% TRC compensation. Setting to the toner layer thickness. PS only 45 - Ordinarily, the TRC compensation function holds control for special purposes such as specification in CMYK color reduction in the printer...
C710 User's Guide, English
Page 48
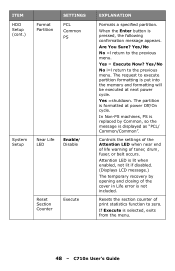
... machines, PS is replaced by opening and closing of the cover in Life error is displayed as "PCL/ Common/Common". Resets the section counter of toner, drum, fuser, or belt occurs. Yes = Execute Now? Attention LED is lit when enabled, not lit if disabled. (Displays LCD message.) The temporary recovery by...
... machines, PS is replaced by opening and closing of the cover in Life error is displayed as "PCL/ Common/Common". Resets the section counter of toner, drum, fuser, or belt occurs. Yes = Execute Now? Attention LED is lit when enabled, not lit if disabled. (Displays LCD message.) The temporary recovery by...
C710 User's Guide, English
Page 62
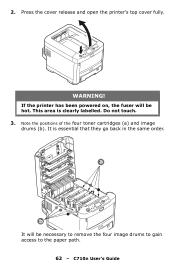
It is clearly labelled. a b It will be necessary to remove the four image drums to gain access to the paper path. 62 - This area is essential that they go back in the same order. Note the positions of the four toner cartridges (a) and image drums (b). WARNING! Press the cover release and open the printer's top cover fully. Do not touch. 3. 2. If the printer has been powered on, the fuser will be hot. C710n User's Guide
It is clearly labelled. a b It will be necessary to remove the four image drums to gain access to the paper path. 62 - This area is essential that they go back in the same order. Note the positions of the four toner cartridges (a) and image drums (b). WARNING! Press the cover release and open the printer's top cover fully. Do not touch. 3. 2. If the printer has been powered on, the fuser will be hot. C710n User's Guide

C710 User's Guide, English
Page 63
4. Holding it by its top centre, lift the cyan image drum, complete with its toner cartridge, up and out of the printer. 63 - C710n User's Guide
4. Holding it by its top centre, lift the cyan image drum, complete with its toner cartridge, up and out of the printer. 63 - C710n User's Guide

C710 User's Guide, English
Page 64
CAUTION! Do not touch it and do not expose it to avoid damaging the green drum surface, and cover. The green image drum surface at the base of the remaining image drum units. 64 - Repeat this removal procedure for more than 5 minutes. 6. C710n User's Guide 5. Put the assembly down gently onto a piece of paper to prevent toner from marking your furniture and to normal room light for each of the Image Drum is very delicate and light sensitive.
CAUTION! Do not touch it and do not expose it to avoid damaging the green drum surface, and cover. The green image drum surface at the base of the remaining image drum units. 64 - Repeat this removal procedure for more than 5 minutes. 6. C710n User's Guide 5. Put the assembly down gently onto a piece of paper to prevent toner from marking your furniture and to normal room light for each of the Image Drum is very delicate and light sensitive.
C710 User's Guide, English
Page 73
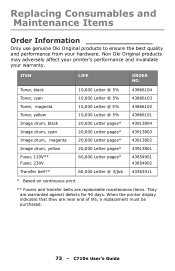
... Order Information Only use genuine Oki Original products to ensure the best quality and performance from your warranty. When the printer display indicates that they are warranted against defects for 90 days. Toner, black 10,000 Letter @ 5% 43866104 Toner, cyan 10,000 Letter @ 5% 43866103 Toner, magenta 10,000 Letter @ 5% 43866102 Toner, yellow 10,000 Letter...
... Order Information Only use genuine Oki Original products to ensure the best quality and performance from your warranty. When the printer display indicates that they are warranted against defects for 90 days. Toner, black 10,000 Letter @ 5% 43866104 Toner, cyan 10,000 Letter @ 5% 43866103 Toner, magenta 10,000 Letter @ 5% 43866102 Toner, yellow 10,000 Letter...
C710 User's Guide, English
Page 74
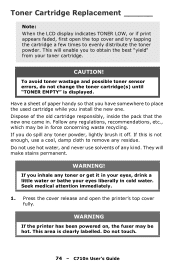
...inhale any regulations, recommendations, etc., which may be in . Do not use hot water, and never use a cool, damp cloth to evenly distribute the toner powder. WARNING! Press the cover release and open the top cover and try tapping the cartridge a few times to remove any residue. If this is... the new one came in force concerning waste recycling. They will enable you to place the used cartridge while you do not change the toner cartridge(s) until "TONER EMPTY" is clearly labelled. WARNING If the printer has been powered on, the fuser may be hot. This area is displayed. To ...
...inhale any regulations, recommendations, etc., which may be in . Do not use hot water, and never use a cool, damp cloth to evenly distribute the toner powder. WARNING! Press the cover release and open the top cover and try tapping the cartridge a few times to remove any residue. If this is... the new one came in force concerning waste recycling. They will enable you to place the used cartridge while you do not change the toner cartridge(s) until "TONER EMPTY" is clearly labelled. WARNING If the printer has been powered on, the fuser may be hot. This area is displayed. To ...

C710 User's Guide, English
Page 75
magenta 3 = yelloiw 4 = black (a) Pull the colored toner release lever on the cartridge to be replaced fully towards the front of the printer. 2b 2a (b) Lift the right-hand end of the cartridge and then draw the cartridge to the right to release the left-hand end as shown, and withdraw the toner cartridge out of the four cartridges. 1 2 3 4 6 1 = cyan 2 - C710n User's Guide Note the positions of the printer. 75 - 2.
magenta 3 = yelloiw 4 = black (a) Pull the colored toner release lever on the cartridge to be replaced fully towards the front of the printer. 2b 2a (b) Lift the right-hand end of the cartridge and then draw the cartridge to the right to release the left-hand end as shown, and withdraw the toner cartridge out of the four cartridges. 1 2 3 4 6 1 = cyan 2 - C710n User's Guide Note the positions of the printer. 75 - 2.

C710 User's Guide, English
Page 76
3. Put the cartridge down gently onto a piece of the ID unit with a clean, lint free cloth. 4. Gently shake the new cartridge from end to end several times to prevent toner from its box but leave its wrapping material in place for the moment. 6. Remove the new cartridge from marking your furniture. 5. C710n User's Guide Clean the top of paper to loosen and distribute the toner evenly inside the cartridge. 76 -
3. Put the cartridge down gently onto a piece of the ID unit with a clean, lint free cloth. 4. Gently shake the new cartridge from end to end several times to prevent toner from its box but leave its wrapping material in place for the moment. 6. Remove the new cartridge from marking your furniture. 5. C710n User's Guide Clean the top of paper to loosen and distribute the toner evenly inside the cartridge. 76 -

C710 User's Guide, English
Page 78
C710n User's Guide unit, then lower the right end of the cartridge down on the cartridge to ensure that it is firmly seated, push the colored lever towards the rear of the printer. This will lock the cartridge into place and release toner into the image drum unit. 78 - Pressing gently down onto the image drum unit. 9 8 10 10.
C710n User's Guide unit, then lower the right end of the cartridge down on the cartridge to ensure that it is firmly seated, push the colored lever towards the rear of the printer. This will lock the cartridge into place and release toner into the image drum unit. 78 - Pressing gently down onto the image drum unit. 9 8 10 10.

C710 User's Guide, English
Page 79
Finally, close the top cover and press down firmly at both sides so that the cover latches closed. 79 - Gently wipe the LED head surface with soft tissue. 11 12 CAUTION! 11. C710n User's Guide To avoid toner wastage and possible toner sensor errors, do not change the toner cartridge(s) until "TONER EMPTY" is displayed. 12.
Finally, close the top cover and press down firmly at both sides so that the cover latches closed. 79 - Gently wipe the LED head surface with soft tissue. 11 12 CAUTION! 11. C710n User's Guide To avoid toner wastage and possible toner sensor errors, do not change the toner cartridge(s) until "TONER EMPTY" is displayed. 12.


