
Setup Guide (English, Fran栩s, Espa?ol, Portugu鱩
Page 3
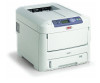
Check Package Contents 1 Printer 2 Black light-shield bags (to protect drum/toner cartridge if unit is inside the printer. Select a location for your packing ... transport the unit. With consumables installed the printer weighs C710n - 61 lbs. (28 kg) C710dn - 68 lbs. (31 kg) C710dtn - 81 lbs. (37 kg) 28kg 61lbs. Note: We recommend you keep your printer. 60cm 23in. 70cm 27in. 20cm 8in. .... Prepare a Location Note: Space requirements are approximate. Safety, Warranty, Regulatory Information booklet Note: Drum/Toner Cartridge is shipped) 3 Power Cable 4 CD-ROM 5 This Setup Guide;
Check Package Contents 1 Printer 2 Black light-shield bags (to protect drum/toner cartridge if unit is inside the printer. Select a location for your packing ... transport the unit. With consumables installed the printer weighs C710n - 61 lbs. (28 kg) C710dn - 68 lbs. (31 kg) C710dtn - 81 lbs. (37 kg) 28kg 61lbs. Note: We recommend you keep your printer. 60cm 23in. 70cm 27in. 20cm 8in. .... Prepare a Location Note: Space requirements are approximate. Safety, Warranty, Regulatory Information booklet Note: Drum/Toner Cartridge is shipped) 3 Power Cable 4 CD-ROM 5 This Setup Guide;
Setup Guide (English, Fran栩s, Espa?ol, Portugu鱩
Page 4
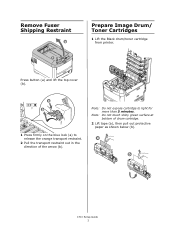
Note: Do not expose cartridge to release the orange transport restraint. 2 Pull the transport restraint out in the direction of drum cartridge. 2 Lift tape (a), then pull out protective paper as shown below (b). a b C710 Setup Guide 2 a b 1 Press firmly on the blue lock (a) to light for more than 5 minutes. Note: Do not touch shiny green surface at bottom of the arrow (b). Remove Fuser Shipping Restraint b a Prepare Image Drum/ Toner Cartridges 1 Lift the Black drum/toner cartridge from printer. Press button (a) and lift the top cover (b).
Note: Do not expose cartridge to release the orange transport restraint. 2 Pull the transport restraint out in the direction of drum cartridge. 2 Lift tape (a), then pull out protective paper as shown below (b). a b C710 Setup Guide 2 a b 1 Press firmly on the blue lock (a) to light for more than 5 minutes. Note: Do not touch shiny green surface at bottom of the arrow (b). Remove Fuser Shipping Restraint b a Prepare Image Drum/ Toner Cartridges 1 Lift the Black drum/toner cartridge from printer. Press button (a) and lift the top cover (b).

Setup Guide (English, Fran栩s, Espa?ol, Portugu鱩
Page 5
3 Reinstall drum/toner cartridge in printer. a c b 4 Lock toner cartridge with colored lever. 3 Fan the paper to be loaded then tap the edges of the stack on a flat surface to paper size. C710 Setup Guide 3 Load Paper 1 Pull out the paper tray (a). 2 Set guides (b,c) to make it flush. 5 Repeat steps 1-4 for remaining drum/ toner cartridges. 6 Close the top cover.
3 Reinstall drum/toner cartridge in printer. a c b 4 Lock toner cartridge with colored lever. 3 Fan the paper to be loaded then tap the edges of the stack on a flat surface to paper size. C710 Setup Guide 3 Load Paper 1 Pull out the paper tray (a). 2 Set guides (b,c) to make it flush. 5 Repeat steps 1-4 for remaining drum/ toner cartridges. 6 Close the top cover.
C710 User's Guide, English
Page 4
... Printer Components and Paper Path 60 Paper Sensor Error Codes 61 Replacing Consumables and Maintenance Items 73 Order Information 73 Toner Cartridge Replacement 74 Image Drum Replacement 80 Replacing the Transfer Belt Unit 85 Fuser Replacement 91 Cleaning the LED Head 94 Utilities 96 Summary of Utilities Provided 96 Utilities on...
... Printer Components and Paper Path 60 Paper Sensor Error Codes 61 Replacing Consumables and Maintenance Items 73 Order Information 73 Toner Cartridge Replacement 74 Image Drum Replacement 80 Replacing the Transfer Belt Unit 85 Fuser Replacement 91 Cleaning the LED Head 94 Utilities 96 Summary of Utilities Provided 96 Utilities on...
C710 User's Guide, English
Page 25
... name. Configuration Menu ITEM ACTION Page Count Tray1 Tray 2* Tray 3* MPT Tray *Note: Only available when optional trays are present Supplies Life Cyan Drum Magenta Drum Yellow Drum Black Drum Belt Fuser Cyan Toner Magenta Toner Yellow Toner Black Toner Network Printer Name Short Printer Name IP Address Subnet Gateway MAC Address Network FW...
... name. Configuration Menu ITEM ACTION Page Count Tray1 Tray 2* Tray 3* MPT Tray *Note: Only available when optional trays are present Supplies Life Cyan Drum Magenta Drum Yellow Drum Black Drum Belt Fuser Cyan Toner Magenta Toner Yellow Toner Black Toner Network Printer Name Short Printer Name IP Address Subnet Gateway MAC Address Network FW...

C710 User's Guide, English
Page 32
...:Off Sets whether to rotate the drum in idle prior to printing in the hexadecimal Dump. BG Setting +3/+2/+1/-1/-2/ -3 Default: 0 To correct variations in print density/frequency. Hex Dump Execute Prints out data ...
...:Off Sets whether to rotate the drum in idle prior to printing in the hexadecimal Dump. BG Setting +3/+2/+1/-1/-2/ -3 Default: 0 To correct variations in print density/frequency. Hex Dump Execute Prints out data ...
C710 User's Guide, English
Page 48
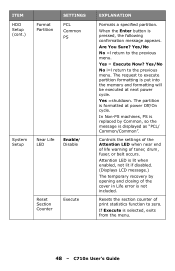
... Enter button is selected, exits from the menu. 48 - Are You Sure? Yes = Execute Now? The partition is replaced by opening and closing of toner, drum, fuser, or belt occurs. Resets the section counter of print statistics function to the previous menu. ITEM HDD Setup (cont.) Format Partition SETTINGS PCL Common...
... Enter button is selected, exits from the menu. 48 - Are You Sure? Yes = Execute Now? The partition is replaced by opening and closing of toner, drum, fuser, or belt occurs. Resets the section counter of print statistics function to the previous menu. ITEM HDD Setup (cont.) Format Partition SETTINGS PCL Common...
C710 User's Guide, English
Page 62
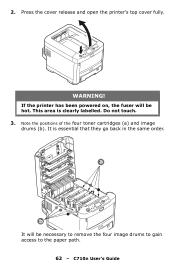
It is clearly labelled. C710n User's Guide This area is essential that they go back in the same order. Note the positions of the four toner cartridges (a) and image drums (b). a b It will be necessary to remove the four image drums to gain access to the paper path. 62 - If the printer has been powered on, the fuser will be hot. WARNING! Press the cover release and open the printer's top cover fully. Do not touch. 3. 2.
It is clearly labelled. C710n User's Guide This area is essential that they go back in the same order. Note the positions of the four toner cartridges (a) and image drums (b). a b It will be necessary to remove the four image drums to gain access to the paper path. 62 - If the printer has been powered on, the fuser will be hot. WARNING! Press the cover release and open the printer's top cover fully. Do not touch. 3. 2.

C710 User's Guide, English
Page 63
Holding it by its top centre, lift the cyan image drum, complete with its toner cartridge, up and out of the printer. 63 - 4. C710n User's Guide
Holding it by its top centre, lift the cyan image drum, complete with its toner cartridge, up and out of the printer. 63 - 4. C710n User's Guide

C710 User's Guide, English
Page 64
Do not touch it and do not expose it to avoid damaging the green drum surface, and cover. 5. Repeat this removal procedure for more than 5 minutes. 6. C710n User's Guide CAUTION! The green image drum surface at the base of the remaining image drum units. 64 - Put the assembly down gently onto a piece of paper to prevent toner from marking your furniture and to normal room light for each of the Image Drum is very delicate and light sensitive.
Do not touch it and do not expose it to avoid damaging the green drum surface, and cover. 5. Repeat this removal procedure for more than 5 minutes. 6. C710n User's Guide CAUTION! The green image drum surface at the base of the remaining image drum units. 64 - Put the assembly down gently onto a piece of paper to prevent toner from marking your furniture and to normal room light for each of the Image Drum is very delicate and light sensitive.

C710 User's Guide, English
Page 66
C710n User's Guide forwards into the internal drum cavity and withdraw the sheet. (b) To remove a sheet from the central area of the belt (2), carefully separate the sheet from the belt surface and withdraw the sheet. (c) To remove a sheet just entering the fuser (3), separate the trailing edge of the sheet from the belt, push the fuser pressure release lever (4) towards the front and down to release the fuser's grip on the sheet, and withdraw the 66 -
C710n User's Guide forwards into the internal drum cavity and withdraw the sheet. (b) To remove a sheet from the central area of the belt (2), carefully separate the sheet from the belt surface and withdraw the sheet. (c) To remove a sheet just entering the fuser (3), separate the trailing edge of the sheet from the belt, push the fuser pressure release lever (4) towards the front and down to release the fuser's grip on the sheet, and withdraw the 66 -
C710 User's Guide, English
Page 67
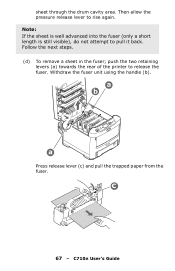
push the two retaining levers (a) towards the rear of the printer to rise again. Withdraw the fuser unit using the handle (b). Then allow the pressure release lever to release the fuser. c 67 - Note: If the sheet is well advanced into the fuser (only a short length is still visible), do not attempt to pull it back. C710n User's Guide sheet through the drum cavity area. a b a Press release lever (c) and pull the trapped paper from the fuser. Follow the next steps. (d) To remove a sheet in the fuser;
push the two retaining levers (a) towards the rear of the printer to rise again. Withdraw the fuser unit using the handle (b). Then allow the pressure release lever to release the fuser. c 67 - Note: If the sheet is well advanced into the fuser (only a short length is still visible), do not attempt to pull it back. C710n User's Guide sheet through the drum cavity area. a b a Press release lever (c) and pull the trapped paper from the fuser. Follow the next steps. (d) To remove a sheet in the fuser;
C710 User's Guide, English
Page 69
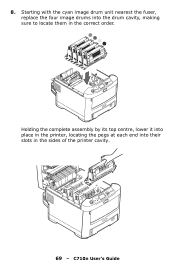
Holding the complete assembly by its top centre, lower it into place in the printer, locating the pegs at each end into the drum cavity, making sure to locate them in the sides of the printer cavity. 69 - 8. Starting with the cyan image drum unit nearest the fuser, replace the four image drums into their slots in the correct order. C710n User's Guide
Holding the complete assembly by its top centre, lower it into place in the printer, locating the pegs at each end into the drum cavity, making sure to locate them in the sides of the printer cavity. 69 - 8. Starting with the cyan image drum unit nearest the fuser, replace the four image drums into their slots in the correct order. C710n User's Guide

C710 User's Guide, English
Page 70
... for a sheet of paper in this case raise the top cover, reach around and press down to latch it closed yet. This will protect the drums from this area. 70 - 9. If you are not using the rear exit tray, close it is probably still gripped by the fuser. Lower the top...
... for a sheet of paper in this case raise the top cover, reach around and press down to latch it closed yet. This will protect the drums from this area. 70 - 9. If you are not using the rear exit tray, close it is probably still gripped by the fuser. Lower the top...
C710 User's Guide, English
Page 73
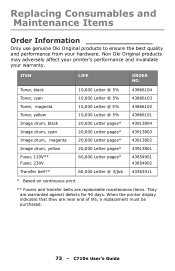
... Oki Original products may adversely affect your printer's performance and invalidate your hardware. Toner, black 10,000 Letter @ 5% 43866104 Toner, cyan 10,000 Letter @ 5% 43866103 Toner, magenta 10,000 Letter @ 5% 43866102 Toner, yellow 10,000 Letter @ 5% 43866101 Image drum, black Image drum,... cyan 20,000 Letter pages* 20,000 Letter pages* 43913804 43913803 Image drum, magenta 20,000 Letter pages* 43913802 Image drum, yellow 20,000 Letter pages* 43913801 Fuser, 120V** Fuser, 230V ...
... Oki Original products may adversely affect your printer's performance and invalidate your hardware. Toner, black 10,000 Letter @ 5% 43866104 Toner, cyan 10,000 Letter @ 5% 43866103 Toner, magenta 10,000 Letter @ 5% 43866102 Toner, yellow 10,000 Letter @ 5% 43866101 Image drum, black Image drum,... cyan 20,000 Letter pages* 20,000 Letter pages* 43913804 43913803 Image drum, magenta 20,000 Letter pages* 43913802 Image drum, yellow 20,000 Letter pages* 43913801 Fuser, 120V** Fuser, 230V ...

C710 User's Guide, English
Page 77
7. Holding the cartridge by its top centre with the colored lever to the right, lower it into the top of the cartridge. 8. C710n User's Guide Insert the left end of the cartridge into the printer over the image drum unit from the underside of the image drum unit first, pushing it against the spring on the drum 77 - Remove the wrapping material and peel off the adhesive tape from which the old cartridge was removed. 9.
7. Holding the cartridge by its top centre with the colored lever to the right, lower it into the top of the cartridge. 8. C710n User's Guide Insert the left end of the cartridge into the printer over the image drum unit from the underside of the image drum unit first, pushing it against the spring on the drum 77 - Remove the wrapping material and peel off the adhesive tape from which the old cartridge was removed. 9.

C710 User's Guide, English
Page 78
C710n User's Guide This will lock the cartridge into place and release toner into the image drum unit. 78 - Pressing gently down on the cartridge to ensure that it is firmly seated, push the colored lever towards the rear of the cartridge down onto the image drum unit. 9 8 10 10. unit, then lower the right end of the printer.
C710n User's Guide This will lock the cartridge into place and release toner into the image drum unit. 78 - Pressing gently down on the cartridge to ensure that it is firmly seated, push the colored lever towards the rear of the cartridge down onto the image drum unit. 9 8 10 10. unit, then lower the right end of the printer.

C710 User's Guide, English
Page 80
This area is clearly labelled. If the printer has been powered on, the fuser will be hot. WARNING! Press the cover release and open the printer's top cover fully. C710n User's Guide The printer contains four image drums: cyan, magenta, yellow and black. 1. Static sensitive devices, handle with care. Do not touch. 80 - Image Drum Replacement. ________ CAUTION!
This area is clearly labelled. If the printer has been powered on, the fuser will be hot. WARNING! Press the cover release and open the printer's top cover fully. C710n User's Guide The printer contains four image drums: cyan, magenta, yellow and black. 1. Static sensitive devices, handle with care. Do not touch. 80 - Image Drum Replacement. ________ CAUTION!

C710 User's Guide, English
Page 81
Note the positions of the four toner cartridges (a) and image drums (b). a b 81 - It is essential that they go back in the same order. C710n User's Guide 2.
Note the positions of the four toner cartridges (a) and image drums (b). a b 81 - It is essential that they go back in the same order. C710n User's Guide 2.

C710 User's Guide, English
Page 82
... at the base of the printer. 4. 3. CAUTION! If the drum unit needs to keep it away from marking your furniture and to direct sunlight or very bright room lighting. 82 - Never expose the drum to avoid damaging the green drum surface. Do not touch it and do not expose it by its top... centre, lift the image drum, complete with its toner cartridge, up and out of the ID unit is very...
... at the base of the printer. 4. 3. CAUTION! If the drum unit needs to keep it away from marking your furniture and to direct sunlight or very bright room lighting. 82 - Never expose the drum to avoid damaging the green drum surface. Do not touch it and do not expose it by its top... centre, lift the image drum, complete with its toner cartridge, up and out of the ID unit is very...


