
C330/C530 Safety Warranty Regulatory Guide
Page 3
... fire or electric shock. Clean using an extension cable or power strip ensure that you may receive burns. Do not throw toner cartridges or image drum cartridges into the ventilation holes or operate this product with this product is already supplied with your product's rating label on the product that are...
... fire or electric shock. Clean using an extension cable or power strip ensure that you may receive burns. Do not throw toner cartridges or image drum cartridges into the ventilation holes or operate this product with this product is already supplied with your product's rating label on the product that are...

C330/C530 Safety Warranty Regulatory Guide
Page 4
... not apply to abuse, misuse, misapplication, accident, improper storage, or installation, an unsuitable physical operating environment, or as toner cartridges, image drums, ribbon cartridges, fuses, etc. Limited Warranty, US and Canada U.S. THERE ARE NO EXPRESS WARRANTIES OTHER THAN THOSE ON THE FACE HEREOF AND... you via overnight carrier. If they determine that your receipt of the customer when the returned machine has been picked up by Oki Data's designated carrier. Overnight Exchange of the printer for service under this C330/C530 (hereinafter "the Product") to be returned ...
... not apply to abuse, misuse, misapplication, accident, improper storage, or installation, an unsuitable physical operating environment, or as toner cartridges, image drums, ribbon cartridges, fuses, etc. Limited Warranty, US and Canada U.S. THERE ARE NO EXPRESS WARRANTIES OTHER THAN THOSE ON THE FACE HEREOF AND... you via overnight carrier. If they determine that your receipt of the customer when the returned machine has been picked up by Oki Data's designated carrier. Overnight Exchange of the printer for service under this C330/C530 (hereinafter "the Product") to be returned ...

Safety Warranty Manual
Page 3
.... There is a risk of explosion if the battery is a risk of direct sunlight to fire or electric shock. Do not throw toner cartridges or image drum cartridges into the ventilation holes or operate this product is adequate ventilation all necessary precautions to prevent overheating and any risk of the product. If...
.... There is a risk of explosion if the battery is a risk of direct sunlight to fire or electric shock. Do not throw toner cartridges or image drum cartridges into the ventilation holes or operate this product is adequate ventilation all necessary precautions to prevent overheating and any risk of the product. If...

Safety Warranty Manual
Page 4
... same or its functional equivalent, at no later than an authorized Oki Data service center. The Product to abuse, misuse, misapplication, accident, improper storage, or installation, an unsuitable physical operating environment, or as toner cartridges, image drums, ribbon cartridges, fuses, etc. To make a request or claim...customer when the returned machine has been picked up by any such defect according to you ship the Product, remove the image drums and toner cartridges to prevent damage to the Product during shipment: failure to do not allow the exclusion or limitation of ...
... same or its functional equivalent, at no later than an authorized Oki Data service center. The Product to abuse, misuse, misapplication, accident, improper storage, or installation, an unsuitable physical operating environment, or as toner cartridges, image drums, ribbon cartridges, fuses, etc. To make a request or claim...customer when the returned machine has been picked up by any such defect according to you ship the Product, remove the image drums and toner cartridges to prevent damage to the Product during shipment: failure to do not allow the exclusion or limitation of ...
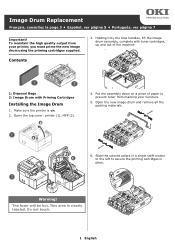
Image Drum Replacement Instructions (English, Fran栩s, Espa?ol, Poetugu鱩
Page 1
... la page 3 • Español, ver página 5 • Português, ver página 7 Important! Open the new image drum and remove all the packing materials. The fuser will be hot. Make sure the printer is clearly labeled. Holding it by the blue handles, lift ...the image drum assembly, complete with toner cartridges, up and out of paper to secure the priming cartridges in a place. b a 4. Slide the colored collars in...
... la page 3 • Español, ver página 5 • Português, ver página 7 Important! Open the new image drum and remove all the packing materials. The fuser will be hot. Make sure the printer is clearly labeled. Holding it by the blue handles, lift ...the image drum assembly, complete with toner cartridges, up and out of paper to secure the priming cartridges in a place. b a 4. Slide the colored collars in...
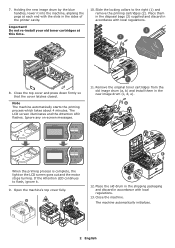
Image Drum Replacement Instructions (English, Fran栩s, Espa?ol, Poetugu鱩
Page 2
... the LCD screen goes out and the motor stops turning. b a c a b c 12. 7. Remove the original toner cartridges from the old image drum (a, b) and install them in the disposal bags (3) supplied and discard in accordance with local regulations. 13. Close the machine. If the Attention LED continues...Close the top cover and press down firmly so that the cover latches closed. Place the old drum in the shipping packaging and discard in accordance with the slots in the new image drum (c, d, e). Slide the locking collars to flash, ignore it into the machine, aligning the ...
... the LCD screen goes out and the motor stops turning. b a c a b c 12. 7. Remove the original toner cartridges from the old image drum (a, b) and install them in the disposal bags (3) supplied and discard in accordance with local regulations. 13. Close the machine. If the Attention LED continues...Close the top cover and press down firmly so that the cover latches closed. Place the old drum in the shipping packaging and discard in accordance with the slots in the new image drum (c, d, e). Slide the locking collars to flash, ignore it into the machine, aligning the ...
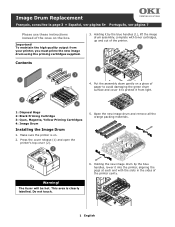
Image Drum Replacement: Priming Cartridges Separate
Page 1
...and open the printer's top cover (2). 5. The fuser will be hot. Do not touch. 6. Holding the new image drum by the blue handles (1), lift the image drum assembly, complete with the slots in the sides of the ones on the box. Make sure the printer is clearly labelled... página 5• Português, ver página 7 Please use these instructions instead of the printer cavity. 1 English Open the new image drum and remove all the orange packing materials. To maintain the high quality output from light. 1: Disposal Bags 2: Black Priming Cartridge 3: Cyan, Magenta, Yellow...
...and open the printer's top cover (2). 5. The fuser will be hot. Do not touch. 6. Holding the new image drum by the blue handles (1), lift the image drum assembly, complete with the slots in the sides of the ones on the box. Make sure the printer is clearly labelled... página 5• Português, ver página 7 Please use these instructions instead of the printer cavity. 1 English Open the new image drum and remove all the orange packing materials. To maintain the high quality output from light. 1: Disposal Bags 2: Black Priming Cartridge 3: Cyan, Magenta, Yellow...
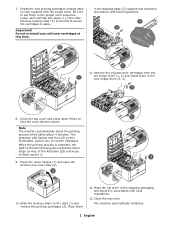
Image Drum Replacement: Priming Cartridges Separate
Page 2
... supplied and discard in accordance with local regulations. 13. Remove the original toner cartridges from the old image drum (1, 2) and install them c 12. a 8. Place them in the new image drum (3, 4). Install the new priming cartridges (orange label on the LCD screen goes out and the motor stops... that the cover latches closed. The Attention LED flashes and the LCD screen illuminates. Place the old drum in the shipping packaging and discard in accordance with the image drum. Be sure to the right (1) and remove the priming cartridges (2). Ignore any on-screen messages. ...
... supplied and discard in accordance with local regulations. 13. Remove the original toner cartridges from the old image drum (1, 2) and install them c 12. a 8. Place them in the new image drum (3, 4). Install the new priming cartridges (orange label on the LCD screen goes out and the motor stops... that the cover latches closed. The Attention LED flashes and the LCD screen illuminates. Place the old drum in the shipping packaging and discard in accordance with the image drum. Be sure to the right (1) and remove the priming cartridges (2). Ignore any on-screen messages. ...


