C330/C530 Software Setup Guide (English, Fran栩s, Espa?ol, Portugu鱩
Page 3
... the network Configuration Sheets.) 3 Click on a tab to set up the printer on the Oki web site. Test the Printer Driver Installation To make sure the printer driver is currently available only on your language. 3 Accept the license agreement. 4 Click Install Driver. 5 Select network printer. 6 Click Next to install and follow the instructions. Using a Web...
... the network Configuration Sheets.) 3 Click on a tab to set up the printer on the Oki web site. Test the Printer Driver Installation To make sure the printer driver is currently available only on your language. 3 Accept the license agreement. 4 Click Install Driver. 5 Select network printer. 6 Click Next to install and follow the instructions. Using a Web...

C330/C530 Software Setup Guide (English, Fran栩s, Espa?ol, Portugu鱩
Page 4
...'s Guide. 3 Follow the on the printer. 1 Click Start > Control Panel > Printers. 2 Right click the OKI C330/C530 icon. 3 Click Properties. 4 Click the Installable Options tab. 5 Select Two-Way Communications. 6 Type the IP address or DNS name. 7 To display the printer's current default setting when opened, select ...OkiData > C330/C530 User Guide. To Configure PostScript and PCL Options Manually 1 Click Start > Control Panel > Printers on the Windows task bar. 2 Right-click the printer icon and choose Properties. 3 Click on the Installable Options tab in the PS driver or the Device Options tab ...
...'s Guide. 3 Follow the on the printer. 1 Click Start > Control Panel > Printers. 2 Right click the OKI C330/C530 icon. 3 Click Properties. 4 Click the Installable Options tab. 5 Select Two-Way Communications. 6 Type the IP address or DNS name. 7 To display the printer's current default setting when opened, select ...OkiData > C330/C530 User Guide. To Configure PostScript and PCL Options Manually 1 Click Start > Control Panel > Printers on the Windows task bar. 2 Right-click the printer icon and choose Properties. 3 Click on the Installable Options tab in the PS driver or the Device Options tab ...

C330/C530 Software Setup Guide (English, Fran栩s, Espa?ol, Portugu鱩
Page 5
...to view the manuals. 1 Insert the CD into your operating system. 7 Select the driver installer. 8 Follow the on-screen instructions. Click Add. 2 Click More Printers. 3 Select USB, TCP/IP, or Rendezvous/Bonjour from the CD installer menu bar. 2 Click Install User's Guide. 3 Follow the on-screen instructions to the...cable to the USB port on the computer, then to install. Note: To view without installing, double-click the file on the com- Add the Printer 1 Run the Print Center, or Print Setup Utility, or Print & Fax. To load: drag the .pdf file to install and follow the instructions....
...to view the manuals. 1 Insert the CD into your operating system. 7 Select the driver installer. 8 Follow the on-screen instructions. Click Add. 2 Click More Printers. 3 Select USB, TCP/IP, or Rendezvous/Bonjour from the CD installer menu bar. 2 Click Install User's Guide. 3 Follow the on-screen instructions to the...cable to the USB port on the computer, then to install. Note: To view without installing, double-click the file on the com- Add the Printer 1 Run the Print Center, or Print Setup Utility, or Print & Fax. To load: drag the .pdf file to install and follow the instructions....
C330/C530 Software Setup Guide (English, Fran栩s, Espa?ol, Portugu鱩
Page 6
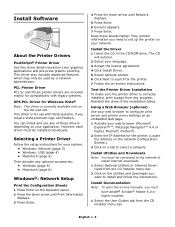
...Apply Changes to activate the current settings. English • 6 Activate Optional Accessories Windows If your printer has an optional second paper tray, or duplex unit, you must open the printer driver and activate the device (note that some networked computers will automatically detect accessories). 1 Open...PCL driver select the appropriate check box in the Printer List. 4 With the printer selected, click the "Printer Setup..." Macintosh If your printer has an optional second paper tray, or duplex unit, you must open the printer driver and activate the device (note that some ...
...Apply Changes to activate the current settings. English • 6 Activate Optional Accessories Windows If your printer has an optional second paper tray, or duplex unit, you must open the printer driver and activate the device (note that some networked computers will automatically detect accessories). 1 Open...PCL driver select the appropriate check box in the Printer List. 4 With the printer selected, click the "Printer Setup..." Macintosh If your printer has an optional second paper tray, or duplex unit, you must open the printer driver and activate the device (note that some ...

C330/C530 Safety Warranty Regulatory Guide
Page 4
... FOR A PARTICULAR PURPOSE. 4 - This Limited Warranty only extends to take advantage of the warranted item. Overnight Exchange US and Canada Only Oki Data offers Overnight Exchange of the exchange product: failure to do not allow limitations on a parts only basis at its representative. This Limited...and toner cartridges to prevent damage to the Product during shipment: failure to do not allow the exclusion or limitation of purchase. The exchange printer will try to the Product. A written receipt for the Product, showing the date of purchase, dealer's name, and both the model...
... FOR A PARTICULAR PURPOSE. 4 - This Limited Warranty only extends to take advantage of the warranted item. Overnight Exchange US and Canada Only Oki Data offers Overnight Exchange of the exchange product: failure to do not allow limitations on a parts only basis at its representative. This Limited...and toner cartridges to prevent damage to the Product during shipment: failure to do not allow the exclusion or limitation of purchase. The exchange printer will try to the Product. A written receipt for the Product, showing the date of purchase, dealer's name, and both the model...
C330/C530/C610/C711 DIMM Install Sheet
Page 3
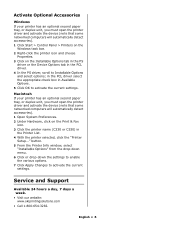
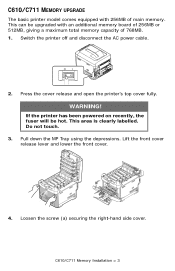
... (a) securing the right-hand side cover. Press the cover release and open the printer's top cover fully. WARNING! If the printer has been powered on recently, the fuser will be upgraded with 256MB of 768MB. 1. Switch the printer off and disconnect the AC power cable. C610/C711 Memory Installation > 3 Do... not touch. 3. C610/C711 MEMORY UPGRADE The basic printer model comes equipped with an additional memory board of 256MB or 512MB, giving a maximum total memory capacity of main memory. Pull down ...
... (a) securing the right-hand side cover. Press the cover release and open the printer's top cover fully. WARNING! If the printer has been powered on recently, the fuser will be upgraded with 256MB of 768MB. 1. Switch the printer off and disconnect the AC power cable. C610/C711 Memory Installation > 3 Do... not touch. 3. C610/C711 MEMORY UPGRADE The basic printer model comes equipped with an additional memory board of 256MB or 512MB, giving a maximum total memory capacity of main memory. Pull down ...
C330/C530/C610/C711 DIMM Install Sheet
Page 4
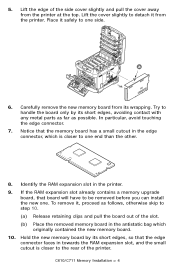
...expansion slot already contains a memory upgrade board, that board will have to one end than the other. 8. Carefully remove the new memory board from the printer at the top. a 6. C610/C711 Memory Installation > 4 Lift the edge of the side cover slightly and pull the cover away from its short ...edges, so that the memory board has a small cutout in the printer. 9. To remove it from the printer. Try to step 10. (a) Release retaining clips and pull the board out of the printer. Hold the new memory board by its short edges, avoiding contact with any metal ...
...expansion slot already contains a memory upgrade board, that board will have to one end than the other. 8. Carefully remove the new memory board from the printer at the top. a 6. C610/C711 Memory Installation > 4 Lift the edge of the side cover slightly and pull the cover away from its short ...edges, so that the memory board has a small cutout in the printer. 9. To remove it from the printer. Try to step 10. (a) Release retaining clips and pull the board out of the printer. Hold the new memory board by its short edges, avoiding contact with any metal ...
C330/C530/C610/C711 DIMM Install Sheet
Page 5
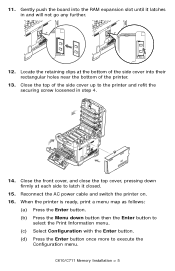
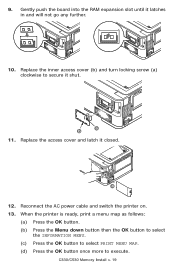
...retaining clips at each side to execute the Configuration menu. C610/C711 Memory Installation > 5 Close the top of the printer. 13. Reconnect the AC power cable and switch the printer on. 16. When the printer is ready, print a menu map as follows: (a) Press the Enter button. (b) Press the Menu down firmly ...RAM expansion slot until it closed. 15. Gently push the board into their rectangular holes near the bottom of the side cover up to the printer and refit the securing screw loosened in and will not go any further. 12. Close the front cover, and close the top cover, ...
...retaining clips at each side to execute the Configuration menu. C610/C711 Memory Installation > 5 Close the top of the printer. 13. Reconnect the AC power cable and switch the printer on. 16. When the printer is ready, print a menu map as follows: (a) Press the Enter button. (b) Press the Menu down firmly ...RAM expansion slot until it closed. 15. Gently push the board into their rectangular holes near the bottom of the side cover up to the printer and refit the securing screw loosened in and will not go any further. 12. Close the front cover, and close the top cover, ...

C330/C530/C610/C711 DIMM Install Sheet
Page 6
(e) When the Configuration map is printed, press On Line to exit the menu system. 17. C610/C711 Memory Installation > 6 Near the top of the menu map. This list contains the figure for total memory size. Examine the first page of the page, between the two horizontal lines, you will see the current printer configuration. This should indicate the total memory now installed.
(e) When the Configuration map is printed, press On Line to exit the menu system. 17. C610/C711 Memory Installation > 6 Near the top of the menu map. This list contains the figure for total memory size. Examine the first page of the page, between the two horizontal lines, you will see the current printer configuration. This should indicate the total memory now installed.
C330/C530/C610/C711 DIMM Install Sheet
Page 17
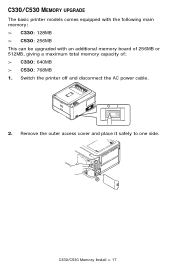
C330/C530 MEMORY UPGRADE The basic printer models comes equipped with the following main memory: > C330: 128MB > C530: 256MB This can be upgraded with an additional memory board of 256MB or 512MB, giving a maximum total memory capacity of: > C330: 640MB > C530: 768MB 1. Switch the printer off and disconnect the AC power cable. 2. Remove the outer access cover and place it safely to one side. a b C330/C530 Memory Install > 17
C330/C530 MEMORY UPGRADE The basic printer models comes equipped with the following main memory: > C330: 128MB > C530: 256MB This can be upgraded with an additional memory board of 256MB or 512MB, giving a maximum total memory capacity of: > C330: 640MB > C530: 768MB 1. Switch the printer off and disconnect the AC power cable. 2. Remove the outer access cover and place it safely to one side. a b C330/C530 Memory Install > 17
C330/C530/C610/C711 DIMM Install Sheet
Page 18
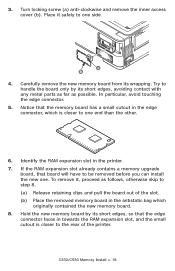
... edge connector. 5. Place it , proceed as possible. C330/C530 Memory Install > 18 Notice that the memory board has a small cutout in the printer. 7. Identify the RAM expansion slot in the edge connector, which originally contained the new memory board. 8. Carefully remove the new memory board from its...contact with any metal parts as far as follows, otherwise skip to step 8. (a) Release retaining clips and pull the board out of the printer. If the RAM expansion slot already contains a memory upgrade board, that the edge connector faces in the antistatic bag which is closer to ...
... edge connector. 5. Place it , proceed as possible. C330/C530 Memory Install > 18 Notice that the memory board has a small cutout in the printer. 7. Identify the RAM expansion slot in the edge connector, which originally contained the new memory board. 8. Carefully remove the new memory board from its...contact with any metal parts as far as follows, otherwise skip to step 8. (a) Release retaining clips and pull the board out of the printer. If the RAM expansion slot already contains a memory upgrade board, that the edge connector faces in the antistatic bag which is closer to ...
C330/C530/C610/C711 DIMM Install Sheet
Page 19
... to execute. a b 11. b a 12. Replace the access cover and latch it shut. Reconnect the AC power cable and switch the printer on. 13. C330/C530 Memory Install > 19 When the printer is ready, print a menu map as follows: (a) Press the OK button. (b) Press the Menu down button then the OK button to...
... to execute. a b 11. b a 12. Replace the access cover and latch it shut. Reconnect the AC power cable and switch the printer on. 13. C330/C530 Memory Install > 19 When the printer is ready, print a menu map as follows: (a) Press the OK button. (b) Press the Menu down button then the OK button to...

Safety Warranty Manual
Page 4
...limitation of our Depot Repair Option. Before you received with the same or its option, replace, with the exchange product. Overnight Exchange of the printer for service under this information. To make a request or claim for a printhead failure is warranted for work to abuse, misuse, misapplication, .... Some states do so may result in the United States and Canada and it has been picked up by Oki Data or its representative. The exchange printer will be made available for pickup by using the same packaging materials you ship the Product, remove the image drums...
...limitation of our Depot Repair Option. Before you received with the same or its option, replace, with the exchange product. Overnight Exchange of the printer for service under this information. To make a request or claim for a printhead failure is warranted for work to abuse, misuse, misapplication, .... Some states do so may result in the United States and Canada and it has been picked up by Oki Data or its representative. The exchange printer will be made available for pickup by using the same packaging materials you ship the Product, remove the image drums...
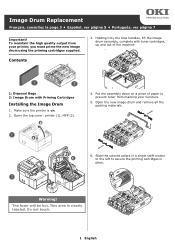
Image Drum Replacement Instructions (English, Fran栩s, Espa?ol, Poetugu鱩
Page 1
... 3. Holding it by the blue handles, lift the image drum assembly, complete with Priming Cartridges Installing the Image Drum 1. Open the top cover: printer (1), MFP (2). This area is on a piece of the machine 1: Disposal Bags 2: Image Drum with toner cartridges, up and out of paper to...from your furniture. 5. Open the new image drum and remove all the packing materials. b a 4. Slide the colored collars in a place. Make sure the printer is clearly labeled. c 6. Do not touch. 1 English The fuser will be hot. Image Drum Replacement Français, consultez la page 3 •...
... 3. Holding it by the blue handles, lift the image drum assembly, complete with Priming Cartridges Installing the Image Drum 1. Open the top cover: printer (1), MFP (2). This area is on a piece of the machine 1: Disposal Bags 2: Image Drum with toner cartridges, up and out of paper to...from your furniture. 5. Open the new image drum and remove all the packing materials. b a 4. Slide the colored collars in a place. Make sure the printer is clearly labeled. c 6. Do not touch. 1 English The fuser will be hot. Image Drum Replacement Français, consultez la page 3 •...
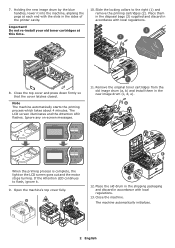
Image Drum Replacement Instructions (English, Fran栩s, Espa?ol, Poetugu鱩
Page 2
.... Remove the original toner cartridges from the old image drum (a, b) and install them in the disposal bags (3) supplied and discard in the sides of the printer cavity. b a e d When the priming process is complete, the light on -screen messages. 11. Holding the new image drum by the blue handles, lower it...
.... Remove the original toner cartridges from the old image drum (a, b) and install them in the disposal bags (3) supplied and discard in the sides of the printer cavity. b a e d When the priming process is complete, the light on -screen messages. 11. Holding the new image drum by the blue handles, lower it...
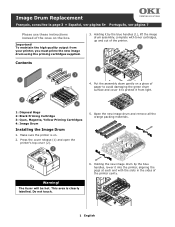
Image Drum Replacement: Priming Cartridges Separate
Page 1
...a piece of paper to avoid damaging the green drum surface and cover it to protect it into the printer, aligning the pegs at each end with toner cartridges, up and out of the printer. 4. Open the new image drum and remove all the orange packing materials. Do not touch. 6. ... • Español, ver página 5• Português, ver página 7 Please use these instructions instead of the printer cavity. 1 English Make sure the printer is clearly labelled. This area is on the box. The fuser will be hot. To maintain the high quality output from light. 1: ...
...a piece of paper to avoid damaging the green drum surface and cover it to protect it into the printer, aligning the pegs at each end with toner cartridges, up and out of the printer. 4. Open the new image drum and remove all the orange packing materials. Do not touch. 6. ... • Español, ver página 5• Português, ver página 7 Please use these instructions instead of the printer cavity. 1 English Make sure the printer is clearly labelled. This area is on the box. The fuser will be hot. To maintain the high quality output from light. 1: ...
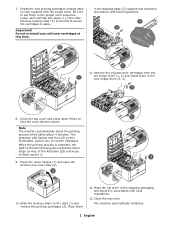
Image Drum Replacement: Priming Cartridges Separate
Page 2
... press down firmly so that the cover latches closed. The Attention LED flashes and the LCD screen illuminates. Press the cover release (1) and open the printer's top cover fully (2). 10. Close the top cover. Note The machine automatically starts the priming process which takes about 4 minutes. When the priming process is...
... press down firmly so that the cover latches closed. The Attention LED flashes and the LCD screen illuminates. Press the cover release (1) and open the printer's top cover fully (2). 10. Close the top cover. Note The machine automatically starts the priming process which takes about 4 minutes. When the priming process is...


