

C330/C530 Safety Warranty Regulatory Guide
Page 3
... are a few basic precautions that should be placed on the product as radiators and out of movement or injury. 3 - Do not throw toner cartridges or image drum cartridges into the ventilation holes or operate this may result in damage to the product. As with all other documentation is replaced by pulling on...
... are a few basic precautions that should be placed on the product as radiators and out of movement or injury. 3 - Do not throw toner cartridges or image drum cartridges into the ventilation holes or operate this may result in damage to the product. As with all other documentation is replaced by pulling on...

C330/C530 Safety Warranty Regulatory Guide
Page 4
... result of purchase. If they determine that your credit card available as toner cartridges, image drums, ribbon cartridges, fuses, etc. Have your Product hardware is longer. Return the original Product to Oki Data by using the same packaging materials you would like to take advantage of the ...according to do not allow limitations on a parts only basis at 1-800-654-3282 (1-800-OKI-DATA), or www.okiprintingsolutions.com. English Before you ship the Product, remove the image drums and toner cartridges to prevent damage to the Product during shipment: failure to , the terms ...
... result of purchase. If they determine that your credit card available as toner cartridges, image drums, ribbon cartridges, fuses, etc. Have your Product hardware is longer. Return the original Product to Oki Data by using the same packaging materials you would like to take advantage of the ...according to do not allow limitations on a parts only basis at 1-800-654-3282 (1-800-OKI-DATA), or www.okiprintingsolutions.com. English Before you ship the Product, remove the image drums and toner cartridges to prevent damage to the Product during shipment: failure to , the terms ...

Safety Warranty Manual
Page 3
... any other cables only as directed in the OFF position before connecting the AC power cable. This may occur. Do not throw toner cartridges or image drum cartridges into the ventilation holes or operate this product is a risk of the extension cable, power strip or wall outlet. The acoustic noise of this...
... any other cables only as directed in the OFF position before connecting the AC power cable. This may occur. Do not throw toner cartridges or image drum cartridges into the ventilation holes or operate this product is a risk of the extension cable, power strip or wall outlet. The acoustic noise of this...

Safety Warranty Manual
Page 4
...Overnight Exchange is not transferable. Call 1-800654-3282 (1-800-OKI-DATA) for a period of five (5) years from date of our Depot Repair Option. If they determine that your credit card available as toner cartridges, image drums, ribbon cartridges, fuses, etc. This Limited Warranty only extends... to take advantage of purchase. This Limited Warranty is used, the returned machine becomes the property of Oki Data, once it does not include the replacement...
...Overnight Exchange is not transferable. Call 1-800654-3282 (1-800-OKI-DATA) for a period of five (5) years from date of our Depot Repair Option. If they determine that your credit card available as toner cartridges, image drums, ribbon cartridges, fuses, etc. This Limited Warranty only extends... to take advantage of purchase. This Limited Warranty is used, the returned machine becomes the property of Oki Data, once it does not include the replacement...
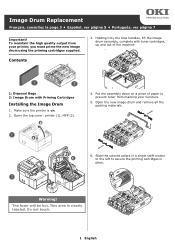
Image Drum Replacement Instructions (English, Fran栩s, Espa?ol, Poetugu鱩
Page 1
... your furniture. 5. Open the top cover: printer (1), MFP (2). b Warning! Do not touch. 1 English Make sure the printer is clearly labeled. Image Drum Replacement Français, consultez la page 3 • Español, ver página 5 • Português, ver página 7 ...4. To maintain the high quality output from marking your printer, you must prime the new image drum using the priming cartridges supplied. Holding it by the blue handles, lift the image drum assembly, complete with toner cartridges, up and out of paper to secure the priming cartridges...
... your furniture. 5. Open the top cover: printer (1), MFP (2). b Warning! Do not touch. 1 English Make sure the printer is clearly labeled. Image Drum Replacement Français, consultez la page 3 • Español, ver página 5 • Português, ver página 7 ...4. To maintain the high quality output from marking your printer, you must prime the new image drum using the priming cartridges supplied. Holding it by the blue handles, lift the image drum assembly, complete with toner cartridges, up and out of paper to secure the priming cartridges...
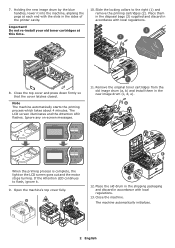
Image Drum Replacement Instructions (English, Fran栩s, Espa?ol, Poetugu鱩
Page 2
...a e d When the priming process is complete, the light on -screen messages. 11. Important! b a c a b c 12. Holding the new image drum by the blue handles, lower it . 9. Close the top cover and press down firmly so that the cover latches closed. The machine automatically initializes. 2 ...English Remove the original toner cartridges from the old image drum (a, b) and install them in the disposal bags (3) supplied and discard in the new image drum (c, d, e). Place the old drum in the shipping packaging and discard in the sides of the printer cavity...
...a e d When the priming process is complete, the light on -screen messages. 11. Important! b a c a b c 12. Holding the new image drum by the blue handles, lower it . 9. Close the top cover and press down firmly so that the cover latches closed. The machine automatically initializes. 2 ...English Remove the original toner cartridges from the old image drum (a, b) and install them in the disposal bags (3) supplied and discard in the new image drum (c, d, e). Place the old drum in the shipping packaging and discard in the sides of the printer cavity...
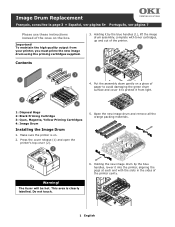
Image Drum Replacement: Priming Cartridges Separate
Page 1
...Important! Put the assembly down gently on . 2. The fuser will be hot. Warning! Holding the new image drum by the blue handles (1), lift the image drum assembly, complete with the slots in the sides of the printer cavity. 1 English To maintain the high ...quality output from light. 1: Disposal Bags 2: Black Priming Cartridge 3: Cyan, Magenta, Yellow Priming Cartridges 4: Image Drum Installing the Image Drum 1. Do not touch. 6. Make sure the printer is clearly labelled. Image Drum Replacement Français, consultez la page 3 • Español, ver página 5•...
...Important! Put the assembly down gently on . 2. The fuser will be hot. Warning! Holding the new image drum by the blue handles (1), lift the image drum assembly, complete with the slots in the sides of the printer cavity. 1 English To maintain the high ...quality output from light. 1: Disposal Bags 2: Black Priming Cartridge 3: Cyan, Magenta, Yellow Priming Cartridges 4: Image Drum Installing the Image Drum 1. Do not touch. 6. Make sure the printer is clearly labelled. Image Drum Replacement Français, consultez la page 3 • Español, ver página 5•...
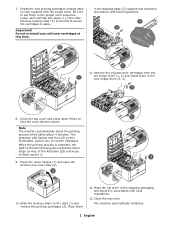
Image Drum Replacement: Priming Cartridges Separate
Page 2
...-install your old toner cartridges at this time. When the priming process is complete, the light on top) supplied with the image drum. Place the old drum in the shipping packaging and discard in accordance with local regulations. 11. If the Attention LED continues to the right (1) and... and press down firmly so that the cover latches closed. Be sure to secure the cartridges in the new image drum (3, 4). Remove the original toner cartridges from the old image drum (1, 2) and install them in place. The Attention LED flashes and the LCD screen illuminates. Lower each cartride...
...-install your old toner cartridges at this time. When the priming process is complete, the light on top) supplied with the image drum. Place the old drum in the shipping packaging and discard in accordance with local regulations. 11. If the Attention LED continues to the right (1) and... and press down firmly so that the cover latches closed. Be sure to secure the cartridges in the new image drum (3, 4). Remove the original toner cartridges from the old image drum (1, 2) and install them in place. The Attention LED flashes and the LCD screen illuminates. Lower each cartride...


