Installation Guide
Page 5
... Slots 19 System Status LEDs 19 Managing the IP390 Appliance 20 Site Requirements, Warnings, and Cautions 21 Software Requirements 22 Product Disposal 22 2 Installing the Nokia IP390 Appliance 23 Before You Begin 23 Rack Mounting the Appliance 23 Connecting Power 24 Connecting to the Console or Auxiliary Port 25 Console Port 27 Auxiliary Port 28 Connecting to Network...
... Slots 19 System Status LEDs 19 Managing the IP390 Appliance 20 Site Requirements, Warnings, and Cautions 21 Software Requirements 22 Product Disposal 22 2 Installing the Nokia IP390 Appliance 23 Before You Begin 23 Rack Mounting the Appliance 23 Connecting Power 24 Connecting to the Console or Auxiliary Port 25 Console Port 27 Auxiliary Port 28 Connecting to Network...

Installation Guide
Page 9
Tables Table 1 Command-Line Conventions 14 Table 2 Text Conventions 15 Table 3 Specifications for the IP390 Platform 17 Table 4 PMC Network Interface Card Slots 19 Table 5 System Status LEDs 20 Table 6 Pin Assignments Console Connector and Cable 28 Table 7 Pin Assignments for AUX Connector and Modem Cable 28 IP390 Security Platform Installation Guide 9
Tables Table 1 Command-Line Conventions 14 Table 2 Text Conventions 15 Table 3 Specifications for the IP390 Platform 17 Table 4 PMC Network Interface Card Slots 19 Table 5 System Status LEDs 20 Table 6 Pin Assignments Console Connector and Cable 28 Table 7 Pin Assignments for AUX Connector and Modem Cable 28 IP390 Security Platform Installation Guide 9
Installation Guide
Page 18
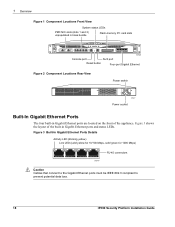
...Front View System status LEDs PMC NIC slots (slots 1 and 2) unpopulated in base bundle Flash-memory PC card slots IP390 00525 Console port AUX port Reset button Four-port Gigabit Ethernet Figure 2 Component Locations Rear View Power switch 00527 Power socket Built-...appliance. Figure 3 Built-In Gigabit Ethernet Ports Details Activity LED (blinking yellow) Link LED (solid yellow for 10/100 Mbps, solid green for 1000 Mbps) 00547 RJ-45 connectors Caution Cables that connect to the Gigabit Ethernet ports must be IEEE 802.3 compliant to prevent potential data loss. 18 IP390 Security...
...Front View System status LEDs PMC NIC slots (slots 1 and 2) unpopulated in base bundle Flash-memory PC card slots IP390 00525 Console port AUX port Reset button Four-port Gigabit Ethernet Figure 2 Component Locations Rear View Power switch 00527 Power socket Built-...appliance. Figure 3 Built-In Gigabit Ethernet Ports Details Activity LED (blinking yellow) Link LED (solid yellow for 10/100 Mbps, solid green for 1000 Mbps) 00547 RJ-45 connectors Caution Cables that connect to the Gigabit Ethernet ports must be IEEE 802.3 compliant to prevent potential data loss. 18 IP390 Security...
Installation Guide
Page 23
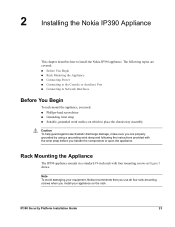
... „ Connecting to the Console or Auxiliary Port „ Connecting to Network Interfaces Before You Begin To rack-mount the appliance, you need: „ Phillips-head screwdriver „ Grounding wrist strap „ Suitable, grounded work surface on the rack. Rack Mounting the Appliance The IP390 appliance mounts in a standard 19-inch... using a grounding wrist strap and following the instructions provided with four mounting screws as Figure 5 shows. Note To avoid damaging your appliance on which to install the Nokia IP390 appliance. IP390 Security Platform Installation Guide 23
... „ Connecting to the Console or Auxiliary Port „ Connecting to Network Interfaces Before You Begin To rack-mount the appliance, you need: „ Phillips-head screwdriver „ Grounding wrist strap „ Suitable, grounded work surface on the rack. Rack Mounting the Appliance The IP390 appliance mounts in a standard 19-inch... using a grounding wrist strap and following the instructions provided with four mounting screws as Figure 5 shows. Note To avoid damaging your appliance on which to install the Nokia IP390 appliance. IP390 Security Platform Installation Guide 23

Installation Guide
Page 25
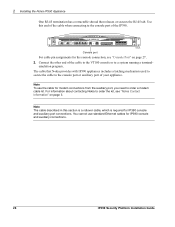
... the back of the appliance. 2. Use only the RJ-45 port labeled Console on the front panel of the IP390. the serial (AUX) port is Cisco compatible. Use the following configuration settings for initial configurations, see Chapter 3, "Performing the Initial Configuration." Note The supplied console cable is an auxiliary modem port. IP390 Security Platform Installation Guide...
... the back of the appliance. 2. Use only the RJ-45 port labeled Console on the front panel of the IP390. the serial (AUX) port is Cisco compatible. Use the following configuration settings for initial configurations, see Chapter 3, "Performing the Initial Configuration." Note The supplied console cable is an auxiliary modem port. IP390 Security Platform Installation Guide...
Installation Guide
Page 26
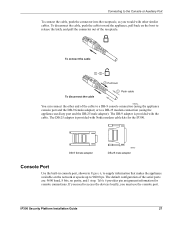
... is a rollover cable, which is required for the console connection, see "Nokia Contact Information" on page 27. 2. 2 Installing the Nokia IP390 Appliance One RJ-45 termination has a retractable shroud that Nokia provides with IP390 appliances includes a latching mechanism used to secure the cable to the console port or auxiliary port of your appliance. Connect the other end of the cable to...
... is a rollover cable, which is required for the console connection, see "Nokia Contact Information" on page 27. 2. 2 Installing the Nokia IP390 Appliance One RJ-45 termination has a retractable shroud that Nokia provides with IP390 appliances includes a latching mechanism used to secure the cable to the console port or auxiliary port of your appliance. Connect the other end of the cable to...
Installation Guide
Page 27
... Table 6 provides pin assignment information for the IP390. The DB-9 adapter is provided with Nokia modem cable kits for console connections. The DB-25 adaptor is provided with other end of the cable to a DB-9 console connection (using the appliance console port and the DB-9 female adaptor) or to... to supply information that makes the appliance available on the boot to release the latch, and pull the connector out of the serial ports are: 9600 baud, 8 bits, no parity, and 1 stop. IP390 Security Platform Installation Guide 27 Connecting to the Console or Auxiliary Port To connect the...
... Table 6 provides pin assignment information for the IP390. The DB-9 adapter is provided with Nokia modem cable kits for console connections. The DB-25 adaptor is provided with other end of the cable to a DB-9 console connection (using the appliance console port and the DB-9 female adaptor) or to... to supply information that makes the appliance available on the boot to release the latch, and pull the connector out of the serial ports are: 9600 baud, 8 bits, no parity, and 1 stop. IP390 Security Platform Installation Guide 27 Connecting to the Console or Auxiliary Port To connect the...
Installation Guide
Page 28
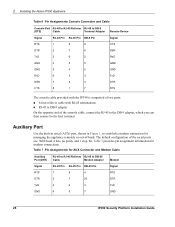
...-45 Pin RJ-45 Pin DB-25 Pin Signal RTS 1 8 4 RTS DTR 2 7 20 DTR TxD 3 6 3 TxD GND 4 5 7 GND 28 IP390 Security Platform Installation Guide 2 Installing the Nokia IP390 Appliance Table 6 Pin Assignments Console Connector and Cable Console Port RJ-45 to RJ-45 Rollover RJ-45 to DB-9 (DTE) Cable Terminal Adapter Remote Device Signal RJ-45...
...-45 Pin RJ-45 Pin DB-25 Pin Signal RTS 1 8 4 RTS DTR 2 7 20 DTR TxD 3 6 3 TxD GND 4 5 7 GND 28 IP390 Security Platform Installation Guide 2 Installing the Nokia IP390 Appliance Table 6 Pin Assignments Console Connector and Cable Console Port RJ-45 to RJ-45 Rollover RJ-45 to DB-9 (DTE) Cable Terminal Adapter Remote Device Signal RJ-45...
Installation Guide
Page 31
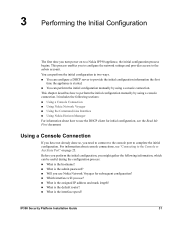
...provide the initial configuration information the first time the appliance is the interface speed? It includes the following information, which can perform the initial configuration manually by using a console connection. 3 Performing the Initial Configuration The first time... a Console Connection „ Using Nokia Network Voyager „ Using the Command-Line Interface „ Using Nokia Horizon Manager For information about console connections, see the Read Me First document. IP390 Security Platform Installation Guide 31 This chapter describes how to a Nokia IP390 appliance, the...
...provide the initial configuration information the first time the appliance is the interface speed? It includes the following information, which can perform the initial configuration manually by using a console connection. 3 Performing the Initial Configuration The first time... a Console Connection „ Using Nokia Network Voyager „ Using the Command-Line Interface „ Using Nokia Horizon Manager For information about console connections, see the Read Me First document. IP390 Security Platform Installation Guide 31 This chapter describes how to a Nokia IP390 appliance, the...

Installation Guide
Page 32
..., the appliance activates the Nokia IPSO boot manager. The power LED should be illuminated. At the console a series of the appliance turn on when you type any character during this time, although you press the switch. Check the power LED on page 19. After some miscellaneous output, the following prompt appears: Hostname? 32 IP390 Security Platform...
..., the appliance activates the Nokia IPSO boot manager. The power LED should be illuminated. At the console a series of the appliance turn on when you type any character during this time, although you press the switch. Check the power LED on page 19. After some miscellaneous output, the following prompt appears: Hostname? 32 IP390 Security Platform...
Installation Guide
Page 33
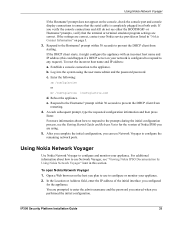
...the requested configuration information and then press Enter. IP390 Security Platform Installation Guide 33 Using Nokia Network Voyager If the Hostname? Establish a console connection to the Hostname? c. Reboot the appliance. Using Nokia Network Voyager Use Nokia Network Voyager to any request). In the Location...can use Network Voyager to configure or monitor your appliance. 2. Open a Web browser on your network is completely plugged in "Nokia Contact Information" on the console, check the console port and console display connections to the Hostname? b. prompt within ...
...the requested configuration information and then press Enter. IP390 Security Platform Installation Guide 33 Using Nokia Network Voyager If the Hostname? Establish a console connection to the Hostname? c. Reboot the appliance. Using Nokia Network Voyager Use Nokia Network Voyager to any request). In the Location...can use Network Voyager to configure or monitor your appliance. 2. Open a Web browser on your network is completely plugged in "Nokia Contact Information" on the console, check the console port and console display connections to the Hostname? b. prompt within ...
Installation Guide
Page 35
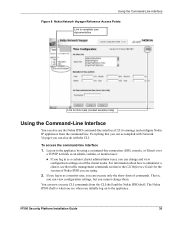
... you see the traffic management commands section in the CLI Reference Guide for the version of Nokia IPSO you are using a command-line connection (SSH, console, or Telnet) over a TCP/IP network as an admin, cadmin, or monitor user:...appliance. To access the command-line interface 1. You can view configuration settings, but you cannot change and view configuration settings on all the cluster nodes. For information about how to administer a cluster, see when you can accomplish with the CLI. IP390 Security Platform Installation Guide 35 Using the Command-Line Interface Figure 8 Nokia...
... you see the traffic management commands section in the CLI Reference Guide for the version of Nokia IPSO you are using a command-line connection (SSH, console, or Telnet) over a TCP/IP network as an admin, cadmin, or monitor user:...appliance. To access the command-line interface 1. You can view configuration settings, but you cannot change and view configuration settings on all the cluster nodes. For information about how to administer a cluster, see when you can accomplish with the CLI. IP390 Security Platform Installation Guide 35 Using the Command-Line Interface Figure 8 Nokia...

Installation Guide
Page 60
... Other than Network Interface Cards The appliance automatically restarts when the chassis tray assembly clicks into PC-card slot 1 or slot 2. 2. The eject button to store local system logs, Nokia IPSO images, and configuration files.The IP390 appliance has two PCMCIA slots that you ...The card is firmly seated in Nokia Contact Information on the power supply at the back of 1 GB or higher. Resecure the two chassis tray assembly retaining screws. 9. Caution You risk damage to the appliance by your console connection. 60 IP390 Security Platform Installation Guide Turn on ...
... Other than Network Interface Cards The appliance automatically restarts when the chassis tray assembly clicks into PC-card slot 1 or slot 2. 2. The eject button to store local system logs, Nokia IPSO images, and configuration files.The IP390 appliance has two PCMCIA slots that you ...The card is firmly seated in Nokia Contact Information on the power supply at the back of 1 GB or higher. Resecure the two chassis tray assembly retaining screws. 9. Caution You risk damage to the appliance by your console connection. 60 IP390 Security Platform Installation Guide Turn on ...
Installation Guide
Page 61
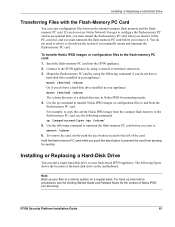
... console or terminal connection. 3. Hold the flash-memory PC card while you push the eject button to the flash-memory PC card: 1. To transfer Nokia IPSO images or configuration files to prevent the card from the flash-memory PC card. If you do not need to the IP390 appliance ... the flash-memory PC card into the IP390 appliance. 2. You do not use the following figure shows the location of the card. Note Back up and restore procedures, see the Getting Started Guide and Release Notes for mounting media. 4. IP390 Security Platform Installation Guide 61 Connect to reboot or...
... console or terminal connection. 3. Hold the flash-memory PC card while you push the eject button to the flash-memory PC card: 1. To transfer Nokia IPSO images or configuration files to prevent the card from the flash-memory PC card. If you do not need to the IP390 appliance ... the flash-memory PC card into the IP390 appliance. 2. You do not use the following figure shows the location of the card. Note Back up and restore procedures, see the Getting Started Guide and Release Notes for mounting media. 4. IP390 Security Platform Installation Guide 61 Connect to reboot or...

Installation Guide
Page 67
... right of the motherboard, as you need the following: „ Physical access to the appliance „ Nokia memory upgrade kit and accompanying documentation „ Network or console access to the appliance Caution To protect the IP390 appliance and the memory modules from Nokia or authorized resellers. IP390 Security Platform Installation Guide 67 Figure 23 DIMM Socket Locations DIMMs and...
... right of the motherboard, as you need the following: „ Physical access to the appliance „ Nokia memory upgrade kit and accompanying documentation „ Network or console access to the appliance Caution To protect the IP390 appliance and the memory modules from Nokia or authorized resellers. IP390 Security Platform Installation Guide 67 Figure 23 DIMM Socket Locations DIMMs and...
Installation Guide
Page 75
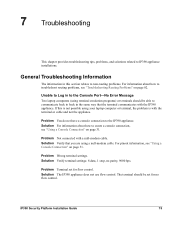
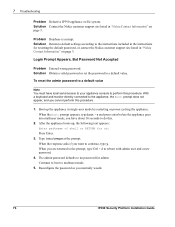
... Terminal set for flow control. Problem You do not have a console connection to IP390 appliance installations. Solution The IP390 appliance does not use flow control. General Troubleshooting Information The information in this...IP390 appliance. Solution For information about how to back in to create a console connection, see "Using a Console Connection" on page 31. Problem Wrong terminal settings. If this section relates to non-routing problems. For information about how to the Console Port-No Error Message Two laptop computers (using a null-modem cable. IP390 Security...
... Terminal set for flow control. Problem You do not have a console connection to IP390 appliance installations. Solution The IP390 appliance does not use flow control. General Troubleshooting Information The information in this...IP390 appliance. Solution For information about how to back in to create a console connection, see "Using a Console Connection" on page 31. Problem Wrong terminal settings. If this section relates to non-routing problems. For information about how to the Console Port-No Error Message Two laptop computers (using a null-modem cable. IP390 Security...
Installation Guide
Page 76
...access to your appliance console to the instructions included in "Nokia Contact Information" on page 3. Continue to boot to a default value. 7 Troubleshooting Problem Defective IP390 appliance or file system.... When the response asks if you cannot perform this . 2. Reconfigure the password as you are returned to the prompt, type Ctrl + d to do this procedure. 1. Problem Database is corrupt. When you normally would. 76 IP390 Security...
...access to your appliance console to the instructions included in "Nokia Contact Information" on page 3. Continue to boot to a default value. 7 Troubleshooting Problem Defective IP390 appliance or file system.... When the response asks if you cannot perform this . 2. Reconfigure the password as you are returned to the prompt, type Ctrl + d to do this procedure. 1. Problem Database is corrupt. When you normally would. 76 IP390 Security...
Installation Guide
Page 78
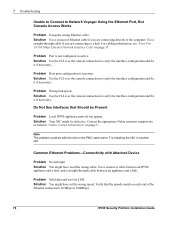
...Present Problem Local IP390 appliance ports do not appear. For cabling information, see "Four-Port 10/100 Mbps Ethernet Network Interface Card" on each end of the Ethernet connection (10 Mbps or 100Mbps). 78 IP390 Security Platform Installation Guide Contact the appropriate Nokia customer support ...site as active. Problem Host port configuration is not configured as listed in another slot. Solution You might have used the wrong cable. Solution Use the CLI over the console connection to...
...Present Problem Local IP390 appliance ports do not appear. For cabling information, see "Four-Port 10/100 Mbps Ethernet Network Interface Card" on each end of the Ethernet connection (10 Mbps or 100Mbps). 78 IP390 Security Platform Installation Guide Contact the appropriate Nokia customer support ...site as active. Problem Host port configuration is not configured as listed in another slot. Solution You might have used the wrong cable. Solution Use the CLI over the console connection to...
Installation Guide
Page 81
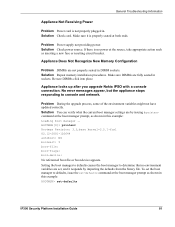
...Problem DIMMs are set, and it is not properly plugged in. No error messages appear, but the appliance stops responding to defaults, issue the set -defaults IP390 Security Platform Installation Guide 81 If there is no environment variables are not properly seated in sockets. Problem ...a new fuse or resetting circuit breaker. Solution Repeat memory installation procedures. Be sure DIMMs click into place. Appliance locks up after you upgrade Nokia IPSO with a console connection. Setting the boot manager to defaults causes the boot manager to determine that no power at the boot...
...Problem DIMMs are set, and it is not properly plugged in. No error messages appear, but the appliance stops responding to defaults, issue the set -defaults IP390 Security Platform Installation Guide 81 If there is no environment variables are not properly seated in sockets. Problem ...a new fuse or resetting circuit breaker. Solution Repeat memory installation procedures. Be sure DIMMs click into place. Appliance locks up after you upgrade Nokia IPSO with a console connection. Setting the boot manager to defaults causes the boot manager to determine that no power at the boot...
Installation Guide
Page 93
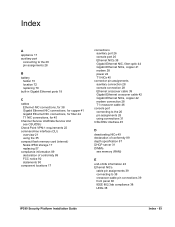
Index A appliance 17 auxiliary port connecting to the 26 pin assignments 28 ...22 command-line interface (CLI) overview 21 using the 35 compact flash memory card (internal) Nokia IPSO storage 17 replacing 57 compliance information 89 declaration of conformity 89 FCC notice 92 statements 90 component... copper 41 modem 28 power 24 T1 NICs 45 connector pin assignments auxiliary connection 28 console connection 28 Ethernet crossover cable 39 Gigabit Ethernet crossover cable 42 Gigabit Ethernet NICs, copper 42 modem... 38 IEEE 802.3ab compliance 38 LEDs 38 IP390 Security Platform Installation Guide Index - 93
Index A appliance 17 auxiliary port connecting to the 26 pin assignments 28 ...22 command-line interface (CLI) overview 21 using the 35 compact flash memory card (internal) Nokia IPSO storage 17 replacing 57 compliance information 89 declaration of conformity 89 FCC notice 92 statements 90 component... copper 41 modem 28 power 24 T1 NICs 45 connector pin assignments auxiliary connection 28 console connection 28 Ethernet crossover cable 39 Gigabit Ethernet crossover cable 42 Gigabit Ethernet NICs, copper 42 modem... 38 IEEE 802.3ab compliance 38 LEDs 38 IP390 Security Platform Installation Guide Index - 93