Installation Guide
Page 5
... Gigabit Ethernet Ports 18 PMC Expansion Slots 19 System Status LEDs 19 Managing the IP390 Appliance 20 Site Requirements, Warnings, and Cautions 21 Software Requirements 22 Product Disposal 22 2 Installing the Nokia IP390 Appliance 23 Before You Begin 23 Rack Mounting the Appliance 23 Connecting Power 24 Connecting to the Console or Auxiliary Port 25 Console Port 27 Auxiliary Port 28 Connecting to Network Interfaces 29 3 Performing the Initial Configuration 31 Using a Console Connection 31 Using Nokia Network Voyager 33 Viewing Nokia IPSO Documentation by Using Nokia Network...
... Gigabit Ethernet Ports 18 PMC Expansion Slots 19 System Status LEDs 19 Managing the IP390 Appliance 20 Site Requirements, Warnings, and Cautions 21 Software Requirements 22 Product Disposal 22 2 Installing the Nokia IP390 Appliance 23 Before You Begin 23 Rack Mounting the Appliance 23 Connecting Power 24 Connecting to the Console or Auxiliary Port 25 Console Port 27 Auxiliary Port 28 Connecting to Network Interfaces 29 3 Performing the Initial Configuration 31 Using a Console Connection 31 Using Nokia Network Voyager 33 Viewing Nokia IPSO Documentation by Using Nokia Network...
Installation Guide
Page 6
... Flash Memory Card 57 Installing a Flash-Memory PC Card 60 Before You Begin 60 Transferring Files with the Flash-Memory PC Card 61 Installing or Replacing a Hard-Disk Drive 61 Before You Start 62 Configuring a Hard-Disk Drive for Logging 65 Replacing or Upgrading Memory 66 Before You Start 67 Replacing the Battery 70 7 Troubleshooting 75 General Troubleshooting Information 75 Troubleshooting Routing Problems 82 A Technical Specifications 87 Physical Dimensions 87 Space Requirements 87 Operating Temperature 87 NIC Interfaces 88 6 IP390 Security Platform Installation Guide
... Flash Memory Card 57 Installing a Flash-Memory PC Card 60 Before You Begin 60 Transferring Files with the Flash-Memory PC Card 61 Installing or Replacing a Hard-Disk Drive 61 Before You Start 62 Configuring a Hard-Disk Drive for Logging 65 Replacing or Upgrading Memory 66 Before You Start 67 Replacing the Battery 70 7 Troubleshooting 75 General Troubleshooting Information 75 Troubleshooting Routing Problems 82 A Technical Specifications 87 Physical Dimensions 87 Space Requirements 87 Operating Temperature 87 NIC Interfaces 88 6 IP390 Security Platform Installation Guide
Installation Guide
Page 13
... Other than Network Interface Cards" describes how to install or replace compact flash memory cards, flash-memory PC cards, RAM memory, and a hard-disk drive. „ Chapter 7, "Troubleshooting" describes problems you might encounter and proposes solutions to install and use Nokia IP390 security appliances. IP390 Security Platform Installation Guide 13 Installation and maintenance should be performed by experienced technicians or Nokia-approved service providers only. About This Guide This guide describes how to these problems. „ Appendix A, "Technical Specifications" provides...
... Other than Network Interface Cards" describes how to install or replace compact flash memory cards, flash-memory PC cards, RAM memory, and a hard-disk drive. „ Chapter 7, "Troubleshooting" describes problems you might encounter and proposes solutions to install and use Nokia IP390 security appliances. IP390 Security Platform Installation Guide 13 Installation and maintenance should be performed by experienced technicians or Nokia-approved service providers only. About This Guide This guide describes how to these problems. „ Appendix A, "Technical Specifications" provides...
Installation Guide
Page 16
... use the Nokia IPSO boot manager „ Clustering Configuration Guide for the version of the Nokia IP390 Security Platform Installation Guide in PDF on the Nokia IPSO operating system CD issued with your Nokia IP390 security platform. In addition to this guide and other documents shipped with your appliance, documentation for this guide in PDF on the Nokia support Web site (https:// support.nokia.com/) and on the Nokia support site (https://support.nokia.com). Do not press the Return or Enter key when an instruction says type...
... use the Nokia IPSO boot manager „ Clustering Configuration Guide for the version of the Nokia IP390 Security Platform Installation Guide in PDF on the Nokia IPSO operating system CD issued with your Nokia IP390 security platform. In addition to this guide and other documents shipped with your appliance, documentation for this guide in PDF on the Nokia support Web site (https:// support.nokia.com/) and on the Nokia support site (https://support.nokia.com). Do not press the Return or Enter key when an instruction says type...
Installation Guide
Page 17
... two-port fiber-optic Gigabit Ethernet NICs The following topics are ideally suited for various network interface cards (NICs). This chapter provides an overview of IP-routing functions and protocols, including RIPv1/RIPv2, IGRP, OSPF and BGP4 for unicast traffic, and DVMRP for the Nokia IP390 appliance. IP390 Security Platform Installation Guide 17 The small size of firewall and VPN applications. The Nokia IPSO system is a one rack-unit disk-based or flash-based appliance...
... two-port fiber-optic Gigabit Ethernet NICs The following topics are ideally suited for various network interface cards (NICs). This chapter provides an overview of IP-routing functions and protocols, including RIPv1/RIPv2, IGRP, OSPF and BGP4 for unicast traffic, and DVMRP for the Nokia IP390 appliance. IP390 Security Platform Installation Guide 17 The small size of firewall and VPN applications. The Nokia IPSO system is a one rack-unit disk-based or flash-based appliance...
Installation Guide
Page 19
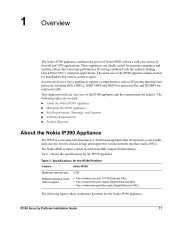
... Nokia Global Support Services group can monitor the basic operation of the appliance, as described in the "Nokia Contact Information" on the front panel of the IP390 appliance and NICs by checking their status LEDs. About the Nokia IP390 Appliance Note Nokia recommends the use Nokia-approved accessories. For sales or reseller information, contact a Nokia service provider listed in Table 4. IP390 Security Platform Installation Guide 19 Four-port copper 10/100 Ethernet "Four-Port 10/100 Mbps Ethernet Network Interface Card...
... Nokia Global Support Services group can monitor the basic operation of the appliance, as described in the "Nokia Contact Information" on the front panel of the IP390 appliance and NICs by checking their status LEDs. About the Nokia IP390 Appliance Note Nokia recommends the use Nokia-approved accessories. For sales or reseller information, contact a Nokia service provider listed in Table 4. IP390 Security Platform Installation Guide 19 Four-port copper 10/100 Ethernet "Four-Port 10/100 Mbps Ethernet Network Interface Card...
Installation Guide
Page 28
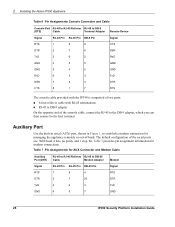
... RJ-45 to DB-25 Cable Modem Adapter Modem Signal RJ-45 Pin RJ-45 Pin DB-25 Pin Signal RTS 1 8 4 RTS DTR 2 7 20 DTR TxD 3 6 3 TxD GND 4 5 7 GND 28 IP390 Security Platform Installation Guide 2 Installing the Nokia IP390 Appliance Table 6 Pin Assignments Console Connector and Cable Console Port RJ-45 to RJ-45 Rollover RJ-45 to DB-9 (DTE) Cable Terminal Adapter Remote Device Signal RJ-45 Pin...
... RJ-45 to DB-25 Cable Modem Adapter Modem Signal RJ-45 Pin RJ-45 Pin DB-25 Pin Signal RTS 1 8 4 RTS DTR 2 7 20 DTR TxD 3 6 3 TxD GND 4 5 7 GND 28 IP390 Security Platform Installation Guide 2 Installing the Nokia IP390 Appliance Table 6 Pin Assignments Console Connector and Cable Console Port RJ-45 to RJ-45 Rollover RJ-45 to DB-9 (DTE) Cable Terminal Adapter Remote Device Signal RJ-45 Pin...
Installation Guide
Page 29
.... Note All Nokia copper Gigabit Ethernet NICs support cable auto-sensing. You can also use a half-duplex LC-to-LC cable to loop back the transmit port of an interface to a 10-Mbps, 100- To connect fiber-optic Gigabit Ethernet devices „ Use a multi-mode, fiber-optic cable with an LC connector to connect to the receiver port. You can use as described in Chapter 3, "Performing the Initial Configuration." IP390 Security Platform Installation Guide 29 To connect Ethernet devices „ Use a straight...
.... Note All Nokia copper Gigabit Ethernet NICs support cable auto-sensing. You can also use a half-duplex LC-to-LC cable to loop back the transmit port of an interface to a 10-Mbps, 100- To connect fiber-optic Gigabit Ethernet devices „ Use a multi-mode, fiber-optic cable with an LC connector to connect to the receiver port. You can use as described in Chapter 3, "Performing the Initial Configuration." IP390 Security Platform Installation Guide 29 To connect Ethernet devices „ Use a straight...
Installation Guide
Page 31
... configuration manually by using a console connection. Before you perform the initial configuration, you use the DHCP client for subsequent configuration? „ Which interface will you might gather the following sections: „ Using a Console Connection „ Using Nokia Network Voyager „ Using the Command-Line Interface „ Using Nokia Horizon Manager For information about console connections, see the Read Me First document. This process enables you need to connect to the console port to the Console or Auxiliary Port" on to the admin account. Using a Console...
... configuration manually by using a console connection. Before you perform the initial configuration, you use the DHCP client for subsequent configuration? „ Which interface will you might gather the following sections: „ Using a Console Connection „ Using Nokia Network Voyager „ Using the Command-Line Interface „ Using Nokia Horizon Manager For information about console connections, see the Read Me First document. This process enables you need to connect to the console port to the Console or Auxiliary Port" on to the admin account. Using a Console...

Installation Guide
Page 32
.... BOOTMGR[0]> Note For information about the system status LEDs, see the Nokia IPSO Boot Manager Reference Guide. For more information about using the boot manager, see "System Status LEDs" on page 3 for technical support. 2. Verify that the fans are tightened. „ Make sure that power is not illuminated: „ Check the power supply cord to make VLAN, SNMP community string, and remote logging configuration choices at this time, the appliance activates the Nokia IPSO boot manager. At the console...
.... BOOTMGR[0]> Note For information about the system status LEDs, see the Nokia IPSO Boot Manager Reference Guide. For more information about using the boot manager, see "System Status LEDs" on page 3 for technical support. 2. Verify that the fans are tightened. „ Make sure that power is not illuminated: „ Check the power supply cord to make VLAN, SNMP community string, and remote logging configuration choices at this time, the appliance activates the Nokia IPSO boot manager. At the console...
Installation Guide
Page 33
... console, check the console port and console display connections to ensure that the terminal or terminal emulator program settings are prompted to prevent the DHCP client from restarting. 4. prompt does not appear on page 3. 3. To reset the incorrect host name and IP address: a. b. c. Respond to configure the remaining network ports. After you complete the initial configuration, you are correct, contact your appliance. Open a Web browser on your appliance. 2. IP390 Security Platform Installation Guide 33 Using Nokia Network...
... console, check the console port and console display connections to ensure that the terminal or terminal emulator program settings are prompted to prevent the DHCP client from restarting. 4. prompt does not appear on page 3. 3. To reset the incorrect host name and IP address: a. b. c. Respond to configure the remaining network ports. After you complete the initial configuration, you are correct, contact your appliance. Open a Web browser on your appliance. 2. IP390 Security Platform Installation Guide 33 Using Nokia Network...
Installation Guide
Page 34
... also access the Nokia Network Voyager Reference Guide and other Nokia IPSO documentation at the bottom of the window (as shown in the installation guide for the window you are firmly connected. For more information, see the documentation as shown in Figure 8).You can access inline help window you view. 34 IP390 Security Platform Installation Guide Confirm the information you entered during the initial configuration and check that was delivered with your appliance...
... also access the Nokia Network Voyager Reference Guide and other Nokia IPSO documentation at the bottom of the window (as shown in the installation guide for the window you are firmly connected. For more information, see the documentation as shown in Figure 8).You can access inline help window you view. 34 IP390 Security Platform Installation Guide Confirm the information you entered during the initial configuration and check that was delivered with your appliance...

Installation Guide
Page 36
... management of Nokia IPSO you can manage multiple devices simultaneously, perform parallel software upgrades, device verifications, device configuration, file backups, and more information about how to obtain Horizon Manager or to multiple appliances simultaneously, thereby reducing potential human error and improving productivity. The argument must place double-quotation marks around the CLI command. While Network Voyager provides the device administrator access to access and use the CLI, see "Nokia Contact Information" on page 3. 060228 36 IP390 Security Platform Installation...
... management of Nokia IPSO you can manage multiple devices simultaneously, perform parallel software upgrades, device verifications, device configuration, file backups, and more information about how to obtain Horizon Manager or to multiple appliances simultaneously, thereby reducing potential human error and improving productivity. The argument must place double-quotation marks around the CLI command. While Network Voyager provides the device administrator access to access and use the CLI, see "Nokia Contact Information" on page 3. 060228 36 IP390 Security Platform Installation...

Installation Guide
Page 38
... you set the port speed and full-duplex or half-duplex mode by using Network Voyager. You can configure and monitor Ethernet interfaces with IEEE 802.3 Ethernet specification You can order appropriate adapter cables separately. 4 About IP390 Appliance Network Interface Cards „ Compliance with Nokia Network Voyager. As data is turned on, the Ethernet link LEDs on the appliance and on the appliance light up. You can order additional cables from a cable vendor of your choice. 38 IP390 Security Platform Installation Guide Figure 9 Four-Port Ethernet...
... you set the port speed and full-duplex or half-duplex mode by using Network Voyager. You can configure and monitor Ethernet interfaces with IEEE 802.3 Ethernet specification You can order appropriate adapter cables separately. 4 About IP390 Appliance Network Interface Cards „ Compliance with Nokia Network Voyager. As data is turned on, the Ethernet link LEDs on the appliance and on the appliance light up. You can order additional cables from a cable vendor of your choice. 38 IP390 Security Platform Installation Guide Figure 9 Four-Port Ethernet...
Installation Guide
Page 43
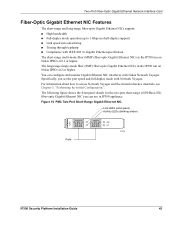
... Gigabit Ethernet Network Interface Card Fiber-Optic Gigabit Ethernet NIC Features The short-range and long-range fiber-optic Gigabit Ethernet NICs support: „ High bandwidth „ Full-duplex mode operation up to access Network Voyager and the related reference materials, see Chapter 3, "Performing the Initial Configuration.". You can use in the IP390 run on Nokia IPSO v4.0.1 or higher. Figure 16 PMC Two-Port Short-Range Gigabit Ethernet NIC Link LEDs (solid green) Activity LEDs (blinking amber) GIGE Ports 00206 IP390 Security Platform Installation Guide...
... Gigabit Ethernet Network Interface Card Fiber-Optic Gigabit Ethernet NIC Features The short-range and long-range fiber-optic Gigabit Ethernet NICs support: „ High bandwidth „ Full-duplex mode operation up to access Network Voyager and the related reference materials, see Chapter 3, "Performing the Initial Configuration.". You can use in the IP390 run on Nokia IPSO v4.0.1 or higher. Figure 16 PMC Two-Port Short-Range Gigabit Ethernet NIC Link LEDs (solid green) Activity LEDs (blinking amber) GIGE Ports 00206 IP390 Security Platform Installation Guide...
Installation Guide
Page 76
... before the appliance goes into multiuser mode; After the appliance boots up the appliance in single-user mode by restarting or power cycling the appliance. The admin password defaults to the instructions included in the instructions for resetting the default password, or contact the Nokia customer support site listed in "Nokia Contact Information" on page 3. you have local serial access to your appliance console to reboot with admin user and a new password. 4. When you normally would. 76 IP390 Security Platform Installation Guide Problem Database is...
... before the appliance goes into multiuser mode; After the appliance boots up the appliance in single-user mode by restarting or power cycling the appliance. The admin password defaults to the instructions included in the instructions for resetting the default password, or contact the Nokia customer support site listed in "Nokia Contact Information" on page 3. you have local serial access to your appliance console to reboot with admin user and a new password. 4. When you normally would. 76 IP390 Security Platform Installation Guide Problem Database is...
Installation Guide
Page 78
...). 78 IP390 Security Platform Installation Guide Solution You might have set the wrong speed. Do Not See Interfaces that the speeds match on page 3. Problem Host port configuration is not configured as listed in another slot. Contact the appropriate Nokia customer support site as active. Solution You might have used the wrong cable. For cabling information, see "Four-Port 10/100 Mbps Ethernet Network Interface Card" on the PMC card carrier. Problem Wrong link speed. Common Ethernet Problems-Connectivity with the...
...). 78 IP390 Security Platform Installation Guide Solution You might have set the wrong speed. Do Not See Interfaces that the speeds match on page 3. Problem Host port configuration is not configured as listed in another slot. Contact the appropriate Nokia customer support site as active. Solution You might have used the wrong cable. For cabling information, see "Four-Port 10/100 Mbps Ethernet Network Interface Card" on the PMC card carrier. Problem Wrong link speed. Common Ethernet Problems-Connectivity with the...

Installation Guide
Page 80
... (for Ethernet interfaces) or 16018 (for a specific interface, use . Problem Exceeding TTL on the interfaces in Network Voyager, you have IP connectivity; Under Routing Options in the Routing Configuration section in use the following command: ipsctl ifphys:logical interface:max_rxlabel Problem Encapsulation is enabled on clients. Problems Interfacing to access Network Voyager and the related reference materials, see the Nokia Network Voyager Reference Guide. Enter the following command: tcpdump -i interface proto igmp. Nokia does not support larger MTU sizes. 80 IP390 Security...
... (for Ethernet interfaces) or 16018 (for a specific interface, use . Problem Exceeding TTL on the interfaces in Network Voyager, you have IP connectivity; Under Routing Options in the Routing Configuration section in use the following command: ipsctl ifphys:logical interface:max_rxlabel Problem Encapsulation is enabled on clients. Problems Interfacing to access Network Voyager and the related reference materials, see the Nokia Network Voyager Reference Guide. Enter the following command: tcpdump -i interface proto igmp. Nokia does not support larger MTU sizes. 80 IP390 Security...
Installation Guide
Page 83
... to the preceding ICLID command is not configured. connected, S - These traces are involved in Network Voyager. hostname[admin]# iclid hostname | IP address> hostname | IP address> ? For information about how to view routing information. Use the following command display routing updates for OSPF. You can enable these options under the routing options in /var/tmp/ipsrd.log. IP390 Security Platform Installation Guide 83 Hidden, S - RIP, B - Kernel Remnant, H - Problem OSPF is as...
... to the preceding ICLID command is not configured. connected, S - These traces are involved in Network Voyager. hostname[admin]# iclid hostname | IP address> hostname | IP address> ? For information about how to view routing information. Use the following command display routing updates for OSPF. You can enable these options under the routing options in /var/tmp/ipsrd.log. IP390 Security Platform Installation Guide 83 Hidden, S - RIP, B - Kernel Remnant, H - Problem OSPF is as...

Installation Guide
Page 94
...locations 67 replacing 66 specification upgrading 66 modem, connecting to the 28 monitoring appliances 19 multicast traffic 17 multi-mode, fiber-optic cable 44 N network interface cards see NICs network interfaces connecting to 29 NICs deactivating 49 Ethernet 38 Gigabit Ethernet two-port, long-range, fiber-optic 44 Gigabit Ethernet two-port, short-range, fiber-optic 43 Gigabit Ethernet, copper 41 installing 49 interface specifications 88 specifications 17, 88 T1 45 Nokia Horizon Manager overview 21 using the 36 Nokia IPSO command-line interface (CLI) 35 reference documentation 34 requirements...
...locations 67 replacing 66 specification upgrading 66 modem, connecting to the 28 monitoring appliances 19 multicast traffic 17 multi-mode, fiber-optic cable 44 N network interface cards see NICs network interfaces connecting to 29 NICs deactivating 49 Ethernet 38 Gigabit Ethernet two-port, long-range, fiber-optic 44 Gigabit Ethernet two-port, short-range, fiber-optic 43 Gigabit Ethernet, copper 41 installing 49 interface specifications 88 specifications 17, 88 T1 45 Nokia Horizon Manager overview 21 using the 36 Nokia IPSO command-line interface (CLI) 35 reference documentation 34 requirements...


