Installation Guide
Page 5
...14 Text Conventions 15 Related Documentation 16 1 Overview 17 About the Nokia IP390 Appliance 17 Built-In Gigabit Ethernet Ports 18 PMC Expansion Slots 19 System Status LEDs 19 Managing the IP390 Appliance 20 Site Requirements, Warnings, and Cautions 21 Software Requirements 22 ... Interfaces 29 3 Performing the Initial Configuration 31 Using a Console Connection 31 Using Nokia Network Voyager 33 Viewing Nokia IPSO Documentation by Using Nokia Network Voyager 34 Using the Command-Line Interface 35 Using Nokia Horizon Manager 36 IP390 Security Platform Installation Guide 5
...14 Text Conventions 15 Related Documentation 16 1 Overview 17 About the Nokia IP390 Appliance 17 Built-In Gigabit Ethernet Ports 18 PMC Expansion Slots 19 System Status LEDs 19 Managing the IP390 Appliance 20 Site Requirements, Warnings, and Cautions 21 Software Requirements 22 ... Interfaces 29 3 Performing the Initial Configuration 31 Using a Console Connection 31 Using Nokia Network Voyager 33 Viewing Nokia IPSO Documentation by Using Nokia Network Voyager 34 Using the Command-Line Interface 35 Using Nokia Horizon Manager 36 IP390 Security Platform Installation Guide 5
Installation Guide
Page 11
... 2 Component Locations Rear View 18 Figure 3 Built-In Gigabit Ethernet Ports Details 18 Figure 4 Appliance Status LEDs 20 Figure 5 Mounting Screws Location 24 Figure 6 Adjustable Mounting Brackets 24 Figure 7 Back Panel Power Switch and Socket 25 Figure 8 Nokia Network Voyager Reference Access Points 35 Figure 9 Four-Port Ethernet NIC Front Panel Details... Cable Pin Connections 46 Figure 21 Compact Flash Memory Card Slot 58 Figure 22 Hard-Disk Drive Location 62 Figure 23 DIMM Socket Locations 67 IP390 Security Platform Installation Guide 11
... 2 Component Locations Rear View 18 Figure 3 Built-In Gigabit Ethernet Ports Details 18 Figure 4 Appliance Status LEDs 20 Figure 5 Mounting Screws Location 24 Figure 6 Adjustable Mounting Brackets 24 Figure 7 Back Panel Power Switch and Socket 25 Figure 8 Nokia Network Voyager Reference Access Points 35 Figure 9 Four-Port Ethernet NIC Front Panel Details... Cable Pin Connections 46 Figure 21 Compact Flash Memory Card Slot 58 Figure 22 Hard-Disk Drive Location 62 Figure 23 DIMM Socket Locations 67 IP390 Security Platform Installation Guide 11
Installation Guide
Page 13
...and a hard-disk drive. „ Chapter 7, "Troubleshooting" describes problems you might encounter and proposes solutions to and use Nokia IP390 security appliances. This preface provides the following information: „ In this Guide „ Conventions this Guide Uses „ Related Documentation...following chapters and appendixes: „ Chapter 1, "Overview" presents a general overview of the IP390 appliance. „ Chapter 2, "Installing the Nokia IP390 Appliance" describes how to rack-mount the appliance and how to physically connect it to a network and power. „ Chapter 3, "...
...and a hard-disk drive. „ Chapter 7, "Troubleshooting" describes problems you might encounter and proposes solutions to and use Nokia IP390 security appliances. This preface provides the following information: „ In this Guide „ Conventions this Guide Uses „ Related Documentation...following chapters and appendixes: „ Chapter 1, "Overview" presents a general overview of the IP390 appliance. „ Chapter 2, "Installing the Nokia IP390 Appliance" describes how to rack-mount the appliance and how to physically connect it to a network and power. „ Chapter 3, "...
Installation Guide
Page 16
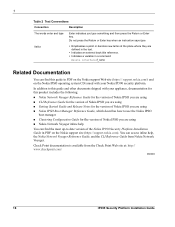
...and other documents shipped with your appliance, documentation for this guide in PDF on the Nokia support Web site (https:// support.nokia.com/) and on the Nokia support site (https://support.nokia.com). You can access inline help, the Nokia Network Voyager Reference Guide, and...for the version of the Nokia IP390 Security Platform Installation Guide in PDF on the Nokia IPSO operating system CD issued with your Nokia IP390 security platform. Italics • Emphasizes a point or denotes new terms at : http:// www.checkpoint.com/ 060306 16 IP390 Security Platform Installation Guide Do ...
...and other documents shipped with your appliance, documentation for this guide in PDF on the Nokia support Web site (https:// support.nokia.com/) and on the Nokia support site (https://support.nokia.com). You can access inline help, the Nokia Network Voyager Reference Guide, and...for the version of the Nokia IP390 Security Platform Installation Guide in PDF on the Nokia IPSO operating system CD issued with your Nokia IP390 security platform. Italics • Emphasizes a point or denotes new terms at : http:// www.checkpoint.com/ 060306 16 IP390 Security Platform Installation Guide Do ...
Installation Guide
Page 17
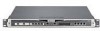
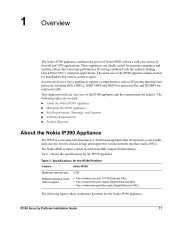
...need to conserve space. Table 3 shows the specifications for the IP390 appliance Table 3 Specifications for the IP390 Platform Feature Nokia IP390 Maximum memory size Network interface cards (NICs) support 2 GB ...appliances support a comprehensive suite of the IP390 appliance makes it . IP390 Security Platform Installation Guide 17 These appliances are covered: „ About the Nokia IP390 Appliance „ Managing the IP390 Appliance „ Site Requirements, Warnings, and Cautions „ Software Requirements „ Product Disposal About the Nokia IP390 Appliance The IP390...
...need to conserve space. Table 3 shows the specifications for the IP390 appliance Table 3 Specifications for the IP390 Platform Feature Nokia IP390 Maximum memory size Network interface cards (NICs) support 2 GB ...appliances support a comprehensive suite of the IP390 appliance makes it . IP390 Security Platform Installation Guide 17 These appliances are covered: „ About the Nokia IP390 Appliance „ Managing the IP390 Appliance „ Site Requirements, Warnings, and Cautions „ Software Requirements „ Product Disposal About the Nokia IP390 Appliance The IP390...
Installation Guide
Page 19
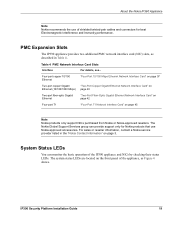
...IP390 Security Platform Installation Guide 19 The Nokia Global Support Services group can monitor the basic operation of the IP390 appliance and NICs by checking their status LEDs. System Status LEDs You can provide support only for Nokia products that use of the appliance, as described in the "Nokia...and Immunity performance. About the Nokia IP390 Appliance Note Nokia recommends the use Nokia-approved accessories. For sales or reseller information, contact a Nokia service provider listed in Table 4. PMC Expansion Slots The IP390 appliance provides two additional PMC network ...
...IP390 Security Platform Installation Guide 19 The Nokia Global Support Services group can monitor the basic operation of the IP390 appliance and NICs by checking their status LEDs. System Status LEDs You can provide support only for Nokia products that use of the appliance, as described in the "Nokia...and Immunity performance. About the Nokia IP390 Appliance Note Nokia recommends the use Nokia-approved accessories. For sales or reseller information, contact a Nokia service provider listed in Table 4. PMC Expansion Slots The IP390 appliance provides two additional PMC network ...
Installation Guide
Page 20
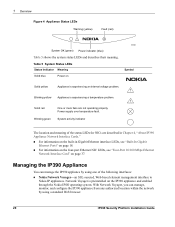
... and describes their meaning. Managing the IP390 Appliance You can manage, monitor, and configure the IP390 appliance from any authorized location within the network by using a standard Web browser. 20 IP390 Security Platform Installation Guide Solid red One or...IP390 appliance by using one of the status LEDs for NICs are not operating properly. Blinking green System activity indicator The location and meaning of the following interfaces: „ Nokia Network Voyager-an SSL-secured, Web-based element management interface to Nokia IP appliances. Blinking yellow Appliance...
... and describes their meaning. Managing the IP390 Appliance You can manage, monitor, and configure the IP390 appliance from any authorized location within the network by using a standard Web browser. 20 IP390 Security Platform Installation Guide Solid red One or...IP390 appliance by using one of the status LEDs for NICs are not operating properly. Blinking green System activity indicator The location and meaning of the following interfaces: „ Nokia Network Voyager-an SSL-secured, Web-based element management interface to Nokia IP appliances. Blinking yellow Appliance...
Installation Guide
Page 21
... CLI. Dispose of the ventilation holes on page 33. „ The Nokia IPSO command-line interface (CLI)-an SSHv2-secured interface that enables you install a Nokia IP390 appliance, ensure that are not described in Chapter A, "Technical Specifications." Horizon Manager can securely install and upgrade the Nokia IPSO operating system, plus hardware and third-party applications such as...
... CLI. Dispose of the ventilation holes on page 33. „ The Nokia IPSO command-line interface (CLI)-an SSHv2-secured interface that enables you install a Nokia IP390 appliance, ensure that are not described in Chapter A, "Technical Specifications." Horizon Manager can securely install and upgrade the Nokia IPSO operating system, plus hardware and third-party applications such as...
Installation Guide
Page 22
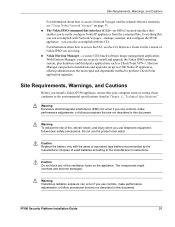
...peripherals included with it . „ The Nokia web site (http://www.nokia.com) provides information about our environmental programs and practices, which provides basic information on page 3. 1 Overview Caution For IP390 appliances intended for guidelines specific to any enhancements marked...fittings approved by the country of properly. Software Requirements The Nokia IP390 appliance supports the following resources are available to your Nokia service provider, as unsorted municipal waste. 050930 22 IP390 Security Platform Installation Guide This applies to you have disposed of...
...peripherals included with it . „ The Nokia web site (http://www.nokia.com) provides information about our environmental programs and practices, which provides basic information on page 3. 1 Overview Caution For IP390 appliances intended for guidelines specific to any enhancements marked...fittings approved by the country of properly. Software Requirements The Nokia IP390 appliance supports the following resources are available to your Nokia service provider, as unsorted municipal waste. 050930 22 IP390 Security Platform Installation Guide This applies to you have disposed of...
Installation Guide
Page 23
... use all four rack-mounting screws when you install your appliance on which to install the Nokia IP390 appliance. IP390 Security Platform Installation Guide 23 Rack Mounting the Appliance The IP390 appliance mounts in a standard 19-inch rack with the wrist strap before you handle the components or open the appliance. The following the instructions provided with four mounting screws...
... use all four rack-mounting screws when you install your appliance on which to install the Nokia IP390 appliance. IP390 Security Platform Installation Guide 23 Rack Mounting the Appliance The IP390 appliance mounts in a standard 19-inch rack with the wrist strap before you handle the components or open the appliance. The following the instructions provided with four mounting screws...

Installation Guide
Page 24
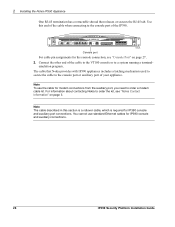
... the Nokia IP390 Appliance Figure 5 Mounting Screws Location IP390 00525 Mounting screw slots Two mounting positions are available allowing you to mount the unit either flush with rack installation Brackets located for IP390 forward of rack installation 00539 Caution Blocking ventilation openings during installation may result in damage to 264]) and configures itself appropriately. 24 IP390 Security...
... the Nokia IP390 Appliance Figure 5 Mounting Screws Location IP390 00525 Mounting screw slots Two mounting positions are available allowing you to mount the unit either flush with rack installation Brackets located for IP390 forward of rack installation 00539 Caution Blocking ventilation openings during installation may result in damage to 264]) and configures itself appropriately. 24 IP390 Security...

Installation Guide
Page 25
...Power socket To connect to the console port on the front panel of your Nokia IP390 appliance, you do not use a serial console connection (RJ-45 null-modem cable included). Connect the power cord securely into a three-wire grounded power strip or wall outlet. After you perform the...no longer need the console connection. Use the following configuration settings for initial configurations, see Chapter 3, "Performing the Initial Configuration." IP390 Security Platform Installation Guide 25 Use only the RJ-45 port labeled Console on the back of the cord into the power socket on...
...Power socket To connect to the console port on the front panel of your Nokia IP390 appliance, you do not use a serial console connection (RJ-45 null-modem cable included). Connect the power cord securely into a three-wire grounded power strip or wall outlet. After you perform the...no longer need the console connection. Use the following configuration settings for initial configurations, see Chapter 3, "Performing the Initial Configuration." IP390 Security Platform Installation Guide 25 Use only the RJ-45 port labeled Console on the back of the cord into the power socket on...
Installation Guide
Page 26
... and auxiliary port connections. The cable that releases or secures the RJ-45 tab. 2 Installing the Nokia IP390 Appliance One RJ-45 termination has a retractable shroud that Nokia provides with IP390 appliances includes a latching mechanism used to secure the cable to the console port or auxiliary port of your appliance. Use this section is a rollover cable, which is required...
... and auxiliary port connections. The cable that releases or secures the RJ-45 tab. 2 Installing the Nokia IP390 Appliance One RJ-45 termination has a retractable shroud that Nokia provides with IP390 appliances includes a latching mechanism used to secure the cable to the console port or auxiliary port of your appliance. Use this section is a rollover cable, which is required...
Installation Guide
Page 27
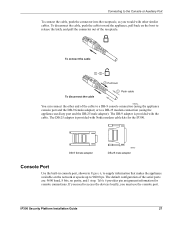
To disconnect the cable, push the cable toward the appliance, pull back on the network at speeds up to 9600 bps. The default configuration of the receptacle. IP390 Security Platform Installation Guide 27 To connect the cable 1 + 2 = 2 Pull boot To disconnect the cable 1 Push cable 00548a You can connect... Port Use the built-in console port, shown in Figure 6, to supply information that makes the appliance available on the boot to access the devices locally, you must use the console port. The DB-25 adaptor is provided with Nokia modem cable kits for console connections.
To disconnect the cable, push the cable toward the appliance, pull back on the network at speeds up to 9600 bps. The default configuration of the receptacle. IP390 Security Platform Installation Guide 27 To connect the cable 1 + 2 = 2 Pull boot To disconnect the cable 1 Push cable 00548a You can connect... Port Use the built-in console port, shown in Figure 6, to supply information that makes the appliance available on the boot to access the devices locally, you must use the console port. The DB-25 adaptor is provided with Nokia modem cable kits for console connections.
Installation Guide
Page 28
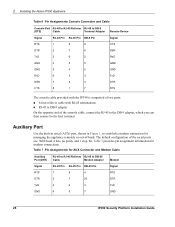
...45 Pin DB-25 Pin Signal RTS 1 8 4 RTS DTR 2 7 20 DTR TxD 3 6 3 TxD GND 4 5 7 GND 28 IP390 Security Platform Installation Guide 2 Installing the Nokia IP390 Appliance Table 6 Pin Assignments Console Connector and Cable Console Port RJ-45 to RJ-45 Rollover RJ-45 to DB-9 (DTE) Cable Terminal Adapter...of the console cable, connect the RJ-45 to the DB-9 adapter, which you can then connect to establish a modem connection for managing the appliance remotely or out-of the serial ports are: 9600 baud, 8 bits, no parity, and 1 stop. The default configuration of -band. bit...
...45 Pin DB-25 Pin Signal RTS 1 8 4 RTS DTR 2 7 20 DTR TxD 3 6 3 TxD GND 4 5 7 GND 28 IP390 Security Platform Installation Guide 2 Installing the Nokia IP390 Appliance Table 6 Pin Assignments Console Connector and Cable Console Port RJ-45 to RJ-45 Rollover RJ-45 to DB-9 (DTE) Cable Terminal Adapter...of the console cable, connect the RJ-45 to the DB-9 adapter, which you can then connect to establish a modem connection for managing the appliance remotely or out-of the serial ports are: 9600 baud, 8 bits, no parity, and 1 stop. The default configuration of -band. bit...
Installation Guide
Page 30
2 Installing the Nokia IP390 Appliance After you connect the network interfaces, continue with Chapter 3, "Performing the Initial Configuration." 30 IP390 Security Platform Installation Guide
2 Installing the Nokia IP390 Appliance After you connect the network interfaces, continue with Chapter 3, "Performing the Initial Configuration." 30 IP390 Security Platform Installation Guide
Installation Guide
Page 31
...appliance is the interface speed? This process enables you need to connect to the console port to the admin account. Using a Console Connection If you have not already done so, you to configure the network settings and provides access to complete the initial configuration. IP390 Security...? „ What is the default router? „ What is started. „ You can configure a DHCP server to a Nokia IP390 appliance, the initial configuration process begins. For information about how to perform the initial configuration manually by using a console connection. 3 Performing ...
...appliance is the interface speed? This process enables you need to connect to the console port to the admin account. Using a Console Connection If you have not already done so, you to configure the network settings and provides access to complete the initial configuration. IP390 Security...? „ What is the default router? „ What is started. „ You can configure a DHCP server to a Nokia IP390 appliance, the initial configuration process begins. For information about how to perform the initial configuration manually by using a console connection. 3 Performing ...

Installation Guide
Page 32
Press the power switch to the "on" position to the appliance. After some miscellaneous output, the following prompt appears: Hostname? 32 IP390 Security Platform Installation Guide Cooling fans Power switch 00527 The fans on the back of the appliance (the Nokia logo) to ensure that power is turned on to the power strip or wall receptacle...
Press the power switch to the "on" position to the appliance. After some miscellaneous output, the following prompt appears: Hostname? 32 IP390 Security Platform Installation Guide Cooling fans Power switch 00527 The fans on the back of the appliance (the Nokia logo) to ensure that power is turned on to the power strip or wall receptacle...
Installation Guide
Page 33
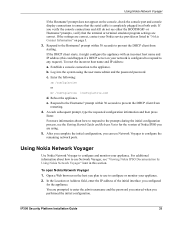
..., you can use Network Voyager, see "Viewing Nokia IPSO Documentation by Using Nokia Network Voyager" later in "Nokia Contact Information" on your appliance. To open Nokia Network Voyager 1. You are correct, contact your appliance. 2. Reboot the appliance. prompt within 30 seconds to any request). Establish... the appliance. In the Location or Address field, enter the IP address of Nokia IPSO you configured for the version of the initial interface you are correct. IP390 Security Platform Installation Guide 33 Respond to configure or monitor your Nokia service ...
..., you can use Network Voyager, see "Viewing Nokia IPSO Documentation by Using Nokia Network Voyager" later in "Nokia Contact Information" on your appliance. To open Nokia Network Voyager 1. You are correct, contact your appliance. 2. Reboot the appliance. prompt within 30 seconds to any request). Establish... the appliance. In the Location or Address field, enter the IP address of Nokia IPSO you configured for the version of the initial interface you are correct. IP390 Security Platform Installation Guide 33 Respond to configure or monitor your Nokia service ...
Installation Guide
Page 34
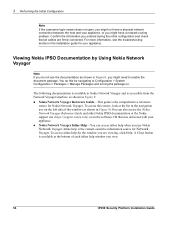
...configuration and check that was delivered with your appliance. „ Nokia Network Voyager Inline Help-You can also access the Nokia Network Voyager Reference Guide and other Nokia IPSO documentation at the Nokia support site (https://support.nokia.com) or on . For more information...appliance, or you might need to Configuration > System Configuration > Packages > Manage Packages and turning the package on the software CD that all cables are viewing, click Help. To access inline help when you view. 34 IP390 Security Platform Installation Guide Inline help window you use Nokia...
...configuration and check that was delivered with your appliance. „ Nokia Network Voyager Inline Help-You can also access the Nokia Network Voyager Reference Guide and other Nokia IPSO documentation at the Nokia support site (https://support.nokia.com) or on . For more information...appliance, or you might need to Configuration > System Configuration > Packages > Manage Packages and turning the package on the software CD that all cables are viewing, click Help. To access inline help when you view. 34 IP390 Security Platform Installation Guide Inline help window you use Nokia...


