
User Guide
Page 4
All rights reserved. 4 fold closed 25 Introduction to the phone - fold open 26 Standby mode...27 Mini display ...27 Main display ...28 Wallpaper...29 Screen saver ...29 Essential indicators in standby mode 29 Some ...(Keyguard) ...32 3. Contents Contents...4 FOR YOUR SAFETY 12 General information 16 Access codes ...16 Configuration settings service ...17 1. Call functions 34 Copyright © 2005 Nokia. Your phone...25 Introduction to the phone - Getting started 19 Installing the battery and the SIM card 19 Attaching the wrist strap ...21 Opening the fold...22 Charging the...
All rights reserved. 4 fold closed 25 Introduction to the phone - fold open 26 Standby mode...27 Mini display ...27 Main display ...28 Wallpaper...29 Screen saver ...29 Essential indicators in standby mode 29 Some ...(Keyguard) ...32 3. Contents Contents...4 FOR YOUR SAFETY 12 General information 16 Access codes ...16 Configuration settings service ...17 1. Call functions 34 Copyright © 2005 Nokia. Your phone...25 Introduction to the phone - Getting started 19 Installing the battery and the SIM card 19 Attaching the wrist strap ...21 Opening the fold...22 Charging the...
User Guide
Page 10
... Battery information 141 Copyright © 2005 Nokia. PC Connectivity 140 Using data communication applications 140 8. Options available for an application 126 Downloading a game or an application 127 Web ...128 Basic steps for accessing and using services 128 Setting up browsing...129 Connecting to a service...129 Browsing the pages ...130 Browsing with phone keys...
... Battery information 141 Copyright © 2005 Nokia. PC Connectivity 140 Using data communication applications 140 8. Options available for an application 126 Downloading a game or an application 127 Web ...128 Basic steps for accessing and using services 128 Setting up browsing...129 Connecting to a service...129 Browsing the pages ...130 Browsing with phone keys...
User Guide
Page 13
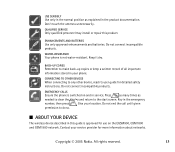
... incompatible products. Keep it dry. ENHANCEMENTS AND BATTERIES Use only approved enhancements and batteries. WATER-RESISTANCE Your phone is switched on the EGSM900, GSM1800 and GSM1900 network. Do not connect incompatible products. Key in your phone. Copyright © 2005 Nokia. Press as many times as explained in the.... BACK-UP COPIES Remember to any other device, read its user guide for more information about networks. EMERGENCY CALLS Ensure the phone is not water-resistant. Do not end the call until given permission to do so. ■ ABOUT YOUR DEVICE The wireless...
... incompatible products. Keep it dry. ENHANCEMENTS AND BATTERIES Use only approved enhancements and batteries. WATER-RESISTANCE Your phone is switched on the EGSM900, GSM1800 and GSM1900 network. Do not connect incompatible products. Key in your phone. Copyright © 2005 Nokia. Press as many times as explained in the.... BACK-UP COPIES Remember to any other device, read its user guide for more information about networks. EMERGENCY CALLS Ensure the phone is not water-resistant. Do not end the call until given permission to do so. ■ ABOUT YOUR DEVICE The wireless...
User Guide
Page 19
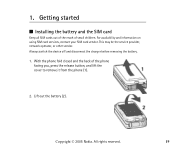
... the SIM card Keep all SIM cards out of the reach of the phone facing you, press the release button, and lift the cover to remove it from the phone (1). 2. Lift out the battery (2). With the phone fold closed and the back of small children. This may be the service ...provider, network operator, or other vendor. Copyright © 2005 Nokia. For availability and information on using SIM card services, ...
... the SIM card Keep all SIM cards out of the reach of the phone facing you, press the release button, and lift the cover to remove it from the phone (1). 2. Lift out the battery (2). With the phone fold closed and the back of small children. This may be the service ...provider, network operator, or other vendor. Copyright © 2005 Nokia. For availability and information on using SIM card services, ...
User Guide
Page 20
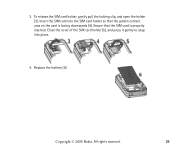
Close the cover of the SIM card holder (5), and press it gently to snap into the SIM card holder so that the SIM card is facing downwards (4). Insert the SIM card into place. 4. All rights reserved. 20 To release the SIM card holder, gently pull the locking clip, and open the holder (3). Copyright © 2005 Nokia. Ensure that the golden contact area on the card is properly inserted. 3. Replace the battery (6).
Close the cover of the SIM card holder (5), and press it gently to snap into the SIM card holder so that the SIM card is facing downwards (4). Insert the SIM card into place. 4. All rights reserved. 20 To release the SIM card holder, gently pull the locking clip, and open the holder (3). Copyright © 2005 Nokia. Ensure that the golden contact area on the card is properly inserted. 3. Replace the battery (6).
User Guide
Page 21
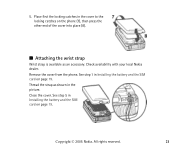
Thread the strap as an accessory. All rights reserved. 21 See step 1 in Installing the battery and the SIM card on page 19. Copyright © 2005 Nokia. Remove the cover from the phone. See step 5 in the picture. Close the cover. Place first the locking catches in the cover to the locking catches on the phone (7), then press the other end of the cover into place (8). ■ Attaching the wrist strap Wrist strap is available as shown in Installing the battery and the SIM card on page 19. 5. Check availability with your local Nokia dealer.
Thread the strap as an accessory. All rights reserved. 21 See step 1 in Installing the battery and the SIM card on page 19. Copyright © 2005 Nokia. Remove the cover from the phone. See step 5 in the picture. Close the cover. Place first the locking catches in the cover to the locking catches on the phone (7), then press the other end of the cover into place (8). ■ Attaching the wrist strap Wrist strap is available as shown in Installing the battery and the SIM card on page 19. 5. Check availability with your local Nokia dealer.
User Guide
Page 22
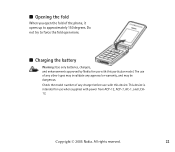
... open more. ■ Charging the battery Warning: Use only batteries, chargers, and enhancements approved by Nokia for use with this device. Do not try to approximately 150 degrees. The use with power from ACP-12, ACP-7, AC-1, and LCH12. Copyright © 2005 Nokia. All rights reserved. 22 This device... is intended for use when supplied with this particular model. Check the model number of any charger before use of the phone, it opens up to force the fold open the fold...
... open more. ■ Charging the battery Warning: Use only batteries, chargers, and enhancements approved by Nokia for use with this device. Do not try to approximately 150 degrees. The use with power from ACP-12, ACP-7, AC-1, and LCH12. Copyright © 2005 Nokia. All rights reserved. 22 This device... is intended for use when supplied with this particular model. Check the model number of any charger before use of the phone, it opens up to force the fold open the fold...
User Guide
Page 23
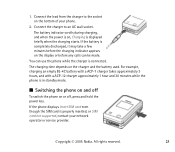
... and off , press and hold the power key. Copyright © 2005 Nokia. The charging time depends on or off To switch the phone on the charger and the battery used. For example, charging an empty BL-4C battery with a ACP-7 charger takes approximately 3 hours, and with a ACP-12 charger approximately ...1 hour and 30 minutes while the phone is properly inserted, or SIM card not ...
... and off , press and hold the power key. Copyright © 2005 Nokia. The charging time depends on or off To switch the phone on the charger and the battery used. For example, charging an empty BL-4C battery with a ACP-7 charger takes approximately 3 hours, and with a ACP-12 charger approximately ...1 hour and 30 minutes while the phone is properly inserted, or SIM card not ...
User Guide
Page 24
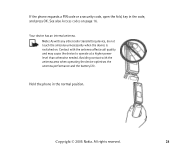
... on page 16. Note: As with the antenna area when operating the device optimises the antenna performance and the battery life. Copyright © 2005 Nokia. Your device has an internal antenna. Hold the phone in the code, and press OK. All rights reserved. 24 See also Access codes on . Contact with the antenna...
... on page 16. Note: As with the antenna area when operating the device optimises the antenna performance and the battery life. Copyright © 2005 Nokia. Your device has an internal antenna. Hold the phone in the code, and press OK. All rights reserved. 24 See also Access codes on . Contact with the antenna...
User Guide
Page 27
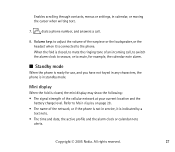
Copyright © 2005 Nokia. Mini display When the fold is indicated by a text note. • The time and date, the active profile and the alarm clock or calendar note alerts. Refer to the phone. Enables scrolling through contacts, menus or settings, in standby mode. When the fold is ... the mini display may show the following: • The signal strength of the cellular network at your current location and the battery charge level. All rights reserved. 27 dials a phone number, and answers a call , to switch the alarm clock to snooze, or to mute, for example, the calendar note...
Copyright © 2005 Nokia. Mini display When the fold is indicated by a text note. • The time and date, the active profile and the alarm clock or calendar note alerts. Refer to the phone. Enables scrolling through contacts, menus or settings, in standby mode. When the fold is ... the mini display may show the following: • The signal strength of the cellular network at your current location and the battery charge level. All rights reserved. 27 dials a phone number, and answers a call , to switch the alarm clock to snooze, or to mute, for example, the calendar note...
User Guide
Page 28
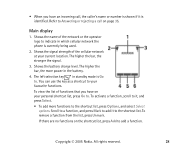
... add more power in which cellular network the phone is currently being used. 2. Copyright © 2005 Nokia. • When you have an incoming call on the shortcut list, press Add to indicate in the battery. 4. The higher the bar, the stronger the signal. 3. Shows the battery charge level. If there are no functions on...
... add more power in which cellular network the phone is currently being used. 2. Copyright © 2005 Nokia. • When you have an incoming call on the shortcut list, press Add to indicate in the battery. 4. The higher the bar, the stronger the signal. 3. Shows the battery charge level. If there are no functions on...
User Guide
Page 58
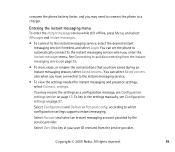
consume the phone battery faster, and you have saved during an instant messaging session, select Saved ... user ID received from the instant messaging service on page 97. You may need to connect the phone to and disconnecting from the service provider. Select Account and select an instant messaging account provided by the service ...provider. Copyright © 2005 Nokia. You can set the phone to automatically connect to key in the settings manually, see Configuration settings service on page 17. All...
consume the phone battery faster, and you have saved during an instant messaging session, select Saved ... user ID received from the instant messaging service on page 97. You may need to connect the phone to and disconnecting from the service provider. Select Account and select an instant messaging account provided by the service ...provider. Copyright © 2005 Nokia. You can set the phone to automatically connect to key in the settings manually, see Configuration settings service on page 17. All...
User Guide
Page 88
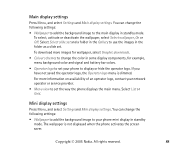
... display settings. You can change the following settings: • Wallpaper to add the background image to your phone to the main display in standby mode. Copyright © 2005 Nokia. Main display settings Press Menu, and select Settings and Main display settings. Select List or Grid. For... more images for example, menu background color and signal and battery bar colors. • Operator logo to use the images in the folder as a slide set your phone mini ...
... display settings. You can change the following settings: • Wallpaper to add the background image to your phone to the main display in standby mode. Copyright © 2005 Nokia. Main display settings Press Menu, and select Settings and Main display settings. Select List or Grid. For... more images for example, menu background color and signal and battery bar colors. • Operator logo to use the images in the folder as a slide set your phone mini ...
User Guide
Page 89
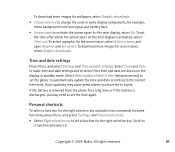
... to set the phone to automatically update the time and date according to expire. Auto-updating may cause some alarms you may need to a function and select it. Scroll to set to the current time zone. All rights reserved. 89 If the battery is removed from the phone for a long ...time or if the battery is activated, select Time-out. Copyright © 2005 Nokia. To select a graphic for screen saver, select Graphic downloads. To download more images for ...
... to set the phone to automatically update the time and date according to expire. Auto-updating may cause some alarms you may need to a function and select it. Scroll to set to the current time zone. All rights reserved. 89 If the battery is removed from the phone for a long ...time or if the battery is activated, select Time-out. Copyright © 2005 Nokia. To select a graphic for screen saver, select Graphic downloads. To download more images for ...
User Guide
Page 114
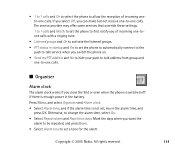
... switched off if there is not set the phone to first notify you of incoming one-toone calls with a ringing tone. • Listened groups and On to activate the listened groups. • PTT status in the battery. Copyright © 2005 Nokia. The service provider may offer some services that override these settings. 1 ...want the alarm to be repeated, and press Done. • Select Alarm tone to -one -to set the phone to automatically connect to the push to talk service when you switch the phone on. • Send my PTT address and No to hide your push to talk address from group and one...
... switched off if there is not set the phone to first notify you of incoming one-toone calls with a ringing tone. • Listened groups and On to activate the listened groups. • PTT status in the battery. Copyright © 2005 Nokia. The service provider may offer some services that override these settings. 1 ...want the alarm to be repeated, and press Done. • Select Alarm tone to -one -to set the phone to automatically connect to the push to talk service when you switch the phone on. • Send my PTT address and No to hide your push to talk address from group and one...

User Guide
Page 124
... time, key in the alarm time in the background when using other features increases the demand on battery power and reduces the battery life. To set the timer to take an intermediate time. Copyright © 2005 Nokia. To stop the timer, select Stop timer. Press Start to run in hours, minutes, and seconds...
... time, key in the alarm time in the background when using other features increases the demand on battery power and reduces the battery life. To set the timer to take an intermediate time. Copyright © 2005 Nokia. To stop the timer, select Stop timer. Press Start to run in hours, minutes, and seconds...

User Guide
Page 126
Running some applications may consume battery power faster (you may need to connect the phone to the phone, select Downloads and App. downloads. settings. Copyright © 2005 Nokia. All rights reserved. 126 For options, press Options, and see Options available for an application on page 97. ...and Collection. • To select and open an application, scroll to the charger). Running some games may consume battery power faster (you may need to connect the phone to the application, and press Open or . To set sounds, lights, and shakes for the application, select...
Running some applications may consume battery power faster (you may need to connect the phone to the phone, select Downloads and App. downloads. settings. Copyright © 2005 Nokia. All rights reserved. 126 For options, press Options, and see Options available for an application on page 97. ...and Collection. • To select and open an application, scroll to the charger). Running some games may consume battery power faster (you may need to connect the phone to the application, and press Open or . To set sounds, lights, and shakes for the application, select...
User Guide
Page 141
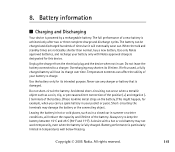
... is particularly limited in summer or winter conditions, will eventually wear out. Use only Nokia approved batteries, and recharge your battery only with a hot or cold battery may not work temporarily, even when the battery is damaged. Overcharging may damage the battery or the connecting object. The full performance of times but it will reduce the...
... is particularly limited in summer or winter conditions, will eventually wear out. Use only Nokia approved batteries, and recharge your battery only with a hot or cold battery may not work temporarily, even when the battery is damaged. Overcharging may damage the battery or the connecting object. The full performance of times but it will reduce the...

User Guide
Page 142
Copyright © 2005 Nokia. Do not dispose of batteries according to local regulations. Do not dispose as household waste. Please recycle when possible. All rights reserved. 142 Dispose of batteries in a fire!
Copyright © 2005 Nokia. Do not dispose of batteries according to local regulations. Do not dispose as household waste. Please recycle when possible. All rights reserved. 142 Dispose of batteries in a fire!
User Guide
Page 144
...When the device returns to its normal temperature, moisture can contain minerals that will help you protect your device does get wet, remove the battery and allow the device to dry completely before replacing it. • Do not use harsh chemicals, cleaning solvents, or strong detergents to ...clean any lenses (such as instructed in dusty, dirty areas. Copyright © 2005 Nokia. Paint can clog the moving parts and electronic components can shorten the life of electronic devices, damage batteries, and warp or melt certain plastics. • Do not store the device in hot areas...
...When the device returns to its normal temperature, moisture can contain minerals that will help you protect your device does get wet, remove the battery and allow the device to dry completely before replacing it. • Do not use harsh chemicals, cleaning solvents, or strong detergents to ...clean any lenses (such as instructed in dusty, dirty areas. Copyright © 2005 Nokia. Paint can clog the moving parts and electronic components can shorten the life of electronic devices, damage batteries, and warp or melt certain plastics. • Do not store the device in hot areas...


