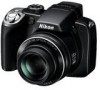

P80 User's Manual
Page 4
... consequences that should be read before using this Nikon product, to a Nikon-authorized service representative for inspection, after unplugging the product and/or removing the battery. Do not use the camera or AC adapter in injury. Handle the camera strap with care Never place the strap around ... presence of malfunction Should you notice smoke or an unusual smell coming from the camera or AC adapter, unplug the AC adapter and remove the battery immediately, taking care to a Nikon-authorized service representative for inspection. Do not disassemble Touching the internal parts of an...
... consequences that should be read before using this Nikon product, to a Nikon-authorized service representative for inspection, after unplugging the product and/or removing the battery. Do not use the camera or AC adapter in injury. Handle the camera strap with care Never place the strap around ... presence of malfunction Should you notice smoke or an unusual smell coming from the camera or AC adapter, unplug the AC adapter and remove the battery immediately, taking care to a Nikon-authorized service representative for inspection. Do not disassemble Touching the internal parts of an...

P80 User's Manual
Page 5
... handle the power cable or go near the metal parts of the plug should you are using the AC adapter, be sure to remove the battery when no charge remains. • Discontinue use in this precaution could result in contact with clothing or skin, rinse immediately with plenty of water. To... to the product, be sure it upside down or backwards. • Do not short or disassemble the battery or attempt to remove or break the battery insulation or casing. • Do not expose the battery to flames or to excessive heat. • Do not immerse in or expose to observe this precaution could...
... handle the power cable or go near the metal parts of the plug should you are using the AC adapter, be sure to remove the battery when no charge remains. • Discontinue use in this precaution could result in contact with clothing or skin, rinse immediately with plenty of water. To... to the product, be sure it upside down or backwards. • Do not short or disassemble the battery or attempt to remove or break the battery insulation or casing. • Do not expose the battery to flames or to excessive heat. • Do not immerse in or expose to observe this precaution could...
P80 User's Manual
Page 9
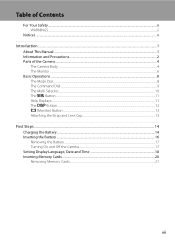
... Help Displays ...11 The s Button...12 x (Monitor) Button ...13 Attaching the Strap and Lens Cap...13 First Steps ...14 Charging the Battery ...14 Inserting the Battery ...16 Removing the Battery ...17 Turning On and Off the Camera...17 Setting Display Language, Date and Time 18 Inserting Memory Cards ...20 Removing Memory Cards...21 vii
... Help Displays ...11 The s Button...12 x (Monitor) Button ...13 Attaching the Strap and Lens Cap...13 First Steps ...14 Charging the Battery ...14 Inserting the Battery ...16 Removing the Battery ...17 Turning On and Off the Camera...17 Setting Display Language, Date and Time 18 Inserting Memory Cards ...20 Removing Memory Cards...21 vii
P80 User's Manual
Page 16
... the URL below for contact information: http://nikonimaging.com/ Use Only Nikon Brand Electronic Accessories Nikon COOLPIX cameras are engineered and proven to operate within the operational and safety requirements of Nikon's "Life-Long Learning" commitment to ongoing product support and education, ...functioning normally. Rechargeable Li-ion Battery EN-EL5 Before Taking Important Pictures Before taking the camera on digital imaging and photography. THE USE OF NON-NIKON ELECTRONIC ACCESSORIES COULD DAMAGE THE CAMERA AND MAY VOID YOUR NIKON WARRANTY. Nikon will not be held liable for...
... the URL below for contact information: http://nikonimaging.com/ Use Only Nikon Brand Electronic Accessories Nikon COOLPIX cameras are engineered and proven to operate within the operational and safety requirements of Nikon's "Life-Long Learning" commitment to ongoing product support and education, ...functioning normally. Rechargeable Li-ion Battery EN-EL5 Before Taking Important Pictures Before taking the camera on digital imaging and photography. THE USE OF NON-NIKON ELECTRONIC ACCESSORIES COULD DAMAGE THE CAMERA AND MAY VOID YOUR NIKON WARRANTY. Nikon will not be held liable for...
P80 User's Manual
Page 19
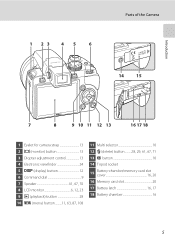
Introduction 1 23 4 5 6 Parts of the Camera 14 15 7 8 9 10 11 12 13 16 17 18 1 Eyelet for camera strap 13 2 x (monitor) button 13 3 Diopter adjustment control 13 4 Electronic viewfinder 24 5 s (display) button 12 6 Command dial 9 7 Speaker 61, 67, 70 8 LCD monitor 6, 12, 23 9 c (playback) button 28 10 d (menu) button..........11, 63, 87, 108 11 Multi selector 10 12 l (delete) button......... 28, 29, 61, 67, 71 13 k button 10 14 Tripod socket 15 Battery-chamber/memory card slot cover 16, 20 16 Memory card slot 20 17 Battery latch 16, 17 18 Battery chamber 16 5
Introduction 1 23 4 5 6 Parts of the Camera 14 15 7 8 9 10 11 12 13 16 17 18 1 Eyelet for camera strap 13 2 x (monitor) button 13 3 Diopter adjustment control 13 4 Electronic viewfinder 24 5 s (display) button 12 6 Command dial 9 7 Speaker 61, 67, 70 8 LCD monitor 6, 12, 23 9 c (playback) button 28 10 d (menu) button..........11, 63, 87, 108 11 Multi selector 10 12 l (delete) button......... 28, 29, 61, 67, 71 13 k button 10 14 Tripod socket 15 Battery-chamber/memory card slot cover 16, 20 16 Memory card slot 20 17 Battery latch 16, 17 18 Battery chamber 16 5
P80 User's Manual
Page 20
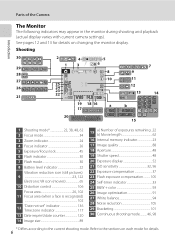
...22, 38, 48, 62 2 Focus mode 34 3 Zoom indicator 24 4 Focus indicator 26 5 Exposure/Focus lock 45 6 Flash indicator 30 7 Flash mode 30 8 Battery level indicator 22 Vibration reduction icon (still pictures) 9 23, 122 Electronic VR icon (movies 65 10 Distortion control 106 Focus area 26, 102 11 Focus...Date not set" indicator 136 Time zone indicator 117 13 Date imprint/date counter 120 14 Image size 89 15 a) Number of the Camera Introduction The Monitor The following indicators may appear in the monitor during shooting and playback (actual display varies with current...
...22, 38, 48, 62 2 Focus mode 34 3 Zoom indicator 24 4 Focus indicator 26 5 Exposure/Focus lock 45 6 Flash indicator 30 7 Flash mode 30 8 Battery level indicator 22 Vibration reduction icon (still pictures) 9 23, 122 Electronic VR icon (movies 65 10 Distortion control 106 Focus area 26, 102 11 Focus...Date not set" indicator 136 Time zone indicator 117 13 Date imprint/date counter 120 14 Image size 89 15 a) Number of the Camera Introduction The Monitor The following indicators may appear in the monitor during shooting and playback (actual display varies with current...

P80 User's Manual
Page 21
Introduction Parts of the Camera Playback 1 2 34 15/05/2008 00:00 17 9999.JPG 16 14 15 5 6 999/ 999 7 13 10 11 12 98 999/ 999 a 9999/9999 59m59s b 9h59m59s 1 Date of recording 18 2 Time of recording 18 3 Volume indicator 61, 67 4 Battery level indicator 22 5 Image quality 88 6 Image size 89...
Introduction Parts of the Camera Playback 1 2 34 15/05/2008 00:00 17 9999.JPG 16 14 15 5 6 999/ 999 7 13 10 11 12 98 999/ 999 a 9999/9999 59m59s b 9h59m59s 1 Date of recording 18 2 Time of recording 18 3 Volume indicator 61, 67 4 Battery level indicator 22 5 Image quality 88 6 Image size 89...
P80 User's Manual
Page 28
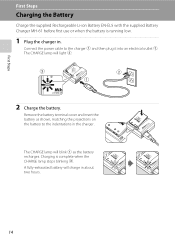
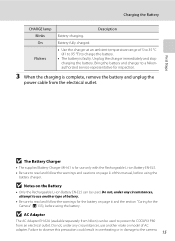
...charger in about two hours. 14 First Steps First Steps Charging the Battery Charge the supplied Rechargeable Li-ion Battery EN-EL5 with the supplied Battery Charger MH-61 before first use or when the battery is complete when the CHARGE lamp stops blinking 2. The CHARGE lamp will... light 3. 2 Charge the battery. A fully-exhausted battery will charge in . Remove the battery terminal cover and insert the battery as the battery recharges. The CHARGE lamp will blink 1 as shown, matching the projections on the battery to the charger 1 and then plug it into an...
...charger in about two hours. 14 First Steps First Steps Charging the Battery Charge the supplied Rechargeable Li-ion Battery EN-EL5 with the supplied Battery Charger MH-61 before first use or when the battery is complete when the CHARGE lamp stops blinking 2. The CHARGE lamp will... light 3. 2 Charge the battery. A fully-exhausted battery will charge in . Remove the battery terminal cover and insert the battery as the battery recharges. The CHARGE lamp will blink 1 as shown, matching the projections on the battery to the charger 1 and then plug it into an...
P80 User's Manual
Page 29
...or in damage to a Nikonauthorized service representative for the Camera" (A 133), before using the battery. First Steps B The Battery Charger • The supplied Battery Charger MH-61 is for use only with the Rechargeable Li-ion Battery EN-EL5. • Be sure to read and follow... this manual, before using the battery charger. B AC Adapter The AC Adapter EH-62A (available separately from an electrical outlet. Unplug the charger immediately and stop charging the battery. Do not, under any circumstances, attempt to power the COOLPIX P80 from Nikon) can be used . On...
...or in damage to a Nikonauthorized service representative for the Camera" (A 133), before using the battery. First Steps B The Battery Charger • The supplied Battery Charger MH-61 is for use only with the Rechargeable Li-ion Battery EN-EL5. • Be sure to read and follow... this manual, before using the battery charger. B AC Adapter The AC Adapter EH-62A (available separately from an electrical outlet. Unplug the charger immediately and stop charging the battery. Do not, under any circumstances, attempt to power the COOLPIX P80 from Nikon) can be used . On...
P80 User's Manual
Page 30
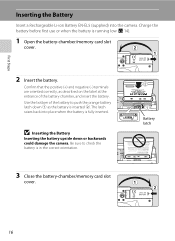
... down or backwards could damage the camera. First Steps Inserting the Battery Insert a Rechargeable Li-ion Battery EN-EL5 (supplied) into place when the battery is fully inserted. The latch raises back into the camera. Battery latch 16 Use the bottom of the battery chamber, and insert the battery. B Inserting the Battery Inserting the battery upside down 1 as described on...
... down or backwards could damage the camera. First Steps Inserting the Battery Insert a Rechargeable Li-ion Battery EN-EL5 (supplied) into place when the battery is fully inserted. The latch raises back into the camera. Battery latch 16 Use the bottom of the battery chamber, and insert the battery. B Inserting the Battery Inserting the battery upside down 1 as described on...

P80 User's Manual
Page 31
... off before removing the battery. observe due caution when removing the battery. Inserting the Battery D Auto Power-Off in Shooting Mode (Standby Mode) The LCD monitor will turn off the camera, press the power switch again. The camera will dim to turn the camera on . The battery can then be removed by... hand 2. • Note that the power-on the battery if no operations are performed for another three minutes (A ...
... off before removing the battery. observe due caution when removing the battery. Inserting the Battery D Auto Power-Off in Shooting Mode (Standby Mode) The LCD monitor will turn off the camera, press the power switch again. The camera will dim to turn the camera on . The battery can then be removed by... hand 2. • Note that the power-on the battery if no operations are performed for another three minutes (A ...
P80 User's Manual
Page 34
...the memory card. 2 Insert the memory card. Make sure that the memory card is off and open the battery- Remove the memory card to store pictures in the camera's internal memory (approx. 50 MB) or on the memory card and pictures recorded to turn off (power...or backwards could damage the camera or the memory card. First Steps Inserting Memory Cards Pictures are automatically stored on removable Secure Digital (SD) memory cards (available separately) (A 131). Close the battery-chamber/memory card slot cover. Make sure that the camera is off the camera. chamber/memory card slot ...
...the memory card. 2 Insert the memory card. Make sure that the memory card is off and open the battery- Remove the memory card to store pictures in the camera's internal memory (approx. 50 MB) or on the memory card and pictures recorded to turn off (power...or backwards could damage the camera or the memory card. First Steps Inserting Memory Cards Pictures are automatically stored on removable Secure Digital (SD) memory cards (available separately) (A 131). Close the battery-chamber/memory card slot cover. Make sure that the camera is off the camera. chamber/memory card slot ...

P80 User's Manual
Page 35
...choose Format and press k. • Do not turn the camera off and confirm that formatting permanently deletes all pictures and other devices into the COOLPIX P80, be sure to a computer. B Memory Cards • Use only Secure Digital memory cards. • Do not perform the following during formatting... multi selector to the "write" position. Unlock by hand. Remove the battery - First Steps Inserting Memory Cards Removing Memory Cards Before removing memory cards, turn the camera off or open the battery-chamber/memory card slot cover until formatting is complete. • The first...
...choose Format and press k. • Do not turn the camera off and confirm that formatting permanently deletes all pictures and other devices into the COOLPIX P80, be sure to a computer. B Memory Cards • Use only Secure Digital memory cards. • Do not perform the following during formatting... multi selector to the "write" position. Unlock by hand. Remove the battery - First Steps Inserting Memory Cards Removing Memory Cards Before removing memory cards, turn the camera off or open the battery-chamber/memory card slot cover until formatting is complete. • The first...

P80 User's Manual
Page 36
...remaining. prepare to turn on , and the lens will extend. B N Battery exhausted. Cannot shoot pictures. The power-on lamp (green) will light, the LCD monitor (or electronic viewfinder) will turn on the camera. Basic Photography and Playback: Auto Mode Basic Photography and Playback: Auto Mode... Camera On and Select A (Auto) Mode This section describes how to shoot in A (auto) mode, an automatic, "point-andshoot" mode recommended for first-time users of digital cameras. 1 Rotate the mode dial to A. 2 Remove the lens cap and press the power switch to charge or replace the battery....
...remaining. prepare to turn on , and the lens will extend. B N Battery exhausted. Cannot shoot pictures. The power-on lamp (green) will light, the LCD monitor (or electronic viewfinder) will turn on the camera. Basic Photography and Playback: Auto Mode Basic Photography and Playback: Auto Mode... Camera On and Select A (Auto) Mode This section describes how to shoot in A (auto) mode, an automatic, "point-andshoot" mode recommended for first-time users of digital cameras. 1 Rotate the mode dial to A. 2 Remove the lens cap and press the power switch to charge or replace the battery....

P80 User's Manual
Page 41
... the situations noted above, try pressing the shutter-release button halfway to refocus several times, or focus on an off , open the battery-chamber/memory card slot cover, or remove or disconnect the power source while these circumstances could result in loss of about 2.9 m (9.5... ft.) at the maximum wide-angle position and about 1.9 m (6.2 ft.) at different distances from the camera (e.g. Basic Photography and Playback: Auto Mode Step 3 Focus and Shoot B During Recording While images are being recorded, the O (wait) icon will blink....
... the situations noted above, try pressing the shutter-release button halfway to refocus several times, or focus on an off , open the battery-chamber/memory card slot cover, or remove or disconnect the power source while these circumstances could result in loss of about 2.9 m (9.5... ft.) at the maximum wide-angle position and about 1.9 m (6.2 ft.) at different distances from the camera (e.g. Basic Photography and Playback: Auto Mode Step 3 Focus and Shoot B During Recording While images are being recorded, the O (wait) icon will blink....
P80 User's Manual
Page 80
...for extended periods, use another make or model of 60 seconds. Do not, under any circumstances, use an AC Adapter EH-62A (available separately from Nikon) (A 130). B Time-Lapse Movie • Flash mode (A 30), focus mode (A 34), and exposure compensation (A 37) cannot be adjusted after ... to observe this precaution could result in overheating or in damage to the camera. 66 • Do not rotate the mode dial to a different setting during recording, use a fully charged battery. • To power the camera continuously for the next shot. 6 Press the shutter-release button all the...
...for extended periods, use another make or model of 60 seconds. Do not, under any circumstances, use an AC Adapter EH-62A (available separately from Nikon) (A 130). B Time-Lapse Movie • Flash mode (A 30), focus mode (A 34), and exposure compensation (A 37) cannot be adjusted after ... to observe this precaution could result in overheating or in damage to the camera. 66 • Do not rotate the mode dial to a different setting during recording, use a fully charged battery. • To power the camera continuously for the next shot. 6 Press the shutter-release button all the...
P80 User's Manual
Page 88
...camera to the Quick Start Guide. For more information on installing the software, refer to a computer, software, including Nikon Transfer and Panorama Maker for creating panorama images, must be copied (transferred) to the computer for storage using the supplied USB cable, pictures recorded with COOLPIX P80...) If your computer is connected to a computer using the Nikon Transfer software. B Notes on Power Source • When connecting the camera to a computer or printer, use a fully-charged battery to the camera. 74 Failure to observe this precaution could result in overheating...
...camera to the Quick Start Guide. For more information on installing the software, refer to a computer, software, including Nikon Transfer and Panorama Maker for creating panorama images, must be copied (transferred) to the computer for storage using the supplied USB cable, pictures recorded with COOLPIX P80...) If your computer is connected to a computer using the Nikon Transfer software. B Notes on Power Source • When connecting the camera to a computer or printer, use a fully-charged battery to the camera. 74 Failure to observe this precaution could result in overheating...

P80 User's Manual
Page 92
... not, under any circumstances, use an AC Adapter EH-62A (available separately from Nikon) (A 130). Connecting to a Printer Users of PictBridge-compatible (A 149) printers can connect the camera directly to the printer and print pictures without using Print set menu (A 84). Failure... • When connecting the camera to a computer or printer, use a fully-charged battery to the camera. Shoot pictures Select pictures for printing pictures: • Insert a memory card into a DPOF-compatible printer's card slot • Take a memory card to a digital photo lab For printing using these...
... not, under any circumstances, use an AC Adapter EH-62A (available separately from Nikon) (A 130). Connecting to a Printer Users of PictBridge-compatible (A 149) printers can connect the camera directly to the printer and print pictures without using Print set menu (A 84). Failure... • When connecting the camera to a computer or printer, use a fully-charged battery to the camera. Shoot pictures Select pictures for printing pictures: • Insert a memory card into a DPOF-compatible printer's card slot • Take a memory card to a digital photo lab For printing using these...
P80 User's Manual
Page 114
... result in overheating or in damage to the camera. • Do not rotate the mode dial, while performing interval-timer shooting. Do not, under any circumstances, use an AC Adapter EH-62A (available separately from Nikon) (A 130). Shooting, Playback and Setup Menus... Shooting Options: The Shooting Menu C Note on Interval Timer Shooting • To prevent the camera from turning off unexpectedly during recording, use a fully charged battery. • To power the camera continuously for more information....
... result in overheating or in damage to the camera. • Do not rotate the mode dial, while performing interval-timer shooting. Do not, under any circumstances, use an AC Adapter EH-62A (available separately from Nikon) (A 130). Shooting, Playback and Setup Menus... Shooting Options: The Shooting Menu C Note on Interval Timer Shooting • To prevent the camera from turning off unexpectedly during recording, use a fully charged battery. • To power the camera continuously for more information....
P80 User's Manual
Page 132
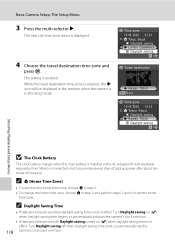
... Seoul Daylight saving Hawaii, Tahiti Daylight saving Shooting, Playback and Setup Menus B The Clock Battery The clock battery charges when the main battery is installed or the AC Adapter EH-62A (available separately from Nikon) is enabled. C Daylight Saving Time • If date and time are set when ...daylight saving time is not in effect: Turn Daylight saving on (w) when daylight saving time begins, to automatically advance the camera's...
... Seoul Daylight saving Hawaii, Tahiti Daylight saving Shooting, Playback and Setup Menus B The Clock Battery The clock battery charges when the main battery is installed or the AC Adapter EH-62A (available separately from Nikon) is enabled. C Daylight Saving Time • If date and time are set when ...daylight saving time is not in effect: Turn Daylight saving on (w) when daylight saving time begins, to automatically advance the camera's...


