
FS726T User Manual
Page 4
....1Q Tag VLAN 3-7 Switch> Trunking Page 3-9 Switch> Monitor Page 3-10 Switch> Advanced> Jumbo Frame 3-10 Switch> Advanced> Spanning Tree Page 3-11 Switch> Advanced> SNMP 3-11 Firmware Menu ...3-12 Firmware> Configuration Backup Page 3-12 Firmware> Factory Reset Page 3-12 Logout ...3-13 Chapter 5 Software Upgrade Appendix A Default Settings Appendix B IEEE 802.1Q Virtual Local Area Network (VLAN) IEEE...
....1Q Tag VLAN 3-7 Switch> Trunking Page 3-9 Switch> Monitor Page 3-10 Switch> Advanced> Jumbo Frame 3-10 Switch> Advanced> Spanning Tree Page 3-11 Switch> Advanced> SNMP 3-11 Firmware Menu ...3-12 Firmware> Configuration Backup Page 3-12 Firmware> Factory Reset Page 3-12 Logout ...3-13 Chapter 5 Software Upgrade Appendix A Default Settings Appendix B IEEE 802.1Q Virtual Local Area Network (VLAN) IEEE...
FS726T User Manual
Page 16
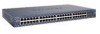
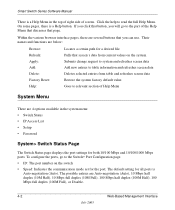
Smart Switch Series Software Manual There is a Help Menu in the system menu: • Switch Status • IP Access List • Setup • Password System> Switch Status Page The Switch Status page displays the port settings for both 10/100 Mbps and 10/100/1000 Mbps ports. Click the help to the Switch... set for the port. The default setting for a desired file. The possible entries are below: Browse: Refresh: Apply: Add: Delete: Factory Reset: Help: Locates a certain path for all ports is a Help button. Within the various browser interface pages, there are 4 options available in ...
Smart Switch Series Software Manual There is a Help Menu in the system menu: • Switch Status • IP Access List • Setup • Password System> Switch Status Page The Switch Status page displays the port settings for both 10/100 Mbps and 10/100/1000 Mbps ports. Click the help to the Switch... set for the port. The default setting for a desired file. The possible entries are below: Browse: Refresh: Apply: Add: Delete: Factory Reset: Help: Locates a certain path for all ports is a Help button. Within the various browser interface pages, there are 4 options available in ...

FS726T User Manual
Page 27
... you can use this function • When reset process is finished, click OK to confirm disconnection of the switch Firmware> Factory Reset Page You can always reset the switch to default values by using a duplicate configuration): • Click Restore to recover the Backup file from your workstation. Firmware Menu Smart Switch Series Software Manual There are 2 options...
... you can use this function • When reset process is finished, click OK to confirm disconnection of the switch Firmware> Factory Reset Page You can always reset the switch to default values by using a duplicate configuration): • Click Restore to recover the Backup file from your workstation. Firmware Menu Smart Switch Series Software Manual There are 2 options...
FS726T User Manual
Page 28
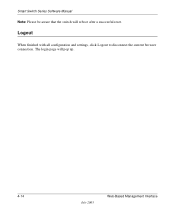
Smart Switch Series Software Manual Note: Please be aware that the switch will pop up. 4-14 July 2005 Web-Based Management Interface Logout When finished with all configuration and settings, click Logout to disconnect the current browser connection. The login page will reboot after a successful reset.
Smart Switch Series Software Manual Note: Please be aware that the switch will pop up. 4-14 July 2005 Web-Based Management Interface Logout When finished with all configuration and settings, click Logout to disconnect the current browser connection. The login page will reboot after a successful reset.
FS726T User Manual
Page 45
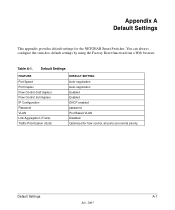
... (QoS) DEFAULT SETTING Auto-negotiation Auto-negotiation Enabled Enabled DHCP enabled password Port-Based VLAN Disabled Optimized for the NETGEAR Smart Switches. You can always configure the switch to default settings by using the Factory Reset function from a Web browser. Appendix A Default Settings This appendix provides default settings for flow control, all ports set normal...
... (QoS) DEFAULT SETTING Auto-negotiation Auto-negotiation Enabled Enabled DHCP enabled password Port-Based VLAN Disabled Optimized for the NETGEAR Smart Switches. You can always configure the switch to default settings by using the Factory Reset function from a Web browser. Appendix A Default Settings This appendix provides default settings for flow control, all ports set normal...
FS726T User Manual
Page 47
... 5-29 CLI Configure System IP-Mode 5-29 CLI Configure System Mask 5-29 CLI Configure System Password 5-31 CLI Configure System RADIUS 5-32 CLI Configure System Reset 5-33 1
... 5-29 CLI Configure System IP-Mode 5-29 CLI Configure System Mask 5-29 CLI Configure System Password 5-31 CLI Configure System RADIUS 5-32 CLI Configure System Reset 5-33 1
FS726T User Manual
Page 48
CLI Configure System Restore 5-30 CLI Configure System Save 5-30 CLI Configure System Stat-Reset 5-34 CLI Configure System Username 5-31 CLI Configure System Web 5-30 CLI Configure Trap 5-25 CLI Exit 5-3 CLI Help 5-2 CLI ... CMI 3-3 COM Port Selection 3-2 Command Menu Interface 3-3 Configuration Manager 4-30 console port 3-1 conventions typography 1-2 Cost 3-25, 4-37 crossover cable D-2 2 D Device Reset 4-18 Differentiated Service 3-20 Differentiated Service Code Points 3-20 DiffServ 3-20 Direct Console Access 3-1 Disable Advanced Alerting 4-20, 4-22 Documentation updates 1-2 DSCP 3-20 E Enable...
CLI Configure System Restore 5-30 CLI Configure System Save 5-30 CLI Configure System Stat-Reset 5-34 CLI Configure System Username 5-31 CLI Configure System Web 5-30 CLI Configure Trap 5-25 CLI Exit 5-3 CLI Help 5-2 CLI ... CMI 3-3 COM Port Selection 3-2 Command Menu Interface 3-3 Configuration Manager 4-30 console port 3-1 conventions typography 1-2 Cost 3-25, 4-37 crossover cable D-2 2 D Device Reset 4-18 Differentiated Service 3-20 Differentiated Service Code Points 3-20 DiffServ 3-20 Direct Console Access 3-1 Disable Advanced Alerting 4-20, 4-22 Documentation updates 1-2 DSCP 3-20 E Enable...

GS748T Hardware manual
Page 3
...SFP GBIC Module ...10 LED Descriptions ...10 Reset Button ...10 Factory Defaults Button ...11 CHAPTER 3: APPLICATIONS...12 Desktop Switching ...12 Backbone Switching ...12 CHAPTER 4: INSTALLATION...14 Step 1: Preparing the Site ...14 Step 2: Installing the Switch ...14 Step 3: Checking the Installation...15 ...Step 4: Connecting Devices to the Switch...15 Step 5: Installing a SFP GBIC Module ...15 Step 6: Applying AC Power ...16 Step 7: Switch Management through a Web Browser or Utility Program (...
...SFP GBIC Module ...10 LED Descriptions ...10 Reset Button ...10 Factory Defaults Button ...11 CHAPTER 3: APPLICATIONS...12 Desktop Switching ...12 Backbone Switching ...12 CHAPTER 4: INSTALLATION...14 Step 1: Preparing the Site ...14 Step 2: Installing the Switch ...14 Step 3: Checking the Installation...15 ...Step 4: Connecting Devices to the Switch...15 Step 5: Installing a SFP GBIC Module ...15 Step 6: Applying AC Power ...16 Step 7: Switch Management through a Web Browser or Utility Program (...

GS748T Hardware manual
Page 4
FACTORY DEFAULTS BUTTON OF THE GS748T GIGABIT SMART SWITCH 11 FIGURE 3-1. EXAMPLE OF BACKBONE SWITCHING ...13 FIGURE 4-1. FRONT PANEL OF THE GS748T GIGABIT SMART SWITCH ...9 FIGURE 2-2. BACK PANEL OF THE GS748T GIGABIT SMART SWITCH ...9 FIGURE 2-3. RESET BUTTON OF THE GS748T GIGABIT SMART SWITCH ...10 FIGURE 2-4. CONNECTING DEVICES TO THE SWITCH ...15 FIGURE 4-3. ATTACHING MOUNTING BRACKETS...15 FIGURE 4-2. INSTALLING A SFP GBIC MODULE INTO GS748T ...16 Page 4 of 20 PACKAGE CONTENTS ...8 FIGURE 2-1. Figures FIGURE 1-1. EXAMPLE OF DESKTOP SWITCHING...12 FIGURE 3-2.
FACTORY DEFAULTS BUTTON OF THE GS748T GIGABIT SMART SWITCH 11 FIGURE 3-1. EXAMPLE OF BACKBONE SWITCHING ...13 FIGURE 4-1. FRONT PANEL OF THE GS748T GIGABIT SMART SWITCH ...9 FIGURE 2-2. BACK PANEL OF THE GS748T GIGABIT SMART SWITCH ...9 FIGURE 2-3. RESET BUTTON OF THE GS748T GIGABIT SMART SWITCH ...10 FIGURE 2-4. CONNECTING DEVICES TO THE SWITCH ...15 FIGURE 4-3. ATTACHING MOUNTING BRACKETS...15 FIGURE 4-2. INSTALLING A SFP GBIC MODULE INTO GS748T ...16 Page 4 of 20 PACKAGE CONTENTS ...8 FIGURE 2-1. Figures FIGURE 1-1. EXAMPLE OF DESKTOP SWITCHING...12 FIGURE 3-2.

GS748T Hardware manual
Page 7
...of the NETGEAR GS748T Gigabit Smart Switch. • Forty-eight 10/100/1000 Mbps auto-sensing Gigabit Ethernet switching ports • Four SFP GBIC combo Gigabit Ethernet slots for optional fiber connectivity • Reset Button • Factory Defaults Button • Administrative switch management ... device follow control ♦ Support Auto-Discovery application program for discovering and managing the smart switches on the network ♦ Support flash upgrading, configuration backup/restore and factory reset • Full compatibility with IEEE standards: o IEEE 802.3i (10BASE-T) o IEEE...
...of the NETGEAR GS748T Gigabit Smart Switch. • Forty-eight 10/100/1000 Mbps auto-sensing Gigabit Ethernet switching ports • Four SFP GBIC combo Gigabit Ethernet slots for optional fiber connectivity • Reset Button • Factory Defaults Button • Administrative switch management ... device follow control ♦ Support Auto-Discovery application program for discovering and managing the smart switches on the network ♦ Support flash upgrading, configuration backup/restore and factory reset • Full compatibility with IEEE standards: o IEEE 802.3i (10BASE-T) o IEEE...

GS748T Hardware manual
Page 9
...(half- When you attach devices to enable communications with the attached device, without requiring user intervention. Page 9 of the NETGEAR GS748T Gigabit Smart Switch. In this way, the Auto Uplink technology compensates for setting uplink connections, while eliminating concern about whether to use crossover... • Reset button • Factory defaults button Front and Back Panels Figures 2-1 and 2-2 show the key components on the front and back panels of the GS748T Gigabit Smart Switch 10/100/1000 Mbps RJ-45 Ports As Figure 2-1 shows, the GS748T Gigabit Smart Switch has 48 ...
...(half- When you attach devices to enable communications with the attached device, without requiring user intervention. Page 9 of the NETGEAR GS748T Gigabit Smart Switch. In this way, the Auto Uplink technology compensates for setting uplink connections, while eliminating concern about whether to use crossover... • Reset button • Factory defaults button Front and Back Panels Figures 2-1 and 2-2 show the key components on the front and back panels of the GS748T Gigabit Smart Switch 10/100/1000 Mbps RJ-45 Ports As Figure 2-1 shows, the GS748T Gigabit Smart Switch has 48 ...

GS748T Hardware manual
Page 10
... a connection with the IEEE 802.3Z 1000 BaseSX Standard. Power is supplied to the switch. To press the Reset Button, insert a small device such as the AGM731F or AGM732F from NETGEAR, allowing you to have fiber connections on . Table 2-1 summarizes the LEDs on the ... and then come back on the port Reset Button The GS748T has a Reset Button to trigger a hardware reset of the NETGEAR GS748T Gigabit Smart Switch has LEDs that is occurring on the switch. This is established on as it resets. Reset Button of the GS748T Gigabit Smart Switch Page 10 of connection can be active....
... a connection with the IEEE 802.3Z 1000 BaseSX Standard. Power is supplied to the switch. To press the Reset Button, insert a small device such as the AGM731F or AGM732F from NETGEAR, allowing you to have fiber connections on . Table 2-1 summarizes the LEDs on the ... and then come back on the port Reset Button The GS748T has a Reset Button to trigger a hardware reset of the NETGEAR GS748T Gigabit Smart Switch has LEDs that is occurring on the switch. This is established on as it resets. Reset Button of the GS748T Gigabit Smart Switch Page 10 of connection can be active....

GS748T Hardware manual
Page 19
...correct duplex mode and speed if the device at a time. APPENDIX B: TROUBLESHOOTING This chapter provides information about troubleshooting the NETGEAR GS748T Gigabit Smart Switch. Network Adapter Cards Make sure the network adapter cards installed in the PCs are correct and comply with your problem, ... If problems occur after altering the network configuration, restore the original connections and determine the problem by resetting the switch. In North America, call 1-888-NETGEAR. Troubleshooting Chart Symptom Power LED is off Link/ACT LED is off Cause No power is received...
...correct duplex mode and speed if the device at a time. APPENDIX B: TROUBLESHOOTING This chapter provides information about troubleshooting the NETGEAR GS748T Gigabit Smart Switch. Network Adapter Cards Make sure the network adapter cards installed in the PCs are correct and comply with your problem, ... If problems occur after altering the network configuration, restore the original connections and determine the problem by resetting the switch. In North America, call 1-888-NETGEAR. Troubleshooting Chart Symptom Power LED is off Link/ACT LED is off Cause No power is received...
GS748Tv3 User Manual
Page 6
Managing Your System Configuration 3-5 Saving and Restoring Your Configuration 3-5 Performing a Factory Reset or a Device Reboot 3-6 Chapter 4 Configuring the Switch Configuring Ports ...4-1 Configuring the Link Aggregation Group (LAG 4-3 Setting Up SNMP ...4-5 Configuring...Configuring the IP Access List 4-22 Controlling Switch Access by MAC Address and VLAN ID 4-22 Setting up Mirroring or "Sniffer Ports 4-23 Viewing Packet Statistics 4-24 Appendix A Specifications and Default Values GS748T Smart Switch Specifications A-1 GS748T Smart Switch Features and Defaults A-2 Appendix B Virtual...
Managing Your System Configuration 3-5 Saving and Restoring Your Configuration 3-5 Performing a Factory Reset or a Device Reboot 3-6 Chapter 4 Configuring the Switch Configuring Ports ...4-1 Configuring the Link Aggregation Group (LAG 4-3 Setting Up SNMP ...4-5 Configuring...Configuring the IP Access List 4-22 Controlling Switch Access by MAC Address and VLAN ID 4-22 Setting up Mirroring or "Sniffer Ports 4-23 Viewing Packet Statistics 4-24 Appendix A Specifications and Default Values GS748T Smart Switch Specifications A-1 GS748T Smart Switch Features and Defaults A-2 Appendix B Virtual...

GS748Tv3 User Manual
Page 23
...includes this information under the following headings: • "Accessing the Switch Management Home Screen" • "Changing Your Password" • "Saving and Restoring Your Configuration" • "Performing a Factory Reset or a Device Reboot" Your NETGEAR Smart Switch series provides a built-in your browser window. Web Management requires either... for performing basic configuration using your network by selecting Setup. This interface also allows for the GS748T Smart Switch. However, if you want to configure and manage it remotely using the home page for system monitoring of the...
...includes this information under the following headings: • "Accessing the Switch Management Home Screen" • "Changing Your Password" • "Saving and Restoring Your Configuration" • "Performing a Factory Reset or a Device Reboot" Your NETGEAR Smart Switch series provides a built-in your browser window. Web Management requires either... for performing basic configuration using your network by selecting Setup. This interface also allows for the GS748T Smart Switch. However, if you want to configure and manage it remotely using the home page for system monitoring of the...

GS748Tv3 User Manual
Page 26
Smart Switch Software User Manual GS748T IP Configuration 1. Enter a static IP address for you switch (make sure that all devices are on the device, and the password will return to the default (see "Performing a Factory Reset or a Device Reboot"). 3-4 Basic Web Management v1.0, October 2007 For optimum security, ...note of numbers and letters-names and simple words can press the Factory Reset button on the front on the same subnet) • Gateway - If you can be a combination of this address for the switch. Select the System > Management > IP Configuration screen shown below to ...
Smart Switch Software User Manual GS748T IP Configuration 1. Enter a static IP address for you switch (make sure that all devices are on the device, and the password will return to the default (see "Performing a Factory Reset or a Device Reboot"). 3-4 Basic Web Management v1.0, October 2007 For optimum security, ...note of numbers and letters-names and simple words can press the Factory Reset button on the front on the same subnet) • Gateway - If you can be a combination of this address for the switch. Select the System > Management > IP Configuration screen shown below to ...

GS748Tv3 User Manual
Page 27
... Password field, enter the new password, and then reenter your new password in case of a loss or an accidental manual factory reset. Saving and Restoring Your Configuration This facility may be used to your system configuration and save the configuration: 1. Select Maintenance > ...the new password. Basic Web Management 3-5 v1.0, October 2007 These topics are described at this stage of the GS748T Smart Switch. A dialog box appears. Smart Switch Software User Manual GS748T To change . 4. To save a possibly long manual configuration in the Re-Type New Password field to ...
... Password field, enter the new password, and then reenter your new password in case of a loss or an accidental manual factory reset. Saving and Restoring Your Configuration This facility may be used to your system configuration and save the configuration: 1. Select Maintenance > ...the new password. Basic Web Management 3-5 v1.0, October 2007 These topics are described at this stage of the GS748T Smart Switch. A dialog box appears. Smart Switch Software User Manual GS748T To change . 4. To save a possibly long manual configuration in the Re-Type New Password field to ...
GS748Tv3 User Manual
Page 28
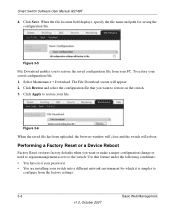
... Performing a Factory Reset or a Device Reboot Factory Reset restores factory defaults when you want to the switch. Smart Switch Software User Manual GS748T 4. The File Download screen will reboot. Figure 3-6 When the saved file has been uploaded, the browser window will close and the switch will appear: .... 3-6 Basic Web Management v1.0, October 2007 Click Browse and select the configuration file that you to configure from your switch into a different network environment for saving the configuration file. Use this feature under the following conditions: • You have...
... Performing a Factory Reset or a Device Reboot Factory Reset restores factory defaults when you want to the switch. Smart Switch Software User Manual GS748T 4. The File Download screen will reboot. Figure 3-6 When the saved file has been uploaded, the browser window will close and the switch will appear: .... 3-6 Basic Web Management v1.0, October 2007 Click Browse and select the configuration file that you to configure from your switch into a different network environment for saving the configuration file. Use this feature under the following conditions: • You have...

GS748Tv3 User Manual
Page 29
...the front panel. The effect of each of the following methods: • From the main menu, Maintenance > Reset > Factory Default. This operation does not disturb your switch configuration. The Device Reboot screen will display. • Select the Check this box and click APPLY below to ...then click Apply, or • Press the Factory Defaults button on the left-hand side of the front panel. Click Apply. Smart Switch Software User Manual GS748T • You want to reboot unit checkbox. 3. Performing a Device Reboot restarts the system. Select the Check this box and click...
...the front panel. The effect of each of the following methods: • From the main menu, Maintenance > Reset > Factory Default. This operation does not disturb your switch configuration. The Device Reboot screen will display. • Select the Check this box and click APPLY below to ...then click Apply, or • Press the Factory Defaults button on the left-hand side of the front panel. Click Apply. Smart Switch Software User Manual GS748T • You want to reboot unit checkbox. 3. Performing a Device Reboot restarts the system. Select the Check this box and click...

GS748Tv3 User Manual
Page 54
Click Refresh to zero. 4-24 v1.0, October 2007 Configuring the Switch Click Clear Counters to reset all counters to retrieve the current count from the Port pull-down menu, select the port number. 2. To view statistics for a single port:... Tx and Rx statistical information, by port. • Summary Statistics: All ports Tx and Rx statistics summarized. To retrieve summary statistics. 1. Smart Switch Software User Manual GS748T Figure 4-23 Viewing Packet Statistics The Port Statistics screen shows reports of packet traffic and packet errors formatted as follows: • Port Selection: ...
Click Refresh to zero. 4-24 v1.0, October 2007 Configuring the Switch Click Clear Counters to reset all counters to retrieve the current count from the Port pull-down menu, select the port number. 2. To view statistics for a single port:... Tx and Rx statistical information, by port. • Summary Statistics: All ports Tx and Rx statistics summarized. To retrieve summary statistics. 1. Smart Switch Software User Manual GS748T Figure 4-23 Viewing Packet Statistics The Port Statistics screen shows reports of packet traffic and packet errors formatted as follows: • Port Selection: ...


