

User Guide
Page 9
... this phone using only the power source that are unsure of other controls may fall, causing serious damage to the product. 6. Do not retrieve the handset or base until after you are covered by the unplugged cords. • The product has been dropped or the cabinet has been damaged. • The...
... this phone using only the power source that are unsure of other controls may fall, causing serious damage to the product. 6. Do not retrieve the handset or base until after you are covered by the unplugged cords. • The product has been dropped or the cabinet has been damaged. • The...
User Guide
Page 11
... Instructions 6 Getting Started 12 Choosing a Location 12 Connecting the Charging Base 12 Installing the Battery Pack in the Handset 13 Charging the Handset 14 Handset Controls 14 Using the Display 15 Handset Standby Screen Example 15 Using the Soft Keys 15 Using the Menu Key 16 Registering an Expansion... Handset 16 Setting Up Your Expansion Handset 18 Setting the Time 18 Personalizing Your Expansion Handset 19 Setting the Ringer Volume 19 Setting the Ringer Tone 20 Setting the Keypad Tone ...
... Instructions 6 Getting Started 12 Choosing a Location 12 Connecting the Charging Base 12 Installing the Battery Pack in the Handset 13 Charging the Handset 14 Handset Controls 14 Using the Display 15 Handset Standby Screen Example 15 Using the Soft Keys 15 Using the Menu Key 16 Registering an Expansion... Handset 16 Setting Up Your Expansion Handset 18 Setting the Time 18 Personalizing Your Expansion Handset 19 Setting the Ringer Volume 19 Setting the Ringer Tone 20 Setting the Keypad Tone ...

User Guide
Page 12
Using the Basic Functions 25 Making and Ending a Call 25 Adjusting the Volume on the Handset During a Call 26 Using the Speakerphone on the Handset (handsfree operation 26 Using Call Waiting 27 Muting a Call 27 Putting a Call on Hold 28 Saving a Name/Number in the Phonebook 28 Inserting Pauses in a ... Calls 33 Dialing a Number from Caller ID 34 Saving a Caller ID Number in the Phonebook. . . . 34 Deleting Caller ID Numbers 35 Finding a Lost or Misplaced Handset 35 Entering Text 36 Using the Belt Clip 37 Using a Headset 37 10
Using the Basic Functions 25 Making and Ending a Call 25 Adjusting the Volume on the Handset During a Call 26 Using the Speakerphone on the Handset (handsfree operation 26 Using Call Waiting 27 Muting a Call 27 Putting a Call on Hold 28 Saving a Name/Number in the Phonebook 28 Inserting Pauses in a ... Calls 33 Dialing a Number from Caller ID 34 Saving a Caller ID Number in the Phonebook. . . . 34 Deleting Caller ID Numbers 35 Finding a Lost or Misplaced Handset 35 Entering Text 36 Using the Belt Clip 37 Using a Headset 37 10
User Guide
Page 13
Advanced Features 38 Using Conference Calling 39 Using the Intercom 40 From the Base Station to All Handsets 40 From the Base Station to a Specific Handset . . . . 40 From a Handset to the Base Station 41 From a Handset to a Handset 41 From a Handset to All Handsets and Base Station 41 Answering a Base Station to Handset Intercom Call 42 Transferring Calls 42 Unannounced Transfer from the Base Station or a Handset 42 Announced Transfer from the Base Station or a Handset 43 Motorola Limited Warranty for the United States and Canada 44 11
Advanced Features 38 Using Conference Calling 39 Using the Intercom 40 From the Base Station to All Handsets 40 From the Base Station to a Specific Handset . . . . 40 From a Handset to the Base Station 41 From a Handset to a Handset 41 From a Handset to All Handsets and Base Station 41 Answering a Base Station to Handset Intercom Call 42 Transferring Calls 42 Unannounced Transfer from the Base Station or a Handset 42 Announced Transfer from the Base Station or a Handset 43 Motorola Limited Warranty for the United States and Canada 44 11
User Guide
Page 14
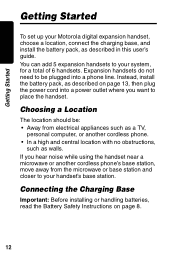
...no obstructions, such as described on page 8. 12 Instead, install the battery pack, as walls. You can add 5 expansion handsets to place the handset. Connecting the Charging Base Important: Before installing or handling batteries, read the Battery Safety Instructions on page 13, then plug the...station, move away from the microwave or base station and closer to be plugged into a power outlet where you want to your Motorola digital expansion handset, choose a location, connect the charging base, and install the battery pack, as described in this user's guide. Getting Started ...
...no obstructions, such as described on page 8. 12 Instead, install the battery pack, as walls. You can add 5 expansion handsets to place the handset. Connecting the Charging Base Important: Before installing or handling batteries, read the Battery Safety Instructions on page 13, then plug the...station, move away from the microwave or base station and closer to be plugged into a power outlet where you want to your Motorola digital expansion handset, choose a location, connect the charging base, and install the battery pack, as described in this user's guide. Getting Started ...
User Guide
Page 15
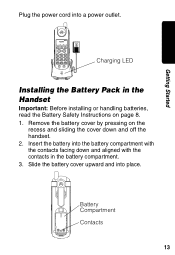
Charging LED charge Installing the Battery Pack in the battery compartment. 3. Remove the battery cover by pressing on page 8. 1. Battery Compartment Contacts 031615 13 Insert the battery into the battery compartment with the contacts facing down and aligned with the contacts in the Handset Important: Before installing or handling batteries, read the Battery Safety Instructions on the recess and sliding the cover down and off the handset. 2. Slide the battery cover upward and into a power outlet. Getting Started Plug the power cord into place.
Charging LED charge Installing the Battery Pack in the battery compartment. 3. Remove the battery cover by pressing on page 8. 1. Battery Compartment Contacts 031615 13 Insert the battery into the battery compartment with the contacts facing down and aligned with the contacts in the Handset Important: Before installing or handling batteries, read the Battery Safety Instructions on the recess and sliding the cover down and off the handset. 2. Slide the battery cover upward and into a power outlet. Getting Started Plug the power cord into place.
User Guide
Page 16
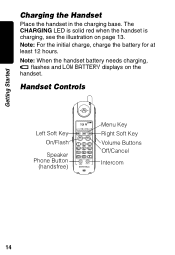
The CHARGING LED is solid red when the handset is charging, see the illustration on the handset. Handset Controls Left Soft Key On/Flash Speaker Phone Button (handsfree) Menu Key Right Soft Key Volume Buttons Off/Cancel Intercom 14 Getting Started Charging the Handset Place the handset in the charging base. Note: For the initial charge, charge the battery for at least 12 hours. Note: When the handset battery needs charging, l flashes and LOW BATTERY displays on page 13.
The CHARGING LED is solid red when the handset is charging, see the illustration on the handset. Handset Controls Left Soft Key On/Flash Speaker Phone Button (handsfree) Menu Key Right Soft Key Volume Buttons Off/Cancel Intercom 14 Getting Started Charging the Handset Place the handset in the charging base. Note: For the initial charge, charge the battery for at least 12 hours. Note: When the handset battery needs charging, l flashes and LOW BATTERY displays on page 13.
User Guide
Page 17
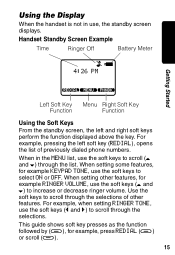
... or decrease ringer volume. For example, when setting RINGER TONE, use the soft keys (< and >) to scroll through the selections of previously dialed phone numbers. Handset Standby Screen Example Time Ringer Off Battery Meter Wm 4:26 PM Getting Started VSU Left Soft Key Menu Right Soft Key Function Function Using the... features, for example, press REDIAL (a) or scroll (a). 15 When in use the soft keys to scroll (t and s) through the list. Using the Display When the handset is not in the MENU list, use , the standby screen displays.
... or decrease ringer volume. For example, when setting RINGER TONE, use the soft keys (< and >) to scroll through the selections of previously dialed phone numbers. Handset Standby Screen Example Time Ringer Off Battery Meter Wm 4:26 PM Getting Started VSU Left Soft Key Menu Right Soft Key Function Function Using the... features, for example, press REDIAL (a) or scroll (a). 15 When in use the soft keys to scroll (t and s) through the list. Using the Display When the handset is not in the MENU list, use , the standby screen displays.
User Guide
Page 18
... base station, SEARCHING FOR BASE displays. Registering an Expansion Handset The handset that came with your phone system. Note: When a handset is not registered or is highlighted. You need to register only new handsets you try to register a 7th handset, Unable to Register displays. 16 If you add to ...items above and below the currently highlighted item. You can register up to 5 expansion handsets to confirm (OK) settings. Use the left ...
... base station, SEARCHING FOR BASE displays. Registering an Expansion Handset The handset that came with your phone system. Note: When a handset is not registered or is highlighted. You need to register only new handsets you try to register a 7th handset, Unable to Register displays. 16 If you add to ...items above and below the currently highlighted item. You can register up to 5 expansion handsets to confirm (OK) settings. Use the left ...

User Guide
Page 19
The ENTER BASE ID screen displays. 5 Using the keys on the handset. Action 1 Ensure the base station is off. The base station displays the 15-digit base ID code. 4 Press NEW (a) on the handset, enter the 15-digit base ID code, then press OK (a). If you register a new handset. Getting Started Note: Install and charge the battery pack before you make a mistake while entering the code, press the left soft key ( Press v if necessary. 2 Press MENU (a) on the base station. 3 Scroll (a) to DISPLAY BASE-ID, then press OK (a).
The ENTER BASE ID screen displays. 5 Using the keys on the handset. Action 1 Ensure the base station is off. The base station displays the 15-digit base ID code. 4 Press NEW (a) on the handset, enter the 15-digit base ID code, then press OK (a). If you register a new handset. Getting Started Note: Install and charge the battery pack before you make a mistake while entering the code, press the left soft key ( Press v if necessary. 2 Press MENU (a) on the base station. 3 Scroll (a) to DISPLAY BASE-ID, then press OK (a).
User Guide
Page 20
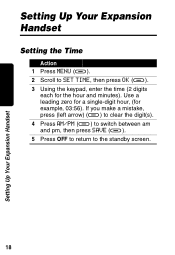
Setting Up Your Expansion Handset Setting Up Your Expansion Handset Setting the Time Action 1 Press MENU (a). 2 Scroll to the standby screen. 18 If you make a mistake, press (left arrow) (a) to clear the digit(s). 4 Press AM/PM (a) to switch between am and pm, then press SAVE (a). 5 Press OFF to return to SET TIME, then press OK (a). 3 Using the keypad, enter the time (2 digits each for example, 03:56). Use a leading zero for a single-digit hour, (for the hour and minutes).
Setting Up Your Expansion Handset Setting Up Your Expansion Handset Setting the Time Action 1 Press MENU (a). 2 Scroll to the standby screen. 18 If you make a mistake, press (left arrow) (a) to clear the digit(s). 4 Press AM/PM (a) to switch between am and pm, then press SAVE (a). 5 Press OFF to return to SET TIME, then press OK (a). 3 Using the keypad, enter the time (2 digits each for example, 03:56). Use a leading zero for a single-digit hour, (for the hour and minutes).

User Guide
Page 21
... Press OFF twice to return to the standby screen, or scroll (a) to OFF, W displays. Setting Up Your Expansion Handset Personalizing Your Expansion Handset You can personalize the handset by setting unique ringer tones, adjusting the ringer volume, and setting the language (English, Spanish, Portuguese, or French). When... set the volume to the lowest level, OFF, the handset does not ring when you set to ...
... Press OFF twice to return to the standby screen, or scroll (a) to OFF, W displays. Setting Up Your Expansion Handset Personalizing Your Expansion Handset You can personalize the handset by setting unique ringer tones, adjusting the ringer volume, and setting the language (English, Spanish, Portuguese, or French). When... set the volume to the lowest level, OFF, the handset does not ring when you set to ...

User Guide
Page 22
When you hear the ring tone you scroll through the ring tones. Each tone plays as you want, press OK (a). 5 Press OFF twice to return to the standby screen, or scroll (a) to RINGER MELODY or RINGER TONE, then press OK (a). 4 Scroll (a) through them. Setting Up Your Expansion Handset Setting the Ringer Tone This option sets a ringer tone for incoming calls. Action 1 Press MENU (a). 2 Scroll (a) to HANDSET SETTINGS, then press OK (a). 3 Scroll (a) to another option. 20
When you hear the ring tone you scroll through the ring tones. Each tone plays as you want, press OK (a). 5 Press OFF twice to return to the standby screen, or scroll (a) to RINGER MELODY or RINGER TONE, then press OK (a). 4 Scroll (a) through them. Setting Up Your Expansion Handset Setting the Ringer Tone This option sets a ringer tone for incoming calls. Action 1 Press MENU (a). 2 Scroll (a) to HANDSET SETTINGS, then press OK (a). 3 Scroll (a) to another option. 20

User Guide
Page 23
...return to the standby screen, or scroll (a) to another option. Setting the Contrast This option adjusts the display contrast. Action 1 Press MENU (a). 2 Scroll (a) to HANDSET SETTINGS, then press OK (a). 3 Scroll (a) to CONTRAST, then press OK (a). 4 Press the left or right soft key (a) to select ON or OFF, ... press OK (a). 5 Press OFF twice to return to the standby screen, or scroll (a) to ON, the handset beeps every time you press a key or button. Setting Up Your Expansion Handset Setting the Keypad Tone This option turns the keypad tones on or off. When set to another option. 21...
...return to the standby screen, or scroll (a) to another option. Setting the Contrast This option adjusts the display contrast. Action 1 Press MENU (a). 2 Scroll (a) to HANDSET SETTINGS, then press OK (a). 3 Scroll (a) to CONTRAST, then press OK (a). 4 Press the left or right soft key (a) to select ON or OFF, ... press OK (a). 5 Press OFF twice to return to the standby screen, or scroll (a) to ON, the handset beeps every time you press a key or button. Setting Up Your Expansion Handset Setting the Keypad Tone This option turns the keypad tones on or off. When set to another option. 21...
User Guide
Page 24
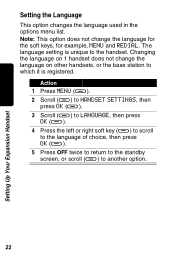
... the base station to which it is unique to another option. 22 Action 1 Press MENU (a). 2 Scroll (a) to HANDSET SETTINGS, then press OK (a). 3 Scroll (a) to LANGUAGE, then press OK (a). 4 Press the left or right soft key (a) to scroll to the language of choice, then ...press OK (a). 5 Press OFF twice to return to the standby screen, or scroll (a) to the handset. Setting Up Your Expansion Handset Setting the Language This option changes the language used in the options menu list. Note: This option does not change the language on...
... the base station to which it is unique to another option. 22 Action 1 Press MENU (a). 2 Scroll (a) to HANDSET SETTINGS, then press OK (a). 3 Scroll (a) to LANGUAGE, then press OK (a). 4 Press the left or right soft key (a) to scroll to the language of choice, then ...press OK (a). 5 Press OFF twice to return to the standby screen, or scroll (a) to the handset. Setting Up Your Expansion Handset Setting the Language This option changes the language used in the options menu list. Note: This option does not change the language on...
User Guide
Page 25
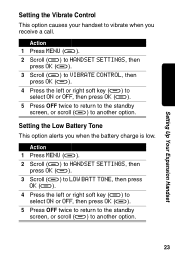
... vibrate when you when the battery charge is low. Action 1 Press MENU (a). 2 Scroll (a) to HANDSET SETTINGS, then press OK (a). 3 Scroll (a) to VIBRATE CONTROL, then press OK (a). 4 Press the left or right soft key (a) to select ON or OFF, then press ...OK (a). 5 Press OFF twice to return to the standby screen, or scroll (a) to another option. 23 Action 1 Press MENU (a). 2 Scroll (a) to HANDSET SETTINGS, then press OK (a). 3 Scroll (a) to LOW BATT TONE, then press OK (a). 4 Press the left or right soft key (a) to select ON or OFF, then...
... vibrate when you when the battery charge is low. Action 1 Press MENU (a). 2 Scroll (a) to HANDSET SETTINGS, then press OK (a). 3 Scroll (a) to VIBRATE CONTROL, then press OK (a). 4 Press the left or right soft key (a) to select ON or OFF, then press ...OK (a). 5 Press OFF twice to return to the standby screen, or scroll (a) to another option. 23 Action 1 Press MENU (a). 2 Scroll (a) to HANDSET SETTINGS, then press OK (a). 3 Scroll (a) to LOW BATT TONE, then press OK (a). 4 Press the left or right soft key (a) to select ON or OFF, then...

User Guide
Page 26
Action 1 Press MENU (a). 2 Scroll (a) to HANDSET SETTINGS, then press OK (a). 3 Scroll (a) to RANGE TONE, then press OK (a). 4 Press the left or right soft key (a) to select ON or OFF, then press OK (a). 5 Press OFF twice to return to the standby screen, or scroll (a) to another option. 24 Setting Up Your Expansion Handset Setting the Range Tone This option alerts you when the handset is out of range from the base station.
Action 1 Press MENU (a). 2 Scroll (a) to HANDSET SETTINGS, then press OK (a). 3 Scroll (a) to RANGE TONE, then press OK (a). 4 Press the left or right soft key (a) to select ON or OFF, then press OK (a). 5 Press OFF twice to return to the standby screen, or scroll (a) to another option. 24 Setting Up Your Expansion Handset Setting the Range Tone This option alerts you when the handset is out of range from the base station.

User Guide
Page 27
The keypad lights up when the handset is on. 2 When you are finished talking, press OFF, or place the handset back on the display before the phone dials the number. 3 When you hear the dial tone, dial the number. or Enter the phone number, then press ON. Using the Basic Functions Making and Ending a Call Action 1 Pick up . 25 Using the Basic Functions This lets you see the phone number on the charger base to hang up the handset and press ON.
The keypad lights up when the handset is on. 2 When you are finished talking, press OFF, or place the handset back on the display before the phone dials the number. 3 When you hear the dial tone, dial the number. or Enter the phone number, then press ON. Using the Basic Functions Making and Ending a Call Action 1 Pick up . 25 Using the Basic Functions This lets you see the phone number on the charger base to hang up the handset and press ON.

User Guide
Page 28
Using the Speakerphone on a call. The SPEAKER PHONE button lights up to increase volume, or press down to decrease volume. Volume Buttons Note: This procedure is the same for adjusting the volume on the handset speakerphone and the headset while on the Handset (handsfree operation) Action Press SPEAKER PHONE. Adjusting the Volume on the Handset During a Call Action Press the volume button up and HANDSFREE ON displays briefly. 26 Using the Basic Functions
Using the Speakerphone on a call. The SPEAKER PHONE button lights up to increase volume, or press down to decrease volume. Volume Buttons Note: This procedure is the same for adjusting the volume on the handset speakerphone and the headset while on the Handset (handsfree operation) Action Press SPEAKER PHONE. Adjusting the Volume on the Handset During a Call Action Press the volume button up and HANDSFREE ON displays briefly. 26 Using the Basic Functions

User Guide
Page 30
... 2 To return to the call, press ON. After 5 minutes, CALL ON HOLD RING BACK! You have 30 seconds to return to the call frequently. Each handset phonebook is unique and is dropped/ disconnected. Note: If Clock Mode is on, CALL ON HOLD displays for up to dial numbers you call before... caller ID or redial list. Saving a Name/Number in the Phonebook Saving names and numbers in the phonebook makes it is not accessible by other handsets or the base station. Action 1 From the standby screen, enter the phone number, then press PHNBK (a). Note: Be sure to include long distance codes and...
... 2 To return to the call, press ON. After 5 minutes, CALL ON HOLD RING BACK! You have 30 seconds to return to the call frequently. Each handset phonebook is unique and is dropped/ disconnected. Note: If Clock Mode is on, CALL ON HOLD displays for up to dial numbers you call before... caller ID or redial list. Saving a Name/Number in the Phonebook Saving names and numbers in the phonebook makes it is not accessible by other handsets or the base station. Action 1 From the standby screen, enter the phone number, then press PHNBK (a). Note: Be sure to include long distance codes and...


