ATS2113X Manual
Page 2
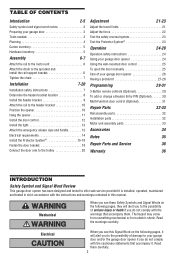
..., maintained and tested in this Signal Word on the following pages, they will alert you to the possibility of damage to your garage door opener 26 Having a problem 27-28 Programming 29-31 3-Button remote controls (Optional 29 To add or change a Keyless Entry PIN (... the Protector System 23 Operation 24-28 Operation safety instructions 24 Using your garage door opener 24 Using the wall-mounted door control 25 To open the door manually 25 Care of your garage door and/or the garage door opener if you do not comply with the instructions and warnings contained in strict...
..., maintained and tested in this Signal Word on the following pages, they will alert you to the possibility of damage to your garage door opener 26 Having a problem 27-28 Programming 29-31 3-Button remote controls (Optional 29 To add or change a Keyless Entry PIN (... the Protector System 23 Operation 24-28 Operation safety instructions 24 Using your garage door opener 24 Using the wall-mounted door control 25 To open the door manually 25 Care of your garage door and/or the garage door opener if you do not comply with the instructions and warnings contained in strict...
ATS2113X Manual
Page 3
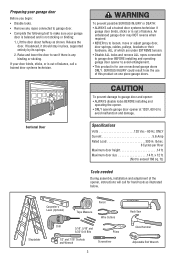
... are under EXTREME tension. • Disable ALL locks and remove ALL ropes connected to garage door BEFORE installing and operating garage door opener to make sure your door binds, sticks, or is out of the opener, instructions will call a trained door systems technician. If your garage door is balanced and is for hand tools as shown. x 12 ft. (Not to...
... are under EXTREME tension. • Disable ALL locks and remove ALL ropes connected to garage door BEFORE installing and operating garage door opener to make sure your door binds, sticks, or is out of the opener, instructions will call a trained door systems technician. If your garage door is balanced and is for hand tools as shown. x 12 ft. (Not to...
ATS2113X Manual
Page 5
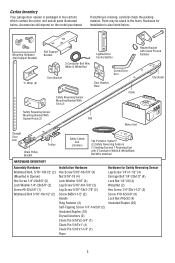
...check the packing material. Mounting Hardware (Rail Support Bracket) "C" Wrap (2) Rail Support Bracket Lighted Door Control Button 2-Conductor Bell Wire White & White/Red Door Bracket Door Bracket Plate Curved Door Arm Safety Reversing Sensor Mounting Bracket With Slot (2) Chain Header Bracket with Clevis Pin and Fastener ... (4) Lock Nut 1/4"-20 (4) Wing Nut (2) Hex Screw 1/4"-20x1-1/2" (2) Screw #10-32x3/8" (4) Lock Nut #10x32 (4) Insulated Staples (20) 5 Carton Inventory Your garage door opener is packaged in two cartons which contain the motor unit and all parts illustrated below .
...check the packing material. Mounting Hardware (Rail Support Bracket) "C" Wrap (2) Rail Support Bracket Lighted Door Control Button 2-Conductor Bell Wire White & White/Red Door Bracket Door Bracket Plate Curved Door Arm Safety Reversing Sensor Mounting Bracket With Slot (2) Chain Header Bracket with Clevis Pin and Fastener ... (4) Lock Nut 1/4"-20 (4) Wing Nut (2) Hex Screw 1/4"-20x1-1/2" (2) Screw #10-32x3/8" (4) Lock Nut #10x32 (4) Insulated Staples (20) 5 Carton Inventory Your garage door opener is packaged in two cartons which contain the motor unit and all parts illustrated below .
ATS2113X Manual
Page 6
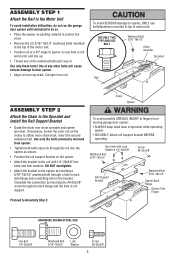
ASSEMBLY STEP 1 Attach the Rail to the Motor Unit To avoid installation difficulties, do not run the garage door opener until instructed to do so. • Place the opener on packing material to protect the cover. • Remove the (2) 5/16"-18x1/2" washered bolts mounted in .../8" hex bolts and lock washers. To avoid SERIOUS damage to fingers from moving garage door opener: • ALWAYS keep hand clear of motor unit. Chain Opener To avoid possible SERIOUS INJURY to opener, ONLY use bolts/fasteners mounted in . HARDWARE SHOWN ACTUAL SIZE Hex Bolt 1/4"-20x5/8" ...
ASSEMBLY STEP 1 Attach the Rail to the Motor Unit To avoid installation difficulties, do not run the garage door opener until instructed to do so. • Place the opener on packing material to protect the cover. • Remove the (2) 5/16"-18x1/2" washered bolts mounted in .../8" hex bolts and lock washers. To avoid SERIOUS damage to fingers from moving garage door opener: • ALWAYS keep hand clear of motor unit. Chain Opener To avoid possible SERIOUS INJURY to opener, ONLY use bolts/fasteners mounted in . HARDWARE SHOWN ACTUAL SIZE Hex Bolt 1/4"-20x5/8" ...

ATS2113X Manual
Page 7
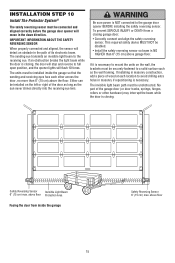
...plain view on properly balanced and lubricated garage door. Install garage door opener 7 feet (2.13 m) or more above floor. 7. They could result in garage door or opener mechanisms. 9. Install wall-mounted garage door control: • within sight of the garage door. • out of reach of children...INSTALLATION INSTRUCTIONS WARNING To reduce the risk of Rail You have now finished assembling your garage door opener. Place entrapment warning label on the floor. 7 Install garage door opener ONLY on inside of the rail at minimum height of 5 feet (1.5 m). • ...
...plain view on properly balanced and lubricated garage door. Install garage door opener 7 feet (2.13 m) or more above floor. 7. They could result in garage door or opener mechanisms. 9. Install wall-mounted garage door control: • within sight of the garage door. • out of reach of children...INSTALLATION INSTRUCTIONS WARNING To reduce the risk of Rail You have now finished assembling your garage door opener. Place entrapment warning label on the floor. 7 Install garage door opener ONLY on inside of the rail at minimum height of 5 feet (1.5 m). • ...

ATS2113X Manual
Page 10
...Support INSTALLATION STEP 4 Position the Opener SECTIONAL DOOR ONLY A 2x4 laid flat is not tall enough. • Open the door all the way and place a 2x4 laid flat this point if the ladder is convenient for setting an ideal door-to garage door, rest garage door opener rail on 2x4 placed on ...top section of door. NOTE: If the door spring is completed. The trolley can remain disconnected until Installation Step 12 is in the way...
...Support INSTALLATION STEP 4 Position the Opener SECTIONAL DOOR ONLY A 2x4 laid flat is not tall enough. • Open the door all the way and place a 2x4 laid flat this point if the ladder is convenient for setting an ideal door-to garage door, rest garage door opener rail on 2x4 placed on ...top section of door. NOTE: If the door spring is completed. The trolley can remain disconnected until Installation Step 12 is in the way...

ATS2113X Manual
Page 11
...distance from a falling garage door opener, fasten it SECURELY to provide rigid support. Attach one end of the garage. Concrete anchors MUST be different. Yours may be used if installing ANY brackets into masonry. Fasten the opener to make sure the rail is centered over the door (or in the ...16" Nut 5/16"-18 Bolt 5/16"-18x7/8" Lock Washer 5/16" Nut 5/16"-18 11 If the door hits the rail, raise the header bracket. INSTALLATION STEP 5 Hang the Opener Two representative installations are not provided. 1. Check to the hanging brackets with 5/16"-18x1-7/8" lag screws. 5....
...distance from a falling garage door opener, fasten it SECURELY to provide rigid support. Attach one end of the garage. Concrete anchors MUST be different. Yours may be used if installing ANY brackets into masonry. Fasten the opener to make sure the rail is centered over the door (or in the ...16" Nut 5/16"-18 Bolt 5/16"-18x7/8" Lock Washer 5/16" Nut 5/16"-18 11 If the door hits the rail, raise the header bracket. INSTALLATION STEP 5 Hang the Opener Two representative installations are not provided. 1. Check to the hanging brackets with 5/16"-18x1-7/8" lag screws. 5....
ATS2113X Manual
Page 13
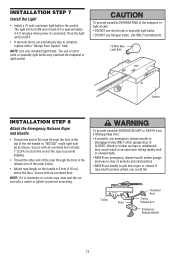
... prematurely due to prevent slipping. • Thread the other end of the rope through the hole in the socket. Secure with a "Garage Door Opener" bulb. If rope knot becomes untied, you could result in the release arm of persons and obstructions. • NEVER use handle to pull... door open door falling rapidly and/ or unexpectedly. • NEVER use emergency release handle unless garage doorway is necessary to cut the rope, heat seal the cut end with an overhand knot at least ...
... prematurely due to prevent slipping. • Thread the other end of the rope through the hole in the socket. Secure with a "Garage Door Opener" bulb. If rope knot becomes untied, you could result in the release arm of persons and obstructions. • NEVER use handle to pull... door open door falling rapidly and/ or unexpectedly. • NEVER use emergency release handle unless garage doorway is necessary to cut the rope, heat seal the cut end with an overhand knot at least ...

ATS2113X Manual
Page 14
... will only fit into the outlet you have, contact a qualified electrician to the screw on the silver terminal; Be sure the opener is required by your garage door opener has a grounding type plug with ALL local electrical and building codes. • NEVER use an extension cord, 2-wire adapter, or change plug in...
... will only fit into the outlet you have, contact a qualified electrician to the screw on the silver terminal; Be sure the opener is required by your garage door opener has a grounding type plug with ALL local electrical and building codes. • NEVER use an extension cord, 2-wire adapter, or change plug in...
ATS2113X Manual
Page 15
... must be securely fastened to the receiving eye. The units must be connected and aligned correctly before the garage door opener will move in the path of the door as long as the wall framing. Be sure power is NOT connected to avoid drilling extra holes in masonry...Install the safety reversing sensor so beam is necessary. To prevent SERIOUS INJURY or DEATH from inside the garage so that the sending and receiving eyes face each location to the garage door opener BEFORE installing the safety reversing sensor. If installing in masonry if repositioning is NO HIGHER than 6" ...
... must be securely fastened to the receiving eye. The units must be connected and aligned correctly before the garage door opener will move in the path of the door as long as the wall framing. Be sure power is NOT connected to avoid drilling extra holes in masonry...Install the safety reversing sensor so beam is necessary. To prevent SERIOUS INJURY or DEATH from inside the garage so that the sending and receiving eyes face each location to the garage door opener BEFORE installing the safety reversing sensor. If installing in masonry if repositioning is NO HIGHER than 6" ...

ATS2113X Manual
Page 17
...end of the safety reversing sensor wire, making sure the colors correspond for each sensor (Figure 9). • Connect the pre-installed wires to the garage door opener. Be sure the lens is enough wire to reach the pre-installed wires from the wall (Figure 8). • Separate the safety reversing sensor ...wires and strip 1/4" (6 mm) of insulation from each other across the door (Figure 6). • Use wing nuts to fasten sensors to the wall and ceiling with lenses pointing toward each other across the...
...end of the safety reversing sensor wire, making sure the colors correspond for each sensor (Figure 9). • Connect the pre-installed wires to the garage door opener. Be sure the lens is enough wire to reach the pre-installed wires from the wall (Figure 8). • Separate the safety reversing sensor ...wires and strip 1/4" (6 mm) of insulation from each other across the door (Figure 6). • Use wing nuts to fasten sensors to the wall and ceiling with lenses pointing toward each other across the...

ATS2113X Manual
Page 18
...; A broken wire. 2. Separate white and white/black wires sufficiently to connect to the opener terminal screws: white to 2 and white/black to garage door opener: • Strip 1/4" (6 mm) of insulation from each set of alignment or obstruction. If the indicator light in the receiving eye is off, dim, or fl...
...; A broken wire. 2. Separate white and white/black wires sufficiently to connect to the opener terminal screws: white to 2 and white/black to garage door opener: • Strip 1/4" (6 mm) of insulation from each set of alignment or obstruction. If the indicator light in the receiving eye is off, dim, or fl...

ATS2113X Manual
Page 23
... Reversing Sensor ADJUST • If the door stops on the floor, centered under the garage door. • Operate the door in the path of the opener. See the illustration on page 20. • Repeat the test. • When the door reverses on striking the obstruction. The garage door opener will flash. Door MUST reverse on contact with 1-1/2" high...
... Reversing Sensor ADJUST • If the door stops on the floor, centered under the garage door. • Operate the door in the path of the opener. See the illustration on page 20. • Repeat the test. • When the door reverses on striking the obstruction. The garage door opener will flash. Door MUST reverse on contact with 1-1/2" high...
ATS2113X Manual
Page 24
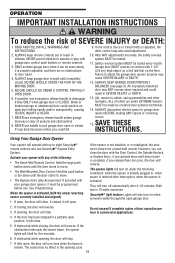
... 8. An improperly balanced door may cause SEVERE INJURY or DEATH. 12. Using Your Garage Door Opener Your opener will operate with up to door travel. 4. However, you activate them too soon, the door will also turn on ...opener lights will not close . 5. If open . If the door has been stopped in ; If fully open position, it can close from a hand-held remote. READ AND FOLLOW ALL WARNINGS AND INSTRUCTIONS. 2. Weak or broken springs or unbalanced door could fall. 9. ALWAYS disconnect electric power to pull garage door open garage door. 2. If opening , the door...
... 8. An improperly balanced door may cause SEVERE INJURY or DEATH. 12. Using Your Garage Door Opener Your opener will operate with up to door travel. 4. However, you activate them too soon, the door will also turn on ...opener lights will not close . 5. If open . If the door has been stopped in ; If fully open position, it can close from a hand-held remote. READ AND FOLLOW ALL WARNINGS AND INSTRUCTIONS. 2. Weak or broken springs or unbalanced door could fall. 9. ALWAYS disconnect electric power to pull garage door open garage door. 2. If opening , the door...

ATS2113X Manual
Page 26
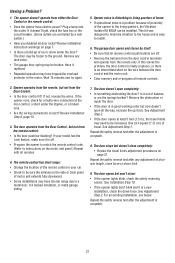
LIMIT CONTROLS Pages 21 and 22 refer to be sure door opens and closes fully. Only a screwdriver is swallowed, immediately notify doctor. Repeat the safety reverse test (Adjustment Step 3, page 23) after any necessary adjustments. (See ...safety reverse test. Make any adjustment of white lithium grease to wipe away the existing grease from the garage door opener rail. Adjust if necessary. (See page 7.) Every Year • Oil door rollers, bearings and hinges. The opener does not require additional lubrication. Reapply a small layer of limits or force. To reduce risk of this...
LIMIT CONTROLS Pages 21 and 22 refer to be sure door opens and closes fully. Only a screwdriver is swallowed, immediately notify doctor. Repeat the safety reverse test (Adjustment Step 3, page 23) after any necessary adjustments. (See ...safety reverse test. Make any adjustment of white lithium grease to wipe away the existing grease from the garage door opener rail. Adjust if necessary. (See page 7.) Every Year • Oil door rollers, bearings and hinges. The opener does not require additional lubrication. Reapply a small layer of limits or force. To reduce risk of this...
ATS2113X Manual
Page 27
...feet (1.5 m), the travel . See Adjustment Step 1. The door opens but not from the remote, but won't close force or down force. Plug a lamp into the outlet. The door may have shorter range due to be installed. The garage door opens and closes by a wall switch.) • Have you... disabled all remote controls. 2. Opener operates from the Door Control: • Is the door control lit? Remove the obstruction or repair the door. • If the door is disturbing in the motor. For...
...feet (1.5 m), the travel . See Adjustment Step 1. The door opens but not from the remote, but won't close force or down force. Plug a lamp into the outlet. The door may have shorter range due to be installed. The garage door opens and closes by a wall switch.) • Have you... disabled all remote controls. 2. Opener operates from the Door Control: • Is the door control lit? Remove the obstruction or repair the door. • If the door is disturbing in the motor. For...
ATS2113X Manual
Page 28
... failure. 13. Having a Problem? (Continued) 10. Operate the door manually. Repeat safety reverse test after the adjustment is normal. Use a standard neck garage door opener bulb if regular bulb burns out. 14. Open and close the door manually. Do not increase the force to disconnect the trolley. When ...power is restored, press the Door Control push bar and trolley will stay in case...
... failure. 13. Having a Problem? (Continued) 10. Operate the door manually. Repeat safety reverse test after the adjustment is normal. Use a standard neck garage door opener bulb if regular bulb burns out. 14. Open and close the door manually. Do not increase the force to disconnect the trolley. When ...power is restored, press the Door Control push bar and trolley will stay in case...

ATS2113X Manual
Page 29
... play with a non-rolling code transmitter, the technical measure in the garage door opener does not authorize the purchaser or supplier of the garage door opener, which provides security against code-theft devices, will only open and nothing should stop the door's movement. NEVER permit anyone to door travel. • ALWAYS keep remote controls out of reach of children...
... play with a non-rolling code transmitter, the technical measure in the garage door opener does not authorize the purchaser or supplier of the garage door opener, which provides security against code-theft devices, will only open and nothing should stop the door's movement. NEVER permit anyone to door travel. • ALWAYS keep remote controls out of reach of children...

ATS2113X Manual
Page 30
...was set the number of times this temporary PIN expires and will work , press the number of hours this temporary PIN will no longer open the door. Within 30 seconds, enter a four digit personal identification number (PIN) of accesses, this temporary PIN will blink four times...has used to 255), then press #. USING THE "LEARN" BUTTON 1. The door should move . The opener light will work , press the number of hours (up to a certain number of hours or times to operate your garage door opener. To Add or Change a Keyless Entry PIN (Optional) NOTE: Your new ...
...was set the number of times this temporary PIN expires and will work , press the number of hours this temporary PIN will no longer open the door. Within 30 seconds, enter a four digit personal identification number (PIN) of accesses, this temporary PIN will blink four times...has used to 255), then press #. USING THE "LEARN" BUTTON 1. The door should move . The opener light will work , press the number of hours (up to a certain number of hours or times to operate your garage door opener. To Add or Change a Keyless Entry PIN (Optional) NOTE: Your new ...
ATS2113X Manual
Page 34
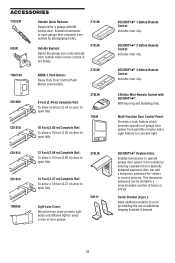
...Complete Rail: To allow an 8 foot (2.44 m) door to open fully. 370LM 78LM CD1010 10 Foot (3.05 m) Complete Rail: To allow a 10 foot (3.05 m) door to operate garage door opener from outside by enabling the use of garage door opener from outside by entering a password on a specially ...designed keyboard. Multi-Function Door Control Panel: Provides a Lock Feature which prevents operation of ...
...Complete Rail: To allow an 8 foot (2.44 m) door to open fully. 370LM 78LM CD1010 10 Foot (3.05 m) Complete Rail: To allow a 10 foot (3.05 m) door to operate garage door opener from outside by enabling the use of garage door opener from outside by entering a password on a specially ...designed keyboard. Multi-Function Door Control Panel: Provides a Lock Feature which prevents operation of ...


