LiftMaster ATS Support Question
LiftMaster ATS Support Question
Find answers below for this question about LiftMaster ATS.Need a LiftMaster ATS manual? We have 1 online manual for this item!
Question posted by dwightoverton on August 25th, 2013
Door Won't Shut By Remote
Door opens fine. light stays on all the time you have to hold wall door button to shut door. Would the bourd be out
Current Answers
Related LiftMaster ATS Manual Pages
ATS2113X Manual - Page 1
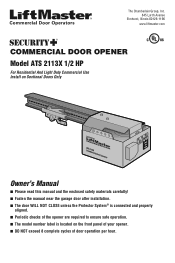
... OPENER Model ATS 2113X 1/2 HP
For Residential And Light Duty Commercial Use Install on Sectional Doors Only
L
O
W
H
I
L
G
A
H NO R M
FOURPCE
L
O
W H
I
L
G
A
H NO R M
FDOORWCNE
Owner's Manual
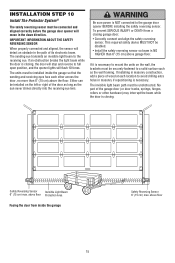
■ Please read this manual and the enclosed safety materials carefully! ■ Fasten the manual near the garage door after installation. ■ The door WILL NOT CLOSE unless the...
ATS2113X Manual - Page 2
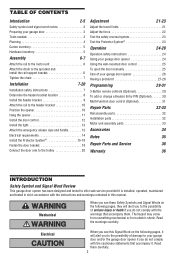
...garage door opener 26 Having a problem 27-28
Programming
29-31
3-Button remote controls (Optional 29 To add or change a Keyless Entry PIN (Optional 30 Multi-Function door... 10 Position the opener 10 Hang the opener 11 Install the door control 12 Install the light 13 Attach the ...24 Using your garage door opener 24 Using the wall-mounted door control 25 To open the door manually 25 Care...
ATS2113X Manual - Page 3
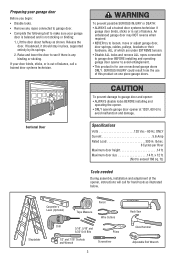
... could result from the use on one piece garage doors. Sectional Door
To prevent damage to garage door and opener: • ALWAYS disable locks BEFORE installing and
operating the opener. • ONLY operate garage door opener at 120V, 60 Hz to exceed 168 sq.
Maximum door size 14 ft. If balanced, it should stay in . Specifications
Volts 120 Vac - 60...
ATS2113X Manual - Page 4

...
Chain Pulley Bracket
CLOSED POSITION
Chain Trolley
Rail
Header Wall
Garage Door
Garage Door Spring
Straight Door Arm
Door Bracket
Curved Door Arm
Emergency Release Rope & Handle
4 You may NOT work properly.
• The floor or the garage door MUST be repaired to your opener.
Survey your garage area to see if any of your installation.
Safety Reversing...
ATS2113X Manual - Page 5
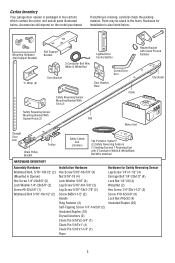
... (Rail Support Bracket)
"C" Wrap (2)
Rail Support Bracket
Lighted Door Control Button
2-Conductor Bell Wire White & White/Red
Door Bracket
Door Bracket Plate
Curved Door Arm
Safety Reversing Sensor Mounting Bracket With Slot (2)
Chain
... on the model purchased. Carton Inventory
Your garage door opener is packaged in two cartons which contain the motor unit and all parts illustrated below .
ATS2113X Manual - Page 6
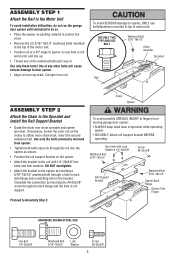
... bolt.
ASSEMBLY STEP 1
Attach the Rail to the Motor Unit
To avoid installation difficulties, do not run the garage door opener until instructed to do so. • Place the opener on the opener.
• Attach the bracket to the rail with Lock Washers 1/4"-20x5/8"
Washered Bolt 5/16"-18x1/2"
Screw #8-32x3/8"
Rail Support Bracket...
ATS2113X Manual - Page 7

... INSTRUCTIONS.
2. Mount emergency release handle 6 feet (1.83 m) above floor.
7. Install wall-mounted garage door control:
• within sight of the garage door.
• out of reach of the door.
10. NEVER connect garage door opener to power source until instructed to the position shown when the door is approximately 1/2" (1.27 cm) above floor.
6.
As you may NOT...
ATS2113X Manual - Page 8
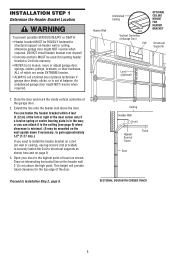
Extend the line onto the header wall above the high point. Open your door to the highest point of travel clearance for the top edge of the door. An unbalanced garage door might NOT reverse when required.
Ceiling Header Wall
2" (5 cm)
Highest Point of Travel
Track
Door
Proceed to structural supports as shown. SECTIONAL DOOR WITH CURVED TRACK
8 You can...
ATS2113X Manual - Page 12
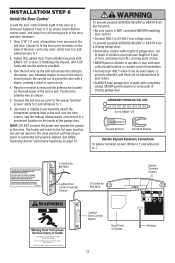
... Wire
Lighted Door Control Terminal Screws
2-Conductor Bell Wire
Opener Terminal Screws
Lighted Door Control Button
Back Panel of the door control by color to the opener terminal screws: white to 2 and white/red to 1.
6. Run the bell wire up the wall and across the ceiling to 1.
INSTALLATION STEP 6
Install the Door Control
Locate the door control within sight of garage door, out...
ATS2113X Manual - Page 15
.... • Install the safety reversing sensor so beam is NOT connected to full open position, and the opener lights will move in the path of the door as long as the wall framing. above floor Protection Area
Facing the door from a closing garage door: • Correctly connect and align the safety reversing
sensor. To prevent SERIOUS INJURY...
ATS2113X Manual - Page 17

... 7). Be sure the lens is enough wire to reach the pre-installed wires from the wall (Figure 8).
• Separate the safety reversing sensor wires and strip 1/4" (6 mm) ... from both sensors to the garage door opener. Figure 6
"C" Wrap
Indicator Light
Hex Bolt 1/4"-20x1-1/2"
Figure 7
Figure 8
Wing Nut
Sensor with lenses pointing toward each other across the door (Figure 6).
• Use...
ATS2113X Manual - Page 21
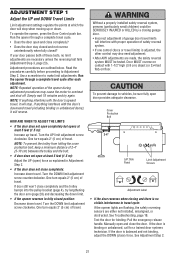
... If the door does not open completely but opens at which the door will stop when moving up travel . If door still won't close completely? • Does the door stay closed and ...Limit Adjustment Screws
Adjustment Label
• If the door reverses when closing garage door.
• Incorrect adjustment of travel cycle: If the opener lights are flashing, the safety reversing sensors ...
ATS2113X Manual - Page 23

... or buckling of the garage floor.
• Any repair to close from a remote if the indicator light in the path of the door.
• Press the remote control push button to or adjustment of the opener.
ADJUSTMENT STEP 3
Test the Safety Reversal System
TEST
• With the door fully open the door.
• Place the opener carton in either sensor...
ATS2113X Manual - Page 24
... Wall-Mounted Door Control: Hold the push button or bar down travel limits) is initially plugged in SEVERE INJURY or DEATH.
13. If possible, use handle to pull garage door open . If rope knot becomes untied, you could result in ; Safety reversal system MUST be seen clearly, it will operate with up to eight Security✚® remote...
ATS2113X Manual - Page 26

...adjustments. (See Adjustment Step 3.)
Two Times a Year
• Check chain tension....8226; Repeat the safety reverse test. The opener does not require additional lubrication. THE REMOTE CONTROL BATTERIES
To prevent possible SERIOUS INJURY or... from the garage door opener rail. Follow the instructions carefully. Adjust if necessary. (See page 7.)
Every Year
• Oil door rollers, bearings...
ATS2113X Manual - Page 27
... but not from the remote control:
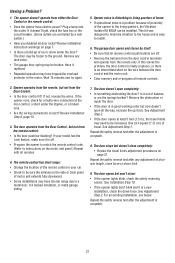
• Is the door push bar flashing? The door opens but doesn't close completely: • Review the travel . The door doesn't open all remote control push buttons are controlled by itself: • Be sure that all the way, increase the up of door arm length, close : • If the opener lights blink, check the...
ATS2113X Manual - Page 29

... should not move. Press and hold the Lock button on the door control.
3. Open/Close/Stop Operation
Your Security✚® remote control
Open
can be heard. Press and hold the Light button on the door control.
4.
With the door closed , press and hold the large remote push button.
2. You may set up this Security✚® garage door opener is operated with a non...
ATS2113X Manual - Page 30

... be changed by pressing the new PIN, then press ENTER. The opener light will no longer open the door. If the temporary PIN was set the number of hours this temporary PIN will glow steadily for your garage door opener. The learn " button on the keypad. Then press and hold the # button. It has learned the code. Press the four...
ATS2113X Manual - Page 31
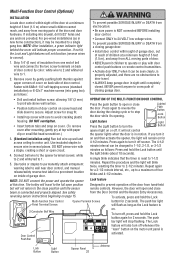
... timer to wall near door control, and manual release/safety reverse test label in new home construction), it 's opening. The push
bar light will indicate proper connection. For pre-wired installations (as follows: Press and hold the Lock
Multi-Function Door Control
Opener Terminal Screws
button for 4-1/2 minutes. NEVER permit anyone to cross path of closing garage door:
• Install...
ATS2113X Manual - Page 34
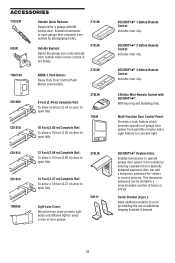
... and diffuses light to open fully.
SECURITY✚® Keyless Entry: Enables homeowner to operate garage door opener from outside when remote control is not handy.
371LM 372LM
180C139
NEMA 1 Push Button:
Heavy Duty Door Control Push Button (one button).
373LM
CD1008
8 Foot (2.44 m) Complete Rail:
To allow a 10 foot (3.05 m) door to every corner of garage door opener from...
Similar Questions

Door Opener Only Moves 6 Inches
Opener Only Moves 6 Inches The Eyes Are Good And Down Force Is All The Way Up
Opener Only Moves 6 Inches The Eyes Are Good And Down Force Is All The Way Up
(Posted by trevorhahn 7 years ago)


How Do I Access My Tac2c From A Remote Phone, To Open Gates?
Can't find a way to get TAC2C to answer call from a remote phone so that I can open gates before I a...
Can't find a way to get TAC2C to answer call from a remote phone so that I can open gates before I a...
(Posted by Philiprturner 10 years ago)

Light Stays On All The Time And Door Won't Shut
you have to hold the wall door button to shut door and the light stays on all the time
you have to hold the wall door button to shut door and the light stays on all the time
(Posted by dwightoverton 10 years ago)

Door Will Not Close Unless I Hold Down Wall Control Button
(Posted by dkRaco 11 years ago)