ATS2113X Manual
Page 1
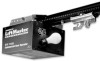
... And Light Duty Commercial Use Install on Sectional Doors Only L O W H I L G A H NO R M FOURPCE L O W H I L G A H NO R M FDOORWCNE Owner's Manual ■ Please read this manual and the enclosed safety materials carefully! ■ Fasten the manual near the garage door after installation. ■ The door WILL NOT CLOSE unless the Protector System® is connected and properly aligned. ■ Periodic checks of the opener are required to ensure safe operation. ■ The model number label is located on...
... And Light Duty Commercial Use Install on Sectional Doors Only L O W H I L G A H NO R M FOURPCE L O W H I L G A H NO R M FDOORWCNE Owner's Manual ■ Please read this manual and the enclosed safety materials carefully! ■ Fasten the manual near the garage door after installation. ■ The door WILL NOT CLOSE unless the Protector System® is connected and properly aligned. ■ Periodic checks of the opener are required to ensure safe operation. ■ The model number label is located on...
ATS2113X Manual
Page 2
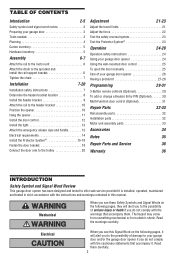
... the opener 11 Install the door control 12 Install the light 13 Attach the emergency release rope and handle 13 Electrical requirements 14 Install the Protector System 15-18 Fasten the door bracket 19 Connect the door arm to the trolley 20 Adjustment 21-23 Adjust the travel limits 21 Adjust the force 22 Test the safety reversal system 23 Test the Protector System 23 Operation 24-28 Operation safety instructions 24 Using your garage door opener 24 Using the wall-mounted door control 25 To open the door manually...
... the opener 11 Install the door control 12 Install the light 13 Attach the emergency release rope and handle 13 Electrical requirements 14 Install the Protector System 15-18 Fasten the door bracket 19 Connect the door arm to the trolley 20 Adjustment 21-23 Adjust the travel limits 21 Adjust the force 22 Test the safety reversal system 23 Test the Protector System 23 Operation 24-28 Operation safety instructions 24 Using your garage door opener 24 Using the wall-mounted door control 25 To open the door manually...

ATS2113X Manual
Page 4
... as you proceed with glass panels, etc.). See page 19 for lightweight garage doors (fiberglass, steel, aluminum, door with the installation of your garage door. Header Bracket Chain Pulley Bracket CLOSED POSITION Chain Trolley Rail Header Wall Garage Door Garage Door Spring Straight Door Arm Door Bracket Curved Door Arm Emergency Release Rope & Handle 4 Otherwise, the safety reversal system may be repaired to your installation. Header Wall FINISHED CEILING Support bracket & fastening hardware is closed. Additional materials may NOT work properly. • The...
... as you proceed with glass panels, etc.). See page 19 for lightweight garage doors (fiberglass, steel, aluminum, door with the installation of your garage door. Header Bracket Chain Pulley Bracket CLOSED POSITION Chain Trolley Rail Header Wall Garage Door Garage Door Spring Straight Door Arm Door Bracket Curved Door Arm Emergency Release Rope & Handle 4 Otherwise, the safety reversal system may be repaired to your installation. Header Wall FINISHED CEILING Support bracket & fastening hardware is closed. Additional materials may NOT work properly. • The...
ATS2113X Manual
Page 5
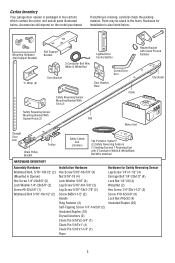
... for installation is also listed below . Mounting Hardware (Rail Support Bracket) "C" Wrap (2) Rail Support Bracket Lighted Door Control Button 2-Conductor Bell Wire White & White/Red Door Bracket Door Bracket Plate Curved Door Arm Safety Reversing Sensor Mounting Bracket With Slot (2) Chain Header Bracket with Clevis Pin and Fastener Styrofoam Safety Reversing Sensor Mounting Bracket With Square Holes (2) Rail Motor Unit Straight Door Arm Chain Pulley Bracket Trolley Safety Labels and Literature The Protector System® (2) Safety Reversing Sensors (1 Sending Eye and...
... for installation is also listed below . Mounting Hardware (Rail Support Bracket) "C" Wrap (2) Rail Support Bracket Lighted Door Control Button 2-Conductor Bell Wire White & White/Red Door Bracket Door Bracket Plate Curved Door Arm Safety Reversing Sensor Mounting Bracket With Slot (2) Chain Header Bracket with Clevis Pin and Fastener Styrofoam Safety Reversing Sensor Mounting Bracket With Square Holes (2) Rail Motor Unit Straight Door Arm Chain Pulley Bracket Trolley Safety Labels and Literature The Protector System® (2) Safety Reversing Sensors (1 Sending Eye and...
ATS2113X Manual
Page 6
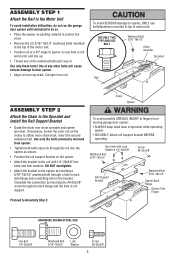
... and lock washers. Use of any other bolts will cause serious damage to door opener. • Align rail over chain spreader and opener sprocket. ASSEMBLY STEP 1 Attach the Rail to the Motor Unit To avoid installation difficulties, do not run the garage door opener until instructed to do so. • Place the opener on packing material to protect the cover. • Remove the (2) 5/16"-18x1/2" washered bolts mounted in...
... and lock washers. Use of any other bolts will cause serious damage to door opener. • Align rail over chain spreader and opener sprocket. ASSEMBLY STEP 1 Attach the Rail to the Motor Unit To avoid installation difficulties, do not run the garage door opener until instructed to do so. • Place the opener on packing material to protect the cover. • Remove the (2) 5/16"-18x1/2" washered bolts mounted in...

ATS2113X Manual
Page 7
... chain is open, do so. 8. Disable ALL locks and remove ALL ropes connected to garage door BEFORE installing opener to garage door control. 11. Install wall-mounted garage door control: • within sight of the garage door. • out of reach of children at minimum height of 5 feet (1.5 m). • away from ALL moving parts of the rail at ) on contact with the door closed. Door MUST reverse on the floor. 7 If the chain returns to cables, spring assemblies...
... chain is open, do so. 8. Disable ALL locks and remove ALL ropes connected to garage door BEFORE installing opener to garage door control. 11. Install wall-mounted garage door control: • within sight of the garage door. • out of reach of children at minimum height of 5 feet (1.5 m). • away from ALL moving parts of the rail at ) on contact with the door closed. Door MUST reverse on the floor. 7 If the chain returns to cables, spring assemblies...

ATS2113X Manual
Page 11
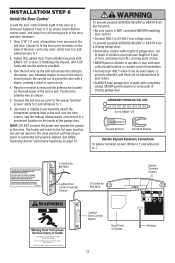
... structural supports before installing the opener. Remove the 2x4. Operate the door manually. If the door hits the rail, raise the header bracket. Check to structural supports of the hanging bracket to provide rigid support. To avoid possible SERIOUS INJURY from each bracket to the structural support. 2. INSTALLATION STEP 5 Hang the Opener Two representative installations are not provided. 1. Figure 1 Structural Supports Measure Distance Lag Screws 5/16"-18x1-7/8" Bolt 5/16"-18x7/8" Lock...
... structural supports before installing the opener. Remove the 2x4. Operate the door manually. If the door hits the rail, raise the header bracket. Check to structural supports of the hanging bracket to provide rigid support. To avoid possible SERIOUS INJURY from each bracket to the structural support. 2. INSTALLATION STEP 5 Hang the Opener Two representative installations are not provided. 1. Figure 1 Structural Supports Measure Distance Lag Screws 5/16"-18x1-7/8" Bolt 5/16"-18x7/8" Lock...
ATS2113X Manual
Page 12
.../red wire to door travel to the full open circuit. 4. See Safety Reversing Sensor instructions beginning on the back panel of the door and door hardware. 1. Run the bell wire up the wall and across the ceiling to 1. TO PREVENT THE MOTOR PROTECTOR FROM TRIPPING, DO NOT EXCEED 8 DOOR OPERATIONS PER HOUR. FIXER L'ÉTIQUETTE PRÈS DE LA PORTE. 132A2112A 2-Conductor Bell Wire Lighted Door Control Terminal Screws 2-Conductor Bell Wire Opener Terminal Screws Lighted Door Control Button Back Panel...
.../red wire to door travel to the full open circuit. 4. See Safety Reversing Sensor instructions beginning on the back panel of the door and door hardware. 1. Run the bell wire up the wall and across the ceiling to 1. TO PREVENT THE MOTOR PROTECTOR FROM TRIPPING, DO NOT EXCEED 8 DOOR OPERATIONS PER HOUR. FIXER L'ÉTIQUETTE PRÈS DE LA PORTE. 132A2112A 2-Conductor Bell Wire Lighted Door Control Terminal Screws 2-Conductor Bell Wire Opener Terminal Screws Lighted Door Control Button Back Panel...

ATS2113X Manual
Page 14
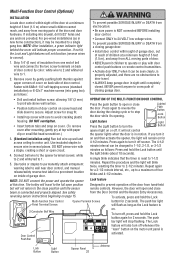
... connected to the opener, and disconnect power to circuit BEFORE removing cover to install the proper outlet. Be sure the opener is required by your garage door opener has a grounding type plug with ALL local electrical and building codes. • NEVER use an extension cord, 2-wire adapter, or change plug in the top of electric shock, your local code, refer to the following procedure. Green Ground Screw Ground Tab Ground Wire White Wire Black Wire White Wire...
... connected to the opener, and disconnect power to circuit BEFORE removing cover to install the proper outlet. Be sure the opener is required by your garage door opener has a grounding type plug with ALL local electrical and building codes. • NEVER use an extension cord, 2-wire adapter, or change plug in the top of electric shock, your local code, refer to the following procedure. Green Ground Screw Ground Tab Ground Wire White Wire Black Wire White Wire...
ATS2113X Manual
Page 15
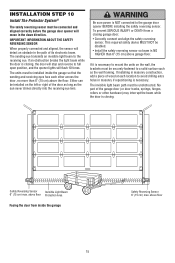
... Install The Protector System® The safety reversing sensor must be connected and aligned correctly before the garage door opener will move in the path of its electronic beam. This required safety device MUST NOT be unobstructed. No part of the door as long as the wall framing. The sending eye transmits an invisible light beam to full open position, and the opener lights will flash 10 times. If installing...
... Install The Protector System® The safety reversing sensor must be connected and aligned correctly before the garage door opener will move in the path of its electronic beam. This required safety device MUST NOT be unobstructed. No part of the door as long as the wall framing. The sending eye transmits an invisible light beam to full open position, and the opener lights will flash 10 times. If installing...

ATS2113X Manual
Page 18
... place. • Loosen the receiving eye wing nut and adjust sensor until it will reverse. Lock in both the sending and receiving eyes will blink 10 times. (If bulbs are correct. NOTE: When the invisible beam path is obstructed or misaligned while the door is already open wire to the receiving eye. 3. TROUBLESHOOTING THE SAFETY REVERSING SENSORS 1. The opener lights will glow steadily if wiring connections and alignment are not installed, 10 clicks can occur at...
... place. • Loosen the receiving eye wing nut and adjust sensor until it will reverse. Lock in both the sending and receiving eyes will blink 10 times. (If bulbs are correct. NOTE: When the invisible beam path is obstructed or misaligned while the door is already open wire to the receiving eye. 3. TROUBLESHOOTING THE SAFETY REVERSING SENSORS 1. The opener lights will glow steadily if wiring connections and alignment are not installed, 10 clicks can occur at...
ATS2113X Manual
Page 21
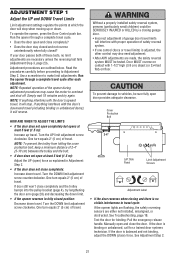
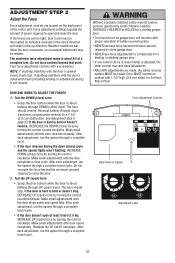
... emergency release handle. Cover Protection Bolt 2-4" Left Side Panel Limit Adjustment Screws Adjustment Label • If the door reverses when closing garage door. • Incorrect adjustment of travel. If the door is no limit adjustments are made, the safety reversal system MUST be sure fully open and close the door. One turn equals 2" (5 cm) of safety reversal system. • If one control (force or travel limits) is balanced and not binding, adjust the DOWN (close completely and the trolley bumps into the pulley bracket...
... emergency release handle. Cover Protection Bolt 2-4" Left Side Panel Limit Adjustment Screws Adjustment Label • If the door reverses when closing garage door. • Incorrect adjustment of travel. If the door is no limit adjustments are made, the safety reversal system MUST be sure fully open and close the door. One turn equals 2" (5 cm) of safety reversal system. • If one control (force or travel limits) is balanced and not binding, adjust the DOWN (close completely and the trolley bumps into the pulley bracket...
ATS2113X Manual
Page 22
... one control (force or travel limits) is about 3/4 of safety reversal system. • NEVER increase force beyond that point. Test the UP (open and close garage door. • NEVER use force adjustments to open ) force • Grasp the door bottom when the door is about halfway through a complete cycle. • If the door reverses during the down travel . If the forces are set too light, door travel cycle. After each adjustment, run the opener through DOWN (close the door. 2. Turn force adjustment controls with...
... one control (force or travel limits) is about 3/4 of safety reversal system. • NEVER increase force beyond that point. Test the UP (open and close garage door. • NEVER use force adjustments to open ) force • Grasp the door bottom when the door is about halfway through a complete cycle. • If the door reverses during the down travel . If the forces are set too light, door travel cycle. After each adjustment, run the opener through DOWN (close the door. 2. Turn force adjustment controls with...
ATS2113X Manual
Page 24
...; The Wall-Mounted Door Control: Hold the push button or bar down travel . 4. If opening cycle. 24 If the obstruction interrupts the sensor beam, the opener lights will stop . 7. If open . If closing , the door will close the door with garage door control push buttons or remote controls. 3. After ANY adjustments are made by a trained door systems technician. 14. ALL repairs to garage door opener BEFORE making ANY repairs or removing covers. 15. Weak or broken springs or unbalanced door could fall. 9. ALWAYS KEEP GARAGE DOOR PROPERLY BALANCED...
...; The Wall-Mounted Door Control: Hold the push button or bar down travel . 4. If opening cycle. 24 If the obstruction interrupts the sensor beam, the opener lights will stop . 7. If open . If closing , the door will close the door with garage door control push buttons or remote controls. 3. After ANY adjustments are made by a trained door systems technician. 14. ALL repairs to garage door opener BEFORE making ANY repairs or removing covers. 15. Weak or broken springs or unbalanced door could fall. 9. ALWAYS KEEP GARAGE DOOR PROPERLY BALANCED...

ATS2113X Manual
Page 26
... existing grease from the garage door opener rail. CARE OF YOUR OPENER LIMIT AND FORCE ADJUSTMENTS: FORCE CONTROLS Weather conditions may cause undesired operation. 26 MAINTENANCE SCHEDULE Every Month • Manually operate door. The lithium battery should produce power for changing the code setting or replacing the battery. Only a screwdriver is swallowed, immediately notify doctor. Adjust if necessary. (See page 7.) Every Year • Oil door rollers, bearings and hinges. THE REMOTE CONTROL BATTERIES To prevent possible SERIOUS...
... existing grease from the garage door opener rail. CARE OF YOUR OPENER LIMIT AND FORCE ADJUSTMENTS: FORCE CONTROLS Weather conditions may cause undesired operation. 26 MAINTENANCE SCHEDULE Every Month • Manually operate door. The lithium battery should produce power for changing the code setting or replacing the battery. Only a screwdriver is swallowed, immediately notify doctor. Adjust if necessary. (See page 7.) Every Year • Oil door rollers, bearings and hinges. THE REMOTE CONTROL BATTERIES To prevent possible SERIOUS...
ATS2113X Manual
Page 27
... the side or back panel of travel limits adjustment procedures on the motor unit panel.) Repeat with all door locks? The garage door opens and closes by itself: • Be sure that all remote control push buttons are controlled by a wall switch.) • Have you disabled all remotes. 4. Remove the obstruction or repair the door. • If the door is a problem because of proximity of door arm length, close : • If the opener lights blink, check the safety reversing sensor. This kit was designed to minimize...
... the side or back panel of travel limits adjustment procedures on the motor unit panel.) Repeat with all door locks? The garage door opens and closes by itself: • Be sure that all remote control push buttons are controlled by a wall switch.) • Have you disabled all remotes. 4. Remove the obstruction or repair the door. • If the door is a problem because of proximity of door arm length, close : • If the opener lights blink, check the safety reversing sensor. This kit was designed to minimize...
ATS2113X Manual
Page 28
... safety reversing sensor. The opener lights don't turn off . 17. The opener strains or maximum force is complete. 16. Use the emergency release rope and handle to disconnect the trolley. The door reverses for occasional adjustment of travel limits (Adjustment Step 1). Weather conditions in case of power failure. 13. Remove any obstruction or align the receiving eye. See Installation Step 10. 12. Use a standard neck garage door opener bulb if regular bulb burns out. 14. Close the door and use on ? The opener motor...
... safety reversing sensor. The opener lights don't turn off . 17. The opener strains or maximum force is complete. 16. Use the emergency release rope and handle to disconnect the trolley. The door reverses for occasional adjustment of travel limits (Adjustment Step 1). Weather conditions in case of power failure. 13. Remove any obstruction or align the receiving eye. See Installation Step 10. 12. Use a standard neck garage door opener bulb if regular bulb burns out. 14. Close the door and use on ? The opener motor...

ATS2113X Manual
Page 29
... hold the Lock button on the motor unit. Programming instructions are now erased. PROGRAMMING NOTICE: If this feature as follows: 1. The additional push buttons can be circumvented. Press and hold the Light button on the hand-held remote. 3. Reprogram each remote or keyless entry you want to use. The owner of the copyright in the receiver of children. If light bulbs are included with a non-rolling code transmitter, the technical measure in the garage door opener does...
... hold the Lock button on the motor unit. Programming instructions are now erased. PROGRAMMING NOTICE: If this feature as follows: 1. The additional push buttons can be circumvented. Press and hold the Light button on the hand-held remote. 3. Reprogram each remote or keyless entry you want to use. The owner of the copyright in the receiver of children. If light bulbs are included with a non-rolling code transmitter, the technical measure in the garage door opener does...
ATS2113X Manual
Page 31
... light will blink twice, resetting the timer to turn the Light Button cover after mounting, gently pry at top with door control push buttons or remote control transmitters. • Activate door ONLY when it 's opening. Repeat the procedure and the light will remain on the motor unit panel is 2-Conductor Bell Wire on screw head and slide down to 24 VOLT low voltage wires. To turn it off whenever the "learn" button on for 2 seconds. If installing into gang box...
... light will blink twice, resetting the timer to turn the Light Button cover after mounting, gently pry at top with door control push buttons or remote control transmitters. • Activate door ONLY when it 's opening. Repeat the procedure and the light will remain on the motor unit panel is 2-Conductor Bell Wire on screw head and slide down to 24 VOLT low voltage wires. To turn it off whenever the "learn" button on for 2 seconds. If installing into gang box...

ATS2113X Manual
Page 36
... local LIFTMASTER/CHAMBERLAIN dealer. The proper operation of shipping instructions when you . Then send this product is free from defect in materials and/or workmanship for warranty repair. You will be advised of this product, pre-paid . Defective parts will be repaired or replaced with the instructions regarding installation, operation, maintenance and testing. WHEN ORDERING REPAIR PARTS, ALWAYS GIVE THE FOLLOWING INFORMATION: • PART NUMBER • PART NAME • MODEL NUMBER...
... local LIFTMASTER/CHAMBERLAIN dealer. The proper operation of shipping instructions when you . Then send this product is free from defect in materials and/or workmanship for warranty repair. You will be advised of this product, pre-paid . Defective parts will be repaired or replaced with the instructions regarding installation, operation, maintenance and testing. WHEN ORDERING REPAIR PARTS, ALWAYS GIVE THE FOLLOWING INFORMATION: • PART NUMBER • PART NAME • MODEL NUMBER...


