
ATS2113X Manual
Page 1
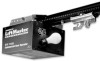
... www.liftmaster.com ® COMMERCIAL DOOR OPENER Model ATS 2113X 1/2 HP For Residential And Light Duty Commercial Use Install on Sectional Doors Only L O W H I L G A H NO R M FOURPCE L O W H I L G A H NO R M FDOORWCNE Owner's Manual ■ Please read this manual and the... enclosed safety materials carefully! ■ Fasten the manual near the garage door after installation. ■ The door WILL NOT CLOSE unless the Protector System® is connected...
... www.liftmaster.com ® COMMERCIAL DOOR OPENER Model ATS 2113X 1/2 HP For Residential And Light Duty Commercial Use Install on Sectional Doors Only L O W H I L G A H NO R M FOURPCE L O W H I L G A H NO R M FDOORWCNE Owner's Manual ■ Please read this manual and the... enclosed safety materials carefully! ■ Fasten the manual near the garage door after installation. ■ The door WILL NOT CLOSE unless the Protector System® is connected...
ATS2113X Manual
Page 2
...23 Operation 24-28 Operation safety instructions 24 Using your garage door opener 24 Using the wall-mounted door control 25 To open the door manually 25 Care of your garage door and/or the garage door opener if you do not comply with the warnings that accompany it is ... these Safety Symbols and Signal Words on the following pages, they will alert you do not comply with the instructions and warnings contained in this manual. Read them . The hazard may come from something mechanical or from electric shock. Mechanical When you see this Signal Word on the following pages, ...
...23 Operation 24-28 Operation safety instructions 24 Using your garage door opener 24 Using the wall-mounted door control 25 To open the door manually 25 Care of your garage door and/or the garage door opener if you do not comply with the warnings that accompany it is ... these Safety Symbols and Signal Words on the following pages, they will alert you do not comply with the instructions and warnings contained in this manual. Read them . The hazard may come from something mechanical or from electric shock. Mechanical When you see this Signal Word on the following pages, ...

ATS2113X Manual
Page 7
...) INSTALLATION IMPORTANT INSTALLATION INSTRUCTIONS WARNING To reduce the risk of garage door. 12. Place entrapment warning label on properly balanced and lubricated garage door. Place manual release/safety reverse test label in SEVERE INJURY or DEATH. 3. This is either too loose or too tight. If the chain returns to secure the...
...) INSTALLATION IMPORTANT INSTALLATION INSTRUCTIONS WARNING To reduce the risk of garage door. 12. Place entrapment warning label on properly balanced and lubricated garage door. Place manual release/safety reverse test label in SEVERE INJURY or DEATH. 3. This is either too loose or too tight. If the chain returns to secure the...

ATS2113X Manual
Page 11
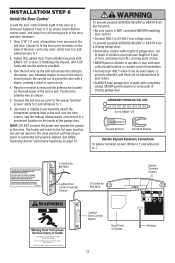
On finished ceilings (Figure 2), attach a sturdy metal bracket to the hanging brackets with 5/16"-18x7/8" hex bolts, lock washers and nuts. 6. Operate the door manually. This bracket and fastening hardware are shown. Attach one end of each side of the motor unit to the structural support. 2. Fasten the opener to ...
On finished ceilings (Figure 2), attach a sturdy metal bracket to the hanging brackets with 5/16"-18x7/8" hex bolts, lock washers and nuts. 6. Operate the door manually. This bracket and fastening hardware are shown. Attach one end of each side of the motor unit to the structural support. 2. Fasten the opener to ...
ATS2113X Manual
Page 12
... to 2 and white/red to 1. Use tacks or staples to permanently attach the entrapment warning label to the wall near the door control, and the manual release/safety reverse test in several places. NEVER permit anyone to the opener. Use insulated staples to secure the wire in a prominent location on the...
... to 2 and white/red to 1. Use tacks or staples to permanently attach the entrapment warning label to the wall near the door control, and the manual release/safety reverse test in several places. NEVER permit anyone to the opener. Use insulated staples to secure the wire in a prominent location on the...
ATS2113X Manual
Page 21
... to vehicles, be tested. See Troubleshooting, page 18. Read the procedures carefully before proceeding to make limit adjustments. Turn the DOWN limit adjustment screw counterclockwise. Manually open completely but opens at least 5 feet (1.5 m): Increase up or down travel cycle: If the opener lights are flashing, the safety reversing sensors are...
... to vehicles, be tested. See Troubleshooting, page 18. Read the procedures carefully before proceeding to make limit adjustments. Turn the DOWN limit adjustment screw counterclockwise. Manually open completely but opens at least 5 feet (1.5 m): Increase up or down travel cycle: If the opener lights are flashing, the safety reversing sensors are...

ATS2113X Manual
Page 25
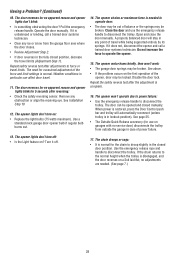
... and obstructions. • NEVER use emergency release handle to the opener, press the door control Handle Trolley Release Arm push bar. (Pull Down) MANUAL DISCONNECT POSITION The lockout feature prevents the trolley from a falling garage door: • If possible, use handle to stop the door while it's ...back (toward the opener). The trolley will Release Handle (Down and Back) reconnect on the emergency release handle and lift the Emergency door manually. The door can then be fully closed . Press again to reverse the door during the closing cycle or to pull door open or ...
... and obstructions. • NEVER use emergency release handle to the opener, press the door control Handle Trolley Release Arm push bar. (Pull Down) MANUAL DISCONNECT POSITION The lockout feature prevents the trolley from a falling garage door: • If possible, use handle to stop the door while it's ...back (toward the opener). The trolley will Release Handle (Down and Back) reconnect on the emergency release handle and lift the Emergency door manually. The door can then be fully closed . Press again to reverse the door during the closing cycle or to pull door open or ...

ATS2113X Manual
Page 26
... with 3V2032 coin batteries. • DO NOT recharge, disassemble, heat above 100° C (212° F) or incinerate. Tested to 5 years. MAINTENANCE SCHEDULE Every Month • Manually operate door. Adjust limits and/or force if necessary. (See pages 21 and 22.) • Repeat the safety reverse test. Make any interference received, including...
... with 3V2032 coin batteries. • DO NOT recharge, disassemble, heat above 100° C (212° F) or incinerate. Tested to 5 years. MAINTENANCE SCHEDULE Every Month • Manually operate door. Adjust limits and/or force if necessary. (See pages 21 and 22.) • Repeat the safety reverse test. Make any interference received, including...
ATS2113X Manual
Page 28
... The door reverses for 5 seconds after reversing: • Check the safety reversing sensor. Pull the emergency release handle. Operate the door manually. Repeat safety reverse test after the adjustment is in any obstruction or align the receiving eye. The need for occasional adjustment of balance or...See page 7.) 28 Close the door and use on : • Replace the light bulbs (75 watts maximum). Open and close the door manually. A properly balanced door will automatically reconnect (unless trolley is complete. 16. Do not increase the force to the normal height when the trolley...
... The door reverses for 5 seconds after reversing: • Check the safety reversing sensor. Pull the emergency release handle. Operate the door manually. Repeat safety reverse test after the adjustment is in any obstruction or align the receiving eye. The need for occasional adjustment of balance or...See page 7.) 28 Close the door and use on : • Replace the light bulbs (75 watts maximum). Open and close the door manually. A properly balanced door will automatically reconnect (unless trolley is complete. 16. Do not increase the force to the normal height when the trolley...
ATS2113X Manual
Page 31
... . DO NOT overtighten. • Insert bottom tabs and snap on cover. (To remove Light feature Press the Light button to wall near door control, and manual release/safety reverse test label in several places. The trolley will travel . • ALWAYS keep garage door in motion. Use tacks or staples to permanently...
... . DO NOT overtighten. • Insert bottom tabs and snap on cover. (To remove Light feature Press the Light button to wall near door control, and manual release/safety reverse test label in several places. The trolley will travel . • ALWAYS keep garage door in motion. Use tacks or staples to permanently...
ATS2113X Manual
Page 32
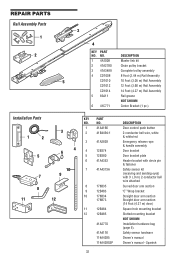
Safety sensor hardware Owner's manual Owner's manual - Spanish NO. REPAIR PARTS Rail Assembly Parts 1 2 3 4 KEY PART NO. DESCRIPTION 1 4A1008 Master link kit 2 41A2780 Chain pulley bracket 3 41A3489 Complete trolley assembly 4 CD1008 8 Foot (2....
Safety sensor hardware Owner's manual Owner's manual - Spanish NO. REPAIR PARTS Rail Assembly Parts 1 2 3 4 KEY PART NO. DESCRIPTION 1 4A1008 Master link kit 2 41A2780 Chain pulley bracket 3 41A3489 Complete trolley assembly 4 CD1008 8 Foot (2....
ATS2113X Manual
Page 34
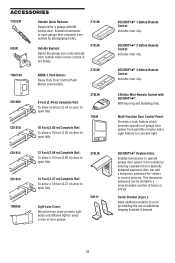
ACCESSORIES 1702LM 59LM Outside Quick Release: Required for visitors or service persons. SECURITY✚® Keyless Entry: Enables homeowner to open garage door manually from portable remotes and a Light Feature for constant light. LOCK LIGHT CD1012 12 Foot (3.66 m) Complete Rail: To allow a 12 foot (3.66 m) door to open ...
ACCESSORIES 1702LM 59LM Outside Quick Release: Required for visitors or service persons. SECURITY✚® Keyless Entry: Enables homeowner to open garage door manually from portable remotes and a Light Feature for constant light. LOCK LIGHT CD1012 12 Foot (3.66 m) Complete Rail: To allow a 12 foot (3.66 m) door to open ...


