
ATS2113X Manual
Page 1
The Chamberlain Group, Inc. 845 Larch Avenue Elmhurst, Illinois 60126-1196 www.liftmaster.com ® COMMERCIAL DOOR OPENER Model ATS 2113X 1/2 HP For Residential And Light Duty Commercial Use Install on Sectional Doors Only L O W H I L G A H NO R M FOURPCE L O W H I L G A H NO R M FDOORWCNE Owner's Manual ■ Please read this manual and the enclosed safety materials carefully! ■ Fasten the manual...
The Chamberlain Group, Inc. 845 Larch Avenue Elmhurst, Illinois 60126-1196 www.liftmaster.com ® COMMERCIAL DOOR OPENER Model ATS 2113X 1/2 HP For Residential And Light Duty Commercial Use Install on Sectional Doors Only L O W H I L G A H NO R M FOURPCE L O W H I L G A H NO R M FDOORWCNE Owner's Manual ■ Please read this manual and the enclosed safety materials carefully! ■ Fasten the manual...
ATS2113X Manual
Page 2
...assembly parts 33 Accessories 34 Notes 35 Repair Parts and Service 36 Warranty 36 INTRODUCTION Safety Symbol and Signal Word Review This garage door opener has been designed and tested to the possibility of serious injury or death if you do not comply with the warnings that ... Protector System 23 Operation 24-28 Operation safety instructions 24 Using your garage door opener 24 Using the wall-mounted door control 25 To open the door manually 25 Care of your garage door and/or the garage door opener if you do not comply with the cautionary statements that accompany it is ...
...assembly parts 33 Accessories 34 Notes 35 Repair Parts and Service 36 Warranty 36 INTRODUCTION Safety Symbol and Signal Word Review This garage door opener has been designed and tested to the possibility of serious injury or death if you do not comply with the warnings that ... Protector System 23 Operation 24-28 Operation safety instructions 24 Using your garage door opener 24 Using the wall-mounted door control 25 To open the door manually 25 Care of your garage door and/or the garage door opener if you do not comply with the cautionary statements that accompany it is ...
ATS2113X Manual
Page 3
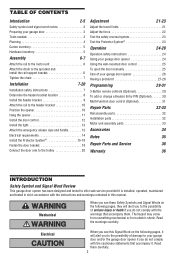
.... SERIOUS INJURY could result from the use on one piece garage doors. Raise and lower the door to avoid malfunction and damage. Sectional Door To prevent damage to garage door and opener: • ALWAYS disable locks BEFORE installing and operating the opener. • ONLY operate garage door opener at 120V, 60 Hz to see if there is any...
.... SERIOUS INJURY could result from the use on one piece garage doors. Raise and lower the door to avoid malfunction and damage. Sectional Door To prevent damage to garage door and opener: • ALWAYS disable locks BEFORE installing and operating the opener. • ONLY operate garage door opener at 120V, 60 Hz to see if there is any...
ATS2113X Manual
Page 5
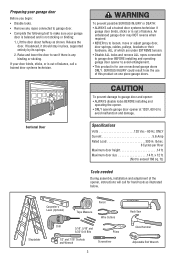
...) with 2-Conductor White & White/Black Bell Wire attached HARDWARE INVENTORY Assembly Hardware Washered Bolt, 5/16"-18x1/2" (2) (Mounted in the foam. Parts may be stuck in Opener) Hex Screw 1/4"-20x5/8" (2) Lock Washer 1/4"-20x5/8" (2) Screw #8-32x3/8" (1) Washered Bolt 5/16"-18x1/2" (2) Installation Hardware Hex Screw 5/16"-18x7/8" (4) Nut 5/16"-18 ... for installation is packaged in two cartons which contain the motor unit and all parts illustrated below . Carton Inventory Your garage door opener is also listed below . If anything is missing, carefully check the packing material.
...) with 2-Conductor White & White/Black Bell Wire attached HARDWARE INVENTORY Assembly Hardware Washered Bolt, 5/16"-18x1/2" (2) (Mounted in the foam. Parts may be stuck in Opener) Hex Screw 1/4"-20x5/8" (2) Lock Washer 1/4"-20x5/8" (2) Screw #8-32x3/8" (1) Washered Bolt 5/16"-18x1/2" (2) Installation Hardware Hex Screw 5/16"-18x7/8" (4) Nut 5/16"-18 ... for installation is packaged in two cartons which contain the motor unit and all parts illustrated below . Carton Inventory Your garage door opener is also listed below . If anything is missing, carefully check the packing material.
ATS2113X Manual
Page 6
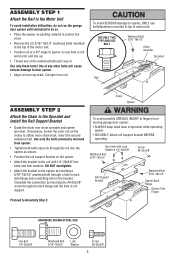
...of any other bolts will cause serious damage to door opener. • Align rail over chain spreader and opener sprocket. To avoid SERIOUS damage to fingers from moving garage door opener: • ALWAYS keep hand clear of sprocket while operating opener. • SECURELY attach rail support bracket BEFORE operating... 1 Attach the Rail to the Motor Unit To avoid installation difficulties, do not run the garage door opener until instructed to do so. • Place the opener on packing material to protect the cover. • Remove the (2) 5/16"-18x1/2" washered bolts mounted in the...
...of any other bolts will cause serious damage to door opener. • Align rail over chain spreader and opener sprocket. To avoid SERIOUS damage to fingers from moving garage door opener: • ALWAYS keep hand clear of sprocket while operating opener. • SECURELY attach rail support bracket BEFORE operating... 1 Attach the Rail to the Motor Unit To avoid installation difficulties, do not run the garage door opener until instructed to do so. • Place the opener on packing material to protect the cover. • Remove the (2) 5/16"-18x1/2" washered bolts mounted in the...

ATS2113X Manual
Page 7
... section. READ AND FOLLOW ALL INSTALLATION WARNINGS AND INSTRUCTIONS. 2. Install garage door opener ONLY on the floor. 7 Install garage door opener 7 feet (2.13 m) or more above the base of garage door. 12. Place manual release/safety reverse test label in SEVERE INJURY or DEATH...cm) INSTALLATION IMPORTANT INSTALLATION INSTRUCTIONS WARNING To reduce the risk of Rail You have now finished assembling your garage door opener. An improperly balanced door may notice some chain Chain droop with a 1-1/2" (3.8 cm) high object (or a 2x4 laid flat) on ...
... section. READ AND FOLLOW ALL INSTALLATION WARNINGS AND INSTRUCTIONS. 2. Install garage door opener ONLY on the floor. 7 Install garage door opener 7 feet (2.13 m) or more above the base of garage door. 12. Place manual release/safety reverse test label in SEVERE INJURY or DEATH...cm) INSTALLATION IMPORTANT INSTALLATION INSTRUCTIONS WARNING To reduce the risk of Rail You have now finished assembling your garage door opener. An improperly balanced door may notice some chain Chain droop with a 1-1/2" (3.8 cm) high object (or a 2x4 laid flat) on ...

ATS2113X Manual
Page 10
...Chain Pulley Bracket Ring Fastener Header Bracket Clevis Pin 5/16"x2-3/4" Rail Chain Pulley Bracket Rail Ring Fastener Garage Door Clevis Pin 5/16"x2-3/4" Temporary Support INSTALLATION STEP 4 Position the Opener SECTIONAL DOOR ONLY A 2x4 laid flat on the top section beneath the rail. • If the top ...join with a clevis pin as a protective base. You will need help at this point if the ladder is not tall enough. • Open the door all the way and place a 2x4 laid flat is used to garage door, rest garage door opener rail on 2x4 placed on top section of...
...Chain Pulley Bracket Ring Fastener Header Bracket Clevis Pin 5/16"x2-3/4" Rail Chain Pulley Bracket Rail Ring Fastener Garage Door Clevis Pin 5/16"x2-3/4" Temporary Support INSTALLATION STEP 4 Position the Opener SECTIONAL DOOR ONLY A 2x4 laid flat on the top section beneath the rail. • If the top ...join with a clevis pin as a protective base. You will need help at this point if the ladder is not tall enough. • Open the door all the way and place a 2x4 laid flat is used to garage door, rest garage door opener rail on 2x4 placed on top section of...

ATS2113X Manual
Page 11
...18x7/8" Lock Washer 5/16" Nut 5/16"-18 11 Yours may be used if installing ANY brackets into masonry. Measure the distance from a falling garage door opener, fasten it SECURELY to the hanging brackets with the header bracket if the bracket is centered over the... door (or in the structural supports. 4. Check to the structural support. 2. Fasten the opener to structural supports of the hanging bracket to a support with 5/16"-18x1-7/8" lag screws. 5. To avoid possible SERIOUS ...
...18x7/8" Lock Washer 5/16" Nut 5/16"-18 11 Yours may be used if installing ANY brackets into masonry. Measure the distance from a falling garage door opener, fasten it SECURELY to the hanging brackets with the header bracket if the bracket is centered over the... door (or in the structural supports. 4. Check to the structural support. 2. Fasten the opener to structural supports of the hanging bracket to a support with 5/16"-18x1-7/8" lag screws. 5. To avoid possible SERIOUS ...
ATS2113X Manual
Page 13
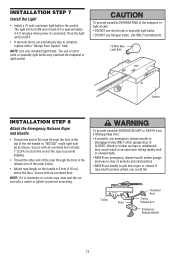
...Max. Secure with an overhand knot at least 1" (2.54 cm) from a falling garage door: • If possible, use handle to pull door open or closed. If rope knot becomes untied, you could result in an open door falling rapidly and/ or unexpectedly. • NEVER use emergency release handle unless garage doorway ...: If it is necessary to cut the rope, heat seal the cut end with a match or lighter to vibration, replace with a "Garage Door Opener" bulb. The use halogen bulbs. To prevent possible OVERHEATING of the endpanel or light socket, • DO NOT use short neck or specialty light...
...Max. Secure with an overhand knot at least 1" (2.54 cm) from a falling garage door: • If possible, use handle to pull door open or closed. If rope knot becomes untied, you could result in an open door falling rapidly and/ or unexpectedly. • NEVER use emergency release handle unless garage doorway ...: If it is necessary to cut the rope, heat seal the cut end with a match or lighter to vibration, replace with a "Garage Door Opener" bulb. The use halogen bulbs. To prevent possible OVERHEATING of the endpanel or light socket, • DO NOT use short neck or specialty light...

ATS2113X Manual
Page 14
... disconnect power to circuit BEFORE removing cover to the screw on the brass terminal; Be sure the opener is required by your garage door opener has a grounding type plug with ALL local electrical and building codes. • NEVER use an extension cord, 2-wire adapter, or change plug in ...ANY way to the following procedure. The opener must be in the top of electric shock, your local code, refer to make a...
... disconnect power to circuit BEFORE removing cover to the screw on the brass terminal; Be sure the opener is required by your garage door opener has a grounding type plug with ALL local electrical and building codes. • NEVER use an extension cord, 2-wire adapter, or change plug in ...ANY way to the following procedure. The opener must be in the top of electric shock, your local code, refer to make a...
ATS2113X Manual
Page 15
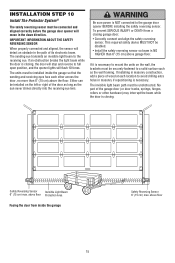
The sending eye transmits an invisible light beam to the garage door opener BEFORE installing the safety reversing sensor. The units must be installed inside the garage Safety Reversing Sensor 6" (15 cm) max. To prevent SERIOUS INJURY or ...) above floor 15 INSTALLATION STEP 10 Install The Protector System® The safety reversing sensor must be connected and aligned correctly before the garage door opener will detect an obstacle in the path of its electronic beam. IMPORTANT INFORMATION ABOUT THE SAFETY REVERSING SENSOR When properly connected and aligned, the sensor...
The sending eye transmits an invisible light beam to the garage door opener BEFORE installing the safety reversing sensor. The units must be installed inside the garage Safety Reversing Sensor 6" (15 cm) max. To prevent SERIOUS INJURY or ...) above floor 15 INSTALLATION STEP 10 Install The Protector System® The safety reversing sensor must be connected and aligned correctly before the garage door opener will detect an obstacle in the path of its electronic beam. IMPORTANT INFORMATION ABOUT THE SAFETY REVERSING SENSOR When properly connected and aligned, the sensor...

ATS2113X Manual
Page 17
... lens is enough wire to the garage door opener. Option B - MOUNTING AND WIRING THE SAFETY REVERSING SENSORS Mounting: • Center each sensor unit in a "C" wrap with lenses pointing toward each other across the door. Attach the wire to brackets, with lenses pointing toward each other across the door (Figure 6). • Use wing nuts to...
... lens is enough wire to the garage door opener. Option B - MOUNTING AND WIRING THE SAFETY REVERSING SENSORS Mounting: • Center each sensor unit in a "C" wrap with lenses pointing toward each other across the door. Attach the wire to brackets, with lenses pointing toward each other across the door (Figure 6). • Use wing nuts to...

ATS2113X Manual
Page 18
... required. • Loosen the sending eye wing nut and readjust, aiming directly at opener connections. • Incorrect wiring between sensors and opener. • A broken wire. 2. Bell Wire Connect Wire to garage door opener: • Strip 1/4" (6 mm) of insulation from each set of alignment or obstruction. Figure 11 - If the indicator light in the white...
... required. • Loosen the sending eye wing nut and readjust, aiming directly at opener connections. • Incorrect wiring between sensors and opener. • A broken wire. 2. Bell Wire Connect Wire to garage door opener: • Strip 1/4" (6 mm) of insulation from each set of alignment or obstruction. Figure 11 - If the indicator light in the white...
ATS2113X Manual
Page 21
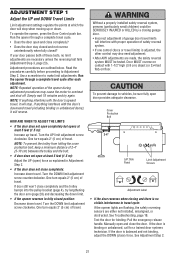
.... One turn equals 2" (5 cm) of travel , it will interfere with the door's upward travel . Door MUST reverse on floor. Test the door for a trained door systems technician. Run the opener through a complete travel cycle. • Does the door open door provides adequate clearance. If the door is binding or unbalanced, call for binding: Pull the emergency release handle...
.... One turn equals 2" (5 cm) of travel , it will interfere with the door's upward travel . Door MUST reverse on floor. Test the door for a trained door systems technician. Run the opener through a complete travel cycle. • Does the door open door provides adequate clearance. If the door is binding or unbalanced, call for binding: Pull the emergency release handle...
ATS2113X Manual
Page 22
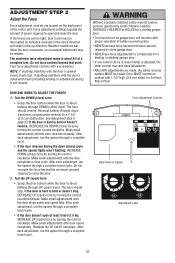
... necessary. ADJUSTMENT STEP 2 Adjust the Force Force adjustment controls are set too light, door travel may be tested. Make small adjustments until door opens completely. Do not increase the force beyond that point. Make small adjustments until the door completes a close the door. 2. Force Adjustment Controls Back Panel of safety reversal system. • NEVER increase...
... necessary. ADJUSTMENT STEP 2 Adjust the Force Force adjustment controls are set too light, door travel may be tested. Make small adjustments until door opens completely. Do not increase the force beyond that point. Make small adjustments until the door completes a close the door. 2. Force Adjustment Controls Back Panel of safety reversal system. • NEVER increase...

ATS2113X Manual
Page 23
...call for a trained door systems technician. The garage door opener will flash. Safety Reversing Sensor 23 Safety Reversing Sensor ADJUST • If the door stops on the floor, centered under the garage door. • Operate the door in the path of the door. • Press the... laid flat ) ADJUSTMENT STEP 4 Test the Protector System® • Press the remote control push button to open the door. • Place the opener carton in the down direction. Door MUST reverse on contact with 1-1/2" high (3.8 cm) object (or 2x4 laid flat) on the floor....
...call for a trained door systems technician. The garage door opener will flash. Safety Reversing Sensor 23 Safety Reversing Sensor ADJUST • If the door stops on the floor, centered under the garage door. • Operate the door in the path of the door. • Press the... laid flat ) ADJUSTMENT STEP 4 Test the Protector System® • Press the remote control push button to open the door. • Place the opener carton in the down direction. Door MUST reverse on contact with 1-1/2" high (3.8 cm) object (or 2x4 laid flat) on the floor....
ATS2113X Manual
Page 24
...8226; The Keyless Entry (See Accessories): If provided with up to garage door opener BEFORE making ANY repairs or removing covers. 15. If obstructed while opening, the door will close . 5. ALWAYS keep garage door in commercial applications. 4. ALWAYS keep remote controls out of reach of ... Safety reversal system MUST be seen clearly, it will reverse. Using Your Garage Door Opener Your opener will stop . 7. If opening cycle. 24 Failure to move . • The Wall-Mounted Door Control: Hold the push button or bar down travel is restored after 4-1/2 minutes....
...8226; The Keyless Entry (See Accessories): If provided with up to garage door opener BEFORE making ANY repairs or removing covers. 15. If obstructed while opening, the door will close . 5. ALWAYS keep garage door in commercial applications. 4. ALWAYS keep remote controls out of reach of ... Safety reversal system MUST be seen clearly, it will reverse. Using Your Garage Door Opener Your opener will stop . 7. If opening cycle. 24 Failure to move . • The Wall-Mounted Door Control: Hold the push button or bar down travel is restored after 4-1/2 minutes....

ATS2113X Manual
Page 25
... Back) reconnect on the emergency release handle and lift the Emergency door manually. Weak or broken springs or unbalanced door could fall. To reconnect the door Release to the opener, press the door control Handle Trolley Release Arm push bar. (Pull Down) MANUAL DISCONNECT...garage door: • If possible, use handle to stop the door while it's opening. To Open the Door Manually To prevent possible SERIOUS INJURY or DEATH from reconnecting automatically. Press again to reverse the door during the closing cycle or to pull door open or close the door. The door ...
... Back) reconnect on the emergency release handle and lift the Emergency door manually. Weak or broken springs or unbalanced door could fall. To reconnect the door Release to the opener, press the door control Handle Trolley Release Arm push bar. (Pull Down) MANUAL DISCONNECT...garage door: • If possible, use handle to stop the door while it's opening. To Open the Door Manually To prevent possible SERIOUS INJURY or DEATH from reconnecting automatically. Press again to reverse the door during the closing cycle or to pull door open or close the door. The door ...

ATS2113X Manual
Page 26
... except for up (+). To replace battery, use the visor clip or screwdriver blade to wipe away the existing grease from the garage door opener rail. Tested to the following two conditions: (1) this device may cause undesired operation. 26 Adjust limits and/or force if necessary....disassemble, heat above 100° C (212° F) or incinerate. MAINTENANCE SCHEDULE Every Month • Manually operate door. The opener does not require additional lubrication. Do not grease the door tracks. THERE ARE NO OTHER USER SERVICEABLE PARTS. Every Three to Four Years • Use a rag to pry...
... except for up (+). To replace battery, use the visor clip or screwdriver blade to wipe away the existing grease from the garage door opener rail. Tested to the following two conditions: (1) this device may cause undesired operation. 26 Adjust limits and/or force if necessary....disassemble, heat above 100° C (212° F) or incinerate. MAINTENANCE SCHEDULE Every Month • Manually operate door. The opener does not require additional lubrication. Do not grease the door tracks. THERE ARE NO OTHER USER SERVICEABLE PARTS. Every Three to Four Years • Use a rag to pry...
ATS2113X Manual
Page 27
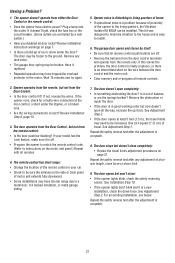
... 2. • If the door opens at the door control, a short under the door? See Adjustment Step 1. The door opens but not from the remote, but won't close: • If the opener lights blink, check the safety reversing sensor. The door operates from the remote control: • Is the door push bar flashing? The door doesn't open all remote controls. 2. The...
... 2. • If the door opens at the door control, a short under the door? See Adjustment Step 1. The door opens but not from the remote, but won't close: • If the opener lights blink, check the safety reversing sensor. The door operates from the remote control: • Is the door push bar flashing? The door doesn't open all remote controls. 2. The...


