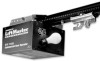
LiftMaster ATS Support Question
LiftMaster ATS Support Question
Find answers below for this question about LiftMaster ATS.Need a LiftMaster ATS manual? We have 1 online manual for this item!
Question posted by bwaterohd on August 18th, 2015
Rail For 10 Ft High Door
actual t rail length for 10 ft high door
Current Answers
Answer #1: Posted by zzed41 on August 30th, 2015 3:41 AM
zzed41

Member since:
December 12th, 2014 Points: 914,010

Member since:
December 12th, 2014 Points: 914,010
Hi! The T-Rail height would be 152 inches for a 1-ft door. Check this link for other dimensions you may need.
Hope this helps! If it does, please click on the Accept Answer button. I will greatly appreciate it! :)
Related LiftMaster ATS Manual Pages
ATS2113X Manual - Page 2
...location 8 Install the header bracket 9 Attach the rail to the header bracket 10 Position the opener 10 Hang the opener 11 Install the door control 12 Install the light 13 Attach the emergency ...
Operation safety instructions 24 Using your garage door opener 24 Using the wall-mounted door control 25 To open the door manually 25 Care of your garage door opener 26 Having a problem 27-28...
ATS2113X Manual - Page 3
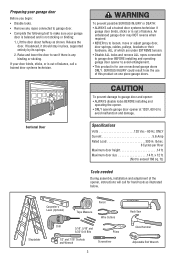
...; Disable ALL locks and remove ALL ropes connected to garage door BEFORE installing and operating garage door opener to avoid entanglement.
• This product is for hand tools as shown.
lb/sec.
8 Cycles per Hour Maximum door height 14 ft. Lift the door about halfway as illustrated below. An unbalanced garage door may NOT reverse when required.
• NEVER try...
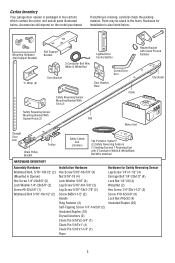
ATS2113X Manual - Page 4

...must not exceed 1/4" (6 mm). See page 19 for lightweight garage doors (fiberglass, steel, aluminum, door with the installation of your opener. Header Bracket
Chain Pulley Bracket
CLOSED POSITION
Chain Trolley
Rail
Header Wall
Garage Door
Garage Door Spring
Straight Door Arm
Door Bracket
Curved Door Arm
Emergency Release Rope & Handle
4 Slack in chain tension is normal when...
ATS2113X Manual - Page 5
...10) Drywall Anchors (2) Clevis Pin 5/16"x2-3/4" (1) Clevis Pin 5/16"x1" (1) Clevis Pin 5/16"x1-1/4" (1) Rope
Hardware for installation is also listed below . Mounting Hardware (Rail Support Bracket)
"C" Wrap (2)
Rail Support Bracket
Lighted Door Control Button
2-Conductor Bell Wire White & White/Red
Door Bracket
Door Bracket Plate
Curved Door...
Your garage door opener is packaged in...
ATS2113X Manual - Page 6
... bolts part way in. HARDWARE SHOWN ACTUAL SIZE
Hex Bolt 1/4"-20x5/8"
Washered Bolt 5/16"-18x1/2"
Lock Washer
Screw #8-32x3/8"
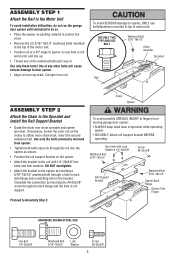
6 ASSEMBLY STEP 1
Attach the Rail to the Motor Unit
To avoid installation difficulties, do not run the garage door opener until instructed to do so. • Place the opener on packing material to protect the...
ATS2113X Manual - Page 7

...opener to garage door control.
11. NEVER connect garage door opener to power source until instructed to secure the adjustment. Install wall-mounted garage door control:
• within sight of the garage door.
• out of reach of the door.
10.
This is either too loose or too tight.
An improperly balanced door may notice some chain
Chain
droop with a 1-1/2" (3.8 cm) high...
ATS2113X Manual - Page 8
... 2x4 to structural supports as shown.
An unbalanced garage door might NOT reverse when required.
Ceiling Header Wall
2" (5 cm)
Highest Point of Garage Door
2x4
OPTIONAL CEILING MOUNT FOR HEADER BRACKET
Structural Supports
Level (Optional)
1. Extend the line onto the header wall above the high point. Open your door to the highest point of travel clearance for...
ATS2113X Manual - Page 10

... you raise the door, pull down on the garage floor below the header bracket.
HARDWARE SHOWN ACTUAL SIZE
Header Wall
Header Bracket
Chain Pulley Bracket
Ring Fastener Header Bracket
Clevis Pin 5/16"x2-3/4"
Rail
Chain
Pulley
Bracket Rail
Ring Fastener
Garage Door
Clevis Pin 5/16"x2-3/4"
Temporary Support
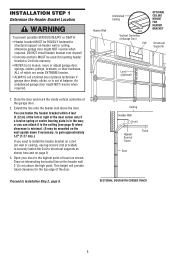
INSTALLATION STEP 4
Position the Opener
SECTIONAL DOOR ONLY
A 2x4 laid...
ATS2113X Manual - Page 11

... required lengths.
3.
Concrete anchors MUST be different. Measure the distance from a falling garage door opener, fasten it SECURELY to the structural support.
2. Operate the door manually.
INSTALLATION STEP 5
Hang the Opener
Two ...Figure 1) to make sure the rail is centered over the door (or in the structural supports.
4. Check to provide rigid support. If the...
ATS2113X Manual - Page 15
... safety reversing sensor must be connected and aligned correctly before the garage door opener will flash 10 times.
To prevent SERIOUS INJURY or DEATH from inside the garage so that the sending and receiving eyes face each location to full open position, and the opener lights will move in the down direction.
The units must be...
ATS2113X Manual - Page 17

...the safety reversing sensor wires and strip 1/4" (6 mm) of insulation from both sensors to the garage door opener. Figure 6
"C" Wrap
Indicator Light
Hex Bolt 1/4"-20x1-1/2"
Figure 7
Figure 8
Wing Nut
Sensor...of insulation from each other across the door. Option A - Installation Without Pre-Wiring:
• Run the bell wire from each sensor (Figure 10). Choose two of the pre-installed ...
ATS2113X Manual - Page 18

...door is already open wire to the opener.
• A short in the white or white/black wires. The opener lights will glow steadily if wiring connections and alignment are not installed, 10... and adjust sensor until it will reverse. TROUBLESHOOTING THE SAFETY REVERSING SENSORS
1.
Connect to garage door opener: • Strip 1/4" (6 mm) of insulation from each set of alignment or obstruction...
ATS2113X Manual - Page 19

...'t require vertical reinforcement but does need top and bottom fastening holes for reinforcement kit. HARDWARE SHOWN ACTUAL SIZE
Self-Threading Screw 1/4"-14x5/8"
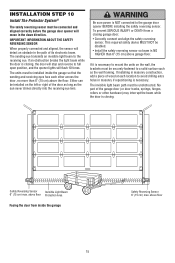
Horizontal and vertical reinforcement is needed for lightweight garage doors (fiberglass, aluminum, steel doors with your door manufacturer for the door bracket, fasten as shown in Figure 2. INSTALLATION STEP 11
Fasten the...
ATS2113X Manual - Page 21
... the door reverses when closing garage door.
• Incorrect adjustment of garage door travel ...door does not close completely: Increase down travel cycle. • Does the door open at least 5 feet (1.5 m): Increase up or down travel . NOTE: If anything interferes with the door's downward travel . Run the opener through a complete travel . One turn equals 2" (5 cm) of 2-4" (5-10...
ATS2113X Manual - Page 22
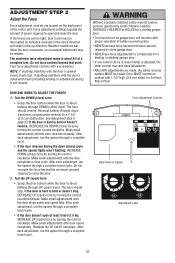
... be interrupted by nuisance reversals in the up direction. Make small adjustments until the door completes a close the door.
Force Adjustment Controls
Back Panel of Opener
Adjustment Label
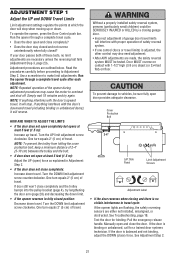
22 ADJUSTMENT STEP 2
Adjust the Force
Force adjustment controls are located on garage door will interfere with
proper operation of safety reversal system. • NEVER increase force...
ATS2113X Manual - Page 23

...:
• Each adjustment of door arm length, limits, or force controls.
• Any repair to or adjustment of the garage door (including springs and hardware).
• Any repair to or buckling of the garage floor.
• Any repair to or adjustment of the door.
• Press the remote control push button to open , place a 1-1/2" (3.8 cm) board...
ATS2113X Manual - Page 24
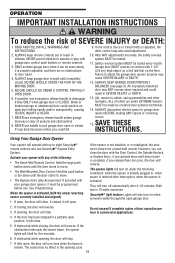
... or DEATH.
12. NEVER use . NEVER use emergency release handle to adjust the garage door opener properly may also need adjustment.
10. If one Security✚® Keyless Entry System. Garage door MUST reverse on the floor. Failure to disengage trolley ONLY when garage door is activated. READ AND FOLLOW ALL WARNINGS AND INSTRUCTIONS.
2. An improperly balanced...
ATS2113X Manual - Page 26

....
Insert battery positive side up (+)
NOTICE: To comply with FCC Standards FOR HOME OR OFFICE USE. Tested to wipe away the existing grease from the garage door opener rail. If it is swallowed, immediately notify doctor. THE REMOTE CONTROL BATTERIES
To prevent possible SERIOUS INJURY or DEATH: • NEVER allow small children near batteries...
ATS2113X Manual - Page 27
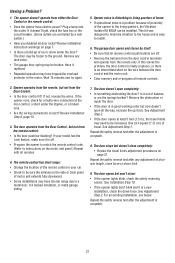
... See Installation Step 10. • If the opener lights don't blink and it replaced.
• Repeated operation may be frozen to a
metal door, foil backed insulation, or metal garage siding.
7. The garage door opens and closes by ... the adjustment is a problem because of proximity
of door arm length, close : • If the opener lights blink, check the safety reversing
sensor. Review...
ATS2113X Manual - Page 34
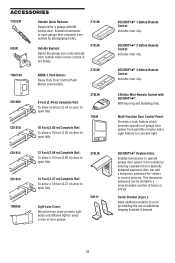
...
12 Foot (3.66 m) Complete Rail:
To allow a 12 foot (3.66 m) door to open fully.
376LM
CD1014 108D36
14 Foot (4.27 m) Complete Rail: To allow a 10 foot (3.05 m) door to open garage door manually from portable remotes and a Light Feature for a garage with SECURITY✚®: With key ring and fastening strip.
Outside Keylock: Opens the garage door automatically from outside by...
Similar Questions

Programming Lj8950w Fails On Automatic Force Setup. Can Not Operate Door.
Went through programming travel, No issues. Automatic force setup, I have no control, it goes up fin...
Went through programming travel, No issues. Automatic force setup, I have no control, it goes up fin...
(Posted by Atmcdilda 1 year ago)

Door Opener Only Moves 6 Inches
Opener Only Moves 6 Inches The Eyes Are Good And Down Force Is All The Way Up
Opener Only Moves 6 Inches The Eyes Are Good And Down Force Is All The Way Up
(Posted by trevorhahn 7 years ago)

Photo Beam Sensor
why istall universal garage door gate sensor photobeam lift master ?
why istall universal garage door gate sensor photobeam lift master ?
(Posted by edgardorodriguez20 7 years ago)

Light Stays On All The Time And Door Won't Shut
you have to hold the wall door button to shut door and the light stays on all the time
you have to hold the wall door button to shut door and the light stays on all the time
(Posted by dwightoverton 10 years ago)
Door Won't Shut By Remote
Door opens fine. light stays on all the time you have to hold wall door button to shut door. Would t...
Door opens fine. light stays on all the time you have to hold wall door button to shut door. Would t...
(Posted by dwightoverton 10 years ago)