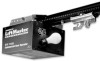
ATS2113X Manual
Page 2
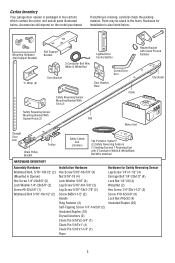
...29 To add or change a Keyless Entry PIN (Optional 30 Multi-Function door control (Optional 31 Repair Parts 32-33 Rail assembly parts 32 Installation parts 32 Motor unit assembly parts 33 Accessories 34 Notes 35 Repair Parts and Service 36 Warranty ... your garage door 3 Tools needed 3 Planning 4 Carton inventory 5 Hardware inventory 5 Assembly 6-7 Attach the rail to the motor unit 6 Attach the chain to the sprocket and install the rail support bracket 6 Tighten the chain 7 Installation 7-20 Installation safety instructions 7 Determine the header bracket location 8...
...29 To add or change a Keyless Entry PIN (Optional 30 Multi-Function door control (Optional 31 Repair Parts 32-33 Rail assembly parts 32 Installation parts 32 Motor unit assembly parts 33 Accessories 34 Notes 35 Repair Parts and Service 36 Warranty ... your garage door 3 Tools needed 3 Planning 4 Carton inventory 5 Hardware inventory 5 Assembly 6-7 Attach the rail to the motor unit 6 Attach the chain to the sprocket and install the rail support bracket 6 Tighten the chain 7 Installation 7-20 Installation safety instructions 7 Determine the header bracket location 8...

ATS2113X Manual
Page 4
... of your installation. You may find it helpful to refer back to your garage door. Header Bracket Chain Pulley Bracket CLOSED POSITION Chain Trolley Rail Header Wall Garage Door Garage Door Spring Straight Door Arm Door Bracket Curved Door Arm Emergency Release Rope & Handle 4 Otherwise, the safety reversal system may...
... of your installation. You may find it helpful to refer back to your garage door. Header Bracket Chain Pulley Bracket CLOSED POSITION Chain Trolley Rail Header Wall Garage Door Garage Door Spring Straight Door Arm Door Bracket Curved Door Arm Emergency Release Rope & Handle 4 Otherwise, the safety reversal system may...
ATS2113X Manual
Page 5
...Nut (2) Hex Screw 1/4"-20x1-1/2" (2) Screw #10-32x3/8" (4) Lock Nut #10x32 (4) Insulated Staples (20) 5 Mounting Hardware (Rail Support Bracket) "C" Wrap (2) Rail Support Bracket Lighted Door Control Button 2-Conductor Bell Wire White & White/Red Door Bracket Door Bracket Plate Curved Door Arm Safety Reversing ...Slot (2) Chain Header Bracket with Clevis Pin and Fastener Styrofoam Safety Reversing Sensor Mounting Bracket With Square Holes (2) Rail Motor Unit Straight Door Arm Chain Pulley Bracket Trolley Safety Labels and Literature The Protector System® (2) Safety ...
...Nut (2) Hex Screw 1/4"-20x1-1/2" (2) Screw #10-32x3/8" (4) Lock Nut #10x32 (4) Insulated Staples (20) 5 Mounting Hardware (Rail Support Bracket) "C" Wrap (2) Rail Support Bracket Lighted Door Control Button 2-Conductor Bell Wire White & White/Red Door Bracket Door Bracket Plate Curved Door Arm Safety Reversing ...Slot (2) Chain Header Bracket with Clevis Pin and Fastener Styrofoam Safety Reversing Sensor Mounting Bracket With Square Holes (2) Rail Motor Unit Straight Door Arm Chain Pulley Bracket Trolley Safety Labels and Literature The Protector System® (2) Safety ...
ATS2113X Manual
Page 6
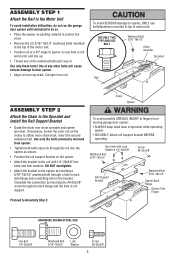
...tape from moving garage door opener: • ALWAYS keep hand clear of any other bolts will cause serious damage to door opener. • Align rail over chain spreader and opener sprocket. DO NOT overtighten. • Attach the bracket to the opener by inserting the #8-32x3/8" screw through a hole ...in each side flange and a matching hole in rail support. ASSEMBLY STEP 1 Attach the Rail to the Motor Unit To avoid installation difficulties, do not run the garage door opener until instructed to do so. ...
...tape from moving garage door opener: • ALWAYS keep hand clear of any other bolts will cause serious damage to door opener. • Align rail over chain spreader and opener sprocket. DO NOT overtighten. • Attach the bracket to the opener by inserting the #8-32x3/8" screw through a hole ...in each side flange and a matching hole in rail support. ASSEMBLY STEP 1 Attach the Rail to the Motor Unit To avoid installation difficulties, do not run the garage door opener until instructed to do so. ...

ATS2113X Manual
Page 7
...threaded shaft, away from the trolley. • To tighten the chain, turn the nut, keep the chain from ALL moving parts of the rail at its midpoint, re-tighten the inner nut to cables, spring assemblies and other hardware MUST be caught in SEVERE INJURY or DEATH. 3. As...control. 11. WARNING Lock Inner Washer Nut To Tighten Inner Nut 1/2" (1.27 cm) INSTALLATION IMPORTANT INSTALLATION INSTRUCTIONS WARNING To reduce the risk of Rail You have now finished assembling your garage door opener. NEVER wear watches, rings or loose clothing while installing or servicing opener. Door MUST...
...threaded shaft, away from the trolley. • To tighten the chain, turn the nut, keep the chain from ALL moving parts of the rail at its midpoint, re-tighten the inner nut to cables, spring assemblies and other hardware MUST be caught in SEVERE INJURY or DEATH. 3. As...control. 11. WARNING Lock Inner Washer Nut To Tighten Inner Nut 1/2" (1.27 cm) INSTALLATION IMPORTANT INSTALLATION INSTRUCTIONS WARNING To reduce the risk of Rail You have now finished assembling your garage door opener. NEVER wear watches, rings or loose clothing while installing or servicing opener. Door MUST...

ATS2113X Manual
Page 10
... completed. HARDWARE SHOWN ACTUAL SIZE Header Wall Header Bracket Chain Pulley Bracket Ring Fastener Header Bracket Clevis Pin 5/16"x2-3/4" Rail Chain Pulley Bracket Rail Ring Fastener Garage Door Clevis Pin 5/16"x2-3/4" Temporary Support INSTALLATION STEP 4 Position the Opener SECTIONAL DOOR ONLY A 2x4...chain pulley bracket against the header bracket. • Align the bracket holes and join with a clevis pin as a protective base. Rail Door 2x4 is convenient for setting an ideal door-to disconnect inner and outer sections. Have someone hold the opener securely on the ...
... completed. HARDWARE SHOWN ACTUAL SIZE Header Wall Header Bracket Chain Pulley Bracket Ring Fastener Header Bracket Clevis Pin 5/16"x2-3/4" Rail Chain Pulley Bracket Rail Ring Fastener Garage Door Clevis Pin 5/16"x2-3/4" Temporary Support INSTALLATION STEP 4 Position the Opener SECTIONAL DOOR ONLY A 2x4...chain pulley bracket against the header bracket. • Align the bracket holes and join with a clevis pin as a protective base. Rail Door 2x4 is convenient for setting an ideal door-to disconnect inner and outer sections. Have someone hold the opener securely on the ...

ATS2113X Manual
Page 11
... bracket and fastening hardware are shown. Remove the 2x4. Concrete anchors MUST be used if installing ANY brackets into masonry. If the door hits the rail, raise the header bracket. FINISHED CEILING Lag Screws 5/16"-18x1-7/8" (Not Provided) Bolt 5/16"-18x7/8" Lock Washer 5/16" Nut 5/16"-18 Bolt 5/16"-18x7/8" ...-7/8" lag screws. 5. Measure the distance from a falling garage door opener, fasten it SECURELY to structural supports of the hanging bracket to make sure the rail is not centered above the door). 7. Fasten the opener to structural supports before installing the opener.
... bracket and fastening hardware are shown. Remove the 2x4. Concrete anchors MUST be used if installing ANY brackets into masonry. If the door hits the rail, raise the header bracket. FINISHED CEILING Lag Screws 5/16"-18x1-7/8" (Not Provided) Bolt 5/16"-18x7/8" Lock Washer 5/16" Nut 5/16"-18 Bolt 5/16"-18x7/8" ...-7/8" lag screws. 5. Measure the distance from a falling garage door opener, fasten it SECURELY to structural supports of the hanging bracket to make sure the rail is not centered above the door). 7. Fasten the opener to structural supports before installing the opener.

ATS2113X Manual
Page 26
... a small layer of white lithium grease to pry open the case as shown. To replace battery, use the visor clip or screwdriver blade to the rail. Tested to be sure door opens and closes fully. Follow the instructions carefully. If it is required. Adjust limits and/or force if necessary. (See... Weather conditions may cause undesired operation. 26 LIMIT CONTROLS Pages 21 and 22 refer to wipe away the existing grease from the garage door opener rail. MAINTENANCE SCHEDULE Every Month • Manually operate door. Disconnect trolley first.
... a small layer of white lithium grease to pry open the case as shown. To replace battery, use the visor clip or screwdriver blade to the rail. Tested to be sure door opens and closes fully. Follow the instructions carefully. If it is required. Adjust limits and/or force if necessary. (See... Weather conditions may cause undesired operation. 26 LIMIT CONTROLS Pages 21 and 22 refer to wipe away the existing grease from the garage door opener rail. MAINTENANCE SCHEDULE Every Month • Manually operate door. Disconnect trolley first.
ATS2113X Manual
Page 32
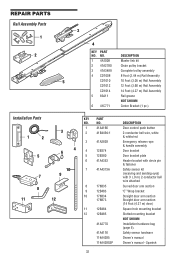
...14 Foot (4.27 m) door) Square hole mounting bracket Slotted mounting bracket NOT SHOWN Installation hardware bag (page 5). REPAIR PARTS Rail Assembly Parts 1 2 3 4 KEY PART NO. Safety sensor hardware Owner's manual Owner's manual - Spanish DESCRIPTION 1 4A1008 ...41A2780 Chain pulley bracket 3 41A3489 Complete trolley assembly 4 CD1008 8 Foot (2.44 m) Rail Assembly 5 CD1010 10 Foot (3.05 m) Rail Assembly CD1012 12 Foot (3.66 m) Rail Assembly CD1014 14 Foot (4.27 m) Rail Assembly 5 83A11 Rail grease NOT SHOWN 6 41C771 Center Bracket (1 pc.) Installation Parts 1 2 5 7...
...14 Foot (4.27 m) door) Square hole mounting bracket Slotted mounting bracket NOT SHOWN Installation hardware bag (page 5). REPAIR PARTS Rail Assembly Parts 1 2 3 4 KEY PART NO. Safety sensor hardware Owner's manual Owner's manual - Spanish DESCRIPTION 1 4A1008 ...41A2780 Chain pulley bracket 3 41A3489 Complete trolley assembly 4 CD1008 8 Foot (2.44 m) Rail Assembly 5 CD1010 10 Foot (3.05 m) Rail Assembly CD1012 12 Foot (3.66 m) Rail Assembly CD1014 14 Foot (4.27 m) Rail Assembly 5 83A11 Rail grease NOT SHOWN 6 41C771 Center Bracket (1 pc.) Installation Parts 1 2 5 7...

ATS2113X Manual
Page 33
NO. DESCRIPTION Rail support bracket assembly kit 10 Pulley (Chain) Gear and sprocket assembly Complete with: Spring washer, thrust washer, retaining washer, 11 bearing plate roll pins (2), drive ...
NO. DESCRIPTION Rail support bracket assembly kit 10 Pulley (Chain) Gear and sprocket assembly Complete with: Spring washer, thrust washer, retaining washer, 11 bearing plate roll pins (2), drive ...
ATS2113X Manual
Page 34
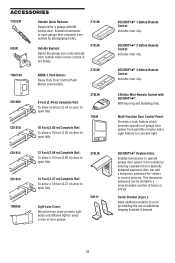
.... Light Lens Cover: Attractive lens cover protects light bulbs and diffuses light to open fully. 376LM CD1014 108D36 14 Foot (4.27 m) Complete Rail: To allow a 12 foot (3.66 m) door to open fully. Multi-Function Door Control Panel: Provides a Lock Feature which prevents operation of... Remote Control: Includes visor clip. SECURITY✚® Keyless Entry: Enables homeowner to open fully. 370LM 78LM CD1010 10 Foot (3.05 m) Complete Rail: To allow an 8 foot (2.44 m) door to open fully. SECURITY✚® 3-Button Remote Control: Includes visor clip. 3-Button Mini-...
.... Light Lens Cover: Attractive lens cover protects light bulbs and diffuses light to open fully. 376LM CD1014 108D36 14 Foot (4.27 m) Complete Rail: To allow a 12 foot (3.66 m) door to open fully. Multi-Function Door Control Panel: Provides a Lock Feature which prevents operation of... Remote Control: Includes visor clip. SECURITY✚® Keyless Entry: Enables homeowner to open fully. 370LM 78LM CD1010 10 Foot (3.05 m) Complete Rail: To allow an 8 foot (2.44 m) door to open fully. SECURITY✚® 3-Button Remote Control: Includes visor clip. 3-Button Mini-...


