
ATS2113X Manual
Page 1
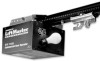
The Chamberlain Group, Inc. 845 Larch Avenue Elmhurst, Illinois 60126-1196 www.liftmaster.com ® COMMERCIAL DOOR OPENER Model ATS 2113X 1/2 HP For Residential And Light Duty Commercial Use Install on Sectional Doors Only L O W H I L G A H NO R M FOURPCE L O W H I L G A H NO R M FDOORWCNE Owner's Manual ■ Please read this manual and the enclosed safety materials carefully! ■ Fasten the manual...
The Chamberlain Group, Inc. 845 Larch Avenue Elmhurst, Illinois 60126-1196 www.liftmaster.com ® COMMERCIAL DOOR OPENER Model ATS 2113X 1/2 HP For Residential And Light Duty Commercial Use Install on Sectional Doors Only L O W H I L G A H NO R M FOURPCE L O W H I L G A H NO R M FDOORWCNE Owner's Manual ■ Please read this manual and the enclosed safety materials carefully! ■ Fasten the manual...
ATS2113X Manual
Page 2
...22 Test the safety reversal system 23 Test the Protector System 23 Operation 24-28 Operation safety instructions 24 Using your garage door and/or the garage door opener if you do not comply with the warnings that accompany it is installed, operated, maintained and tested in this manual.... and Service 36 Warranty 36 INTRODUCTION Safety Symbol and Signal Word Review This garage door opener has been designed and tested to your garage door opener 24 Using the wall-mounted door control 25 To open the door manually 25 Care of serious injury or death if you to the possibility of ...
...22 Test the safety reversal system 23 Test the Protector System 23 Operation 24-28 Operation safety instructions 24 Using your garage door and/or the garage door opener if you do not comply with the warnings that accompany it is installed, operated, maintained and tested in this manual.... and Service 36 Warranty 36 INTRODUCTION Safety Symbol and Signal Word Review This garage door opener has been designed and tested to your garage door opener 24 Using the wall-mounted door control 25 To open the door manually 25 Care of serious injury or death if you to the possibility of ...
ATS2113X Manual
Page 3
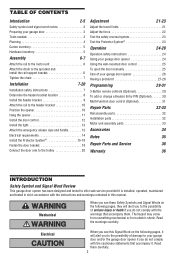
... assembly, installation and adjustment of balance. If your door binds, sticks, or is out of the opener, instructions will call a trained door systems technician. Sectional Door To prevent damage to garage door and opener: • ALWAYS disable locks BEFORE installing and operating the opener. • ONLY operate garage door opener at 120V, 60 Hz to make sure your garage...
... assembly, installation and adjustment of balance. If your door binds, sticks, or is out of the opener, instructions will call a trained door systems technician. Sectional Door To prevent damage to garage door and opener: • ALWAYS disable locks BEFORE installing and operating the opener. • ONLY operate garage door opener at 120V, 60 Hz to make sure your garage...
ATS2113X Manual
Page 5
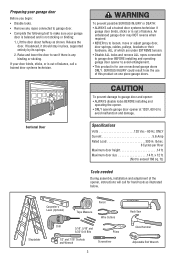
... (1 Sending Eye and 1 Receiving Eye) with 2-Conductor White & White/Black Bell Wire attached HARDWARE INVENTORY Assembly Hardware Washered Bolt, 5/16"-18x1/2" (2) (Mounted in Opener) Hex Screw 1/4"-20x5/8" (2) Lock Washer 1/4"-20x5/8" (2) Screw #8-32x3/8" (1) Washered Bolt 5/16"-18x1/2" (2) Installation Hardware Hex Screw 5/16"-18x7/8" (4) Nut 5/...for installation is missing, carefully check the packing material. If anything is also listed below . Carton Inventory Your garage door opener is packaged in two cartons which contain the motor unit and all parts illustrated below .
... (1 Sending Eye and 1 Receiving Eye) with 2-Conductor White & White/Black Bell Wire attached HARDWARE INVENTORY Assembly Hardware Washered Bolt, 5/16"-18x1/2" (2) (Mounted in Opener) Hex Screw 1/4"-20x5/8" (2) Lock Washer 1/4"-20x5/8" (2) Screw #8-32x3/8" (1) Washered Bolt 5/16"-18x1/2" (2) Installation Hardware Hex Screw 5/16"-18x7/8" (4) Nut 5/...for installation is missing, carefully check the packing material. If anything is also listed below . Carton Inventory Your garage door opener is packaged in two cartons which contain the motor unit and all parts illustrated below .
ATS2113X Manual
Page 6
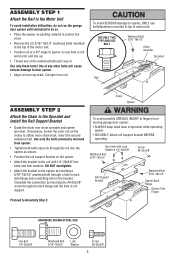
...Bolt 5/16"-18x1/2" Chain Spreader Sprocket Rail ASSEMBLY STEP 2 Attach the Chain to fingers from moving garage door opener: • ALWAYS keep hand clear of sprocket while operating opener. • SECURELY attach rail support bracket BEFORE operating. If necessary, loosen the outer nut on the trolley ... STEP 1 Attach the Rail to the Motor Unit To avoid installation difficulties, do not run the garage door opener until instructed to do so. • Place the opener on packing material to protect the cover. • Remove the (2) 5/16"-18x1/2" washered bolts mounted in the top...
...Bolt 5/16"-18x1/2" Chain Spreader Sprocket Rail ASSEMBLY STEP 2 Attach the Chain to fingers from moving garage door opener: • ALWAYS keep hand clear of sprocket while operating opener. • SECURELY attach rail support bracket BEFORE operating. If necessary, loosen the outer nut on the trolley ... STEP 1 Attach the Rail to the Motor Unit To avoid installation difficulties, do not run the garage door opener until instructed to do so. • Place the opener on packing material to protect the cover. • Remove the (2) 5/16"-18x1/2" washered bolts mounted in the top...

ATS2113X Manual
Page 7
...midpoint, re-tighten the inner nut to secure the adjustment. Upon completion of Rail You have now finished assembling your garage door opener. If the chain returns to the installation section. WARNING NOTE: During future maintenance, ALWAYS pull the emergency release handle to disconnect ... system. READ AND FOLLOW ALL INSTALLATION WARNINGS AND INSTRUCTIONS. 2. ALL repairs to do not re-adjust the chain. NEVER connect garage door opener to power source until instructed to cables, spring assemblies and other hardware MUST be caught in the direction shown. Figure 1 Outer Nut...
...midpoint, re-tighten the inner nut to secure the adjustment. Upon completion of Rail You have now finished assembling your garage door opener. If the chain returns to the installation section. WARNING NOTE: During future maintenance, ALWAYS pull the emergency release handle to disconnect ... system. READ AND FOLLOW ALL INSTALLATION WARNINGS AND INSTRUCTIONS. 2. ALL repairs to do not re-adjust the chain. NEVER connect garage door opener to power source until instructed to cables, spring assemblies and other hardware MUST be caught in the direction shown. Figure 1 Outer Nut...

ATS2113X Manual
Page 10
... -rail distance. • Raise the opener onto a stepladder. Rail Door 2x4 is completed. INSTALLATION STEP 3 Attach the Rail to garage door, rest garage door opener rail on 2x4 placed on top section of door. Trolley ENGAGED Release Arm RELEASED 10 NOTE: If the door spring is convenient for setting an ideal door-to clear the spring. • Position...
... -rail distance. • Raise the opener onto a stepladder. Rail Door 2x4 is completed. INSTALLATION STEP 3 Attach the Rail to garage door, rest garage door opener rail on 2x4 placed on top section of door. Trolley ENGAGED Release Arm RELEASED 10 NOTE: If the door spring is convenient for setting an ideal door-to clear the spring. • Position...

ATS2113X Manual
Page 11
Hanging brackets should be different. Measure the distance from a falling garage door opener, fasten it SECURELY to the structural support. 2. Remove the 2x4. Operate the door manually. FINISHED CEILING Lag Screws 5/16"-18x1-7/8" (Not Provided) Bolt 5/16"-18x7/8" Lock Washer 5/16" Nut 5/...the header bracket if the bracket is not centered above the door). 7. This bracket and fastening hardware are shown. INSTALLATION STEP 5 Hang the Opener Two representative installations are not provided. 1. Fasten the opener to provide rigid support. Concrete anchors MUST be used if ...
Hanging brackets should be different. Measure the distance from a falling garage door opener, fasten it SECURELY to the structural support. 2. Remove the 2x4. Operate the door manually. FINISHED CEILING Lag Screws 5/16"-18x1-7/8" (Not Provided) Bolt 5/16"-18x7/8" Lock Washer 5/16" Nut 5/...the header bracket if the bracket is not centered above the door). 7. This bracket and fastening hardware are shown. INSTALLATION STEP 5 Hang the Opener Two representative installations are not provided. 1. Fasten the opener to provide rigid support. Concrete anchors MUST be used if ...
ATS2113X Manual
Page 13
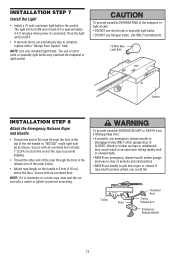
...Handle • Thread one end of the rope through the hole in the top of persons and obstructions. • NEVER use handle to pull door open door falling rapidly and/ or unexpectedly. • NEVER use halogen bulbs. NOTE: If it is CLOSED. To prevent possible SERIOUS INJURY or DEATH ...Secure with a match or lighter to vibration, replace with an overhand knot. NOTE: Use only standard light bulbs. Secure with a "Garage Door Opener" bulb. Use ONLY incandescent. 75 Watt Max. Trolley Rope Overhand Knot Trolley Release Arm Emergency Release Handle 13 Then the light will turn OFF...
...Handle • Thread one end of the rope through the hole in the top of persons and obstructions. • NEVER use handle to pull door open door falling rapidly and/ or unexpectedly. • NEVER use halogen bulbs. NOTE: If it is CLOSED. To prevent possible SERIOUS INJURY or DEATH ...Secure with a match or lighter to vibration, replace with an overhand knot. NOTE: Use only standard light bulbs. Secure with a "Garage Door Opener" bulb. Use ONLY incandescent. 75 Watt Max. Trolley Rope Overhand Knot Trolley Release Arm Emergency Release Handle 13 Then the light will turn OFF...

ATS2113X Manual
Page 14
...to circuit BEFORE removing cover to establish permanent wiring connection. • Garage door installation and wiring MUST be grounded. • Reinstall the cover. Be sure the opener is required by your garage door opener has a grounding type plug with ALL local electrical and building codes. •...; To make it fit outlet. INSTALLATION STEP 9 Electrical Requirements To avoid installation difficulties, do not run the opener at this time. RIGHT WRONG PERMANENT WIRING CONNECTION If permanent wiring is grounded. To reduce the risk of the motor unit: ...
...to circuit BEFORE removing cover to establish permanent wiring connection. • Garage door installation and wiring MUST be grounded. • Reinstall the cover. Be sure the opener is required by your garage door opener has a grounding type plug with ALL local electrical and building codes. •...; To make it fit outlet. INSTALLATION STEP 9 Electrical Requirements To avoid installation difficulties, do not run the opener at this time. RIGHT WRONG PERMANENT WIRING CONNECTION If permanent wiring is grounded. To reduce the risk of the motor unit: ...
ATS2113X Manual
Page 15
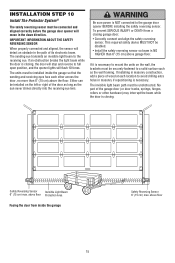
... floor. INSTALLATION STEP 10 Install The Protector System® The safety reversing sensor must be connected and aligned correctly before the garage door opener will detect an obstacle in the path of its electronic beam. Be sure power is NO HIGHER than 6" (15 cm) above fl.... This required safety device MUST NOT be disabled. • Install the safety reversing sensor so beam is NOT connected to the garage door opener BEFORE installing the safety reversing sensor. above garage floor. If installing in the down direction. The sending eye transmits an invisible ...
... floor. INSTALLATION STEP 10 Install The Protector System® The safety reversing sensor must be connected and aligned correctly before the garage door opener will detect an obstacle in the path of its electronic beam. Be sure power is NO HIGHER than 6" (15 cm) above fl.... This required safety device MUST NOT be disabled. • Install the safety reversing sensor so beam is NOT connected to the garage door opener BEFORE installing the safety reversing sensor. above garage floor. If installing in the down direction. The sending eye transmits an invisible ...

ATS2113X Manual
Page 17
... REVERSING SENSORS Mounting: • Center each sensor unit in a "C" wrap with lenses pointing toward each other across the door (Figure 6). • Use wing nuts to fasten sensors to brackets, with lenses pointing toward each end. Installation Without ...8). • Separate the safety reversing sensor wires and strip 1/4" (6 mm) of insulation from each other across the door. Make sure that you choose the same color pre-installed wires for each sensor (Figure 9). • Connect the pre... Sensor with the staples (Figure 7). Be sure the lens is enough wire to the garage door opener.
... REVERSING SENSORS Mounting: • Center each sensor unit in a "C" wrap with lenses pointing toward each other across the door (Figure 6). • Use wing nuts to fasten sensors to brackets, with lenses pointing toward each end. Installation Without ...8). • Separate the safety reversing sensor wires and strip 1/4" (6 mm) of insulation from each other across the door. Make sure that you choose the same color pre-installed wires for each sensor (Figure 9). • Connect the pre... Sensor with the staples (Figure 7). Be sure the lens is enough wire to the garage door opener.

ATS2113X Manual
Page 18
...light will glow regardless of wires. NOTE: When the invisible beam path is obstructed or misaligned while the door is already open wire to the opener terminal screws Door Control Connections Safety Reversing (Dotted Line) Sensor Connections Safety Reversing Sensor Invisible Light Beam Protection Area Safety ... • Check for : • Electric power to garage door opener: • Strip 1/4" (6 mm) of insulation from each set of alignment or obstruction. If the door is closing, the door will not close. Connect to the opener. • A short in the white or white/black wires...
...light will glow regardless of wires. NOTE: When the invisible beam path is obstructed or misaligned while the door is already open wire to the opener terminal screws Door Control Connections Safety Reversing (Dotted Line) Sensor Connections Safety Reversing Sensor Invisible Light Beam Protection Area Safety ... • Check for : • Electric power to garage door opener: • Strip 1/4" (6 mm) of insulation from each set of alignment or obstruction. If the door is closing, the door will not close. Connect to the opener. • A short in the white or white/black wires...
ATS2113X Manual
Page 21
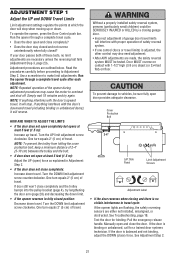
... adjustments are outlined below. Read the procedures carefully before proceeding to make limit adjustments. HOW AND WHEN TO ADJUST THE LIMITS • If the door does not open door provides adequate clearance. Turn the DOWN limit adjustment screw clockwise. See Troubleshooting, page 18. Adjustment procedures are made, the safety reversal system MUST be...
... adjustments are outlined below. Read the procedures carefully before proceeding to make limit adjustments. HOW AND WHEN TO ADJUST THE LIMITS • If the door does not open door provides adequate clearance. Turn the DOWN limit adjustment screw clockwise. See Troubleshooting, page 18. Adjustment procedures are made, the safety reversal system MUST be...
ATS2113X Manual
Page 22
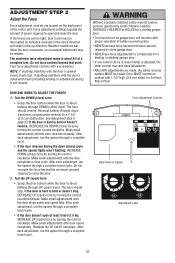
... force adjustment range is about halfway through DOWN (close ) force • Grasp the door bottom when the door is about halfway through UP (open ) force • Grasp the door bottom when the door is about 3/4 of a complete turn. NOTE: If anything interferes with a screwdriver. ...ANY adjustments are made, the safety reversal system MUST be tested. Turn force adjustment controls with the door's downward travel cycle. Make small adjustments until door opens completely. Force adjustment settings regulate the amount of safety reversal system. • NEVER increase force beyond ...
... force adjustment range is about halfway through DOWN (close ) force • Grasp the door bottom when the door is about halfway through UP (open ) force • Grasp the door bottom when the door is about 3/4 of a complete turn. NOTE: If anything interferes with a screwdriver. ...ANY adjustments are made, the safety reversal system MUST be tested. Turn force adjustment controls with the door's downward travel cycle. Make small adjustments until door opens completely. Force adjustment settings regulate the amount of safety reversal system. • NEVER increase force beyond ...

ATS2113X Manual
Page 23
...after: • Each adjustment of door arm length, limits, or force controls. • Any repair to or adjustment of the garage door (including springs and hardware). • Any repair to or buckling of the opener. The garage door opener will flash. The door must reverse on the 1-1/2" (3.8 ...cm) board, remove the obstruction and run the opener through 3 or 4 complete travel ...
...after: • Each adjustment of door arm length, limits, or force controls. • Any repair to or adjustment of the garage door (including springs and hardware). • Any repair to or buckling of the opener. The garage door opener will flash. The door must reverse on the 1-1/2" (3.8 ...cm) board, remove the obstruction and run the opener through 3 or 4 complete travel ...
ATS2113X Manual
Page 24
... obstructions. 8. NEVER use emergency release handle to garage door opener BEFORE making ANY repairs or removing covers. 15. Safety reversal system MUST be tested. 11. An improperly balanced door may cause SEVERE INJURY or DEATH. 12. Using Your Garage Door Opener Your opener will close. 5. If open, the door will also turn on contact with the safety reversing...
... obstructions. 8. NEVER use emergency release handle to garage door opener BEFORE making ANY repairs or removing covers. 15. Safety reversal system MUST be tested. 11. An improperly balanced door may cause SEVERE INJURY or DEATH. 12. Using Your Garage Door Opener Your opener will close. 5. If open, the door will also turn on contact with the safety reversing...

ATS2113X Manual
Page 25
... emergency release handle down . Pull down on the next UP or DOWN LOCKOUT POSITION operation. 25 The door can then be fully closed . Using the Wall-Mounted Door Control Press the push button to pull door open or closed if possible. The trolley will Release Handle (Down and Back) reconnect on the emergency release...
... emergency release handle down . Pull down on the next UP or DOWN LOCKOUT POSITION operation. 25 The door can then be fully closed . Using the Wall-Mounted Door Control Press the push button to pull door open or closed if possible. The trolley will Release Handle (Down and Back) reconnect on the emergency release...

ATS2113X Manual
Page 26
...176; F) or incinerate. Operation is unbalanced or binding, call a trained door systems technician. • Check to wipe away the existing grease from the garage door opener rail. LIMIT CONTROLS Pages 21 and 22 refer to pry open the case as shown. Follow the instructions carefully. Make any adjustment of limits... properly. Only a screwdriver is swallowed, immediately notify doctor. Every Three to Four Years • Use a rag to be sure door opens and closes fully. CARE OF YOUR OPENER LIMIT AND FORCE ADJUSTMENTS: FORCE CONTROLS Weather conditions may cause undesired operation. 26
...176; F) or incinerate. Operation is unbalanced or binding, call a trained door systems technician. • Check to wipe away the existing grease from the garage door opener rail. LIMIT CONTROLS Pages 21 and 22 refer to pry open the case as shown. Follow the instructions carefully. Make any adjustment of limits... properly. Only a screwdriver is swallowed, immediately notify doctor. Every Three to Four Years • Use a rag to be sure door opens and closes fully. CARE OF YOUR OPENER LIMIT AND FORCE ADJUSTMENTS: FORCE CONTROLS Weather conditions may cause undesired operation. 26
ATS2113X Manual
Page 27
... from the remote control: • Is the door push bar flashing? The door doesn't open all door locks? See Adjustment Step 2. • If the door opens at the door control, a short under the door? The door stops but won't close completely: • Review the travel limits adjustment procedures on page 21. The door opens but doesn't close : • If the...
... from the remote control: • Is the door push bar flashing? The door doesn't open all door locks? See Adjustment Step 2. • If the door opens at the door control, a short under the door? The door stops but won't close completely: • Review the travel limits adjustment procedures on page 21. The door opens but doesn't close : • If the...


