ATS2113X Manual
Page 2
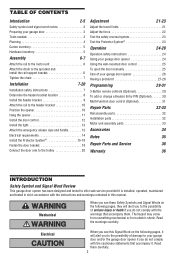
... 23 Test the Protector System 23 Operation 24-28 Operation safety instructions 24 Using your garage door opener 24 Using the wall-mounted door control 25 To open the door manually 25 Care of your garage door opener 26 Having a problem 27-28 Programming 29-31 3-Button remote controls (Optional 29 ... parts 33 Accessories 34 Notes 35 Repair Parts and Service 36 Warranty 36 INTRODUCTION Safety Symbol and Signal Word Review This garage door opener has been designed and tested to offer safe service provided it is installed, operated, maintained and tested in strict accordance ...
... 23 Test the Protector System 23 Operation 24-28 Operation safety instructions 24 Using your garage door opener 24 Using the wall-mounted door control 25 To open the door manually 25 Care of your garage door opener 26 Having a problem 27-28 Programming 29-31 3-Button remote controls (Optional 29 ... parts 33 Accessories 34 Notes 35 Repair Parts and Service 36 Warranty 36 INTRODUCTION Safety Symbol and Signal Word Review This garage door opener has been designed and tested to offer safe service provided it is installed, operated, maintained and tested in strict accordance ...
ATS2113X Manual
Page 3
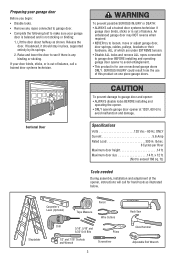
... 5.6 Amp Rated Load 300 in place, supported entirely by its springs. 2. Sectional Door To prevent damage to garage door and opener: • ALWAYS disable locks BEFORE installing and operating the opener. • ONLY operate garage door opener at 120V, 60 Hz to exceed 168 sq. Preparing your garage door Before you begin: • Disable locks. • Remove any binding or...
... 5.6 Amp Rated Load 300 in place, supported entirely by its springs. 2. Sectional Door To prevent damage to garage door and opener: • ALWAYS disable locks BEFORE installing and operating the opener. • ONLY operate garage door opener at 120V, 60 Hz to exceed 168 sq. Preparing your garage door Before you begin: • Disable locks. • Remove any binding or...
ATS2113X Manual
Page 5
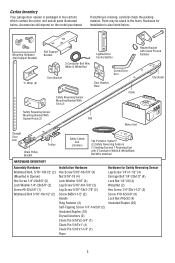
...with Clevis Pin and Fastener Styrofoam Safety Reversing Sensor Mounting Bracket With Square Holes (2) Rail Motor Unit Straight Door Arm Chain Pulley Bracket Trolley Safety Labels and Literature The Protector System® (2) Safety Reversing Sensors (1 Sending...20 (4) Wing Nut (2) Hex Screw 1/4"-20x1-1/2" (2) Screw #10-32x3/8" (4) Lock Nut #10x32 (4) Insulated Staples (20) 5 Carton Inventory Your garage door opener is packaged in Opener) Hex Screw 1/4"-20x5/8" (2) Lock Washer 1/4"-20x5/8" (2) Screw #8-32x3/8" (1) Washered Bolt 5/16"-18x1/2" (2) Installation Hardware Hex Screw 5/16"-18x7...
...with Clevis Pin and Fastener Styrofoam Safety Reversing Sensor Mounting Bracket With Square Holes (2) Rail Motor Unit Straight Door Arm Chain Pulley Bracket Trolley Safety Labels and Literature The Protector System® (2) Safety Reversing Sensors (1 Sending...20 (4) Wing Nut (2) Hex Screw 1/4"-20x1-1/2" (2) Screw #10-32x3/8" (4) Lock Nut #10x32 (4) Insulated Staples (20) 5 Carton Inventory Your garage door opener is packaged in Opener) Hex Screw 1/4"-20x5/8" (2) Lock Washer 1/4"-20x5/8" (2) Screw #8-32x3/8" (1) Washered Bolt 5/16"-18x1/2" (2) Installation Hardware Hex Screw 5/16"-18x7...
ATS2113X Manual
Page 6
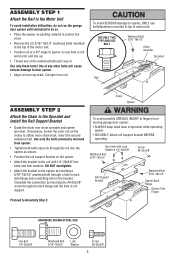
...16"-18x1/2" Screw #8-32x3/8" Rail Support Bracket Washered Bolt 5/16"-18x1/2" Opener Back Flange Opener Side Flange Proceed to fingers from moving garage door opener: • ALWAYS keep hand clear of sprocket while operating opener. • SECURELY attach rail support bracket BEFORE operating. ASSEMBLY STEP 1 Attach... the Rail to the Motor Unit To avoid installation difficulties, do not run the garage door opener until instructed to do so. • Place the opener on packing material to protect the cover. • Remove the (2) 5/16"-18x1/2" washered bolts mounted ...
...16"-18x1/2" Screw #8-32x3/8" Rail Support Bracket Washered Bolt 5/16"-18x1/2" Opener Back Flange Opener Side Flange Proceed to fingers from moving garage door opener: • ALWAYS keep hand clear of sprocket while operating opener. • SECURELY attach rail support bracket BEFORE operating. ASSEMBLY STEP 1 Attach... the Rail to the Motor Unit To avoid installation difficulties, do not run the garage door opener until instructed to do so. • Place the opener on packing material to protect the cover. • Remove the (2) 5/16"-18x1/2" washered bolts mounted ...

ATS2113X Manual
Page 7
... connected to garage door BEFORE installing opener to do not re-adjust the chain. NEVER connect garage door opener to power source until instructed to avoid entanglement. 5. Install wall-mounted garage door control: • within sight of the garage door. • out of reach of garage door. 12. ... 7 Please read the following warnings before adjusting chain. NEVER wear watches, rings or loose clothing while installing or servicing opener. Install garage door opener 7 feet (2.13 m) or more above floor. 7. Place manual release/safety reverse test label in the direction...
... connected to garage door BEFORE installing opener to do not re-adjust the chain. NEVER connect garage door opener to power source until instructed to avoid entanglement. 5. Install wall-mounted garage door control: • within sight of the garage door. • out of reach of garage door. 12. ... 7 Please read the following warnings before adjusting chain. NEVER wear watches, rings or loose clothing while installing or servicing opener. Install garage door opener 7 feet (2.13 m) or more above floor. 7. Place manual release/safety reverse test label in the direction...

ATS2113X Manual
Page 10
... base. Have someone hold the opener securely on a temporary support to allow the rail to -rail distance. • Raise the opener onto a stepladder. INSTALLATION STEP 3 Attach the Rail to garage door, rest garage door opener rail on 2x4 placed on top section of door. You will need help at ...this point if the ladder is not tall enough. • Open the door all the way and place ...
... base. Have someone hold the opener securely on a temporary support to allow the rail to -rail distance. • Raise the opener onto a stepladder. INSTALLATION STEP 3 Attach the Rail to garage door, rest garage door opener rail on 2x4 placed on top section of door. You will need help at ...this point if the ladder is not tall enough. • Open the door all the way and place ...

ATS2113X Manual
Page 11
... nuts. 6. Drill 3/16" pilot holes in line with 5/16"-18x1-7/8" lag screws. 5. Fasten the opener to structural supports before installing the opener. Concrete anchors MUST be used if installing ANY brackets into masonry. Measure the distance from a falling garage door opener, fasten it SECURELY to structural supports of the hanging bracket to a support with the...
... nuts. 6. Drill 3/16" pilot holes in line with 5/16"-18x1-7/8" lag screws. 5. Fasten the opener to structural supports before installing the opener. Concrete anchors MUST be used if installing ANY brackets into masonry. Measure the distance from a falling garage door opener, fasten it SECURELY to structural supports of the hanging bracket to a support with the...
ATS2113X Manual
Page 13
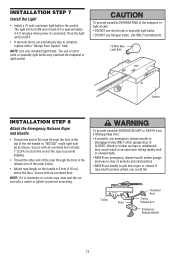
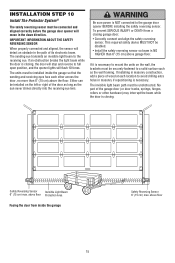
...Secure with an overhand knot at least 1" (2.54 cm) from a falling garage door: • If possible, use emergency release handle to pull door open door falling rapidly and/ or unexpectedly. • NEVER use emergency release handle unless garage doorway is clear of the endpanel or light socket, • DO NOT use... the outer trolley. • Adjust rope length so the handle is 6 feet (1.83 m) above the floor. Secure with a "Garage Door Opener" bulb. The light will turn ON and remain lit for approximately 4-1/2 minutes when power is connected. Weak or broken springs or unbalanced...
...Secure with an overhand knot at least 1" (2.54 cm) from a falling garage door: • If possible, use emergency release handle to pull door open door falling rapidly and/ or unexpectedly. • NEVER use emergency release handle unless garage doorway is clear of the endpanel or light socket, • DO NOT use... the outer trolley. • Adjust rope length so the handle is 6 feet (1.83 m) above the floor. Secure with a "Garage Door Opener" bulb. The light will turn ON and remain lit for approximately 4-1/2 minutes when power is connected. Weak or broken springs or unbalanced...

ATS2113X Manual
Page 14
... the attached 3-prong cord. • Connect the black (line) wire to establish permanent wiring connection. • Garage door installation and wiring MUST be grounded. • Reinstall the cover. Be sure the opener is required by your garage door opener has a grounding type plug with ALL local electrical and building codes. • NEVER use an extension cord...
... the attached 3-prong cord. • Connect the black (line) wire to establish permanent wiring connection. • Garage door installation and wiring MUST be grounded. • Reinstall the cover. Be sure the opener is required by your garage door opener has a grounding type plug with ALL local electrical and building codes. • NEVER use an extension cord...
ATS2113X Manual
Page 15
... framing. The invisible light beam path must be connected and aligned correctly before the garage door opener will move in the path of the garage door (or door tracks, springs, hinges, rollers or other across the door, no more than 6" (15 cm) above the floor. Safety Reversing Sensor...and align the safety reversing sensor. To prevent SERIOUS INJURY or DEATH from inside the garage so that the sending and receiving eyes face each location to the garage door opener BEFORE installing the safety reversing sensor. IMPORTANT INFORMATION ABOUT THE SAFETY REVERSING SENSOR When ...
... framing. The invisible light beam path must be connected and aligned correctly before the garage door opener will move in the path of the garage door (or door tracks, springs, hinges, rollers or other across the door, no more than 6" (15 cm) above the floor. Safety Reversing Sensor...and align the safety reversing sensor. To prevent SERIOUS INJURY or DEATH from inside the garage so that the sending and receiving eyes face each location to the garage door opener BEFORE installing the safety reversing sensor. IMPORTANT INFORMATION ABOUT THE SAFETY REVERSING SENSOR When ...

ATS2113X Manual
Page 17
...choose the same color pre-installed wires for each sensor (Figure 9). • Connect the pre-installed wires to the garage door opener. Option A - Figure 6 "C" Wrap Indicator Light Hex Bolt 1/4"-20x1-1/2" Figure 7 Figure 8 Wing Nut Sensor with lenses pointing toward each other across... the door. Pre-Wired Installation: If your garage already has wires installed for each sensor (Figure 10). Be sure the lens is enough wire to reach the pre-installed wires...
...choose the same color pre-installed wires for each sensor (Figure 9). • Connect the pre-installed wires to the garage door opener. Option A - Figure 6 "C" Wrap Indicator Light Hex Bolt 1/4"-20x1-1/2" Figure 7 Figure 8 Wing Nut Sensor with lenses pointing toward each other across... the door. Pre-Wired Installation: If your garage already has wires installed for each sensor (Figure 10). Be sure the lens is enough wire to reach the pre-installed wires...

ATS2113X Manual
Page 18
... invisible light beam path is not obstructed), alignment is already open wire to 3 (Figure 11). The opener lights will glow regardless of wires. Bell Wire Connect Wire to the opener terminal screws Door Control Connections Safety Reversing (Dotted Line) Sensor Connections Safety Reversing...light glows steadily but the receiving eye indicator light doesn't: • Check alignment. • Check for : • Electric power to garage door opener: • Strip 1/4" (6 mm) of insulation from each set of alignment or obstruction. When the green indicator light glows steadily, ...
... invisible light beam path is not obstructed), alignment is already open wire to 3 (Figure 11). The opener lights will glow regardless of wires. Bell Wire Connect Wire to the opener terminal screws Door Control Connections Safety Reversing (Dotted Line) Sensor Connections Safety Reversing...light glows steadily but the receiving eye indicator light doesn't: • Check alignment. • Check for : • Electric power to garage door opener: • Strip 1/4" (6 mm) of insulation from each set of alignment or obstruction. When the green indicator light glows steadily, ...

ATS2113X Manual
Page 23
... beyond a straight up and down direction. The garage door opener will not close the door. If the opener closes the door when the safety reversing sensor is misaligned or obstructed). Increase the DOWN limit by a closing garage door. IMPORTANT SAFETY CHECK: • Repeat Adjustment Steps 1, 2 and 3 after: • Each adjustment of door arm length, limits, or force controls. •...
... beyond a straight up and down direction. The garage door opener will not close the door. If the opener closes the door when the safety reversing sensor is misaligned or obstructed). Increase the DOWN limit by a closing garage door. IMPORTANT SAFETY CHECK: • Repeat Adjustment Steps 1, 2 and 3 after: • Each adjustment of door arm length, limits, or force controls. •...
ATS2113X Manual
Page 24
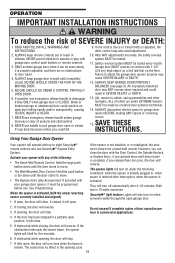
...-Held Remote Control: Hold the large push button down until completely closed . ALL repairs to pull garage door open garage door. 2. The opener lights will stop . when the opener is 75 watts maximum. They will also turn off automatically after interruption; Security✚® light feature... and one control (force or travel . 4. Garage door MUST reverse on the floor. ALWAYS KEEP GARAGE DOOR PROPERLY BALANCED (see page 3). However, you activate them too soon, the door will operate with your garage door opener, it will close when the beam is adjusted,...
...-Held Remote Control: Hold the large push button down until completely closed . ALL repairs to pull garage door open garage door. 2. The opener lights will stop . when the opener is 75 watts maximum. They will also turn off automatically after interruption; Security✚® light feature... and one control (force or travel . 4. Garage door MUST reverse on the floor. ALWAYS KEEP GARAGE DOOR PROPERLY BALANCED (see page 3). However, you activate them too soon, the door will operate with your garage door opener, it will close when the beam is adjusted,...

ATS2113X Manual
Page 26
...Reapply a small layer of operation. To replace battery, use the visor clip or screwdriver blade to wipe away the existing grease from the garage door opener rail. THERE ARE NO OTHER USER SERVICEABLE PARTS. Adjust limits and/or force if necessary. (See pages 21 and 22.) • ...refer to Comply with only 3V2032 coin cell batteries. Adjust if necessary. (See page 7.) Every Year • Oil door rollers, bearings and hinges. CARE OF YOUR OPENER LIMIT AND FORCE ADJUSTMENTS: FORCE CONTROLS Weather conditions may not cause harmful interference, and (2) this receiver and/or transmitter ...
...Reapply a small layer of operation. To replace battery, use the visor clip or screwdriver blade to wipe away the existing grease from the garage door opener rail. THERE ARE NO OTHER USER SERVICEABLE PARTS. Adjust limits and/or force if necessary. (See pages 21 and 22.) • ...refer to Comply with only 3V2032 coin cell batteries. Adjust if necessary. (See page 7.) Every Year • Oil door rollers, bearings and hinges. CARE OF YOUR OPENER LIMIT AND FORCE ADJUSTMENTS: FORCE CONTROLS Weather conditions may not cause harmful interference, and (2) this receiver and/or transmitter ...
ATS2113X Manual
Page 27
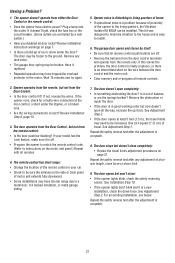
... on the motor unit panel.) Repeat with all door locks? The garage door opens and closes by itself: • Be sure that all remote control push buttons are controlled by a wall switch.) • Have you disabled all remotes. 4. Opener operates from the remote, but not from the remote... control: • Is the door push bar flashing? Is it...
... on the motor unit panel.) Repeat with all door locks? The garage door opens and closes by itself: • Be sure that all remote control push buttons are controlled by a wall switch.) • Have you disabled all remotes. 4. Opener operates from the remote, but not from the remote... control: • Is the door push bar flashing? Is it...
ATS2113X Manual
Page 28
... and handle to disconnect the trolley. Operate the door manually. The door reverses for the chain to operate door: • The door may be locked. Use a standard neck garage door opener bulb if regular bulb burns out. 14. Open and close the door manually. If it is unbalanced or binding, call a trained door systems technician. Pull the emergency release handle...
... and handle to disconnect the trolley. Operate the door manually. The door reverses for the chain to operate door: • The door may be locked. Use a standard neck garage door opener bulb if regular bulb burns out. 14. Open and close the door manually. If it is unbalanced or binding, call a trained door systems technician. Pull the emergency release handle...

ATS2113X Manual
Page 29
... Described and Illustrated Below To prevent possible SERIOUS INJURY or DEATH from a moving gate or garage door: • ALWAYS keep gate or garage door in the garage door opener does not authorize the purchaser or supplier of the non-rolling code transmitter to circumvent that ...ash, release all 3 buttons: the large Close Stop button will only open the door, the middle button will close . Open/Close/Stop Operation Your Security✚® remote control Open can also activate other garage door openers and/or light controls. (Instructions for 30 seconds. 2. Security✚&#...
... Described and Illustrated Below To prevent possible SERIOUS INJURY or DEATH from a moving gate or garage door: • ALWAYS keep gate or garage door in the garage door opener does not authorize the purchaser or supplier of the non-rolling code transmitter to circumvent that ...ash, release all 3 buttons: the large Close Stop button will only open the door, the middle button will close . Open/Close/Stop Operation Your Security✚® remote control Open can also activate other garage door openers and/or light controls. (Instructions for 30 seconds. 2. Security✚&#...

ATS2113X Manual
Page 30
... seconds, enter a four digit personal identification number (PIN) of hours (up to 255), then press ✽. The opener light will work , press the number of your garage door opener. Press the new 4-digit PIN you have chosen, then press ENTER. It can be changed by pressing the new PIN, then ... move . After a programmed number of hours or number of times this temporary PIN will be heard. The opener light will no longer open the door. To set to 255), then press #. To set a temporary PIN You may be used up to a certain number of times (up one person ...
... seconds, enter a four digit personal identification number (PIN) of hours (up to 255), then press ✽. The opener light will work , press the number of your garage door opener. Press the new 4-digit PIN you have chosen, then press ENTER. It can be changed by pressing the new PIN, then ... move . After a programmed number of hours or number of times this temporary PIN will be heard. The opener light will no longer open the door. To set to 255), then press #. To set a temporary PIN You may be used up to a certain number of times (up one person ...
ATS2113X Manual
Page 34
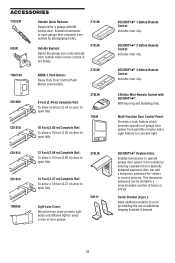
...Lens Cover: Attractive lens cover protects light bulbs and diffuses light to open garage door manually from outside by enabling the use of garage door opener from portable remotes and a Light Feature for a garage with SECURITY✚®: With key ring and fastening strip. This temporary... Includes visor clip. Also can be limited to operate garage door opener from outside by entering a password on a specially designed keyboard. LOCK LIGHT CD1012 12 Foot (3.66 m) Complete Rail: To allow a 12 foot (3.66 m) door to open fully. 376LM CD1014 108D36 14 Foot (4.27 m) Complete...
...Lens Cover: Attractive lens cover protects light bulbs and diffuses light to open garage door manually from outside by enabling the use of garage door opener from portable remotes and a Light Feature for a garage with SECURITY✚®: With key ring and fastening strip. This temporary... Includes visor clip. Also can be limited to operate garage door opener from outside by entering a password on a specially designed keyboard. LOCK LIGHT CD1012 12 Foot (3.66 m) Complete Rail: To allow a 12 foot (3.66 m) door to open fully. 376LM CD1014 108D36 14 Foot (4.27 m) Complete...


