X4500, X7500 MFP Options User's Guide
Page 3
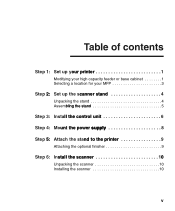
Contents Chapter 1: Getting started 1 How do I use the touch screen 1 How do I use the numeric keypad and buttons 2 How do I scan from the scanner bed 3 How do I log in 3 How do I access online help 3 Chapter 2: Copying 4 How do I make a quick copy 4 How do I cancel a copy job 4 ...while the original ...
Contents Chapter 1: Getting started 1 How do I use the touch screen 1 How do I use the numeric keypad and buttons 2 How do I scan from the scanner bed 3 How do I log in 3 How do I access online help 3 Chapter 2: Copying 4 How do I make a quick copy 4 How do I cancel a copy job 4 ...while the original ...
X4500, X7500 MFP Options User's Guide
Page 8
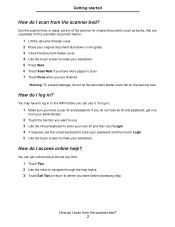
... Scan Next if you have more pages to make your user ID and then touch Login. 4 If required, use it. How do I scan from the scanner bed? 3 You may have an ID and password, get online help at almost any time. 1 Touch Tips. 2 Use the index to navigate through the help... to return to where you are unsuitable for the automatic document feeder. 1 Lift the document feeder cover. 2 Place your original document face down on the scanner bed. Getting started How do I log in? To log in: 1 Make sure you can get one from your administrator. 2 Touch the function you want to...
... Scan Next if you have more pages to make your user ID and then touch Login. 4 If required, use it. How do I scan from the scanner bed? 3 You may have an ID and password, get online help at almost any time. 1 Touch Tips. 2 Use the index to navigate through the help... to return to where you are unsuitable for the automatic document feeder. 1 Lift the document feeder cover. 2 Place your original document face down on the scanner bed. Getting started How do I log in? To log in: 1 Make sure you can get one from your administrator. 2 Touch the function you want to...
X4500, X7500 MFP Options User's Guide
Page 9
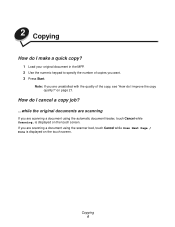
Note: If you are scanning a document using the scanner bed, touch Cancel while Scan Next Page / Done is displayed on the touch screen. How do I cancel a copy job? ...while the original documents are scanning ...
Note: If you are scanning a document using the scanner bed, touch Cancel while Scan Next Page / Done is displayed on the touch screen. How do I cancel a copy job? ...while the original documents are scanning ...
X4500, X7500 MFP Options User's Guide
Page 14
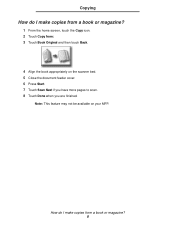
Copying How do I make copies from : 3 Touch Book Original and then touch Back. 4 Align the book appropriately on your MFP. How do I make copies from a book or magazine? 1 From the home screen, touch the Copy icon. 2 Touch Copy from a book or magazine? 9 Note: This feature may not be available on the scanner bed. 5 Close the document feeder cover. 6 Press Start. 7 Touch Scan Next if you have more pages to scan. 8 Touch Done when you are finished.
Copying How do I make copies from : 3 Touch Book Original and then touch Back. 4 Align the book appropriately on your MFP. How do I make copies from a book or magazine? 1 From the home screen, touch the Copy icon. 2 Touch Copy from a book or magazine? 9 Note: This feature may not be available on the scanner bed. 5 Close the document feeder cover. 6 Press Start. 7 Touch Scan Next if you have more pages to scan. 8 Touch Done when you are finished.
X4500, X7500 MFP Options User's Guide
Page 20
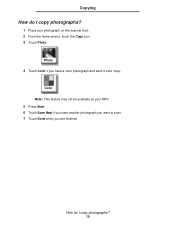
How do I copy photographs? 15 Color Note: This feature may not be available on the scanner bed. 2 From the home screen, touch the Copy icon. 3 Touch Photo. Photo 4 Touch Color if you have another photograph you are finished. Copying How do I copy photographs? 1 Place your photograph on your MFP. 5 Press Start. 6 Touch Scan Next if you have a color photograph and want to scan. 7 Touch Done when you want a color copy.
How do I copy photographs? 15 Color Note: This feature may not be available on the scanner bed. 2 From the home screen, touch the Copy icon. 3 Touch Photo. Photo 4 Touch Color if you have another photograph you are finished. Copying How do I copy photographs? 1 Place your photograph on your MFP. 5 Press Start. 6 Touch Scan Next if you have a color photograph and want to scan. 7 Touch Done when you want a color copy.

X4500, X7500 MFP Options User's Guide
Page 30
How do I cancel a fax job? 25 Note: If Fax Queue is displayed on the touch screen. ...after it has been scanned 1 Touch Fax. 2 Touch Options. 3 Touch Advanced Options. 4 Touch Fax Queue. is grayed out (not available), you cannot cancel any faxes. 5 Touch the button that represents the fax you want to cancel. 6 Touch Done. From the scanner bed: • Touch Cancel while Scan Next Page / Done is displayed on the touch screen. Faxing How do I cancel a fax job? ...while original documents are scanning From the automatic document feeder: • Touch Cancel while Scanning...
How do I cancel a fax job? 25 Note: If Fax Queue is displayed on the touch screen. ...after it has been scanned 1 Touch Fax. 2 Touch Options. 3 Touch Advanced Options. 4 Touch Fax Queue. is grayed out (not available), you cannot cancel any faxes. 5 Touch the button that represents the fax you want to cancel. 6 Touch Done. From the scanner bed: • Touch Cancel while Scan Next Page / Done is displayed on the touch screen. Faxing How do I cancel a fax job? ...while original documents are scanning From the automatic document feeder: • Touch Cancel while Scanning...

X4500, X7500 MFP Options User's Guide
Page 43
... or press Start to send your job. Scanning to e-mail How do I send an e-mail? 38 is displayed on the touch screen. • From the scanner bed, touch Cancel while Scan Next Page / Done is displayed on the touch screen. How do I cancel an e-mail? • From the automatic document feeder...
... or press Start to send your job. Scanning to e-mail How do I send an e-mail? 38 is displayed on the touch screen. • From the scanner bed, touch Cancel while Scan Next Page / Done is displayed on the touch screen. How do I cancel an e-mail? • From the automatic document feeder...
Setup Guide
Page 5
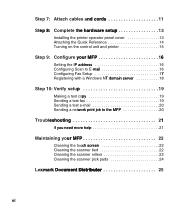
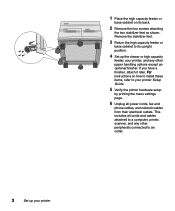
Step 1: Set up your printer 1 Modifying your high capacity feeder or base cabinet 1 Selecting a location for your MFP 3 Step 2: Set up the scanner stand 4 Unpacking the stand 4 Assembling the stand 5 Step 3: Install the control unit 6 Step 4: Mount the power supply 8 Step 5: Attach the stand to the printer 9 Attaching the optional finisher 9 Step 6: Install the scanner 10 Unpacking the scanner 10 Installing the scanner 10 v
Step 1: Set up your printer 1 Modifying your high capacity feeder or base cabinet 1 Selecting a location for your MFP 3 Step 2: Set up the scanner stand 4 Unpacking the stand 4 Assembling the stand 5 Step 3: Install the control unit 6 Step 4: Mount the power supply 8 Step 5: Attach the stand to the printer 9 Attaching the optional finisher 9 Step 6: Install the scanner 10 Unpacking the scanner 10 Installing the scanner 10 v
Setup Guide
Page 6
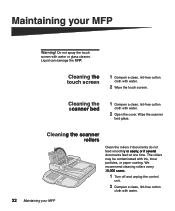
... print job to the MFP 20 Troubleshooting 21 If you need more help 21 Maintaining your MFP 22 Cleaning the touch screen 22 Cleaning the scanner bed 22 Cleaning the scanner rollers 22 Cleaning the scanner pick pads 24 Lexmark Document Distributor 25 vi
... print job to the MFP 20 Troubleshooting 21 If you need more help 21 Maintaining your MFP 22 Cleaning the touch screen 22 Cleaning the scanner bed 22 Cleaning the scanner rollers 22 Cleaning the scanner pick pads 24 Lexmark Document Distributor 25 vi
Setup Guide
Page 10
... up your printer Setup Guide. 5 Verify the printer hardware setup by printing the menu settings page. 6 Unplug all cords and cables attached to a computer, printer, scanner, and any other peripherals connected to your printer
... up your printer Setup Guide. 5 Verify the printer hardware setup by printing the menu settings page. 6 Unplug all cords and cables attached to a computer, printer, scanner, and any other peripherals connected to your printer

Setup Guide
Page 12
... screws: - 7 short - 28 medium - 2 long Shelf If any items are missing or damaged, visit the Lexmark Web site at Base supports www.lexmark.com for the designated Lexmark support phone number for your country. Unpacking the stand Unpack the MFP scanner stand. Save the packing material until the system is completely set up the...
... screws: - 7 short - 28 medium - 2 long Shelf If any items are missing or damaged, visit the Lexmark Web site at Base supports www.lexmark.com for the designated Lexmark support phone number for your country. Unpacking the stand Unpack the MFP scanner stand. Save the packing material until the system is completely set up the...

Setup Guide
Page 13
... legs with six medium screws. 4 Attach the shelf to the legs with four short screws. 5 Attach the shelf support to the legs. Set up the scanner stand 5 Assembling the stand 3 short 4 short Shelf support 6 medium Shelf Beam 4 medium Right and left legs 10 medium Base support 1 Slide the left and right...
... legs with six medium screws. 4 Attach the shelf to the legs with four short screws. 5 Attach the shelf support to the legs. Set up the scanner stand 5 Assembling the stand 3 short 4 short Shelf support 6 medium Shelf Beam 4 medium Right and left legs 10 medium Base support 1 Slide the left and right...

Setup Guide
Page 18
Scanner - Scanner cable (with the cutouts on the shelf. Unpacking the scanner Unpack the MFP scanner. Make sure you have the following items: - Toroid Installing the scanner 1 Make sure the printer is completely set up and working correctly. Align the handholds on the scanner with toroid) Save the packing material until the system is turned off and unplugged. 2 Place the scanner on the shelf. 10 Install the scanner
Scanner - Scanner cable (with the cutouts on the shelf. Unpacking the scanner Unpack the MFP scanner. Make sure you have the following items: - Toroid Installing the scanner 1 Make sure the printer is completely set up and working correctly. Align the handholds on the scanner with toroid) Save the packing material until the system is turned off and unplugged. 2 Place the scanner on the shelf. 10 Install the scanner

Setup Guide
Page 19
...and then to the control unit. Tighten the thumbscrews on both ends of the cable. 3 Connect the end of the scanner cable with the toroid to the scanner and the other end to the printer. 4 Connect the adapter to the telephone fax line cable if necessary. Attach cables... and cords 11 This cable is not provided by Lexmark. 6 Connect the power supply (b) to a network connection. Power supply (b) Power switch Scanner cable Printer Ethernet cable (e) Network Ethernet cable Telephone fax line cable (d) Power supply line cord (j) Do...
...and then to the control unit. Tighten the thumbscrews on both ends of the cable. 3 Connect the end of the scanner cable with the toroid to the scanner and the other end to the printer. 4 Connect the adapter to the telephone fax line cable if necessary. Attach cables... and cords 11 This cable is not provided by Lexmark. 6 Connect the power supply (b) to a network connection. Power supply (b) Power switch Scanner cable Printer Ethernet cable (e) Network Ethernet cable Telephone fax line cable (d) Power supply line cord (j) Do...

Setup Guide
Page 20
Never connect or disconnect the scanner cable when the control unit is turned on. 7 Connect the power supply line cord (j) to the power supply, but do not plug the other end into an electrical outlet at this time. 12 Attach cables and cords Warning!
Never connect or disconnect the scanner cable when the control unit is turned on. 7 Connect the power supply line cord (j) to the power supply, but do not plug the other end into an electrical outlet at this time. 12 Attach cables and cords Warning!

Setup Guide
Page 27
... Home screen, touch the Fax icon. 2 In the Fax destination screen, enter a fax number using the virtual keypad. 3 Place your document face down on the scanner bed. 2 Press the green Start button to the right of the touch screen to make a copy. 3 Touch Done. 4 Place your document face down on the... scanner bed. 4 Touch Fax It or press Start to send the fax. 5 Touch Done. Sending a test fax Send a one -page copy and test the Automatic Document ...
... Home screen, touch the Fax icon. 2 In the Fax destination screen, enter a fax number using the virtual keypad. 3 Place your document face down on the scanner bed. 2 Press the green Start button to the right of the touch screen to make a copy. 3 Touch Done. 4 Place your document face down on the... scanner bed. 4 Touch Fax It or press Start to send the fax. 5 Touch Done. Sending a test fax Send a one -page copy and test the Automatic Document ...

Setup Guide
Page 28
Sending a test e-mail Send a one-page test e-mail to a known e-mail address: 1 From the Home screen, touch the E-mail icon. 2 In the E-mail destination screen, enter an e-mail address using the virtual keypad. 3 Place your document face down on the scanner bed. 4 Touch Send It or press Start to your MFP. 20 Verify setup Sending a network print job to the MFP Use a computer application to send a network print job to scan and send the document. 5 Touch Done.
Sending a test e-mail Send a one-page test e-mail to a known e-mail address: 1 From the Home screen, touch the E-mail icon. 2 In the E-mail destination screen, enter an e-mail address using the virtual keypad. 3 Place your document face down on the scanner bed. 4 Touch Send It or press Start to your MFP. 20 Verify setup Sending a network print job to the MFP Use a computer application to send a network print job to scan and send the document. 5 Touch Done.

Setup Guide
Page 29
... cables and cords" on page 11. • Turn off and then back on. • If you are still having problems, contact Lexmark customer support (see "If you are still having problems, contact Lexmark customer support (see "Attach cables and cords" on page 22. • If you need more help Contact... Make sure all cables and cords are connected to the correct ports. A red exclamation point appears over the Copy icon on . • Clean the scanner rollers and pick pads and try again. Solution • Verify that the control unit is plugged in and turned on the control unit and to...
... cables and cords" on page 11. • Turn off and then back on. • If you are still having problems, contact Lexmark customer support (see "If you are still having problems, contact Lexmark customer support (see "Attach cables and cords" on page 22. • If you need more help Contact... Make sure all cables and cords are connected to the correct ports. A red exclamation point appears over the Copy icon on . • Clean the scanner rollers and pick pads and try again. Solution • Verify that the control unit is plugged in and turned on the control unit and to...
Setup Guide
Page 30
... unit. 2 Dampen a clean, lint-free cotton cloth with ink, toner particles, or paper coating. Cleaning the scanner bed 1 Dampen a clean, lint-free cotton cloth with water or glass cleaner. Cleaning the scanner rollers Clean the rollers if documents do not feed smoothly or easily, or if several documents feed at... one time. Warning! Wipe the scanner bed glass. Do not spray the touch screen with water. 2 Open the cover. Liquid can damage the MFP. Cleaning the touch screen 1 Dampen a clean...
... unit. 2 Dampen a clean, lint-free cotton cloth with ink, toner particles, or paper coating. Cleaning the scanner bed 1 Dampen a clean, lint-free cotton cloth with water or glass cleaner. Cleaning the scanner rollers Clean the rollers if documents do not feed smoothly or easily, or if several documents feed at... one time. Warning! Wipe the scanner bed glass. Do not spray the touch screen with water. 2 Open the cover. Liquid can damage the MFP. Cleaning the touch screen 1 Dampen a clean...

Setup Guide
Page 32
Two screws 6 Align the tabs on either side of the roller plate with water. 5 Wipe the two pick pads. Input tray Cleaning the scanner pick pads Pick pads 1 Lift the input tray. 2 Remove the two screws. 3 Lower the roller plate and pull it snaps into the left groove. 8 Tilt ...
Two screws 6 Align the tabs on either side of the roller plate with water. 5 Wipe the two pick pads. Input tray Cleaning the scanner pick pads Pick pads 1 Lift the input tray. 2 Remove the two screws. 3 Lower the roller plate and pull it snaps into the left groove. 8 Tilt ...


