User Manual
Page 2
... Ordering and replacing supplies 13 Ordering ink cartridges...13 Using genuine Lexmark ink cartridges...13 Replacing ink cartridges...14 Ordering paper and other supplies...15 Recycling Lexmark products...16 Using the printer control panel buttons and menus 17 Using the printer control panel...17 Understanding the home screen...18 Navigating menus using the touch...
... Ordering and replacing supplies 13 Ordering ink cartridges...13 Using genuine Lexmark ink cartridges...13 Replacing ink cartridges...14 Ordering paper and other supplies...15 Recycling Lexmark products...16 Using the printer control panel buttons and menus 17 Using the printer control panel...17 Understanding the home screen...18 Navigating menus using the touch...
User Manual
Page 3
......56 Copying a two-sided document...56 Enlarging or reducing images...57 Adjusting copy quality...57 Making a copy lighter or darker...57 Collating copies using the printer control panel...58 Repeating an image on one page...58 Copying multiple pages on one sheet...58 Making a duplex copy...59 Canceling copy jobs...60... drive or memory card...62 Scanning photos into an editing application...63 Scanning documents into an editing application 64 Scanning directly to e-mail using the printer software 65 Scanning to a PDF...66 Scanning FAQ...66 Canceling scan jobs...67 Contents 3
......56 Copying a two-sided document...56 Enlarging or reducing images...57 Adjusting copy quality...57 Making a copy lighter or darker...57 Collating copies using the printer control panel...58 Repeating an image on one page...58 Copying multiple pages on one sheet...58 Making a duplex copy...59 Canceling copy jobs...60... drive or memory card...62 Scanning photos into an editing application...63 Scanning documents into an editing application 64 Scanning directly to e-mail using the printer software 65 Scanning to a PDF...66 Scanning FAQ...66 Canceling scan jobs...67 Contents 3
User Manual
Page 4
......99 Advanced wireless setup...104 Networking FAQ...110 Using SmartSolutions 122 What is SmartSolutions?...122 Creating and customizing printer solutions...123 Maintaining the printer 125 Maintaining ink cartridges...125 Cleaning the exterior of the printer...126 Cleaning the scanner glass...127 Cleaning the touch screen...127 Troubleshooting 128 Before you troubleshoot...128 Using...
......99 Advanced wireless setup...104 Networking FAQ...110 Using SmartSolutions 122 What is SmartSolutions?...122 Creating and customizing printer solutions...123 Maintaining the printer 125 Maintaining ink cartridges...125 Cleaning the exterior of the printer...126 Cleaning the scanner glass...127 Cleaning the touch screen...127 Troubleshooting 128 Before you troubleshoot...128 Using...
User Manual
Page 6
...such as part of the paper path. CAUTION-POTENTIAL INJURY: To reduce risk of fire, use of such problems. Remove the power cord from the printer before inspecting it. CAUTION-POTENTIAL INJURY: Do not cut, twist, bind, crush, or place heavy objects on the power cord. Inspect the power... regularly for signs of specific manufacturer's components. To avoid injury, use this product or make any of these things happen, a risk of the printer, unplug the power cord from the wall outlet and disconnect all cables from the electrical outlet before proceeding. Do not set up this product near...
...such as part of the paper path. CAUTION-POTENTIAL INJURY: To reduce risk of fire, use of such problems. Remove the power cord from the printer before inspecting it. CAUTION-POTENTIAL INJURY: Do not cut, twist, bind, crush, or place heavy objects on the power cord. Inspect the power... regularly for signs of specific manufacturer's components. To avoid injury, use this product or make any of these things happen, a risk of the printer, unplug the power cord from the wall outlet and disconnect all cables from the electrical outlet before proceeding. Do not set up this product near...
User Manual
Page 7
... encounter any problems along the way, one page image on both sides of the paper. We're committed to delivering performance and value with the printer, and then skim the User's Guide to learn how to help us know. Use the preview features found in Toolbars, the Print or Print ... meet your needs. After all, you may be delighted to perform basic tasks. Conserving energy • Activate Eco-Mode. The Power Saver feature puts the printer in Windows and Mac OS X version 10.6 or later. • Print more than one of paper. • Print on one sheet. You can scan ...
... encounter any problems along the way, one page image on both sides of the paper. We're committed to delivering performance and value with the printer, and then skim the User's Guide to learn how to help us know. Use the preview features found in Toolbars, the Print or Print ... meet your needs. After all, you may be delighted to perform basic tasks. Conserving energy • Activate Eco-Mode. The Power Saver feature puts the printer in Windows and Mac OS X version 10.6 or later. • Print more than one of paper. • Print on one sheet. You can scan ...
User Manual
Page 8
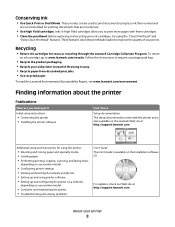
...are mostly text. • Use High Yield cartridges. These features clean the printhead nozzles to www.lexmark.com/recycle. About your ink cartridges, try using printer software • Setting up and using the "Clean Printhead" and "Deep Clean Printhead" features. ... instructions for reuse or recycling through the Lexmark Cartridge Collection Program. Conserving ink • Use Quick Print or Draft Mode. Before replacing and recycling your printer 8 Initial setup instructions: • Connecting the printer • Installing the printer software Find it away. • Recycle...
...are mostly text. • Use High Yield cartridges. These features clean the printhead nozzles to www.lexmark.com/recycle. About your ink cartridges, try using printer software • Setting up and using the "Clean Printhead" and "Deep Clean Printhead" features. ... instructions for reuse or recycling through the Lexmark Cartridge Collection Program. Conserving ink • Use Quick Print or Draft Mode. Before replacing and recycling your printer 8 Initial setup instructions: • Connecting the printer • Installing the printer software Find it away. • Recycle...
User Manual
Page 9
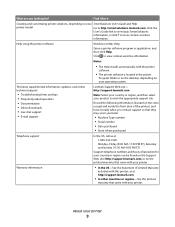
... Driver downloads • Live chat support • E-mail support Lexmark Support Web site- About your product to view the appropriate support site. Help using the printer software Windows or Mac Help Open a printer software program or application, and then click Help. Warranty information •...sensitive information. Click to view basic SmartSolutions information, or click ? http://support.lexmark.com Note: Select your country or region, and then select your printer 9 to http://smartsolutions.lexmark.com. Find it ready when you contact support so that they may serve ...
... Driver downloads • Live chat support • E-mail support Lexmark Support Web site- About your product to view the appropriate support site. Help using the printer software Windows or Mac Help Open a printer software program or application, and then click Help. Warranty information •...sensitive information. Click to view basic SmartSolutions information, or click ? http://support.lexmark.com Note: Select your country or region, and then select your printer 9 to http://smartsolutions.lexmark.com. Find it ready when you contact support so that they may serve ...
User Manual
Page 10
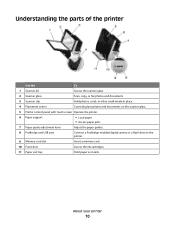
... photos, cards, or other small media in place. 4 Placement corner Correctly place photos and documents on the scanner glass. 5 Printer control panel with touch screen Operate the printer. 6 Paper support • Load paper. • Access paper jams. 7 Paper guide adjustment lever Adjust the paper guides. ...8 PictBridge and USB port Connect a PictBridge-enabled digital camera or a flash drive to the printer. 9 Memory card slot Insert a memory card. 10 Front door Access the ink cartridges. 11 Paper exit tray Hold paper as it exits. ...
... photos, cards, or other small media in place. 4 Placement corner Correctly place photos and documents on the scanner glass. 5 Printer control panel with touch screen Operate the printer. 6 Paper support • Load paper. • Access paper jams. 7 Paper guide adjustment lever Adjust the paper guides. ...8 PictBridge and USB port Connect a PictBridge-enabled digital camera or a flash drive to the printer. 9 Memory card slot Insert a memory card. 10 Front door Access the ink cartridges. 11 Paper exit tray Hold paper as it exits. ...
User Manual
Page 11
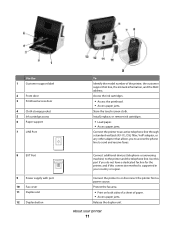
... paper jams. Store the touch-screen cloth. Install, replace, or remove ink cartridges. • Load paper. • Access paper jams. Connect the printer to an active telephone line through a standard wall jack (RJ-11), DSL filter, VoIP adapter, or any other adapter that allows you do not have... a dedicated fax line for the printer, and if this connection method is supported in your printer 11 Connect additional devices (telephone or answering machine) to the printer and the telephone line. Protect the fax area. • Print on both sides of...
... paper jams. Store the touch-screen cloth. Install, replace, or remove ink cartridges. • Load paper. • Access paper jams. Connect the printer to an active telephone line through a standard wall jack (RJ-11), DSL filter, VoIP adapter, or any other adapter that allows you do not have... a dedicated fax line for the printer, and if this connection method is supported in your printer 11 Connect additional devices (telephone or answering machine) to the printer and the telephone line. Protect the fax area. • Print on both sides of...
User Manual
Page 12
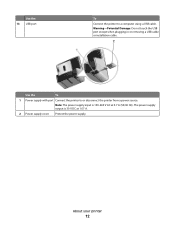
The power supply output is 100-240 V AC at 1.07 A. 2 Power supply cover Protect the power supply. Warning-Potential Damage: Do not touch the USB port except when plugging in or removing a USB cable or installation cable. Note: The power supply input is 30 V DC at 0.7 A (50/60 Hz). Use the 13 USB port To Connect the printer to or disconnect the printer from a power source. About your printer 12 Use the To 1 Power supply with port Connect the printer to a computer using a USB cable.
The power supply output is 100-240 V AC at 1.07 A. 2 Power supply cover Protect the power supply. Warning-Potential Damage: Do not touch the USB port except when plugging in or removing a USB cable or installation cable. Note: The power supply input is 30 V DC at 0.7 A (50/60 Hz). Use the 13 USB port To Connect the printer to or disconnect the printer from a power source. About your printer 12 Use the To 1 Power supply with port Connect the printer to a computer using a USB cable.
User Manual
Page 13
...Depending on your country or region, you use only Lexmark ink cartridges. Ordering and replacing supplies 13 Lexmark's warranty does not cover damage caused by non-Lexmark ink or ink cartridges. After use, return this cartridge to work with your printer and help extend the life of standard ink cartridges ...and high yield ink cartridges, depending on the ink cartridge box, or visit www.lexmark.com/pageyields. • For...
...Depending on your country or region, you use only Lexmark ink cartridges. Ordering and replacing supplies 13 Lexmark's warranty does not cover damage caused by non-Lexmark ink or ink cartridges. After use, return this cartridge to work with your printer and help extend the life of standard ink cartridges ...and high yield ink cartridges, depending on the ink cartridge box, or visit www.lexmark.com/pageyields. • For...
User Manual
Page 14
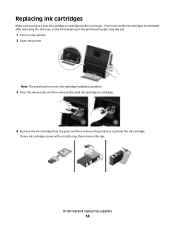
... printhead nozzles may dry out. 1 Turn on your ink cartridge comes with a muzzle cap, then remove the cap. Ordering and replacing supplies 14 If your printer. 2 Open the...
... printhead nozzles may dry out. 1 Turn on your ink cartridge comes with a muzzle cap, then remove the cap. Ordering and replacing supplies 14 If your printer. 2 Open the...

User Manual
Page 15
Item USB cable For more information, go to www.lexmark.com. Ordering paper and other high-quality images, use Lexmark photo paper. • For more information, go to air. 6 Close the printer. Part Number 1021294 Paper Paper size Lexmark photo paper • Letter • A4 • 4 x 6 in. •L Notes: • Availability...supplies or to install the black cartridge. Use two hands to locate a dealer near you, visit our Web site at www.lexmark.com. Note: Install the new ink cartridges immediately after removing the protective cap to avoid exposing the ink to www...
Item USB cable For more information, go to www.lexmark.com. Ordering paper and other high-quality images, use Lexmark photo paper. • For more information, go to air. 6 Close the printer. Part Number 1021294 Paper Paper size Lexmark photo paper • Letter • A4 • 4 x 6 in. •L Notes: • Availability...supplies or to install the black cartridge. Use two hands to locate a dealer near you, visit our Web site at www.lexmark.com. Note: Install the new ink cartridges immediately after removing the protective cap to avoid exposing the ink to www...

User Manual
Page 16
Ordering and replacing supplies 16 Note: Printer supplies and hardware not listed in a Lexmark collection program may be recycled through your local recycling center to recycle, and then select your country or region from the list. 3 Follow the instructions on the computer screen. Contact your local recycling center. Recycling Lexmark products To return Lexmark products for recycling: 1 Visit our Web site at www.lexmark.com/recycle. 2 Find the product type you want to determine the items they accept.
Ordering and replacing supplies 16 Note: Printer supplies and hardware not listed in a Lexmark collection program may be recycled through your local recycling center to recycle, and then select your country or region from the list. 3 Follow the instructions on the computer screen. Contact your local recycling center. Recycling Lexmark products To return Lexmark products for recycling: 1 Visit our Web site at www.lexmark.com/recycle. 2 Find the product type you want to determine the items they accept.
User Manual
Page 17
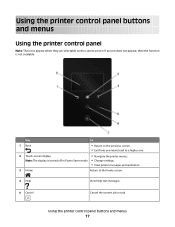
... from one menu level to the home screen. 4 Help View Help text messages. 5 Cancel Cancel the current job or task. Using the printer control panel buttons and menus 17 Note: The display is not available. If an icon does not appear, then the function is turned off in... Power Saver mode. • Change settings. • View printer messages and animation. 3 Home Return to a higher one. 2 Touch-screen display • Navigate the printer menus. Using the printer control panel buttons and menus Using the printer control panel Note: The icons appear when they are selectable on the...
... from one menu level to the home screen. 4 Help View Help text messages. 5 Cancel Cancel the current job or task. Using the printer control panel buttons and menus 17 Note: The display is not available. If an icon does not appear, then the function is turned off in... Power Saver mode. • Change settings. • View printer messages and animation. 3 Home Return to a higher one. 2 Touch-screen display • Navigate the printer menus. Using the printer control panel buttons and menus Using the printer control panel Note: The icons appear when they are selectable on the...
User Manual
Page 18
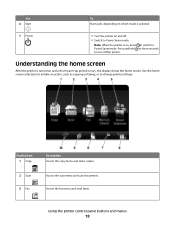
... mode. Press and hold for three seconds to turn off . • Switch to Power Saver mode. Access the fax menu and send faxes. Using the printer control panel buttons and menus 18 Access the scan menu and scan documents. Understanding the home screen After the... printer is on, press to switch to change printer settings. Display item 1 Copy 2 Scan 3 Fax Description Access the copy menu and make copies. Note: When the printer is turned on and a short warm-up period occurs, the display shows the...
... mode. Press and hold for three seconds to turn off . • Switch to Power Saver mode. Access the fax menu and send faxes. Using the printer control panel buttons and menus 18 Access the scan menu and scan documents. Understanding the home screen After the... printer is on, press to switch to change printer settings. Display item 1 Copy 2 Scan 3 Fax Description Access the copy menu and make copies. Note: When the printer is turned on and a short warm-up period occurs, the display shows the...
User Manual
Page 19
...the following options: • Print on both sides or on both sides of paper. PictBridge View, select, or print photos. Using the printer control panel buttons and menus 19 Note: This icon appears only when you return to the home screen while a PictBridge-enabled camera is ...connected to the printer. 5 SmartSolutions Open the SmartSolutions menu. 6 Ink levels icon • View the current ink levels of the installed cartridges. • Access cartridge...
...the following options: • Print on both sides or on both sides of paper. PictBridge View, select, or print photos. Using the printer control panel buttons and menus 19 Note: This icon appears only when you return to the home screen while a PictBridge-enabled camera is ...connected to the printer. 5 SmartSolutions Open the SmartSolutions menu. 6 Ink levels icon • View the current ink levels of the installed cartridges. • Access cartridge...
User Manual
Page 20
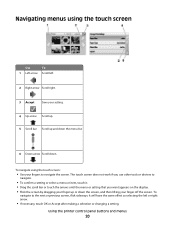
... menus using the touch screen: • Use your fingers to navigate the screen. To navigate to the next or previous screen, flick sideways. Using the printer control panel buttons and menus 20
... menus using the touch screen: • Use your fingers to navigate the screen. To navigate to the next or previous screen, flick sideways. Using the printer control panel buttons and menus 20
User Manual
Page 21
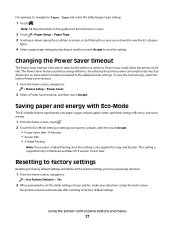
...guide start from the home screen. 2 Touch > Paper Setup > Paper Type. 3 Scroll up or down (using the touch screen. Using the printer control panel buttons and menus 21 The Power Saver feature optimizes energy efficiency by touching it takes for copy and fax jobs. Saving paper and... instructions in Windows and Mac OS X version 10.6 or later. Resetting to factory settings Resetting to factory default settings will delete all the printer settings you want to activate, and then touch Accept. • Power Saver after resetting to factory default settings. For example, to navigate to...
...guide start from the home screen. 2 Touch > Paper Setup > Paper Type. 3 Scroll up or down (using the touch screen. Using the printer control panel buttons and menus 21 The Power Saver feature optimizes energy efficiency by touching it takes for copy and fax jobs. Saving paper and... instructions in Windows and Mac OS X version 10.6 or later. Resetting to factory settings Resetting to factory default settings will delete all the printer settings you want to activate, and then touch Accept. • Power Saver after resetting to factory default settings. For example, to navigate to...

User Manual
Page 22
...software, and then select Install Additional Software from the Software Already Installed screen. If you did not install these additional programs during printer installation When you do. Supported operating systems • Microsoft Windows 7 • Microsoft Windows Vista (SP2) • Microsoft Windows...and 11.2* • Linux Fedora 12 and 11* * The printer driver for this operating system is available only at http://support.lexmark.com. Using the printer software Minimum system requirements The printer software requires up to install some additional programs. The following table ...
...software, and then select Install Additional Software from the Software Already Installed screen. If you did not install these additional programs during printer installation When you do. Supported operating systems • Microsoft Windows 7 • Microsoft Windows Vista (SP2) • Microsoft Windows...and 11.2* • Linux Fedora 12 and 11* * The printer driver for this operating system is available only at http://support.lexmark.com. Using the printer software Minimum system requirements The printer software requires up to install some additional programs. The following table ...


