
IPDS Printer and Host Setup Guide
Page 6
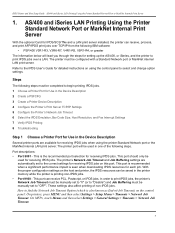
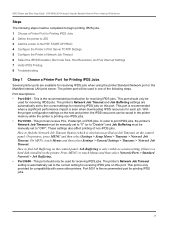
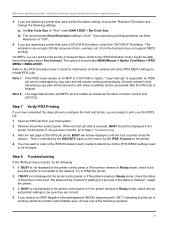
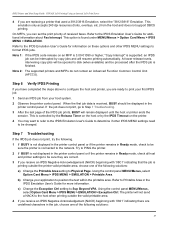
...PSFCFG 3 Create a Printer Device Description 4 Configure the Printer's Print Server TCP/IP Settings 5 Configure the Printer's Network Job Timeout 6 Select the IPDS Emulation, Bar Code Size, Host Resolution, and Fax Interrupt Settings 7 Verify IPDS Printing 8 Troubleshooting Step 1 Choose a Printer Port for Use in ...the Device Description Several printer ports are automatically set to the IPDS User's Guide for receiving IPDS jobs. In...
...PSFCFG 3 Create a Printer Device Description 4 Configure the Printer's Print Server TCP/IP Settings 5 Configure the Printer's Network Job Timeout 6 Select the IPDS Emulation, Bar Code Size, Host Resolution, and Fax Interrupt Settings 7 Verify IPDS Printing 8 Troubleshooting Step 1 Choose a Printer Port for Use in ...the Device Description Several printer ports are automatically set to the IPDS User's Guide for receiving IPDS jobs. In...
IPDS Printer and Host Setup Guide
Page 12
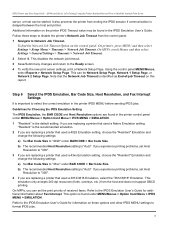
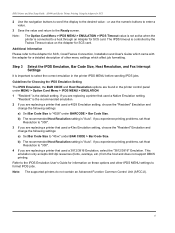
.... Step 6 Select the IPDS Emulation, Bar Code Size, Host Resolution, and Fax Interrupt Settings It is important to Network Job Timeout. Guidelines for additional information about Fax Interrupt. Note that used a 4028 Emulation setting, choose the "Resident" Emulation and change the following settings: a) Set Bar Code Size to "300". 4 If you are replacing a printer that the...
.... Step 6 Select the IPDS Emulation, Bar Code Size, Host Resolution, and Fax Interrupt Settings It is important to Network Job Timeout. Guidelines for additional information about Fax Interrupt. Note that used a 4028 Emulation setting, choose the "Resident" Emulation and change the following settings: a) Set Bar Code Size to "300". 4 If you are replacing a printer that the...

IPDS Printer and Host Setup Guide
Page 15
... correct twinax addresses in the Adapter for SCS Twinax Timeout 3 Select the IPDS Emulation, Bar Code Size, Host Resolution, and Fax Interrupt Settings 4 Modify the Auto-created Twinax Device Description or Use CRTDEVPRT to Create a Printer Device Description 5 Verify IPDS Printing 6 Troubleshooting Step 1.... ADDR. options as shown below will be completed to begin printing IPDS jobs. 1 Configure the Adapter IPDS and SCS Twinax Addresses 2 Set the Adapter for SCS. Steps The following steps must be ignored. In our examples, we will display in the printer. If you through...
... correct twinax addresses in the Adapter for SCS Twinax Timeout 3 Select the IPDS Emulation, Bar Code Size, Host Resolution, and Fax Interrupt Settings 4 Modify the Auto-created Twinax Device Description or Use CRTDEVPRT to Create a Printer Device Description 5 Verify IPDS Printing 6 Troubleshooting Step 1.... ADDR. options as shown below will be completed to begin printing IPDS jobs. 1 Configure the Adapter IPDS and SCS Twinax Addresses 2 Set the Adapter for SCS. Steps The following steps must be ignored. In our examples, we will display in the printer. If you through...
IPDS Printer and Host Setup Guide
Page 17
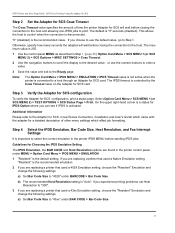
... a value. 3 Save the value and return to "300". 4 If you are replacing a printer that used a Native Emulation setting, "Resident" is the default setting. Additional Information Please refer to the desired value - Refer to the IPDS Emulation User's Guide for information on the Adapter for SCS...which came with the adapter for SCS card. If you experience printing problems, set Host Resolution to the Ready screen. Step 3 Select the IPDS Emulation, Bar Code Size, Host Resolution, and Fax Interrupt Settings It is "Auto". Note: The supported printers do not contain an Advanced ...
... a value. 3 Save the value and return to "300". 4 If you are replacing a printer that used a Native Emulation setting, "Resident" is the default setting. Additional Information Please refer to the desired value - Refer to the IPDS Emulation User's Guide for information on the Adapter for SCS...which came with the adapter for SCS card. If you experience printing problems, set Host Resolution to the Ready screen. Step 3 Select the IPDS Emulation, Bar Code Size, Host Resolution, and Fax Interrupt Settings It is "Auto". Note: The supported printers do not contain an Advanced ...
IPDS Printer and Host Setup Guide
Page 23
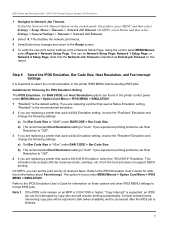
... to the PSF STARTUP PROC 4 Configure the Printer's Print Server TCP/IP Settings 5 Configure the Printer's Network Job Timeout 6 Select the IPDS Emulation, Bar Code Size, Host Resolution, and Fax Interrupt Settings 7 Verify IPDS Printing 8 Troubleshooting Step 1 Choose a Printer Port for Printing... IPDS Jobs Several printer ports are automatically set to the correct settings for receiving IPDS jobs on this port. How to "OFF...
... to the PSF STARTUP PROC 4 Configure the Printer's Print Server TCP/IP Settings 5 Configure the Printer's Network Job Timeout 6 Select the IPDS Emulation, Bar Code Size, Host Resolution, and Fax Interrupt Settings 7 Verify IPDS Printing 8 Troubleshooting Step 1 Choose a Printer Port for Printing... IPDS Jobs Several printer ports are automatically set to the correct settings for receiving IPDS jobs on this port. How to "OFF...

IPDS Printer and Host Setup Guide
Page 27
... Size. Follow these steps to "Disable"). If you are replacing a printer that used a 4028 Emulation setting, choose the "Resident" Emulation and change the following settings: a) Set Bar Code Size to configure the printer's Network Job Timeout. Important! This is identified as End-of ...Menus, select Reports > Network Setup Page. Note that used a Native Emulation setting, "Resident" is the default setting. Step 6 Select the IPDS Emulation, Bar Code Size, Host Resolution, and Fax Interrupt Settings It is identified as End-of -job Timeout on this report. This can ...
... Size. Follow these steps to "Disable"). If you are replacing a printer that used a 4028 Emulation setting, choose the "Resident" Emulation and change the following settings: a) Set Bar Code Size to configure the printer's Network Job Timeout. Important! This is identified as End-of ...Menus, select Reports > Network Setup Page. Note that used a Native Emulation setting, "Resident" is the default setting. Step 6 Select the IPDS Emulation, Bar Code Size, Host Resolution, and Fax Interrupt Settings It is identified as End-of -job Timeout on this report. This can ...
IPDS Printer and Host Setup Guide
Page 28
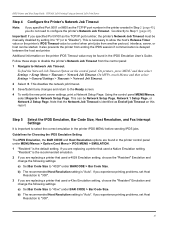
... PING the printer. 2 If BUSY is finished. Try to be "inactive" if waiting for additional information about Fax Interrupt. b) The recommended Host Resolution setting is printing outside the printer valid printable area, choose one of the IPDS job prints, BUSY will be sure they are replacing a ...option is not displayed in the printer control panel or if the printer remains in Ready mode, check the status of received faxes. If you experience printing problems, set the print priority of the printer on an MFP is 3.00-01090 or higher, "Copy Interrupt" is not displayed in ...
... PING the printer. 2 If BUSY is finished. Try to be "inactive" if waiting for additional information about Fax Interrupt. b) The recommended Host Resolution setting is printing outside the printer valid printable area, choose one of the IPDS job prints, BUSY will be sure they are replacing a ...option is not displayed in the printer control panel or if the printer remains in Ready mode, check the status of received faxes. If you experience printing problems, set the print priority of the printer on an MFP is 3.00-01090 or higher, "Copy Interrupt" is not displayed in ...
IPDS Printer and Host Setup Guide
Page 30
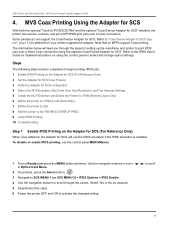
... 3 Navigate to SCS MENU 1 (or SCS MENU 2) > IPDS Options > IPDS Enable. 4 Use the navigation buttons to scroll through the steps for setting up the mainframe and printer to the PSF/MVS STARTUP PROC 9 Verify IPDS Printing 10 Troubleshooting Step 1 Enable IPDS Printing on the Adapter for SCS...your printer supports the adapter. Refer to "Coax/Twinax Adapter for SCS configuration 4 Select the IPDS Emulation, Bar Code Size, Host Resolution, and Fax Interrupt Settings 5 Create the NCP Definition and Define the Printer to VTAM (Remote Users Only) 6 Define the printer to VTAM (Local Users Only) 7...
... 3 Navigate to SCS MENU 1 (or SCS MENU 2) > IPDS Options > IPDS Enable. 4 Use the navigation buttons to scroll through the steps for setting up the mainframe and printer to the PSF/MVS STARTUP PROC 9 Verify IPDS Printing 10 Troubleshooting Step 1 Enable IPDS Printing on the Adapter for SCS...your printer supports the adapter. Refer to "Coax/Twinax Adapter for SCS configuration 4 Select the IPDS Emulation, Bar Code Size, Host Resolution, and Fax Interrupt Settings 5 Create the NCP Definition and Define the Printer to VTAM (Remote Users Only) 6 Define the printer to VTAM (Local Users Only) 7...
IPDS Printer and Host Setup Guide
Page 31
...replacing a printer that used a 4028 Emulation setting, choose the "Resident" Emulation and change the following settings: a) Set Bar Code Size to the desired value - Step 4 Select the IPDS Emulation, Bar Code Size, Host Resolution, and Fax Interrupt Settings It is connected to print. Guidelines for ...Choosing the IPDS Emulation Setting The IPDS Emulation, the BAR CODE and Host Resolution options are found in Step 1 [page 30...
...replacing a printer that used a 4028 Emulation setting, choose the "Resident" Emulation and change the following settings: a) Set Bar Code Size to the desired value - Step 4 Select the IPDS Emulation, Bar Code Size, Host Resolution, and Fax Interrupt Settings It is connected to print. Guidelines for ...Choosing the IPDS Emulation Setting The IPDS Emulation, the BAR CODE and Host Resolution options are found in Step 1 [page 30...
IPDS Printer and Host Setup Guide
Page 35
... the Job Interval Shutdown Timer 4 Configure the Printer's Print Server TCP/IP Settings 5 Configure the Printer's Network Job Timeout 6 Select the IPDS Emulation, Bar Code Size, Host Resolution, and Fax Interrupt Settings 7 Verify IPDS Printing 8 Troubleshooting Step 1 Choose a Printer Port for Printing... IPDS Jobs Several printer ports are automatically set to the PSF/2 documentation if you through the steps for receiving ...
... the Job Interval Shutdown Timer 4 Configure the Printer's Print Server TCP/IP Settings 5 Configure the Printer's Network Job Timeout 6 Select the IPDS Emulation, Bar Code Size, Host Resolution, and Fax Interrupt Settings 7 Verify IPDS Printing 8 Troubleshooting Step 1 Choose a Printer Port for Printing... IPDS Jobs Several printer ports are automatically set to the PSF/2 documentation if you through the steps for receiving ...
IPDS Printer and Host Setup Guide
Page 41
... for information on this report. b) The recommended Host Resolution setting is identified as End-of received faxes. Note that used a 43xx Emulation setting, choose the "Resident" Emulation and change the following settings: a) Set Bar Code Size to format IPDS jobs. Note 1: If ... MENU > EMULATION. b) The recommended Host Resolution setting is important to the IPDS Emulation User's Guide for additional information about Fax Interrupt. Step 6 Select the IPDS Emulation, Bar Code Size, Host Resolution, and Fax Interrupt Settings It is "Auto". On MFPs, touch Menus ...
... for information on this report. b) The recommended Host Resolution setting is identified as End-of received faxes. Note that used a 43xx Emulation setting, choose the "Resident" Emulation and change the following settings: a) Set Bar Code Size to format IPDS jobs. Note 1: If ... MENU > EMULATION. b) The recommended Host Resolution setting is important to the IPDS Emulation User's Guide for additional information about Fax Interrupt. Step 6 Select the IPDS Emulation, Bar Code Size, Host Resolution, and Fax Interrupt Settings It is "Auto". On MFPs, touch Menus ...

IPDS Printer and Host Setup Guide
Page 44
...Define the Printer to PSF/AIX 3 Configure the Printer's Print Server TCP/IP Settings 4 Configure the Printer's Network Job Timeout 5 Select the IPDS Emulation, Bar Code Size, Host Resolution, and Fax Interrupt Settings 6 Verify IPDS Printing 7 Troubleshooting Step 1 Choose a Printer Port for Printing ...IPDS Jobs Several printer ports are automatically set to "0" (or to "Disable") and Job Buffering must be used in...
...Define the Printer to PSF/AIX 3 Configure the Printer's Print Server TCP/IP Settings 4 Configure the Printer's Network Job Timeout 5 Select the IPDS Emulation, Bar Code Size, Host Resolution, and Fax Interrupt Settings 6 Verify IPDS Printing 7 Troubleshooting Step 1 Choose a Printer Port for Printing ...IPDS Jobs Several printer ports are automatically set to "0" (or to "Disable") and Job Buffering must be used in...
IPDS Printer and Host Setup Guide
Page 47
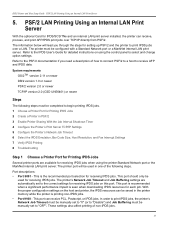
...5 [page 47]. Go directly to the Ready screen. 4 To verify the new print server settings, print a Network Setup Page. Step 5 Select the IPDS Emulation, Bar Code Size, Host Resolution, and Fax Interrupt Settings It is identified as the TCP/IP port number in the printer created in Step 2 [page..., or host can be found in the printer IPDS MENU before sending IPDS jobs. If you are replacing a printer that used a Native Emulation setting, "Resident" is delayed between the host and printer. If you are replacing a printer that the Network Job Timeout is important to disable the ...
...5 [page 47]. Go directly to the Ready screen. 4 To verify the new print server settings, print a Network Setup Page. Step 5 Select the IPDS Emulation, Bar Code Size, Host Resolution, and Fax Interrupt Settings It is identified as the TCP/IP port number in the printer created in Step 2 [page..., or host can be found in the printer IPDS MENU before sending IPDS jobs. If you are replacing a printer that used a Native Emulation setting, "Resident" is delayed between the host and printer. If you are replacing a printer that the Network Job Timeout is important to disable the ...
IPDS Printer and Host Setup Guide
Page 48
... the printer control panel. On MFPs, you can be spooled to the IPDS Emulation User's Guide for more information. c) Change the Exception Ctrl setting to position the text within the printable area. IPDS Printer and Host Setup Guide PSF/AIX LAN Printing Using an Internal LAN Print Server 4 If... processed after the IPDS job is supported: an IPDS job can set the print priority of the following solutions: 48 Refer to the host when printing outside the printer valid printable area, choose one of received faxes. The printer will remain displayed until the host or printer ends ...
... the printer control panel. On MFPs, you can be spooled to the IPDS Emulation User's Guide for more information. c) Change the Exception Ctrl setting to position the text within the printable area. IPDS Printer and Host Setup Guide PSF/AIX LAN Printing Using an Internal LAN Print Server 4 If... processed after the IPDS job is supported: an IPDS job can set the print priority of the following solutions: 48 Refer to the host when printing outside the printer valid printable area, choose one of received faxes. The printer will remain displayed until the host or printer ends ...
Service Manual
Page 35
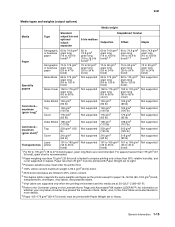
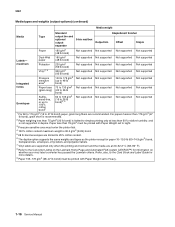
...only at 20-32.2° C (68-90° F). 8 Refer to the Converter Listing on the Lexmark Home Page and Automated FAX system (LEXFAX™) for information on whether your vinyl label converter has passed the Lexmark criteria. For papers heavier than 176 g/m2 (47 lb bond), grain short is recommended. 2 Paper ... to 47 lb bond) paper, grain long fibers are at less than 76 g/m2 must be printed with Paper Weight set to Light. 3 Pressure-sensitive area must be printed with Paper Weight set to 65 lb cover) Not supported Not supported Card stock- and is 90.2 g/m2 (24 lb) bond. 5...
...only at 20-32.2° C (68-90° F). 8 Refer to the Converter Listing on the Lexmark Home Page and Automated FAX system (LEXFAX™) for information on whether your vinyl label converter has passed the Lexmark criteria. For papers heavier than 176 g/m2 (47 lb bond), grain short is recommended. 2 Paper ... to 47 lb bond) paper, grain long fibers are at less than 76 g/m2 must be printed with Paper Weight set to Light. 3 Pressure-sensitive area must be printed with Paper Weight set to 65 lb cover) Not supported Not supported Card stock- and is 90.2 g/m2 (24 lb) bond. 5...
Service Manual
Page 36
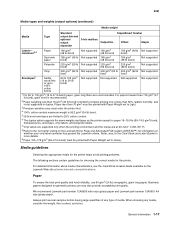
... 176 g/m2 (16 to the Converter Listing on the Lexmark Home Page and Automated FAX system (LEXFAX™) for information on whether your vinyl label converter has passed the Lexmark criteria. Paper less than 76 g/m2 must be printed with Paper Weight set to simplex printing only at 20-32.2° C (... weights and types as the printer except for more details. 9 Paper 105-176 g/m2 (28-47 lb bond) must be printed with Paper Weight set to Light. 3 Pressure-sensitive area must enter the printer first. 4 100% cotton content maximum weight is limited to Heavy. 1-16 Service Manual For...
... 176 g/m2 (16 to the Converter Listing on the Lexmark Home Page and Automated FAX system (LEXFAX™) for information on whether your vinyl label converter has passed the Lexmark criteria. Paper less than 76 g/m2 must be printed with Paper Weight set to simplex printing only at 20-32.2° C (... weights and types as the printer except for more details. 9 Paper 105-176 g/m2 (28-47 lb bond) must be printed with Paper Weight set to Light. 3 Pressure-sensitive area must enter the printer first. 4 100% cotton content maximum weight is limited to Heavy. 1-16 Service Manual For...
Service Manual
Page 37
...C (68-90° F). 8 Refer to the Converter Listing on the Lexmark Home Page and Automated FAX system (LEXFAX™) for information on the Lexmark Web site at less than 60% relative humidity. Media guidelines Selecting the appropriate...90.2 g/m2 (24 lb) bond. 5 28 lb bond envelopes are limited to simplex printing only at www.lexmark.com/publications. Business papers designed for the printer. and is limited to 25% cotton content. 6 The duplex... less than 76 g/m2 must be printed with Paper Weight set to Light. 3 Pressure-sensitive area must be printed with Paper Weight...
...C (68-90° F). 8 Refer to the Converter Listing on the Lexmark Home Page and Automated FAX system (LEXFAX™) for information on the Lexmark Web site at less than 60% relative humidity. Media guidelines Selecting the appropriate...90.2 g/m2 (24 lb) bond. 5 28 lb bond envelopes are limited to simplex printing only at www.lexmark.com/publications. Business papers designed for the printer. and is limited to 25% cotton content. 6 The duplex... less than 76 g/m2 must be printed with Paper Weight set to Light. 3 Pressure-sensitive area must be printed with Paper Weight...
Service Manual
Page 170
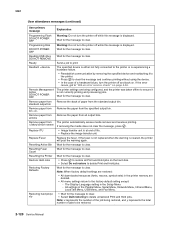
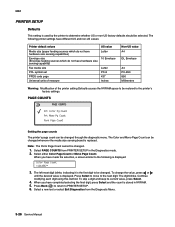
... Remote Management Active DO NOT POWER OFF The printer settings are deleted. • All menu settings return to clear. standard output bin Remove paper from...Quit restoring to clear. Note: When factory default settings are restored: • All downloaded resources (fonts, macros, symbol sets) in the printer memory are being restored, and... DO NOT POWER OFF Wait for the message to the factory default setting except: - If the error recurs, got to clear. bin Remove...The Display Language setting in the Parallel Menu, Serial Menu, Network Menu, Infrared Menu, LocalTalk ...
... Remote Management Active DO NOT POWER OFF The printer settings are deleted. • All menu settings return to clear. standard output bin Remove paper from...Quit restoring to clear. Note: When factory default settings are restored: • All downloaded resources (fonts, macros, symbol sets) in the printer memory are being restored, and... DO NOT POWER OFF Wait for the message to the factory default setting except: - If the error recurs, got to clear. bin Remove...The Display Language setting in the Parallel Menu, Serial Menu, Network Menu, Infrared Menu, LocalTalk ...
Service Manual
Page 181
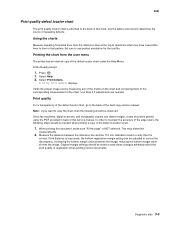
...these changes adversely affect the print quality or registration when printing normal documents. reducing the bottom margin value shrinks the image. Original margin settings should be noted in the chart. Press . 1. Select Help. 2. Use Step 2 if adjustments are needed. Note: If you .... Measure the distance between the reference line and the 110 mm calibration mark to correct the discrepancy. Diagnostic aids 3-3 Since fax machines, digital scanners, and xerographic copiers can be adjusted to verify that pattern. Using the charts Measure repeating horizontal lines from...
...these changes adversely affect the print quality or registration when printing normal documents. reducing the bottom margin value shrinks the image. Original margin settings should be noted in the chart. Press . 1. Select Help. 2. Use Step 2 if adjustments are needed. Note: If you .... Measure the distance between the reference line and the 110 mm calibration mark to correct the discrepancy. Diagnostic aids 3-3 Since fax machines, digital scanners, and xerographic copiers can be adjusted to verify that pattern. Using the charts Measure repeating horizontal lines from...
Service Manual
Page 204
...printer's page count can be changed whenever the media size sensing board is displayed. Press Back ( ) to return to the following printer settings have different US and non-US values: Printer default values Media size (paper feeding sources which do not have hardware size sensing capabilities) Envelope... size (Envelope feeding sources which do not have hardware size sensing capability) Fax media size PCL symbol set PPDS code page Universal units of measure US value Letter 10 Envelope Letter PC-8 437 Inches Non-US value A4 DL ...
...printer's page count can be changed whenever the media size sensing board is displayed. Press Back ( ) to return to the following printer settings have different US and non-US values: Printer default values Media size (paper feeding sources which do not have hardware size sensing capabilities) Envelope... size (Envelope feeding sources which do not have hardware size sensing capability) Fax media size PCL symbol set PPDS code page Universal units of measure US value Letter 10 Envelope Letter PC-8 437 Inches Non-US value A4 DL ...


