User's Guide
Page 4
...) network 70 Loading paper 72 Loading paper...72 Loading various paper types...72 Using the automatic paper type sensor...75 Loading original documents on the scanner glass 76 Loading original documents into the Automatic Document Feeder 77 Contents 4
...) network 70 Loading paper 72 Loading paper...72 Loading various paper types...72 Using the automatic paper type sensor...75 Loading original documents on the scanner glass 76 Loading original documents into the Automatic Document Feeder 77 Contents 4
User's Guide
Page 7
... print cartridge ...122 Refilling print cartridges...123 Using genuine Lexmark print cartridges...123 Aligning print cartridges ...123 Cleaning the print cartridge nozzles...124 Checking ink levels...125 Wiping the print cartridge nozzles and contacts ...126 Preserving the print cartridges ...127 Cleaning the scanner glass...127 Cleaning the exterior of the printer...127...
... print cartridge ...122 Refilling print cartridges...123 Using genuine Lexmark print cartridges...123 Aligning print cartridges ...123 Cleaning the print cartridge nozzles...124 Checking ink levels...125 Wiping the print cartridge nozzles and contacts ...126 Preserving the print cartridges ...127 Cleaning the scanner glass...127 Cleaning the exterior of the printer...127...
User's Guide
Page 21
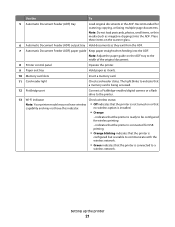
Place these items on the scanner glass. 6 Automatic Document Feeder (ADF) output tray Hold documents as they exit from the ADF. 7 Automatic Document Feeder (ADF) paper guide Keep paper straight when ...
Place these items on the scanner glass. 6 Automatic Document Feeder (ADF) output tray Hold documents as they exit from the ADF. 7 Automatic Document Feeder (ADF) paper guide Keep paper straight when ...
User's Guide
Page 22
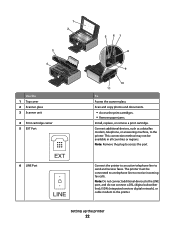
... digital network), or cable modem to send and receive faxes. 1 2 3 W I F I PRINTING 5 67 8 4 W I F I PRINTING Use the 1 Top cover 2 Scanner glass 3 Scanner unit 4 Print cartridge carrier 5 EXT Port 6 LINE Port EXT LINE 9 10 11 To Access the scanner glass. Connect additional devices, such as a data/fax modem, telephone, or answering machine, to access the port...
... digital network), or cable modem to send and receive faxes. 1 2 3 W I F I PRINTING 5 67 8 4 W I F I PRINTING Use the 1 Top cover 2 Scanner glass 3 Scanner unit 4 Print cartridge carrier 5 EXT Port 6 LINE Port EXT LINE 9 10 11 To Access the scanner glass. Connect additional devices, such as a data/fax modem, telephone, or answering machine, to access the port...

User's Guide
Page 76
Loading original documents on the scanner glass You can also scan three-dimensional objects for faxing. WI F I PRINTING Note: Photos should be loaded as magazine clippings), and three-dimensional objects on . 2 ... items (such as shown. You can scan a document for use in catalogs, brochures, or product flyers. WI F I PRINTING 3 Place the original document facedown on the scanner glass in the ADF. 1 Make sure the computer and the printer are on the...
Loading original documents on the scanner glass You can also scan three-dimensional objects for faxing. WI F I PRINTING Note: Photos should be loaded as magazine clippings), and three-dimensional objects on . 2 ... items (such as shown. You can scan a document for use in catalogs, brochures, or product flyers. WI F I PRINTING 3 Place the original document facedown on the scanner glass in the ADF. 1 Make sure the computer and the printer are on the...

User's Guide
Page 77
... postcards, photos, small items, transparencies, photo paper, or thin media (such as magazine clippings) into the ADF. Loading paper 77 Place these items on the scanner glass. 1 Adjust the paper guide on the scanned image. 4 Close the top cover to avoid dark edges on the ADF tray to 25 sheets of...
... postcards, photos, small items, transparencies, photo paper, or thin media (such as magazine clippings) into the ADF. Loading paper 77 Place these items on the scanner glass. 1 Adjust the paper guide on the scanned image. 4 Close the top cover to avoid dark edges on the ADF tray to 25 sheets of...

User's Guide
Page 78
... - 8.25 in.-8.5 in . • You allow preprinted media to the width of the original document. • The original document is not supported when using the scanner. Loading paper 78 3 Load the original document faceup and top edge first into the ADF until you hear a beep. Automatic Document Feeder (ADF) paper capacity...
... - 8.25 in.-8.5 in . • You allow preprinted media to the width of the original document. • The original document is not supported when using the scanner. Loading paper 78 3 Load the original document faceup and top edge first into the ADF until you hear a beep. Automatic Document Feeder (ADF) paper capacity...
User's Guide
Page 99
... up arrow button until Proof Sheet is the printable side, then see the instructions in the circles completely. 8 Load the proof sheet facedown on the scanner glass. Note: If this option: a Press the up or down arrow button until the start date you want appears. Printing photos stored on the display...
... up arrow button until Proof Sheet is the printable side, then see the instructions in the circles completely. 8 Load the proof sheet facedown on the scanner glass. Note: If this option: a Press the up or down arrow button until the start date you want appears. Printing photos stored on the display...
User's Guide
Page 101
...white copy. Note: Make sure you select color or black-only printing, the light nearest your desired paper size is highlighted. 5 Press the left or right arrow button to select the number of the original document. • When using the scanner glass, close the top cover to avoid ... least 24 hours before stacking, displaying, or storing. If your choice comes on the list, select Other. Additional paper size options appear on the scanner glass. Notes: • Do not load postcards, photos, small items, transparencies, photo paper, or thin media (such as magazine clippings) into ...
...white copy. Note: Make sure you select color or black-only printing, the light nearest your desired paper size is highlighted. 5 Press the left or right arrow button to select the number of the original document. • When using the scanner glass, close the top cover to avoid ... least 24 hours before stacking, displaying, or storing. If your choice comes on the list, select Other. Additional paper size options appear on the scanner glass. Notes: • Do not load postcards, photos, small items, transparencies, photo paper, or thin media (such as magazine clippings) into ...

User's Guide
Page 102
...• Adjust the paper guide on the ADF tray to the width of the original document. • When using the scanner glass, close the top cover to avoid dark edges on the scanner glass. b Press . Copying a two-sided document 1 Load paper. 2 Load an original document faceup into the Automatic ... highlighted. 5 If you are copying a one side and feeds it back to the printer to print on the side that performs duplex copies on the scanner glass. c Follow the instructions on one -sided document: a Press the left or right arrow button until 1 to 2 appears. Notes: • Do ...
...• Adjust the paper guide on the ADF tray to the width of the original document. • When using the scanner glass, close the top cover to avoid dark edges on the scanner glass. b Press . Copying a two-sided document 1 Load paper. 2 Load an original document faceup into the Automatic ... highlighted. 5 If you are copying a one side and feeds it back to the printer to print on the side that performs duplex copies on the scanner glass. c Follow the instructions on one -sided document: a Press the left or right arrow button until 1 to 2 appears. Notes: • Do ...
User's Guide
Page 103
.... Making a copy lighter or darker 1 Load paper. 2 Load an original document faceup into the Automatic Document Feeder (ADF) or facedown on the scanner glass. Notes: • If you want is highlighted. 5 Press the left or right arrow button to Photo, or let the printer automatically detect ...the paper type. 6 Press . Enlarging or reducing images 1 Load paper. 2 Load an original document facedown on the scanner glass. For best results with this resize setting, use photo paper and set the paper type selection to set the copy quality to Automatic, Draft...
.... Making a copy lighter or darker 1 Load paper. 2 Load an original document faceup into the Automatic Document Feeder (ADF) or facedown on the scanner glass. Notes: • If you want is highlighted. 5 Press the left or right arrow button to Photo, or let the printer automatically detect ...the paper type. 6 Press . Enlarging or reducing images 1 Load paper. 2 Load an original document facedown on the scanner glass. For best results with this resize setting, use photo paper and set the paper type selection to set the copy quality to Automatic, Draft...

User's Guide
Page 104
...Adjust the paper guide on the ADF tray to the width of the original document. • When using the scanner glass, close the top cover to avoid dark edges on the scanner glass. Copying 104 Collated Not collated 1 Load paper. 2 Load an original document faceup into the Automatic Document ...Do not load postcards, photos, small items, transparencies, photo paper, or thin media (such as magazine clippings) into the ADF. Collating copies using the scanner glass, close the top cover to avoid dark edges on the scanned image. 3 From the printer control panel, press . 4 Press the up or ...
...Adjust the paper guide on the ADF tray to the width of the original document. • When using the scanner glass, close the top cover to avoid dark edges on the scanner glass. Copying 104 Collated Not collated 1 Load paper. 2 Load an original document faceup into the Automatic Document ...Do not load postcards, photos, small items, transparencies, photo paper, or thin media (such as magazine clippings) into the ADF. Collating copies using the scanner glass, close the top cover to avoid dark edges on the scanned image. 3 From the printer control panel, press . 4 Press the up or ...
User's Guide
Page 105
... guide on the ADF tray to the width of the original document. • When using the scanner glass, close the top cover to avoid dark edges on the scanned image. 3 From the printer... to choose Yes. 8 Load the next page of the original document facedown on the scanner glass. Place these items on the scanner glass. • Adjust the paper guide on the ADF tray to the width of ... Load paper. 2 Load an original document faceup into the Automatic Document Feeder (ADF) or facedown on the scanner glass, and then press OK. You may choose to copy on one sheet of paper. Repeating an image ...
... guide on the ADF tray to the width of the original document. • When using the scanner glass, close the top cover to avoid dark edges on the scanned image. 3 From the printer... to choose Yes. 8 Load the next page of the original document facedown on the scanner glass. Place these items on the scanner glass. • Adjust the paper guide on the ADF tray to the width of ... Load paper. 2 Load an original document faceup into the Automatic Document Feeder (ADF) or facedown on the scanner glass, and then press OK. You may choose to copy on one sheet of paper. Repeating an image ...
User's Guide
Page 106
Canceling a copy job 1 Press . Scanning stops and the scanner bar returns to its home position. 2 Press to start printing. Copying 106 9 Repeat steps 7 and 8 until all the pages that you want to copy have been saved to the printer memory. 10 When asked if you want to scan another page, press the left or right arrow button until No is highlighted, and then press OK to turn off the printer.
Canceling a copy job 1 Press . Scanning stops and the scanner bar returns to its home position. 2 Press to start printing. Copying 106 9 Repeat steps 7 and 8 until all the pages that you want to copy have been saved to the printer memory. 10 When asked if you want to scan another page, press the left or right arrow button until No is highlighted, and then press OK to turn off the printer.

User's Guide
Page 107
...see the Help associated with the programs installed with the printer software. b Wait until the computer name of the original document. • When using the scanner glass, close the top cover to avoid dark edges on the ADF tray to a memory card or flash drive: a Insert the memory device. c...arrow buttons to select the quality and original image size, and then press OK each time you make a selection. f Follow the instructions on the scanner glass. c Use the arrow buttons to select the quality and original image size, and then press OK each time you make a selection. Place ...
...see the Help associated with the programs installed with the printer software. b Wait until the computer name of the original document. • When using the scanner glass, close the top cover to avoid dark edges on the ADF tray to a memory card or flash drive: a Insert the memory device. c...arrow buttons to select the quality and original image size, and then press OK each time you make a selection. f Follow the instructions on the scanner glass. c Use the arrow buttons to select the quality and original image size, and then press OK each time you make a selection. Place ...
User's Guide
Page 108
...8226; In Windows XP and earlier, click Start. 3 Click All Programs or Programs, and then select the printer program folder from the list. 4 Click Lexmark Productivity Studio. 5 From the Photo Printing section of the main screen, click Scan. 6 Follow the instructions on the scanned image. 2 From the Finder ... indicates that you select a digit. Using Macintosh 1 Load an original document faceup into the Automatic Document Feeder (ADF) or facedown on the scanner glass. If your operating system. - If your printer does not have a numeric keypad, use the left or right arrow button until the...
...8226; In Windows XP and earlier, click Start. 3 Click All Programs or Programs, and then select the printer program folder from the list. 4 Click Lexmark Productivity Studio. 5 From the Photo Printing section of the main screen, click Scan. 6 Follow the instructions on the scanned image. 2 From the Finder ... indicates that you select a digit. Using Macintosh 1 Load an original document faceup into the Automatic Document Feeder (ADF) or facedown on the scanner glass. If your operating system. - If your printer does not have a numeric keypad, use the left or right arrow button until the...

User's Guide
Page 109
... • If you choose to send the scanned image to a computer over a network. 4 When the destination that you select a digit. Scanning color or black-and-white original documents 1 Load an original document faceup into the ADF. Note: The default setting when you Scanning photos for the printer... software associated with your operating system. • If your printer has a numeric keypad, enter the PIN using the scanner glass, close the top cover to be prompted to send the scanned image. Scan to menu appears on the scanned image. 3 From the...
... • If you choose to send the scanned image to a computer over a network. 4 When the destination that you select a digit. Scanning color or black-and-white original documents 1 Load an original document faceup into the ADF. Note: The default setting when you Scanning photos for the printer... software associated with your operating system. • If your printer has a numeric keypad, enter the PIN using the scanner glass, close the top cover to be prompted to send the scanned image. Scan to menu appears on the scanned image. 3 From the...
User's Guide
Page 110
... the Help for the printer software associated with your operating system. • If your printer has a numeric keypad, enter the PIN using the scanner glass, close the top cover to avoid dark edges on the scanned image. 3 From the printer control panel, press . 4 If necessary, ...a network. 2 Load an original document faceup into the ADF. Place these items on the scanner glass. • Adjust the paper guide on . • The printer is downloaded from the applications available on the scanner glass. Notes: • Do not load postcards, photos, small items, transparencies, photo paper...
... the Help for the printer software associated with your operating system. • If your printer has a numeric keypad, enter the PIN using the scanner glass, close the top cover to avoid dark edges on the scanned image. 3 From the printer control panel, press . 4 If necessary, ...a network. 2 Load an original document faceup into the ADF. Place these items on the scanner glass. • Adjust the paper guide on . • The printer is downloaded from the applications available on the scanner glass. Notes: • Do not load postcards, photos, small items, transparencies, photo paper...

User's Guide
Page 112
...the scanned image. 3 From the printer control panel, press . 4 Enter a fax number, or press Address Book to the call through a speaker on the scanner glass. Sending a fax while listening to a call (On Hook Dial) The manual dialing feature lets you dial a telephone number while listening to select a ... useful when you want to send a fax to a working telephone line. 2 Load an original document faceup into the ADF. Place these items on the scanner glass. • Adjust the paper guide on the ADF tray to the width of numbers (broadcast fax): a Press OK. Faxing 112 b Repeat step...
...the scanned image. 3 From the printer control panel, press . 4 Enter a fax number, or press Address Book to the call through a speaker on the scanner glass. Sending a fax while listening to a call (On Hook Dial) The manual dialing feature lets you dial a telephone number while listening to select a ... useful when you want to send a fax to a working telephone line. 2 Load an original document faceup into the ADF. Place these items on the scanner glass. • Adjust the paper guide on the ADF tray to the width of numbers (broadcast fax): a Press OK. Faxing 112 b Repeat step...

User's Guide
Page 113
.... • Adjust the paper guide on the ADF tray to the width of the original document. • When using the scanner glass, close the top cover to avoid dark edges on and is connected to navigate through an automated answering system. 5 Enter a fax number. Note: At ... 64 numbers, commas, periods, and/or the symbols * or #. • Only one fax number can now hear the dial tone of the numbers on the scanner glass. Notes: • Do not load postcards, photos, small items, transparencies, photo paper, or thin media (such as part of the fax number. • A fax...
.... • Adjust the paper guide on the ADF tray to the width of the original document. • When using the scanner glass, close the top cover to avoid dark edges on and is connected to navigate through an automated answering system. 5 Enter a fax number. Note: At ... 64 numbers, commas, periods, and/or the symbols * or #. • Only one fax number can now hear the dial tone of the numbers on the scanner glass. Notes: • Do not load postcards, photos, small items, transparencies, photo paper, or thin media (such as part of the fax number. • A fax...


