User's Guide
Page 2
... all external connections (such as Ethernet and telephone system connections) are not under the printer when you have any other than those described in their marked plugin ports. CAUTION: Use of controls or adjustments or performance of specific Lexmark components. CAUTION: To reduce the risk of harmful emissions. This product uses a printing...
... all external connections (such as Ethernet and telephone system connections) are not under the printer when you have any other than those described in their marked plugin ports. CAUTION: Use of controls or adjustments or performance of specific Lexmark components. CAUTION: To reduce the risk of harmful emissions. This product uses a printing...

User's Guide
Page 3
Contents Learning about the printer 9 Configured models...9 Using the security lock feature...10 Understanding the control panel...11 Menus list...12 Installing options...14 Installing a 550-sheet drawer...14 Installing ......15 Available options ...15 Accessing the system board to install internal options 15 Installing a memory card ...18 Installing a flash memory or firmware card 21 Installing a printer hard disk...22 Installing an internal print server or port interface card 24 Reinstalling the system board access cover 25 Attaching cables...26 Loading paper...
Contents Learning about the printer 9 Configured models...9 Using the security lock feature...10 Understanding the control panel...11 Menus list...12 Installing options...14 Installing a 550-sheet drawer...14 Installing ......15 Available options ...15 Accessing the system board to install internal options 15 Installing a memory card ...18 Installing a flash memory or firmware card 21 Installing a printer hard disk...22 Installing an internal print server or port interface card 24 Reinstalling the system board access cover 25 Attaching cables...26 Loading paper...
User's Guide
Page 4
...weights 41 Supported paper sizes...41 Support for paper types ...43 Paper types and weights ...43 Paper capacities ...44 Printing...45 Installing printer software...45 Printing a document from Windows 45 Printing a document from a Macintosh computer 45 Printing confidential and other held jobs 45 Holding ...jobs in the printer...45 Printing confidential and other held jobs from Windows 46 Printing confidential and other held jobs from Macintosh 46 Printing from a USB...
...weights 41 Supported paper sizes...41 Support for paper types ...43 Paper types and weights ...43 Paper capacities ...44 Printing...45 Installing printer software...45 Printing a document from Windows 45 Printing a document from a Macintosh computer 45 Printing confidential and other held jobs 45 Holding ...jobs in the printer...45 Printing confidential and other held jobs from Windows 46 Printing confidential and other held jobs from Macintosh 46 Printing from a USB...
User's Guide
Page 5
... in the duplex path...65 Clearing jams in the multipurpose feeder 67 Clearing jams in the manual feeder 68 Maintaining the printer 69 Storing supplies...69 Checking the status of supplies...69 Conserving supplies...69 Aligning the toner cartridges...69 Cleaning the printhead ... a transfer belt...72 Ordering a waste toner box ...73 Ordering a fuser...73 Ordering photoconductors ...73 Moving the printer...73 Before moving the printer ...73 Moving the printer to another location ...74 Administrative support 75 Adjusting the brightness or contrast of the display 75 Disabling control panel menus...
... in the duplex path...65 Clearing jams in the multipurpose feeder 67 Clearing jams in the manual feeder 68 Maintaining the printer 69 Storing supplies...69 Checking the status of supplies...69 Conserving supplies...69 Aligning the toner cartridges...69 Cleaning the printhead ... a transfer belt...72 Ordering a waste toner box ...73 Ordering a fuser...73 Ordering photoconductors ...73 Moving the printer...73 Before moving the printer ...73 Moving the printer to another location ...74 Administrative support 75 Adjusting the brightness or contrast of the display 75 Disabling control panel menus...

User's Guide
Page 6
Troubleshooting...82 Checking an unresponsive printer...82 Solving printing problems...82 Multiple-language PDFs do not print ...82 Control panel display is blank or displays only diamonds 82 Error message about ...
Troubleshooting...82 Checking an unresponsive printer...82 Solving printing problems...82 Multiple-language PDFs do not print ...82 Control panel display is blank or displays only diamonds 82 Error message about ...

User's Guide
Page 9
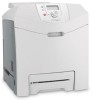
C534n, C534dn 1 2 5 4 3 6 1 Standard exit bin 2 Control panel Learning about the printer Configured models Basic models The following illustrations show the basic printer models. Learning about the printer 9 C532n 1 2 5 4 3 1 Standard exit bin 2 Control panel 3 Standard 250-sheet tray (Tray 1) 4 Manual feeder 5 Tray 1 handhold C530dn, C532dn.
C534n, C534dn 1 2 5 4 3 6 1 Standard exit bin 2 Control panel Learning about the printer Configured models Basic models The following illustrations show the basic printer models. Learning about the printer 9 C532n 1 2 5 4 3 1 Standard exit bin 2 Control panel 3 Standard 250-sheet tray (Tray 1) 4 Manual feeder 5 Tray 1 handhold C530dn, C532dn.
User's Guide
Page 10
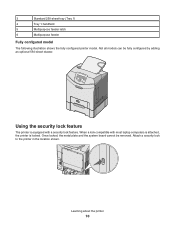
... the system board cannot be fully configured by adding an optional 550-sheet drawer. Using the security lock feature The printer is locked. Learning about the printer 10 Attach a security lock to the printer in the location shown. 3 Standard 250-sheet tray (Tray 1) 4 Tray 1 handhold 5 Multipurpose feeder latch 6 Multipurpose feeder Fully configured model...
... the system board cannot be fully configured by adding an optional 550-sheet drawer. Using the security lock feature The printer is locked. Learning about the printer 10 Attach a security lock to the printer in the location shown. 3 Standard 250-sheet tray (Tray 1) 4 Tray 1 handhold 5 Multipurpose feeder latch 6 Multipurpose feeder Fully configured model...

User's Guide
Page 11
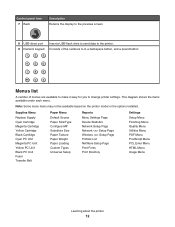
...about supplies, such as Toner Low. • Show-me screens-Provide instructions for resolving common printer errors. Press or to scroll through values or text that communicate information about the printer: • Printer status messages-Indicate the current status of options is needed. Understanding the control panel 7 BACK...to another screen. 4 Indicator light 5 Stop Indicates the printer status: • Off-The power is off. • Blinking green-The printer is warming up, processing data, or printing. • Solid green-The printer is on, but idle. • Solid red-Operator ...
...about supplies, such as Toner Low. • Show-me screens-Provide instructions for resolving common printer errors. Press or to scroll through values or text that communicate information about the printer: • Printer status messages-Indicate the current status of options is needed. Understanding the control panel 7 BACK...to another screen. 4 Indicator light 5 Stop Indicates the printer status: • Off-The power is off. • Blinking green-The printer is warming up, processing data, or printing. • Solid green-The printer is on, but idle. • Solid red-Operator ...
User's Guide
Page 12
...numbers 0-9, a backspace button, and a pound button Menus list A number of menus are available to make it easy for you to the printer. Supplies Menu Replace Supply Cyan Cartridge Magenta Cartridge Yellow Cartridge Black Cartridge Cyan PC Unit Magenta PC Unit Yellow PC Unit Black PC Unit Fuser... Quality Menu Utilities Menu PDF Menu PostScript Menu PCL Emul Menu HTML Menu Image Menu Learning about the printer 12 Note: Some menu items may not be available based on the printer model or the options installed. Control panel item 7 Back Description Returns the display to the previous screen...
...numbers 0-9, a backspace button, and a pound button Menus list A number of menus are available to make it easy for you to the printer. Supplies Menu Replace Supply Cyan Cartridge Magenta Cartridge Yellow Cartridge Black Cartridge Cyan PC Unit Magenta PC Unit Yellow PC Unit Black PC Unit Fuser... Quality Menu Utilities Menu PDF Menu PostScript Menu PCL Emul Menu HTML Menu Image Menu Learning about the printer 12 Note: Some menu items may not be available based on the printer model or the options installed. Control panel item 7 Back Description Returns the display to the previous screen...

User's Guide
Page 13
Security Max Invalid PIN Job Expiration Network/Ports TCP/IP IPv6 Wireless Standard Network Network Standard USB USB NetWare AppleTalk LexLink USB Direct Help Color Quality Print Quality Printing Guide Supplies Guide Media Guide Print Defects Menu Map Information Guide Connection Guide Moving Guide Learning about the printer 13
Security Max Invalid PIN Job Expiration Network/Ports TCP/IP IPv6 Wireless Standard Network Network Standard USB USB NetWare AppleTalk LexLink USB Direct Help Color Quality Print Quality Printing Guide Supplies Guide Media Guide Print Defects Menu Map Information Guide Connection Guide Moving Guide Learning about the printer 13

User's Guide
Page 14
...Installing options 14 f Click Add. therefore, it , and make sure your fingers are not under the printer when you are installing a 550-sheet drawer after setting up the printer, turn the printer off and unplug the power cord before continuing. 1 Unpack the 550-sheet drawer, and remove any ... material. 2 Place the drawer in the location chosen for the printer. 3 Align the printer with the 550-sheet drawer, and lower the printer into place. 4 Set the printer software to recognize the 550-sheet tray. a Click Start ΠSettings ΠPrinters. c Click File ΠProperties. g Click OK. Use...
...Installing options 14 f Click Add. therefore, it , and make sure your fingers are not under the printer when you are installing a 550-sheet drawer after setting up the printer, turn the printer off and unplug the power cord before continuing. 1 Unpack the 550-sheet drawer, and remove any ... material. 2 Place the drawer in the location chosen for the printer. 3 Align the printer with the 550-sheet drawer, and lower the printer into place. 4 Set the printer software to recognize the 550-sheet tray. a Click Start ΠSettings ΠPrinters. c Click File ΠProperties. g Click OK. Use...

User's Guide
Page 15
... cord before continuing. The instructions in this section explain how to remove the system board access cover. Available options Memory cards • Printer memory • Flash memory • Fonts Firmware cards • Bar Code • PrintCryption™ Note: Use a #2 Phillips ...screwdriver to install the available cards; Installing options 15 Installing internal options CAUTION: If you can customize your printer connectivity and memory capacity by adding optional cards. Other internal options The following internal options may be installed on some models: •...
... cord before continuing. The instructions in this section explain how to remove the system board access cover. Available options Memory cards • Printer memory • Flash memory • Fonts Firmware cards • Bar Code • PrintCryption™ Note: Use a #2 Phillips ...screwdriver to install the available cards; Installing options 15 Installing internal options CAUTION: If you can customize your printer connectivity and memory capacity by adding optional cards. Other internal options The following internal options may be installed on some models: •...

User's Guide
Page 18
... card with the ridges on the connector completely. 3 Unpack the memory card. Warning: System board electrical components are installing a memory card after setting up the printer, turn the printer off, and unplug the power cord before touching any system board electronic components or connectors. Touch something metal on the...
... card with the ridges on the connector completely. 3 Unpack the memory card. Warning: System board electrical components are installing a memory card after setting up the printer, turn the printer off, and unplug the power cord before touching any system board electronic components or connectors. Touch something metal on the...
User's Guide
Page 20
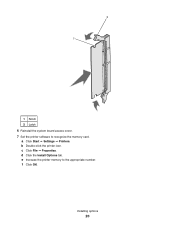
2 1 1 Notch 2 Latch 6 Reinstall the system board access cover. 7 Set the printer software to the appropriate number. f Click OK. a Click Start ΠSettings ΠPrinters. d Click the Install Options tab. b Double-click the printer icon. c Click File ΠProperties. Installing options 20 e Increase the printer memory to recognize the memory card.
2 1 1 Notch 2 Latch 6 Reinstall the system board access cover. 7 Set the printer software to the appropriate number. f Click OK. a Click Start ΠSettings ΠPrinters. d Click the Install Options tab. b Double-click the printer icon. c Click File ΠProperties. Installing options 20 e Increase the printer memory to recognize the memory card.

User's Guide
Page 21
.... For more information, see "Accessing the system board to install internal options" on the system board. This ensures the metal pins line up the printer, turn the printer off, and unplug the power cord before continuing. 1 Access the system board. Installing a flash memory or firmware card The system board has two connections...
.... For more information, see "Accessing the system board to install internal options" on the system board. This ensures the metal pins line up the printer, turn the printer off, and unplug the power cord before continuing. 1 Access the system board. Installing a flash memory or firmware card The system board has two connections...

User's Guide
Page 22
...be flush against the system board. • Be careful not to damage the connectors. 5 Reinstall the system board access cover. 6 Set the printer software to recognize the flash memory. Installing options 22 b Double-click the printer icon. d Click the Install Options tab. e From the Available Options list, select Flash memory. Installing... a printer hard disk Note: A #2 Phillips screwdriver is needed to attach the hard disk to remove it before touching a disk. Note: If an option card ...
...be flush against the system board. • Be careful not to damage the connectors. 5 Reinstall the system board access cover. 6 Set the printer software to recognize the flash memory. Installing options 22 b Double-click the printer icon. d Click the Install Options tab. e From the Available Options list, select Flash memory. Installing... a printer hard disk Note: A #2 Phillips screwdriver is needed to attach the hard disk to remove it before touching a disk. Note: If an option card ...

User's Guide
Page 24
...1 Access the system board. An optional port interface card expands the ways the printer can connect to the system board. 7 Reinstall the system board access cover. The cable connectors on the printer before touching any system board electronic components or connectors. Installing an internal print server ...board electrical components are easily damaged by static electricity. Push the internal print server or port interface card firmly into the holes on the printer that attach the metal plate to install internal options" on page 15. 2 Unpack the internal print server or port interface card. ...
...1 Access the system board. An optional port interface card expands the ways the printer can connect to the system board. 7 Reinstall the system board access cover. The cable connectors on the printer before touching any system board electronic components or connectors. Installing an internal print server ...board electrical components are easily damaged by static electricity. Push the internal print server or port interface card firmly into the holes on the printer that attach the metal plate to install internal options" on page 15. 2 Unpack the internal print server or port interface card. ...

User's Guide
Page 26
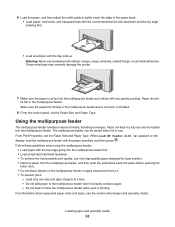
3 Tighten the screws firmly. Attaching cables Connect the printer to match the USB symbol on the printer. Be sure to the computer using a USB cable or an Ethernet cable. Match the appropriate cable with the USB symbol on the cable with the connector shown: 2 1 1 Ethernet connector 2 USB symbol 3 USB connector 3 Installing options 26 A USB port requires a USB cable.
3 Tighten the screws firmly. Attaching cables Connect the printer to match the USB symbol on the printer. Be sure to the computer using a USB cable or an Ethernet cable. Match the appropriate cable with the USB symbol on the cable with the connector shown: 2 1 1 Ethernet connector 2 USB symbol 3 USB connector 3 Installing options 26 A USB port requires a USB cable.

User's Guide
Page 27
... blinks on the width guide tab: they indicate the maximum height for the majority of the optional 550-sheet drawer. Loading the standard tray The printer has two trays to help position the guide. Use these indicators to select from: the standard tray (Tray 1), also known as shown, and slide the...
... blinks on the width guide tab: they indicate the maximum height for the majority of the optional 550-sheet drawer. Loading the standard tray The printer has two trays to help position the guide. Use these indicators to select from: the standard tray (Tray 1), also known as shown, and slide the...
User's Guide
Page 32
Warning: Never use only high-quality paper designed for laser printers. • Remove paper from the multipurpose feeder, and then push the extensions back into the multipurpose feeder. Do not add paper to lightly touch the ... apply excessive force to it. • To prevent jams: - From Print Properties, set the Paper Size and Paper Type. These envelopes may severely damage the printer. 7 Make sure the paper is printing. The multipurpose feeder can also be closed when not in the multipurpose feeder and is not bent or wrinkled...
Warning: Never use only high-quality paper designed for laser printers. • Remove paper from the multipurpose feeder, and then push the extensions back into the multipurpose feeder. Do not add paper to lightly touch the ... apply excessive force to it. • To prevent jams: - From Print Properties, set the Paper Size and Paper Type. These envelopes may severely damage the printer. 7 Make sure the paper is printing. The multipurpose feeder can also be closed when not in the multipurpose feeder and is not bent or wrinkled...


