User's Guide
Page 3
Contents Chapter 1: Learning about the printer 5 Printer overview ...5 Understanding the control panel ...8 Chapter 2: Understanding print media guidelines 10 What types of print media can be loaded? ...10 Selecting print media...250-sheet drawer or 550-sheet drawer 33 Recognizing installed options ...34 Chapter 5: Maintaining the printer 35 Storing supplies ...35 Conserving supplies ...35 Ordering supplies ...35 Photoconductor kit end-of-life ...39 Maintenance kit ...42 Recycling Lexmark products ...42 Chapter 6: Clearing jams 43 Identifying jams ...43 Understanding jam messages ...43 ...
Contents Chapter 1: Learning about the printer 5 Printer overview ...5 Understanding the control panel ...8 Chapter 2: Understanding print media guidelines 10 What types of print media can be loaded? ...10 Selecting print media...250-sheet drawer or 550-sheet drawer 33 Recognizing installed options ...34 Chapter 5: Maintaining the printer 35 Storing supplies ...35 Conserving supplies ...35 Ordering supplies ...35 Photoconductor kit end-of-life ...39 Maintenance kit ...42 Recycling Lexmark products ...42 Chapter 6: Clearing jams 43 Identifying jams ...43 Understanding jam messages ...43 ...
User's Guide
Page 4
...Cleaning the printhead lens ...59 Chapter 8: Administrative support 61 Disabling control panel menus ...61 Enabling control panel menus ...61 Restoring factory default settings ...62 Selecting printer operating mode ...62 Setting security using the Embedded Web Server (EWS 62 Notices ...65 Conventions ...65 Electronic emission notices ...65 Noise emission levels ...67 Product... energy consumption ...67 Waste from Electrical and Electronic Equipment (WEEE) directive 68 Laser notice ...68 Statement of Limited Warranty for Lexmark E350d and E352dn 68 Index ...71 4
...Cleaning the printhead lens ...59 Chapter 8: Administrative support 61 Disabling control panel menus ...61 Enabling control panel menus ...61 Restoring factory default settings ...62 Selecting printer operating mode ...62 Setting security using the Embedded Web Server (EWS 62 Notices ...65 Conventions ...65 Electronic emission notices ...65 Noise emission levels ...67 Product... energy consumption ...67 Waste from Electrical and Electronic Equipment (WEEE) directive 68 Laser notice ...68 Statement of Limited Warranty for Lexmark E350d and E352dn 68 Index ...71 4
User's Guide
Page 5
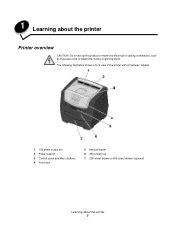
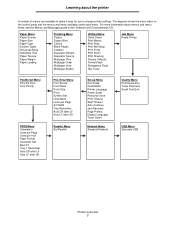
1 Learning about the printer 5 The following illustration shows a front view of the printer with its features labeled. 1 150-sheet output bin 2 Paper support 3 Control panel and Menu buttons 4 Front door 5 Manual feeder 6 250-sheet tray 7 250-sheet drawer or 550-sheet drawer (optional) Learning about the printer Printer overview CAUTION: Do not set up this product or make any electrical or cabling connections, such as the power cord or telephone, during a lightning storm.
1 Learning about the printer 5 The following illustration shows a front view of the printer with its features labeled. 1 150-sheet output bin 2 Paper support 3 Control panel and Menu buttons 4 Front door 5 Manual feeder 6 250-sheet tray 7 250-sheet drawer or 550-sheet drawer (optional) Learning about the printer Printer overview CAUTION: Do not set up this product or make any electrical or cabling connections, such as the power cord or telephone, during a lightning storm.

User's Guide
Page 6
Learning about the printer The following illustration shows a rear view of the printer with its features labeled. 1 Rear exit 5 USB connect 2 Power button 6 Parallel connect 3 Power connect 7 Ethernet connect 4 Dust cover (not available for some models) Printer overview 6
Learning about the printer The following illustration shows a rear view of the printer with its features labeled. 1 Rear exit 5 USB connect 2 Power button 6 Parallel connect 3 Power connect 7 Ethernet connect 4 Dust cover (not available for some models) Printer overview 6
User's Guide
Page 7
... Print Menus Print Stats Print Net Setup Print Fonts Print Demo Print Directory Factory Defaults Format Flash Defragment Flash Hex Trace Job Menu Reset Printer PostScript Menu Print PS Error Font Priority PPDS Menu Orientation Lines per Page Lines per Inch Page Format Character Set Best Fit Tray 1 ...Page A4 Width Tray Renumber Auto CR after LF Auto LF after CR Parallel Menu Std Parallel Set-up Menu Eco-mode Quiet Mode Printer Language Power Saver Resource Save Print Timeout Wait Timeout Auto Continue Jam Recovery Page Protect Display Language Toner Alarm Network Menu Standard Network Quality...
... Print Menus Print Stats Print Net Setup Print Fonts Print Demo Print Directory Factory Defaults Format Flash Defragment Flash Hex Trace Job Menu Reset Printer PostScript Menu Print PS Error Font Priority PPDS Menu Orientation Lines per Page Lines per Inch Page Format Character Set Best Fit Tray 1 ...Page A4 Width Tray Renumber Auto CR after LF Auto LF after CR Parallel Menu Std Parallel Set-up Menu Eco-mode Quiet Mode Printer Language Power Saver Resource Save Print Timeout Wait Timeout Auto Continue Jam Recovery Page Protect Display Language Toner Alarm Network Menu Standard Network Quality...

User's Guide
Page 8
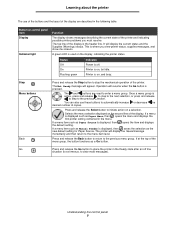
Understanding the control panel 8 An additional translated label is included in your language. Learning about the printer Understanding the control panel The control panel consists of these items: • A 2-line liquid crystal display (LCD) that shows text • Six buttons: Stop , Menu (with Left Menu , Select • An indicator light , and Right Menu ), Back , and Go Note: A label located on the inside front door shows the control panel buttons in the printer box.
Understanding the control panel 8 An additional translated label is included in your language. Learning about the printer Understanding the control panel The control panel consists of these items: • A 2-line liquid crystal display (LCD) that shows text • Six buttons: Stop , Menu (with Left Menu , Select • An indicator light , and Right Menu ), Back , and Go Note: A label located on the inside front door shows the control panel buttons in the printer box.
User's Guide
Page 9
...to the menu item level. You can also use of the buttons and the layout of the display are used on , but idle. The printer will appear. Status Off On Flashing green Indicates Power is displayed, then the default setting. If a menu item such as the new default ...to the next selection, or press and release to step to the previous menu group. If at the top of the printer and indicating possible printer problems you view printer status, supplies messages, and show-me screens. Button or control panel item Display Indicator light Function The display shows messages describing...
...to the menu item level. You can also use of the buttons and the layout of the display are used on , but idle. The printer will appear. Status Off On Flashing green Indicates Power is displayed, then the default setting. If a menu item such as the new default ...to the next selection, or press and release to step to the previous menu group. If at the top of the printer and indicating possible printer problems you view printer status, supplies messages, and show-me screens. Button or control panel item Display Indicator light Function The display shows messages describing...
User's Guide
Page 10
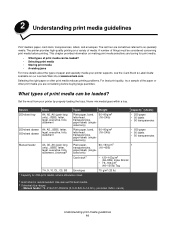
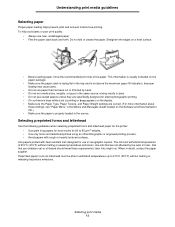
... • Selecting print media • Storing print media • Avoiding jams For more details about the types of paper and specialty media your printer by properly loading the trays. Source Sizes Types Weight Capacity* (sheets) 250-sheet tray A4, A5, A6 (grain long only), JISB5, letter,...media before buying large quantities. cards) Understanding print media guidelines 10 Get the most from your printer supports, see the Card Stock & Label Guide available on our Lexmark Web site at www.lexmark.com. Never mix media types within a tray. The last four are considering before printing....
... • Selecting print media • Storing print media • Avoiding jams For more details about the types of paper and specialty media your printer by properly loading the trays. Source Sizes Types Weight Capacity* (sheets) 250-sheet tray A4, A5, A6 (grain long only), JISB5, letter,...media before buying large quantities. cards) Understanding print media guidelines 10 Get the most from your printer supports, see the Card Stock & Label Guide available on our Lexmark Web site at www.lexmark.com. Never mix media types within a tray. The last four are considering before printing....
User's Guide
Page 11
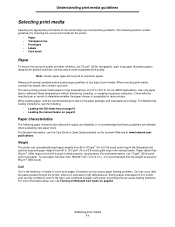
... site at www.lexmark.com/ publications. Use only paper able to high temperatures. Excessive curl can cause paper feeding problems. Curl can occur after the paper passes through the printer, where it is the tendency of print media. When choosing print media, consider the... dry conditions, even in the manual feeder. Understanding print media guidelines Selecting print media Selecting the appropriate print media for the printer helps you avoid printing problems. The following paper characteristics affect print quality and reliability. When loading paper, note the recommended print...
... site at www.lexmark.com/ publications. Use only paper able to high temperatures. Excessive curl can cause paper feeding problems. Curl can occur after the paper passes through the printer, where it is the tendency of print media. When choosing print media, consider the... dry conditions, even in the manual feeder. Understanding print media guidelines Selecting print media Selecting the appropriate print media for the printer helps you avoid printing problems. The following paper characteristics affect print quality and reliability. When loading paper, note the recommended print...

User's Guide
Page 12
... stabilize in the original wrapper. Moisture content The amount of moisture in the paper affects both print quality and the ability of the printer to the alignment of the paper fibers in the Menus and Messages guide on these forms. • Coated papers (erasable bond), synthetic...weight less than 350 points, change Paper Type to be between 150 and 250 Sheffield points produces the best print quality. Recycled paper Lexmark supportsUS executive order 13101 which strongly encourages the use with chemicals that may also require a longer conditioning period because of the mass of ...
... stabilize in the original wrapper. Moisture content The amount of moisture in the paper affects both print quality and the ability of the printer to the alignment of the paper fibers in the Menus and Messages guide on these forms. • Coated papers (erasable bond), synthetic...weight less than 350 points, change Paper Type to be between 150 and 250 Sheffield points produces the best print quality. Recycled paper Lexmark supportsUS executive order 13101 which strongly encourages the use with chemicals that may also require a longer conditioning period because of the mass of ...
User's Guide
Page 13
... heavily textured surfaces. Selecting print media 13 Selecting preprinted forms and letterhead Use the following guidelines when selecting preprinted forms and letterhead paper for the printer: • Use grain long papers for best results for electrophotographic printing. • Do not remove trays while a job is printing or Busy appears on the...
... heavily textured surfaces. Selecting print media 13 Selecting preprinted forms and letterhead Use the following guidelines when selecting preprinted forms and letterhead paper for the printer: • Use grain long papers for best results for electrophotographic printing. • Do not remove trays while a job is printing or Busy appears on the...
User's Guide
Page 14
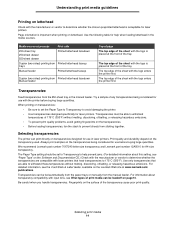
...the manual feeder. The top edge of the sheet with the printer before buying large quantities. We recommend Lexmark part number 70X7240 letter-size transparency and Lexmark part number 12A5010 for laser printers. Selecting print media 14 For detailed information, see What types...print media can print directly on transparencies designed for laser printers. Transparencies must be set the Paper Type to Transparency to determine whether the chosen preprinted letterhead is placed at www.lexmark.com/ publications. Be careful when you handle transparencies. ...
...the manual feeder. The top edge of the sheet with the printer before buying large quantities. We recommend Lexmark part number 70X7240 letter-size transparency and Lexmark part number 12A5010 for laser printers. Selecting print media 14 For detailed information, see What types...print media can print directly on transparencies designed for laser printers. Transparencies must be set the Paper Type to Transparency to determine whether the chosen preprinted letterhead is placed at www.lexmark.com/ publications. Be careful when you handle transparencies. ...
User's Guide
Page 15
... of high humidity (over 60%) and the high printing temperatures may cause labels to 105 g/m2 (28 lb bond) weight for use with laser printers, except for vinyl labels. Have excessive curl or twist. - Have any way. - Have rough, cockle, or laid finishes. • Use envelopes...paper or transparencies in letter-size, A4-size, and legal-size sheets. Selecting print media 15 Envelopes with adhesive, and could void the printer and cartridge warranties. • Use labels that can withstand temperatures of 25 pounds per square inch (psi). When printing on page23 ....
... of high humidity (over 60%) and the high printing temperatures may cause labels to 105 g/m2 (28 lb bond) weight for use with laser printers, except for vinyl labels. Have excessive curl or twist. - Have any way. - Have rough, cockle, or laid finishes. • Use envelopes...paper or transparencies in letter-size, A4-size, and legal-size sheets. Selecting print media 15 Envelopes with adhesive, and could void the printer and cartridge warranties. • Use labels that can withstand temperatures of 25 pounds per square inch (psi). When printing on page23 ....
User's Guide
Page 16
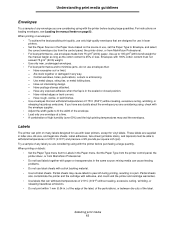
... are considering using card stock that may release hazardous emissions when heated. • Do not use preprinted card stock manufactured with the printer before purchasing a large quantity. on card stock: • Cardstock can significantly affect the print quality and cause print media handling or... in .) strip on label printing, characteristics, and design, see What types of the adhesive at www.lexmark.com/publications. Set this from the control panel, the printer driver, or from edges is 40%. Storing print media 16 Zone coating of print media can significantly affect...
... are considering using card stock that may release hazardous emissions when heated. • Do not use preprinted card stock manufactured with the printer before purchasing a large quantity. on card stock: • Cardstock can significantly affect the print quality and cause print media handling or... in .) strip on label printing, characteristics, and design, see What types of the adhesive at www.lexmark.com/publications. Set this from the control panel, the printer driver, or from edges is 40%. Storing print media 16 Zone coating of print media can significantly affect...
User's Guide
Page 17
... information, see the following: • Loading the 250-sheet tray on page18 • Loading the manual feeder on page10. If jams do occur with the printer before you load it properly, you can avoid most jams. For detailed tray loading instructions, see What types of print media.
... information, see the following: • Loading the 250-sheet tray on page18 • Loading the manual feeder on page10. If jams do occur with the printer before you load it properly, you can avoid most jams. For detailed tray loading instructions, see What types of print media.

User's Guide
Page 18
... indicator Note: To load legal-size or folio-size paper, extend the length of the 250-sheet paper tray. Loading the 250-sheet tray Your printer has a 250-sheet tray. Doing so may have also purchased an optional 250-sheet drawer or 550-sheet drawer. You may cause a jam . 1 Remove the...
... indicator Note: To load legal-size or folio-size paper, extend the length of the 250-sheet paper tray. Loading the 250-sheet tray Your printer has a 250-sheet tray. Doing so may have also purchased an optional 250-sheet drawer or 550-sheet drawer. You may cause a jam . 1 Remove the...

User's Guide
Page 21
Printing 7 Extend the paper support on the latch at the back of the tray. 2 Expand the tray until the extender locks into place. You may also attach a dust cover (if available) on the back of the printer to protect the tray while it is extended. 1 Press down on the output bin. Loading the 250-sheet tray 21 Extending the tray for legal-size or folio-size paper To load legal-size or folio-size paper, extend the paper tray.
Printing 7 Extend the paper support on the latch at the back of the tray. 2 Expand the tray until the extender locks into place. You may also attach a dust cover (if available) on the back of the printer to protect the tray while it is extended. 1 Press down on the output bin. Loading the 250-sheet tray 21 Extending the tray for legal-size or folio-size paper To load legal-size or folio-size paper, extend the paper tray.

User's Guide
Page 22
Note: This feature may not be available for some models. Loading the 250-sheet tray 22 Attach the dust cover to the back of position while it is extended. Printing Attaching the dust cover The dust cover helps protect the tray from being knocked out of the printer by aligning the tabs on the cover to the holes on the printer, then snap the cover into place. It also keeps the tray from the environment.
Note: This feature may not be available for some models. Loading the 250-sheet tray 22 Attach the dust cover to the back of position while it is extended. Printing Attaching the dust cover The dust cover helps protect the tray from being knocked out of the printer by aligning the tabs on the cover to the holes on the printer, then snap the cover into place. It also keeps the tray from the environment.
User's Guide
Page 23
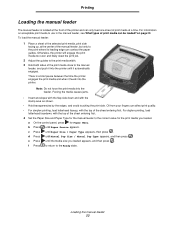
.... 4 Set the Paper Size and Paper Type for the manual feeder to the Ready state. Note: Do not force the print media into the printer. Otherwise, the printer will engage the print media too soon and likely skew the print job. 2 Adjust the guides to the print media width. 3 Hold both sides... of the manual feeder, but only to the manual feeder, and push it into the printer until Paper Size / Paper Type appears, then press . Oil from your fingers can only feed one sheet of the sheet entering first. f Press to return...
.... 4 Set the Paper Size and Paper Type for the manual feeder to the Ready state. Note: Do not force the print media into the printer. Otherwise, the printer will engage the print media too soon and likely skew the print job. 2 Adjust the guides to the print media width. 3 Hold both sides... of the manual feeder, but only to the manual feeder, and push it into the printer until Paper Size / Paper Type appears, then press . Oil from your fingers can only feed one sheet of the sheet entering first. f Press to return...
User's Guide
Page 24
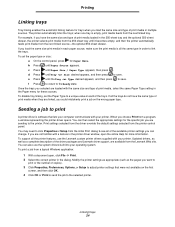
... is software that were not available on the wrong paper type. f Press to return to the selected printer. You can also use the Lexmark custom printer drivers supplied with a feature in the Paper menu for these sources. Updated drivers, as well as the pages you ... the number of copies). 3 Click Properties, Preferences, Options, or Setup to adjust printer settings that lets your printer. Modify the printer settings as appropriate (such as a complete description of the driver packages and Lexmark driver support, are loaded with your operating system. when one tray is all the ...
... is software that were not available on the wrong paper type. f Press to return to the selected printer. You can also use the Lexmark custom printer drivers supplied with a feature in the Paper menu for these sources. Updated drivers, as well as the pages you ... the number of copies). 3 Click Properties, Preferences, Options, or Setup to adjust printer settings that lets your printer. Modify the printer settings as appropriate (such as a complete description of the driver packages and Lexmark driver support, are loaded with your operating system. when one tray is all the ...


