User's Guide
Page 2
... accompanying documentation provided under this statement may cause the print media to release emissions. Use of controls or adjustments or performance of procedures other than those specified herein may result in the operating instructions, to a professional service person. • This product is designed, tested, and approved to meet strict global safety standards with other replacement parts. 2 therefore, this agreement are the user's responsibility. Lexmark...
... accompanying documentation provided under this statement may cause the print media to release emissions. Use of controls or adjustments or performance of procedures other than those specified herein may result in the operating instructions, to a professional service person. • This product is designed, tested, and approved to meet strict global safety standards with other replacement parts. 2 therefore, this agreement are the user's responsibility. Lexmark...
User's Guide
Page 3
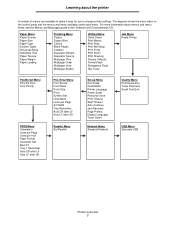
... 5 Printer overview ...5 Understanding the control panel ...8 Chapter 2: Understanding print media guidelines 10 What types of print media can be loaded? ...10 Selecting print media ...11 Storing print media ...16 Avoiding jams ...17 Chapter 3: Printing ...18 Loading the 250-sheet tray ...18 Loading the manual feeder ...23 Linking trays ...24 Sending a job to print ...24 Canceling a print job ...25 Printing the menu settings page ...26 Printing a network setup page ...27 Printing a font sample list ...27 Chapter 4: Installing options 28 Accessing the system board ...28 Adding a memory card...
... 5 Printer overview ...5 Understanding the control panel ...8 Chapter 2: Understanding print media guidelines 10 What types of print media can be loaded? ...10 Selecting print media ...11 Storing print media ...16 Avoiding jams ...17 Chapter 3: Printing ...18 Loading the 250-sheet tray ...18 Loading the manual feeder ...23 Linking trays ...24 Sending a job to print ...24 Canceling a print job ...25 Printing the menu settings page ...26 Printing a network setup page ...27 Printing a font sample list ...27 Chapter 4: Installing options 28 Accessing the system board ...28 Adding a memory card...
User's Guide
Page 4
......50 Calling for service ...50 Checking an unresponsive printer ...50 Printing multiple-language PDFs ...51 Solving printing problems ...51 Turning on Reduced Curl mode ...52 Solving option problems ...53 Solving service message issues ...54 Solving paper feed problems ...54 Solving print quality problems ...55 Cleaning the printhead lens ...59 Chapter 8: Administrative support 61 Disabling control panel menus ...61 Enabling control panel menus ...61 Restoring factory default settings ...62 Selecting printer operating mode ...62 Setting security using the Embedded Web Server (EWS 62 Notices...
......50 Calling for service ...50 Checking an unresponsive printer ...50 Printing multiple-language PDFs ...51 Solving printing problems ...51 Turning on Reduced Curl mode ...52 Solving option problems ...53 Solving service message issues ...54 Solving paper feed problems ...54 Solving print quality problems ...55 Cleaning the printhead lens ...59 Chapter 8: Administrative support 61 Disabling control panel menus ...61 Enabling control panel menus ...61 Restoring factory default settings ...62 Selecting printer operating mode ...62 Setting security using the Embedded Web Server (EWS 62 Notices...
User's Guide
Page 7
...Messages guide on the control panel and the menus and items available under each menu. Paper Menu Paper Source Paper Size Paper Type Custom Types Universal Setup Substitute Size Paper Texture Paper Weight Paper Loading Finishing Menu Duplex Duplex Bind Copies Blank Pages Collation Separator Sheets Separator Source Multipage Print Multipage Order Multipage View Multipage Border Utilities Menu Quick Demo Print Menus Print Stats Print Net Setup Print Fonts Print Demo Print Directory Factory Defaults Format Flash Defragment Flash Hex Trace Job Menu Reset Printer PostScript Menu Print PS Error...
...Messages guide on the control panel and the menus and items available under each menu. Paper Menu Paper Source Paper Size Paper Type Custom Types Universal Setup Substitute Size Paper Texture Paper Weight Paper Loading Finishing Menu Duplex Duplex Bind Copies Blank Pages Collation Separator Sheets Separator Source Multipage Print Multipage Order Multipage View Multipage Border Utilities Menu Quick Demo Print Menus Print Stats Print Net Setup Print Fonts Print Demo Print Directory Factory Defaults Format Flash Defragment Flash Hex Trace Job Menu Reset Printer PostScript Menu Print PS Error...
User's Guide
Page 15
... use in laser printers. • Set the Paper Source in the Paper menu based on the source in use, set the Paper Type to Envelope, and select the correct envelope size from the control panel, the printer driver, or from MarkVision Professional. • For best performance, use label sheets with paper or transparencies in the same source; Labels The printer can cause feeding problems. • Do not use envelopes made from MarkVision Professional. • Do not load...
... use in laser printers. • Set the Paper Source in the Paper menu based on the source in use, set the Paper Type to Envelope, and select the correct envelope size from the control panel, the printer driver, or from MarkVision Professional. • For best performance, use label sheets with paper or transparencies in the same source; Labels The printer can cause feeding problems. • Do not use envelopes made from MarkVision Professional. • Do not load...
User's Guide
Page 16
... the control panel, the printer driver, or from the Manual Feeder. • Set the Paper Type menu item in a temperature range of 18 to 24°C (65 to 75°F) with a relative humidity of grain short card stock is not possible, remove a 3 mm (0.125 in.) strip on card stock: • Cardstock can significantly affect the print quality and cause print media handling or jamming problems. • Avoid using with...
... the control panel, the printer driver, or from the Manual Feeder. • Set the Paper Type menu item in a temperature range of 18 to 24°C (65 to 75°F) with a relative humidity of grain short card stock is not possible, remove a 3 mm (0.125 in.) strip on card stock: • Cardstock can significantly affect the print quality and cause print media handling or jamming problems. • Avoid using with...
User's Guide
Page 23
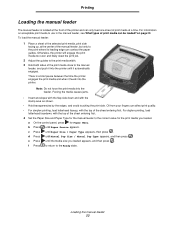
... paper guides. Note: Do not force the print media into the printer. b Press until Paper Size / Paper Type appears, then press . c Press until Paper Source appears. Loading the manual feeder 23 Forcing the media causes jams. • Insert envelopes with the flap side down and with the top of the sheet entering first. 4 Set the Paper Size and Paper Type for the manual feeder to the correct value for Paper Menu. a On the control panel, press for the print media you loaded...
... paper guides. Note: Do not force the print media into the printer. b Press until Paper Size / Paper Type appears, then press . c Press until Paper Source appears. Loading the manual feeder 23 Forcing the media causes jams. • Insert envelopes with the flap side down and with the top of the sheet entering first. 4 Set the Paper Size and Paper Type for the manual feeder to the correct value for Paper Menu. a On the control panel, press for the print media you loaded...
User's Guide
Page 24
..., or Setup to adjust printer settings that lets your computer communicate with your operating system. Once the trays you selected are loaded with a feature in the dialog. To disable tray linking, set the paper type or size: a On the control panel, press for the specific job you can then select the appropriate settings for Paper Menu. Updated drivers, as well as the pages you want to print or the number of the available printer settings you are...
..., or Setup to adjust printer settings that lets your computer communicate with your operating system. Once the trays you selected are loaded with a feature in the dialog. To disable tray linking, set the paper type or size: a On the control panel, press for the specific job you can then select the appropriate settings for Paper Menu. Updated drivers, as well as the pages you want to print or the number of the available printer settings you are...
User's Guide
Page 26
The indicator light flashes, and the printer prints the pages. Canceling a job from a Macintosh computer running Mac OS X 1 Open Applications à Utilities, and then double-click Print Center or Printer Setup. 2 Double-click the printer you are printing to. 3 In the printer window, select the print job you want to cancel. 3 Click the trash can print a menu settings page to review the default printer settings and to verify printer options are installed correctly. 1 Make sure the printer is on your selected printer appears...
The indicator light flashes, and the printer prints the pages. Canceling a job from a Macintosh computer running Mac OS X 1 Open Applications à Utilities, and then double-click Print Center or Printer Setup. 2 Double-click the printer you are printing to. 3 In the printer window, select the print job you want to cancel. 3 Click the trash can print a menu settings page to review the default printer settings and to verify printer options are installed correctly. 1 Make sure the printer is on your selected printer appears...
User's Guide
Page 34
..., you have installed a printer driver, return here to complete these instructions. 1 Click Start à Settings à Printers. 2 Select the printer icon. 3 Click File à Properties. 4 Click the Install Options tab. 5 Add the appropriate options to your configuration: Memory Card-Increase the printer memory to 550 sheets. 6 Click OK. Flash Memory Card-Increase the printer flash memory to the desired number (maximum of 32 MB). 250-sheet drawer or 550-sheet drawer-Increase printing capacity by 250...
..., you have installed a printer driver, return here to complete these instructions. 1 Click Start à Settings à Printers. 2 Select the printer icon. 3 Click File à Properties. 4 Click the Install Options tab. 5 Add the appropriate options to your configuration: Memory Card-Increase the printer memory to 550 sheets. 6 Click OK. Flash Memory Card-Increase the printer flash memory to the desired number (maximum of 32 MB). 250-sheet drawer or 550-sheet drawer-Increase printing capacity by 250...
User's Guide
Page 35
... or on the display let you conserve toner and paper. Refer printing problems and maintenance tasks to 32 pages on one side of print media. In other countries or regions, visit the Lexmark Web site at 1-800-539-6275 for your area. Causes the printer to maintain optimum print quality. Duplex printing lets you adjust the level of toner released on a sheet of a sheet. 5 Maintaining the printer Periodically, you need to complete certain...
... or on the display let you conserve toner and paper. Refer printing problems and maintenance tasks to 32 pages on one side of print media. In other countries or regions, visit the Lexmark Web site at 1-800-539-6275 for your area. Causes the printer to maintain optimum print quality. Duplex printing lets you adjust the level of toner released on a sheet of a sheet. 5 Maintaining the printer Periodically, you need to complete certain...
User's Guide
Page 39
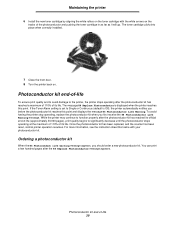
... message 84 Replace Photoconductor is set to significantly decrease until the photoconductor stops operating at the maximum of 110% of its life. You can print a few hundred pages after the photoconductor kit has reached its official end-of its life. Maintaining the printer 6 Install the new toner cartridge by aligning the white rollers on the toner cartridge with your photoconductor kit. For more information, see the instruction sheet...
... message 84 Replace Photoconductor is set to significantly decrease until the photoconductor stops operating at the maximum of 110% of its life. You can print a few hundred pages after the photoconductor kit has reached its official end-of its life. Maintaining the printer 6 Install the new toner cartridge by aligning the white rollers on the toner cartridge with your photoconductor kit. For more information, see the instruction sheet...
User's Guide
Page 51
... set to Set Page Protect to Off from the Setup Menu. Job takes longer than The job is blank or failed. The printer Operating Set the Operating Mode to the Ready state. Make sure the Paper Size and Paper Type specified in the printer driver match the paper size and type in Adobe Reader. 2 Click the printer icon. Solving printing problems Symptom Cause Solution The control panel The printer self test display is too expected to a file. • If you are using a USB Direct interface, make...
... set to Set Page Protect to Off from the Setup Menu. Job takes longer than The job is blank or failed. The printer Operating Set the Operating Mode to the Ready state. Make sure the Paper Size and Paper Type specified in the printer driver match the paper size and type in Adobe Reader. 2 Click the printer icon. Solving printing problems Symptom Cause Solution The control panel The printer self test display is too expected to a file. • If you are using a USB Direct interface, make...
User's Guide
Page 52
... images, and the number of the display. 4 Press until Reduced Curl appears, and then press . The printer does not Add printer memory. The job has timed out. The print media has been in the Finishing Menu. The print job has too many pages for the standard parallel port. If the paper still curls, select the Reduced Curl setting from the Setup Menu. Unexpected page breaks occur. The paper is in Reduced Curl mode. 1 Turn...
... images, and the number of the display. 4 Press until Reduced Curl appears, and then press . The printer does not Add printer memory. The job has timed out. The print media has been in the Finishing Menu. The print job has too many pages for the standard parallel port. If the paper still curls, select the Reduced Curl setting from the Setup Menu. Unexpected page breaks occur. The paper is in Reduced Curl mode. 1 Turn...
User's Guide
Page 54
... and Messages Guide. Blank pages feed into the output bin. Troubleshooting Solving service message issues Problem Service messages Solution A service message indicates printer failure that can help prevent jams from a fresh package. • Store paper in the Setup menu Set Jam Recovery to Auto or On. Solving paper feed problems Symptom Cause Solution Paper frequently jams. You are positioned correctly for your print job, or change the Paper Type to high humidity. • Load paper from occurring, see Avoiding jams on page17. Use recommended print media. See the Card...
... and Messages Guide. Blank pages feed into the output bin. Troubleshooting Solving service message issues Problem Service messages Solution A service message indicates printer failure that can help prevent jams from a fresh package. • Store paper in the Setup menu Set Jam Recovery to Auto or On. Solving paper feed problems Symptom Cause Solution Paper frequently jams. You are positioned correctly for your print job, or change the Paper Type to high humidity. • Load paper from occurring, see Avoiding jams on page17. Use recommended print media. See the Card...
User's Guide
Page 55
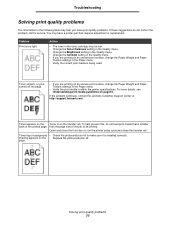
... too light. page. Troubleshooting Solving print quality problems The information in the following table may help prevent this, do not correct the problem, call for service. For more details, see Understanding print media guidelines on an uneven print surface, change the Paper Weight and Paper Texture settings in the Paper menu. • Verify the correct print media is being used. If the problem continues, contact the Lexmark Customer Support Center at http://support.lexmark.com . Open...
... too light. page. Troubleshooting Solving print quality problems The information in the following table may help prevent this, do not correct the problem, call for service. For more details, see Understanding print media guidelines on an uneven print surface, change the Paper Weight and Paper Texture settings in the Paper menu. • Verify the correct print media is being used. If the problem continues, contact the Lexmark Customer Support Center at http://support.lexmark.com . Open...
User's Guide
Page 56
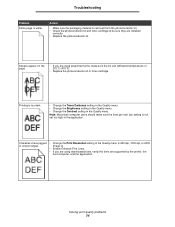
... computer users should make sure the ink can withstand temperatures of 210°C (410°F). • Replace the photoconductor kit or toner cartridge. Solving print quality problems 56 Troubleshooting Problem Entire page is removed from the photoconductor kit. • Check the photoconductor kit and toner cartridge to 600 dpi, 1200 dpi, or 2400 Image Q. • Enable Enhance Fine Lines. • If you are using downloaded fonts, verify the fonts are supported...
... computer users should make sure the ink can withstand temperatures of 210°C (410°F). • Replace the photoconductor kit or toner cartridge. Solving print quality problems 56 Troubleshooting Problem Entire page is removed from the photoconductor kit. • Check the photoconductor kit and toner cartridge to 600 dpi, 1200 dpi, or 2400 Image Q. • Enable Enhance Fine Lines. • If you are using downloaded fonts, verify the fonts are supported...
User's Guide
Page 57
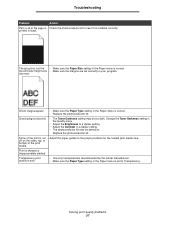
... images appear. • Make sure the Paper Type setting in the Quality menu. • Adjust the Brightness to a darker setting. • Adjust the Contrast to the proper positions for the loaded print media size. Solving print quality problems 57 Some of the print is set correctly in black. Transparency print quality is poor. • Use only transparencies recommended by the printer manufacturer. • Make sure the Paper Type setting in the Paper menu is installed correctly. top and side...
... images appear. • Make sure the Paper Type setting in the Quality menu. • Adjust the Brightness to a darker setting. • Adjust the Contrast to the proper positions for the loaded print media size. Solving print quality problems 57 Some of the print is set correctly in black. Transparency print quality is poor. • Use only transparencies recommended by the printer manufacturer. • Make sure the Paper Type setting in the Paper menu is installed correctly. top and side...
User's Guide
Page 69
... used with Lexmark user's guides, manuals, instructions or guidance • Unsuitable physical or operating environment • Maintenance by anyone other than Lexmark or a Lexmark authorized servicer • Operation of a product beyond repair, or if the product is set forth i n the following paragraph. For further explanation of liability will be available for a fee. NO WARRANTIES, EXPRESS OR IMPLIED, WILL APPLY AFTER THIS PERIOD. ALL INFORMATION, SPECIFICATIONS...
... used with Lexmark user's guides, manuals, instructions or guidance • Unsuitable physical or operating environment • Maintenance by anyone other than Lexmark or a Lexmark authorized servicer • Operation of a product beyond repair, or if the product is set forth i n the following paragraph. For further explanation of liability will be available for a fee. NO WARRANTIES, EXPRESS OR IMPLIED, WILL APPLY AFTER THIS PERIOD. ALL INFORMATION, SPECIFICATIONS...

User's Guide
Page 72
... types 11 unsatisfactory types 12 paper guide 19 paper support 5 paper tray adjustment 19 photoconductor kit changing 40 end-of-life 39 ordering 39 recycling 42 preprinted forms 13 print cartridge See toner cartridge print media jams avoiding 17 print media specifications 11 printer settings 7 printhead lens, cleaning 59 printing 18 problems control panel 51 blank 51 displays black diamonds 51 incorrect characters print 52 job didn't print 51 job prints 51 from wrong tray 51 on wrong paper or specialty media 51 large jobs do not collate 52 paper feed blank pages in output...
... types 11 unsatisfactory types 12 paper guide 19 paper support 5 paper tray adjustment 19 photoconductor kit changing 40 end-of-life 39 ordering 39 recycling 42 preprinted forms 13 print cartridge See toner cartridge print media jams avoiding 17 print media specifications 11 printer settings 7 printhead lens, cleaning 59 printing 18 problems control panel 51 blank 51 displays black diamonds 51 incorrect characters print 52 job didn't print 51 job prints 51 from wrong tray 51 on wrong paper or specialty media 51 large jobs do not collate 52 paper feed blank pages in output...


