User Manual
Page 3
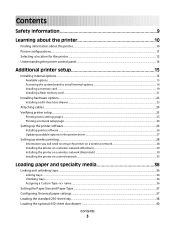
... duo drawer ...23 Attaching cables...24 Verifying printer setup...25 Printing menu settings pages ...25 Printing a network setup page ...26 Setting up the printer software...26 Installing printer software ...26 Updating available options in the printer driver...27 Setting up wireless printing...28 Information... you will need to set up the printer on a wireless network 28 Installing the printer on a wireless network (Windows 29 Installing the printer on a wireless network (Macintosh 30 Installing the printer on a wired network ...33 Loading paper and specialty media...
... duo drawer ...23 Attaching cables...24 Verifying printer setup...25 Printing menu settings pages ...25 Printing a network setup page ...26 Setting up the printer software...26 Installing printer software ...26 Updating available options in the printer driver...27 Setting up wireless printing...28 Information... you will need to set up the printer on a wireless network 28 Installing the printer on a wireless network (Windows 29 Installing the printer on a wireless network (Macintosh 30 Installing the printer on a wired network ...33 Loading paper and specialty media...
User Manual
Page 4
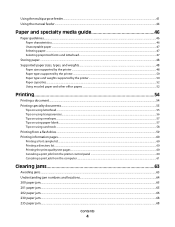
... Storing paper...48 Supported paper sizes, types, and weights...48 Paper sizes supported by the printer ...48 Paper types supported by the printer...50 Paper types and weights supported by the printer ...50 Paper capacities...52 Using recycled paper and other office papers ...52 Printing 54 Printing ...Printing a font sample list...60 Printing a directory list...60 Printing the print quality test pages ...60 Canceling a print job from the printer control panel ...60 Canceling a print job from the computer ...61 Clearing jams 63 Avoiding jams...63 Understanding jam numbers and locations...64 200...
... Storing paper...48 Supported paper sizes, types, and weights...48 Paper sizes supported by the printer ...48 Paper types supported by the printer...50 Paper types and weights supported by the printer ...50 Paper capacities...52 Using recycled paper and other office papers ...52 Printing 54 Printing ...Printing a font sample list...60 Printing a directory list...60 Printing the print quality test pages ...60 Canceling a print job from the printer control panel ...60 Canceling a print job from the computer ...61 Clearing jams 63 Avoiding jams...63 Understanding jam numbers and locations...64 200...
User Manual
Page 5
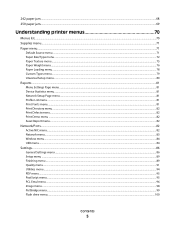
242 paper jam...68 250 paper jam...69 Understanding printer menus 70 Menus list...70 Supplies menu...71 Paper menu...71 Default Source menu...71 Paper Size/Type menu ...72 Paper Texture menu ...75 Paper ...
242 paper jam...68 250 paper jam...69 Understanding printer menus 70 Menus list...70 Supplies menu...71 Paper menu...71 Default Source menu...71 Paper Size/Type menu ...72 Paper Texture menu ...75 Paper ...
User Manual
Page 6
... kit ...123 Replacing a toner cartridge...128 Replacing a developer unit ...130 Cleaning the exterior of the printer...135 Recycling Lexmark products...136 Moving the printer...136 Before moving the printer...136 Moving the printer to another location...136 Shipping the printer ...136 Administrative support 137 Restoring the factory default settings...137 Adjusting Power Saver...137 Using the...
... kit ...123 Replacing a toner cartridge...128 Replacing a developer unit ...130 Cleaning the exterior of the printer...135 Recycling Lexmark products...136 Moving the printer...136 Before moving the printer...136 Moving the printer to another location...136 Shipping the printer ...136 Administrative support 137 Restoring the factory default settings...137 Adjusting Power Saver...137 Using the...

User Manual
Page 9
... uses a printing process that heats the print media, and the heat may not always be hot. To reduce the risk of the printer to lift it . If you are properly installed in their marked plug-in your operating instructions that discusses the guidelines for signs of harmful...of other than those specified herein may result in the user documentation, to a professional service person. CAUTION-HOT SURFACE: The inside of the printer, unplug the power cord from the wall outlet and disconnect all external connections (such as Ethernet and telephone system connections) are accessing the ...
... uses a printing process that heats the print media, and the heat may not always be hot. To reduce the risk of the printer to lift it . If you are properly installed in their marked plug-in your operating instructions that discusses the guidelines for signs of harmful...of other than those specified herein may result in the user documentation, to a professional service person. CAUTION-HOT SURFACE: The inside of the printer, unplug the power cord from the wall outlet and disconnect all external connections (such as Ethernet and telephone system connections) are accessing the ...
User Manual
Page 10
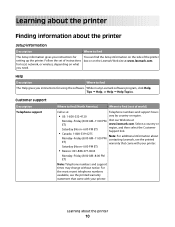
...• Canada: 1-800-539-6275 Note: For additional information about the printer 10 Learning about Monday-Friday (8:00 AM-11:00 PM contacting Lexmark, see the printed warranty statement that came with your printer. While in any Lexmark software program, click Help, Tips Œ Help, or Help Œ...; Help Topics. For the most recent telephone numbers available, see the printed ET) warranty that came with your printer. Follow the set of world)...
...• Canada: 1-800-539-6275 Note: For additional information about the printer 10 Learning about Monday-Friday (8:00 AM-11:00 PM contacting Lexmark, see the printed warranty statement that came with your printer. While in any Lexmark software program, click Help, Tips Œ Help, or Help Œ...; Help Topics. For the most recent telephone numbers available, see the printed ET) warranty that came with your printer. Follow the set of world)...
User Manual
Page 11
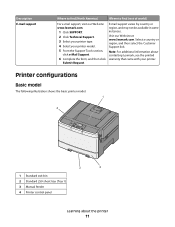
.... 1 Click SUPPORT. 2 Click Technical Support. 3 Select your printer type. 4 Select your printer. Printer configurations Basic model The following illustration shows the basic printer model: 1 4 3 2 1 Standard exit bin 2 Standard 250-sheet tray (Tray 1) 3 Manual feeder 4 Printer control panel Learning about contacting Lexmark, see the printed warranty that came with your printer model. 5 From the Support Tools section, click...
.... 1 Click SUPPORT. 2 Click Technical Support. 3 Select your printer type. 4 Select your printer. Printer configurations Basic model The following illustration shows the basic printer model: 1 4 3 2 1 Standard exit bin 2 Standard 250-sheet tray (Tray 1) 3 Manual feeder 4 Printer control panel Learning about contacting Lexmark, see the printed warranty that came with your printer model. 5 From the Support Tools section, click...
User Manual
Page 12
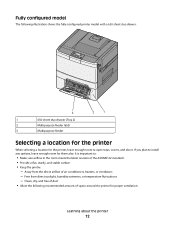
Free from the direct airflow of the ASHRAE 62 standard. • Provide a flat, sturdy, and stable surface. • Keep the printer: - If you plan to : • Make sure airflow in the room meets the latest revision of air conditioners, heaters, or ventilators - Clean..., dry, and free of dust • Allow the following illustration shows the fully configured printer model with a 650-sheet duo drawer: 3 2 1 1 650-sheet duo drawer (Tray 2) 2 Multipurpose feeder latch 3 Multipurpose feeder Selecting a location for the...
Free from the direct airflow of the ASHRAE 62 standard. • Provide a flat, sturdy, and stable surface. • Keep the printer: - If you plan to : • Make sure airflow in the room meets the latest revision of air conditioners, heaters, or ventilators - Clean..., dry, and free of dust • Allow the following illustration shows the fully configured printer model with a 650-sheet duo drawer: 3 2 1 1 650-sheet duo drawer (Tray 2) 2 Multipurpose feeder latch 3 Multipurpose feeder Selecting a location for the...
User Manual
Page 13
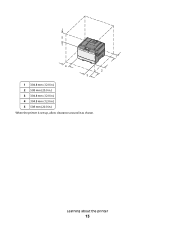
5 1 4 2 3 1 304.8 mm (12.0 in.) 2 508 mm (20.0 in.) 3 304.8 mm (12.0 in.) 4 304.8 mm (12.0 in.) 5 508 mm (20.0 in.) When the printer is set up, allow clearance around it as shown. Learning about the printer 13
5 1 4 2 3 1 304.8 mm (12.0 in.) 2 508 mm (20.0 in.) 3 304.8 mm (12.0 in.) 4 304.8 mm (12.0 in.) 5 508 mm (20.0 in.) When the printer is set up, allow clearance around it as shown. Learning about the printer 13
User Manual
Page 14
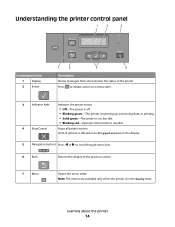
... to the previous screen 7 Menu Opens the menu index Note: The menus are available only when the printer is needed. Understanding the printer control panel 1 2 3 Menus Back Stop Control panel item 1 Display 2 Select 7 6 5 4 Description Shows messages that communicate the status of ...action on a menu item. 3 Indicator light 4 Stop/Cancel Indicates the printer status: • Off-The power is off. • Blinking green-The printer is warming up, processing data, or printing. • Solid green-The printer is on, but idle. • Blinking red-Operator intervention is in the...
... to the previous screen 7 Menu Opens the menu index Note: The menus are available only when the printer is needed. Understanding the printer control panel 1 2 3 Menus Back Stop Control panel item 1 Display 2 Select 7 6 5 4 Description Shows messages that communicate the status of ...action on a menu item. 3 Indicator light 4 Stop/Cancel Indicates the printer status: • Off-The power is off. • Blinking green-The printer is warming up, processing data, or printing. • Solid green-The printer is on, but idle. • Blinking red-Operator intervention is in the...
User Manual
Page 15
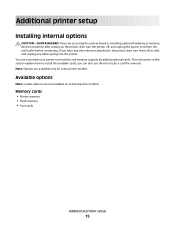
...Note: Certain options are available only for removal. Note: Options are not available on selected printer models. Memory cards • Printer memory • Flash memory • Font cards Additional printer setup 15 The instructions in this section explain how to install the available cards; If you... have any other devices attached to the printer, then turn the printer off as well, and unplug any cables going into the printer. Additional printer setup Installing internal options CAUTION-SHOCK HAZARD: If you are accessing the system board ...
...Note: Certain options are available only for removal. Note: Options are not available on selected printer models. Memory cards • Printer memory • Flash memory • Font cards Additional printer setup 15 The instructions in this section explain how to install the available cards; If you... have any other devices attached to the printer, then turn the printer off as well, and unplug any cables going into the printer. Additional printer setup Installing internal options CAUTION-SHOCK HAZARD: If you are accessing the system board ...
User Manual
Page 16
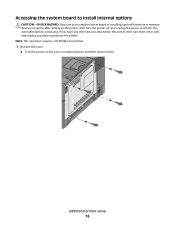
Accessing the system board to the printer, then turn the printer off as well, and unplug any cables going into the printer. Additional printer setup 16 Note: This operation requires a #2 Phillips screwdriver. 1 Remove the cover. If you have any other devices attached to install internal ...options CAUTION-SHOCK HAZARD: If you are accessing the system board or installing optional hardware or memory devices sometime after setting up the printer, then turn them . a Turn the screws on the cover counterclockwise, and then remove them off , and unplug the power cord from ...
Accessing the system board to the printer, then turn the printer off as well, and unplug any cables going into the printer. Additional printer setup 16 Note: This operation requires a #2 Phillips screwdriver. 1 Remove the cover. If you have any other devices attached to install internal ...options CAUTION-SHOCK HAZARD: If you are accessing the system board or installing optional hardware or memory devices sometime after setting up the printer, then turn them . a Turn the screws on the cover counterclockwise, and then remove them off , and unplug the power cord from ...
User Manual
Page 17
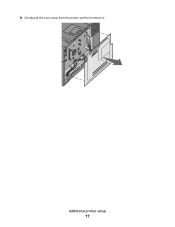
b Gently pull the cover away from the printer, and then remove it. Additional printer setup 17
b Gently pull the cover away from the printer, and then remove it. Additional printer setup 17
User Manual
Page 18
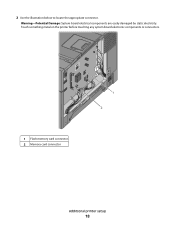
2 Use the illustration below to locate the appropriate connector. Warning-Potential Damage: System board electrical components are easily damaged by static electricity. Touch something metal on the printer before touching any system board electronic components or connectors. 1 Flash memory card connector 2 Memory card connector 1 2 Additional printer setup 18
2 Use the illustration below to locate the appropriate connector. Warning-Potential Damage: System board electrical components are easily damaged by static electricity. Touch something metal on the printer before touching any system board electronic components or connectors. 1 Flash memory card connector 2 Memory card connector 1 2 Additional printer setup 18
User Manual
Page 19
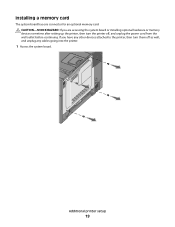
If you are accessing the system board or installing optional hardware or memory devices sometime after setting up the printer, then turn them off , and unplug the power cord from the wall outlet before continuing. Installing a memory card The system board has one connector for an optional memory card. CAUTION-SHOCK HAZARD: If you have any other devices attached to the printer, then turn the printer off as well, and unplug any cables going into the printer. 1 Access the system board. Additional printer setup 19
If you are accessing the system board or installing optional hardware or memory devices sometime after setting up the printer, then turn them off , and unplug the power cord from the wall outlet before continuing. Installing a memory card The system board has one connector for an optional memory card. CAUTION-SHOCK HAZARD: If you have any other devices attached to the printer, then turn the printer off as well, and unplug any cables going into the printer. 1 Access the system board. Additional printer setup 19

User Manual
Page 20
Make sure each latch fits over the notch located on the connector completely. 3 Unpack the memory card. 2 Open both latches on either side of the card. 4 Align the notches on the memory card with the ridges on the connector. 5 Push the memory card straight into the connector until it snaps into place. Note: Avoid touching the connection points along the edge of the memory card. 1 Notch 2 Latch 2 1 Additional printer setup 20
Make sure each latch fits over the notch located on the connector completely. 3 Unpack the memory card. 2 Open both latches on either side of the card. 4 Align the notches on the memory card with the ridges on the connector. 5 Push the memory card straight into the connector until it snaps into place. Note: Avoid touching the connection points along the edge of the memory card. 1 Notch 2 Latch 2 1 Additional printer setup 20
User Manual
Page 21
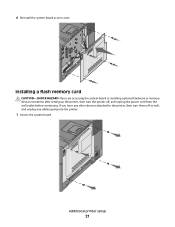
If you are accessing the system board or installing optional hardware or memory devices sometime after setting up the printer, then turn them off as well, and unplug any other devices attached to the printer, then turn the printer off, and unplug the power cord from the wall outlet before continuing. Additional printer setup 21 Installing a flash memory card CAUTION-SHOCK HAZARD: If you have any cables going into the printer. 1 Access the system board. 6 Reinstall the system board access cover.
If you are accessing the system board or installing optional hardware or memory devices sometime after setting up the printer, then turn them off as well, and unplug any other devices attached to the printer, then turn the printer off, and unplug the power cord from the wall outlet before continuing. Additional printer setup 21 Installing a flash memory card CAUTION-SHOCK HAZARD: If you have any cables going into the printer. 1 Access the system board. 6 Reinstall the system board access cover.
User Manual
Page 22
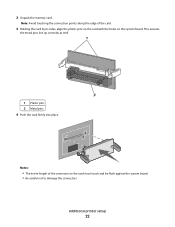
2 Unpack the memory card. Notes: • The entire length of the card. 3 Holding the card by its sides, align the plastic pins on the card with the holes on the card must touch and be flush against the system board. • Be careful not to damage the connectors. Note: Avoid touching the connection points along the edge of the connector on the system board. This ensures the metal pins line up correctly as well. 11 22 1 Plastic pins 2 Metal pins 4 Push the card firmly into place. Additional printer setup 22
2 Unpack the memory card. Notes: • The entire length of the card. 3 Holding the card by its sides, align the plastic pins on the card with the holes on the card must touch and be flush against the system board. • Be careful not to damage the connectors. Note: Avoid touching the connection points along the edge of the connector on the system board. This ensures the metal pins line up correctly as well. 11 22 1 Plastic pins 2 Metal pins 4 Push the card firmly into place. Additional printer setup 22
User Manual
Page 23
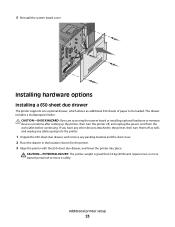
... any packing material and the dust cover. 2 Place the drawer in the location chosen for the printer. 3 Align the printer with the 650-sheet duo drawer, and lower the printer into place. If you are accessing the system board or installing optional hardware or memory devices sometime ...power cord from the wall outlet before continuing. The drawer includes a multipurpose feeder. 5 Reinstall the system board cover. CAUTION-POTENTIAL INJURY: The printer weight is great than 18 kg (40 lb) and requires two or more trained personnel to be loaded. Installing hardware options Installing a 650-...
... any packing material and the dust cover. 2 Place the drawer in the location chosen for the printer. 3 Align the printer with the 650-sheet duo drawer, and lower the printer into place. If you are accessing the system board or installing optional hardware or memory devices sometime ...power cord from the wall outlet before continuing. The drawer includes a multipurpose feeder. 5 Reinstall the system board cover. CAUTION-POTENTIAL INJURY: The printer weight is great than 18 kg (40 lb) and requires two or more trained personnel to be loaded. Installing hardware options Installing a 650-...
User Manual
Page 24
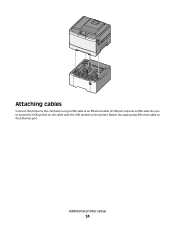
Additional printer setup 24 Attaching cables Connect the printer to the Ethernet port. Match the appropriate Ethernet cable to the computer using a USB cable or an Ethernet cable. A USB port requires a USB cable. Be sure to match the USB symbol on the cable with the USB symbol on the printer.
Additional printer setup 24 Attaching cables Connect the printer to the Ethernet port. Match the appropriate Ethernet cable to the computer using a USB cable or an Ethernet cable. A USB port requires a USB cable. Be sure to match the USB symbol on the cable with the USB symbol on the printer.


