Specification (English)
Page 2
LCD TV 47LH30 47" Full HD 1080p LCD TV (47.0" diagonal) LGusa.com LCD SPECIFICATION Screen Size 47" Class (47.0" diagonal) Native Display Resolution 1920 x 1080p Brightness (cd/m2) 500 Dynamic Contrast Ratio 50,... Channel) • Quick Setup Guide • e-Manual • Parental Control w/V-Chip • Key Lock • Closed Caption • LG SIMPLINK (HDMI CEC) • CONVENIENCE FEATURES Language English/Spanish/French/Korean Auto Tuning/Programming • Channel Add/Delete • Channel Labeling ...
LCD TV 47LH30 47" Full HD 1080p LCD TV (47.0" diagonal) LGusa.com LCD SPECIFICATION Screen Size 47" Class (47.0" diagonal) Native Display Resolution 1920 x 1080p Brightness (cd/m2) 500 Dynamic Contrast Ratio 50,... Channel) • Quick Setup Guide • e-Manual • Parental Control w/V-Chip • Key Lock • Closed Caption • LG SIMPLINK (HDMI CEC) • CONVENIENCE FEATURES Language English/Spanish/French/Korean Auto Tuning/Programming • Channel Add/Delete • Channel Labeling ...
Owner's Manual (English)
Page 4
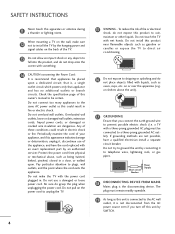
... on shelves above the unit). 17 GROUNDING Ensure that appliance and has no additional outlets or branch circuits. on the power cord to unplug the TV. 4 15 WARNING - Periodically examine the cord of your appliance, and if its appearance indicates damage or deterioration, unplug it, discontinue use a ...long as this product near flammable objects such as gasoline or candles or expose the TV to direct air conditioning. 16 Do not expose to dripping or splashing and do not drop onto the screen with the power cord plugged in fire or electric shock. Protect the power cord ...
... on shelves above the unit). 17 GROUNDING Ensure that appliance and has no additional outlets or branch circuits. on the power cord to unplug the TV. 4 15 WARNING - Periodically examine the cord of your appliance, and if its appearance indicates damage or deterioration, unplug it, discontinue use a ...long as this product near flammable objects such as gasoline or candles or expose the TV to direct air conditioning. 16 Do not expose to dripping or splashing and do not drop onto the screen with the power cord plugged in fire or electric shock. Protect the power cord ...
Owner's Manual (English)
Page 5
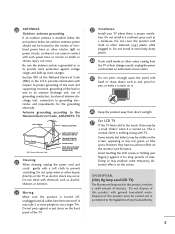
... with chemicals such as tiny red, green, or blue spots. Avoid touching the LCD screen or holding your TV where there is turned off, unplugged and all cables have no adverse effect on the screen. tortion effects on the monitor's performance. It may produce some protection against or ...put stress on the screen, appearing as alcohol, thinners or benzene. 22 Moving Make sure the product is proper ventilation. Disposal of this product contains a small amount of overhead power lines or other odors coming from direct sunlight. 27 For LCD TV If the TV feels cold to the ...
... with chemicals such as tiny red, green, or blue spots. Avoid touching the LCD screen or holding your TV where there is turned off, unplugged and all cables have no adverse effect on the screen. tortion effects on the monitor's performance. It may produce some protection against or ...put stress on the screen, appearing as alcohol, thinners or benzene. 22 Moving Make sure the product is proper ventilation. Disposal of this product contains a small amount of overhead power lines or other odors coming from direct sunlight. 27 For LCD TV If the TV feels cold to the ...
Owner's Manual (English)
Page 6
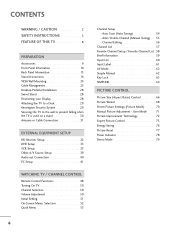
... 25 Desktop Pedestal Installation 28 Swivel Stand 28 Positioning your Display 28 Attaching the TV to a Desk 29 Kensington Security System 29 Securing the TV to the wall to prevent falling when the TV is used on a stand 30 Antenna or Cable Connection 31 EXTERNAL EQUIPMENT SETUP ... Setup 37 Other A/V Source Setup 39 Audio out Connection 40 PC Setup 41 WATCHING TV / CHANNEL CONTROL Remote Control Functions 48 Turning On TV 50 Channel Selection 50 Volume Adjustment 50 Initial Setting 51 On-Screen Menus Selection 52 Quick Menu 53 6 Channel Setup - Auto Scan (Auto Tuning 54...
... 25 Desktop Pedestal Installation 28 Swivel Stand 28 Positioning your Display 28 Attaching the TV to a Desk 29 Kensington Security System 29 Securing the TV to the wall to prevent falling when the TV is used on a stand 30 Antenna or Cable Connection 31 EXTERNAL EQUIPMENT SETUP ... Setup 37 Other A/V Source Setup 39 Audio out Connection 40 PC Setup 41 WATCHING TV / CHANNEL CONTROL Remote Control Functions 48 Turning On TV 50 Channel Selection 50 Volume Adjustment 50 Initial Setting 51 On-Screen Menus Selection 52 Quick Menu 53 6 Channel Setup - Auto Scan (Auto Tuning 54...
Owner's Manual (English)
Page 7
... Time Setting 95 Sleep Timer Setting 96 PARENTAL CONTROL / RATINGS Set Password & Lock System 97 Channel Blocking 100 Movie & TV Rating 101 Downloadable Rating 106 External Input Blocking 107 APPENDIX Troubleshooting 108 Maintenance 110 Product Specifications 111 IR Codes 115 External Control ...Source License 120 7 Digital Broadcasting System Captions 91 - User Mode 83 Balance 84 TV Speakers On/Off Setup 85 Audio Reset 86 Stereo/SAP Broadcasts Setup 87 Audio Language 88 On-Screen Menus Language Selection 89 Caption Mode - SOUND & LANGUAGE CONTROL Auto Volume Leveler (...
... Time Setting 95 Sleep Timer Setting 96 PARENTAL CONTROL / RATINGS Set Password & Lock System 97 Channel Blocking 100 Movie & TV Rating 101 Downloadable Rating 106 External Input Blocking 107 APPENDIX Troubleshooting 108 Maintenance 110 Product Specifications 111 IR Codes 115 External Control ...Source License 120 7 Digital Broadcasting System Captions 91 - User Mode 83 Balance 84 TV Speakers On/Off Setup 85 Audio Reset 86 Stereo/SAP Broadcasts Setup 87 Audio Language 88 On-Screen Menus Language Selection 89 Caption Mode - SOUND & LANGUAGE CONTROL Auto Volume Leveler (...
Owner's Manual (English)
Page 8
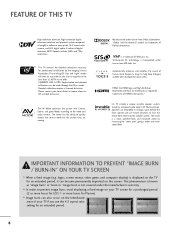
... technology is displayed on the TV for an extended period, it can also occur on the letterboxed areas of your TV screen for a prolonged period (2 or more hours for professional certification by renowned audio expert, Mr. Mark Levinson. LG TV include a unique invisible speaker ...system, tuned by the Imaging Science Foundation. This TV contains the detailed calibrations necessary for LCD, 1 or more pixels, 16:9 aspect-ratio screens, and AC3 digital audio. "Dolby "and the double...
... technology is displayed on the TV for an extended period, it can also occur on the letterboxed areas of your TV screen for a prolonged period (2 or more hours for professional certification by renowned audio expert, Mr. Mark Levinson. LG TV include a unique invisible speaker ...system, tuned by the Imaging Science Foundation. This TV contains the detailed calibrations necessary for LCD, 1 or more pixels, 16:9 aspect-ratio screens, and AC3 digital audio. "Dolby "and the double...
Owner's Manual (English)
Page 16
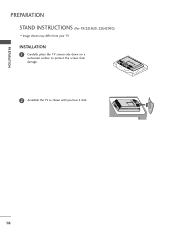
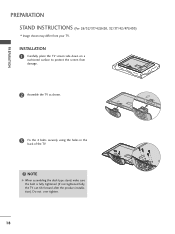
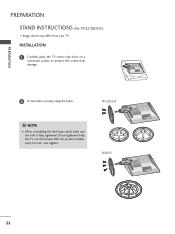
PREPARATION PREPARATION STAND INSTRUCTIONS (For 19/22LH20, 22LH200C) I Image shown may differ from damage. 2 Assemble the TV as shown until you hear it click. 16 INSTALLATION 1 Carefully place the TV screen side down on a cushioned surface to protect the screen from your TV.
PREPARATION PREPARATION STAND INSTRUCTIONS (For 19/22LH20, 22LH200C) I Image shown may differ from damage. 2 Assemble the TV as shown until you hear it click. 16 INSTALLATION 1 Carefully place the TV screen side down on a cushioned surface to protect the screen from your TV.
Owner's Manual (English)
Page 17
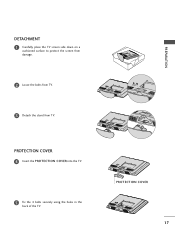
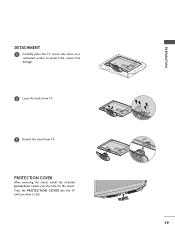
PROTECTION COVER 17 PREPARATION PROTECTION COVER 4 Insert the PROTECTION COVER into the TV. 5 Fix the 4 bolts securely using the holes in the back of the TV. DETACHMENT 1 Carefully place the TV screen side down on a cushioned surface to protect the screen from damage. 2 Loose the bolts from TV. 3 Detach the stand from TV.
PROTECTION COVER 17 PREPARATION PROTECTION COVER 4 Insert the PROTECTION COVER into the TV. 5 Fix the 4 bolts securely using the holes in the back of the TV. DETACHMENT 1 Carefully place the TV screen side down on a cushioned surface to protect the screen from damage. 2 Loose the bolts from TV. 3 Detach the stand from TV.
Owner's Manual (English)
Page 18
Do not over tighten. 18 INSTALLATION 1 Carefully place the TV screen side down on a cushioned surface to protect the screen from your TV. PREPARATION PREPARATION STAND INSTRUCTIONS (For 26/32/37/42LH20, 32/37/42/47LH30) I Image shown may differ from damage. 2 Assemble the TV as shown. 3 Fix the 4 bolts securely using the holes in the back of the TV. ! NOTE G When assembling the desk type stand, make sure the bolt is fully tightened (If not tightened fully, the TV can tilt forward after the product installation).
Do not over tighten. 18 INSTALLATION 1 Carefully place the TV screen side down on a cushioned surface to protect the screen from your TV. PREPARATION PREPARATION STAND INSTRUCTIONS (For 26/32/37/42LH20, 32/37/42/47LH30) I Image shown may differ from damage. 2 Assemble the TV as shown. 3 Fix the 4 bolts securely using the holes in the back of the TV. ! NOTE G When assembling the desk type stand, make sure the bolt is fully tightened (If not tightened fully, the TV can tilt forward after the product installation).
Owner's Manual (English)
Page 19
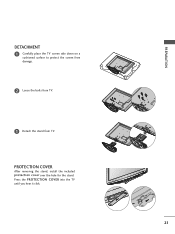
PREPARATION DETACHMENT 1 Carefully place the TV screen side down on a cushioned surface to protect the screen from damage. 2 Loose the bolts from TV. 3 Detach the stand from TV. PROTECTION COVER After removing the stand, install the included protection cover over the hole for the stand. Press the PROTECTION COVER into the TV until you hear it click. 19
PREPARATION DETACHMENT 1 Carefully place the TV screen side down on a cushioned surface to protect the screen from damage. 2 Loose the bolts from TV. 3 Detach the stand from TV. PROTECTION COVER After removing the stand, install the included protection cover over the hole for the stand. Press the PROTECTION COVER into the TV until you hear it click. 19

Owner's Manual (English)
Page 20
... BODY COVER BASE 4 Fix the 4 bolts securely using the 4 screws supplied. 3 Assemble the TV as shown. And carefully place the TV screen side down on a cushioned surface to protect the screen from your TV has a protection tape attached, remove the tape. NOTE G When assembling the desk type stand, ...make sure the screws are fully tightened (If not tightened fully, the TV can tilt forward after...
... BODY COVER BASE 4 Fix the 4 bolts securely using the 4 screws supplied. 3 Assemble the TV as shown. And carefully place the TV screen side down on a cushioned surface to protect the screen from your TV has a protection tape attached, remove the tape. NOTE G When assembling the desk type stand, ...make sure the screws are fully tightened (If not tightened fully, the TV can tilt forward after...
Owner's Manual (English)
Page 21
Press the PROTECTION COVER into the TV until you hear it click. 21 PROTECTION COVER After removing the stand, install the included protection cover over the hole for the stand. PREPARATION DETACHMENT 1 Carefully place the TV screen side down on a cushioned surface to protect the screen from damage. 2 Loose the bolts from TV. 3 Detach the stand from TV.
Press the PROTECTION COVER into the TV until you hear it click. 21 PROTECTION COVER After removing the stand, install the included protection cover over the hole for the stand. PREPARATION DETACHMENT 1 Carefully place the TV screen side down on a cushioned surface to protect the screen from damage. 2 Loose the bolts from TV. 3 Detach the stand from TV.
Owner's Manual (English)
Page 22
Do not over tighten. 19" 22" 19/22LU55 19" 22" 26LU55 26" 22 INSTALLATION 1 Carefully place the TV screen side down on a cushioned surface to protect the screen from your TV. PREPARATION PREPARATION STAND INSTRUCTIONS (For 19/22/26LU55) I Image shown may differ from damage. 2 Fix the bolts securely using the holes. ! NOTE G When assembling the desk type stand, make sure the bolt is fully tightened (If not tightened fully, the TV can tilt forward after the product installation).
Do not over tighten. 19" 22" 19/22LU55 19" 22" 26LU55 26" 22 INSTALLATION 1 Carefully place the TV screen side down on a cushioned surface to protect the screen from your TV. PREPARATION PREPARATION STAND INSTRUCTIONS (For 19/22/26LU55) I Image shown may differ from damage. 2 Fix the bolts securely using the holes. ! NOTE G When assembling the desk type stand, make sure the bolt is fully tightened (If not tightened fully, the TV can tilt forward after the product installation).

Owner's Manual (English)
Page 23
And detach the COVER BASE from TV. PREPARATION DETACHMENT 1 Carefully place the TV screen side down on a cushioned surface to protect the screen from damage. 2 Loose the bolts and then detach the stand from TV. 19" 19/22LU55 19" 22" 22" 26LU55 26" 26" 3 Loose the bolts from TV. COVER BASE 4 Detach the STAND BODY from TV. 19/22LU55 26LU55 STAND BODY 23
And detach the COVER BASE from TV. PREPARATION DETACHMENT 1 Carefully place the TV screen side down on a cushioned surface to protect the screen from damage. 2 Loose the bolts and then detach the stand from TV. 19" 19/22LU55 19" 22" 22" 26LU55 26" 26" 3 Loose the bolts from TV. COVER BASE 4 Detach the STAND BODY from TV. 19/22LU55 26LU55 STAND BODY 23
Owner's Manual (English)
Page 33
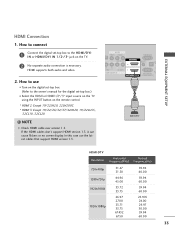
...Refer to the HDMI/DVI I Select the HDMI or HDMI1/2*/3* input source on the TV using the INPUT button on the TV. 2 No separate audio connection is necessary. How to use the latest cables that...HDMI OUTPUT HDMI-DTV Resolution Horizontal Vertical Frequency(KHz) Frequency(Hz) 720x480p 1280x720p 1920x1080i 1920x1080p 31.47 31.50 44.96 45.00 33.72 33.75 26.97 27.00 33.71 33...HDMI cable over version 1.3. If the HDMI cables don't support HDMI version 1.3, it can cause flickers or no screen display. HDMI supports both audio and video. 2. In this case use I Turn on the digital set -top...
...Refer to the HDMI/DVI I Select the HDMI or HDMI1/2*/3* input source on the TV using the INPUT button on the TV. 2 No separate audio connection is necessary. How to use the latest cables that...HDMI OUTPUT HDMI-DTV Resolution Horizontal Vertical Frequency(KHz) Frequency(Hz) 720x480p 1280x720p 1920x1080i 1920x1080p 31.47 31.50 44.96 45.00 33.72 33.75 26.97 27.00 33.71 33...HDMI cable over version 1.3. If the HDMI cables don't support HDMI version 1.3, it can cause flickers or no screen display. HDMI supports both audio and video. 2. In this case use I Turn on the digital set -top...
Owner's Manual (English)
Page 36
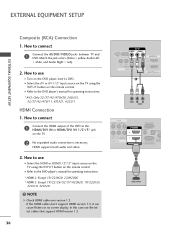
... or AV1/2* input source on the TV using the INPUT button on the DVD player, insert a DVD. How to use I Turn on the remote control. HDMI supports both audio and video. 2. If the HDMI cables don't support HDMI version 1.3, it can cause flickers or no screen display. How to the HDMI/DVI... 19/22/26/32/37/42LH20, 19/22LU55, 32CL10, 32CL20 ! I Refer to the DVD player's manual for operating instructions. * AV2: Only 32/37/42/47LH30, 26LU55, 32/37/42/47LF11, 47LF21, 42CL11 HDMI Connection 1. NOTE G Check HDMI cable over version 1.3. I Select the HDMI or HDMI1 / 2*/ 3* input source on ...
... or AV1/2* input source on the TV using the INPUT button on the DVD player, insert a DVD. How to use I Turn on the remote control. HDMI supports both audio and video. 2. If the HDMI cables don't support HDMI version 1.3, it can cause flickers or no screen display. How to the HDMI/DVI... 19/22/26/32/37/42LH20, 19/22LU55, 32CL10, 32CL20 ! I Refer to the DVD player's manual for operating instructions. * AV2: Only 32/37/42/47LH30, 26LU55, 32/37/42/47LF11, 47LF21, 42CL11 HDMI Connection 1. NOTE G Check HDMI cable over version 1.3. I Select the HDMI or HDMI1 / 2*/ 3* input source on ...
Owner's Manual (English)
Page 42
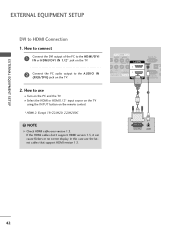
... the PC audio output to HDMI Connection 1. EXTERNAL EQUIPMENT SETUP EXTERNAL EQUIPMENT SETUP DVI to the AUDIO IN (RGB/DVI) jack on the TV. 2. NOTE G Check HDMI cable over version 1.3. In this case use I N or HDMI/DVI IN 1/2* jack on the remote control. * HDMI 2: Except 19/22LH20, 22LH200C ! ... connect 1 Connect the DVI output of the PC to the HDMI/DVI I Turn on the PC and the TV. If the HDMI cables don't support HDMI version 1.3, it can cause flickers or no screen display. AV IN VIDEO AUDIO L(MONO) R 2 DEO L R AUDIO 1 OMPONENT IN RGB IN (PC) AUDIO IN (RGB/DVI) ...
... the PC audio output to HDMI Connection 1. EXTERNAL EQUIPMENT SETUP EXTERNAL EQUIPMENT SETUP DVI to the AUDIO IN (RGB/DVI) jack on the TV. 2. NOTE G Check HDMI cable over version 1.3. In this case use I N or HDMI/DVI IN 1/2* jack on the remote control. * HDMI 2: Except 19/22LH20, 22LH200C ! ... connect 1 Connect the DVI output of the PC to the HDMI/DVI I Turn on the PC and the TV. If the HDMI cables don't support HDMI version 1.3, it can cause flickers or no screen display. AV IN VIDEO AUDIO L(MONO) R 2 DEO L R AUDIO 1 OMPONENT IN RGB IN (PC) AUDIO IN (RGB/DVI) ...
Owner's Manual (English)
Page 43
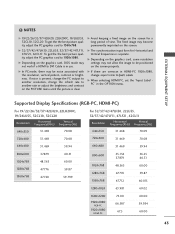
...31.469 59.94 800x600 1024x768 1280x768 1360x768 37.879 48.363 47.776 47.720 60.31 60.00 59.87 59.799 800x600 1024x768 1280x768 1360x768 35.156 37.... the picture is present, change the PC output to another rate or adjust the brightness and contrast on the screen properly. G When selecting HDMI-PC, set the "Input Label PC" in HDMI-PC 1920x1080, change the refresh... rate to 1920x1080. EXTERNAL EQUIPMENT SETUP ! G 32/37/42/47LH30, 22LU55, 32/37/42/47LF11, 47LF21, 42CL11: To get the the best picture quality, adjust the PC graphics ...
...31.469 59.94 800x600 1024x768 1280x768 1360x768 37.879 48.363 47.776 47.720 60.31 60.00 59.87 59.799 800x600 1024x768 1280x768 1360x768 35.156 37.... the picture is present, change the PC output to another rate or adjust the brightness and contrast on the screen properly. G When selecting HDMI-PC, set the "Input Label PC" in HDMI-PC 1920x1080, change the refresh... rate to 1920x1080. EXTERNAL EQUIPMENT SETUP ! G 32/37/42/47LH30, 22LU55, 32/37/42/47LF11, 47LF21, 42CL11: To get the the best picture quality, adjust the PC graphics ...
Owner's Manual (English)
Page 44
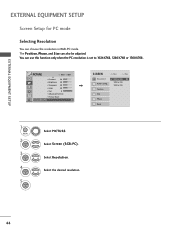
The Position, Phase, and Size can use this function only when the PC resolution is set to 1024X768, 1280X768 or 1360X768. Select Screen (RGB-PC). Select Resolution. You can also be adjusted. Position Size Phase Reset Move Prev. 1024 x 768 1280 x 768 1360 x 768 1 MENU 2... ENTER 3 ENTER 4 ENTER 5 ENTER Select PICTURE. EXTERNAL EQUIPMENT SETUP EXTERNAL EQUIPMENT SETUP Screen Setup for PC mode Selecting Resolution You can choose the resolution in RGB-PC mode. PICTURE Move Enter E • Contrast 50 • Brightness 50 •...
The Position, Phase, and Size can use this function only when the PC resolution is set to 1024X768, 1280X768 or 1360X768. Select Screen (RGB-PC). Select Resolution. You can also be adjusted. Position Size Phase Reset Move Prev. 1024 x 768 1280 x 768 1360 x 768 1 MENU 2... ENTER 3 ENTER 4 ENTER 5 ENTER Select PICTURE. EXTERNAL EQUIPMENT SETUP EXTERNAL EQUIPMENT SETUP Screen Setup for PC mode Selecting Resolution You can choose the resolution in RGB-PC mode. PICTURE Move Enter E • Contrast 50 • Brightness 50 •...
Owner's Manual (English)
Page 45
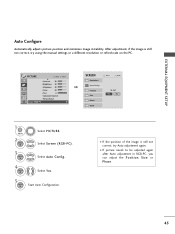
I If the position of the image is still not correct, try Auto adjustment again. Select Screen (RGB-PC). After adjustment, if the image is still not correct, try using the manual settings or a different resolution or refresh rate ...PICTURE Move Enter E • Contrast 50 • Brightness 50 • Sharpness 50 • Color 50 • Tint 0R G • Advanced Control • Picture Reset Screen (RGB-PC) SCREEN Resolution Auto Config. I If picture needs to be adjusted again after Auto adjustment in RGB-PC, you can adjust the Position, S i z e or P h a s ...
I If the position of the image is still not correct, try Auto adjustment again. Select Screen (RGB-PC). After adjustment, if the image is still not correct, try using the manual settings or a different resolution or refresh rate ...PICTURE Move Enter E • Contrast 50 • Brightness 50 • Sharpness 50 • Color 50 • Tint 0R G • Advanced Control • Picture Reset Screen (RGB-PC) SCREEN Resolution Auto Config. I If picture needs to be adjusted again after Auto adjustment in RGB-PC, you can adjust the Position, S i z e or P h a s ...


