

Owner's Manual
Page 3
... TMVODE MACTHIMINEE LIVE TV EEP 8 6 OK EXIT 0 9 SITION Q.VIEW INDEX REVEAL ? 1 4 VOL MARFKAV/ MUTE PR 2 SHTIFIMTE 7 SLEEP 5 8 3 6 SIZE 0 TIME POSITION HOLD INDEX REVEAL ? 9 Q.VIEW Batteries Remote Control Plasma TV models This feature is not available for all models. 32", 37" only Cable management Twists holder Arrange the cables with the twists...
... TMVODE MACTHIMINEE LIVE TV EEP 8 6 OK EXIT 0 9 SITION Q.VIEW INDEX REVEAL ? 1 4 VOL MARFKAV/ MUTE PR 2 SHTIFIMTE 7 SLEEP 5 8 3 6 SIZE 0 TIME POSITION HOLD INDEX REVEAL ? 9 Q.VIEW Batteries Remote Control Plasma TV models This feature is not available for all models. 32", 37" only Cable management Twists holder Arrange the cables with the twists...

Owner's Manual
Page 4
... Menu 4 Front Panel Controls 5 Back Panel Information 7 Stand Installation 9 Attaching the TV to a Wall 10 Back Cover for PC Mode 30 WATCHING TV / PROGRAMME CONTROL Remote Control Key Functions 34 Turning on the TV 36 Programme Selection 36 Volume Adjustment 36 On Screen Menus Selection and Adjustment ......37 Auto Programme Tuning...
... Menu 4 Front Panel Controls 5 Back Panel Information 7 Stand Installation 9 Attaching the TV to a Wall 10 Back Cover for PC Mode 30 WATCHING TV / PROGRAMME CONTROL Remote Control Key Functions 34 Turning on the TV 36 Programme Selection 36 Volume Adjustment 36 On Screen Menus Selection and Adjustment ......37 Auto Programme Tuning...
Owner's Manual
Page 5
... - Picture Mode-Preset 81 - Speaker Sound Output Selection 98 On-Screen Menu Language Selection 99 APPENDIX Troubleshooting 107 Maintenance 109 Product Specifications 110 Programming the Remote Control 112 IR Codes 114 External Control Device Setup 116 3 NICAM Reception 98 - Auto Colour Temperature Control(Warm/Medium/Cool) ..82 Manual Picture Adjustment - User...
... - Picture Mode-Preset 81 - Speaker Sound Output Selection 98 On-Screen Menu Language Selection 99 APPENDIX Troubleshooting 107 Maintenance 109 Product Specifications 110 Programming the Remote Control 112 IR Codes 114 External Control Device Setup 116 3 NICAM Reception 98 - Auto Colour Temperature Control(Warm/Medium/Cool) ..82 Manual Picture Adjustment - User...

Owner's Manual
Page 7
I This is switched off during recording. Plasma TV Models Remote Control Sensor INPUT MENU OK VOL PR INPUT MENU INPUT MENU OK VOL OK PR Power/Standby Indicator • illuminates red in standby mode. • ...
I This is switched off during recording. Plasma TV Models Remote Control Sensor INPUT MENU OK VOL PR INPUT MENU INPUT MENU OK VOL OK PR Power/Standby Indicator • illuminates red in standby mode. • ...

Owner's Manual
Page 8
PR VOL OK MENU INPUT /I Remote Control Sensor Power/Standby Indicator • illuminates red in standby mode. • illuminates green when the TV is switched on. • illuminates orange when the TV is switched off during recording. PREPARATION PREPARATION LCD TV Models Intelligent Eye Adjusts picture according to the surrounding conditions. PROGRAMME VOLUME OK MENU INPUT POWER 6
PR VOL OK MENU INPUT /I Remote Control Sensor Power/Standby Indicator • illuminates red in standby mode. • illuminates green when the TV is switched on. • illuminates orange when the TV is switched off during recording. PREPARATION PREPARATION LCD TV Models Intelligent Eye Adjusts picture according to the surrounding conditions. PROGRAMME VOLUME OK MENU INPUT POWER 6

Owner's Manual
Page 17
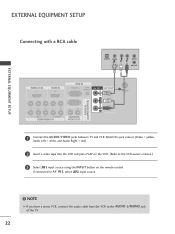
... any equipment, never plug in any power cords until you have finished connecting all equipment. EXTERNAL EQUIPMENT SETUP EXTERNAL EQUIPMENT SETUP I This section on the remote control. If connected to the owner's manual for the digital set-top box.) 1 2 4 Select Component1 input source using the INPUT button on EXTERNAL EQUIPMENT SETUP...
... any equipment, never plug in any power cords until you have finished connecting all equipment. EXTERNAL EQUIPMENT SETUP EXTERNAL EQUIPMENT SETUP I This section on the remote control. If connected to the owner's manual for the digital set-top box.) 1 2 4 Select Component1 input source using the INPUT button on EXTERNAL EQUIPMENT SETUP...

Owner's Manual
Page 18
EXTERNAL EQUIPMENT SETUP Connecting with a HDMI cable 1 Connect the HDMI output of the digital set-top box to the HDMI/DVI IN 1 or HDMI IN 2 jack on the TV. 2 Select HDMI1/DVI or HDMI2 input source using the INPUT button on the remote control. 3 Turn on the digital set-top box. (Refer to the owner's manual for the digital set-top box.) HDMI/DVI IN 1 HDMI IN 2 1 2 VIDEO AUDIO COMPONENT IN 1 HDMI-DTV OUTPUT EXTERNAL EQUIPMENT SETUP 16
EXTERNAL EQUIPMENT SETUP Connecting with a HDMI cable 1 Connect the HDMI output of the digital set-top box to the HDMI/DVI IN 1 or HDMI IN 2 jack on the TV. 2 Select HDMI1/DVI or HDMI2 input source using the INPUT button on the remote control. 3 Turn on the digital set-top box. (Refer to the owner's manual for the digital set-top box.) HDMI/DVI IN 1 HDMI IN 2 1 2 VIDEO AUDIO COMPONENT IN 1 HDMI-DTV OUTPUT EXTERNAL EQUIPMENT SETUP 16

Owner's Manual
Page 19
... set-top box. (Refer to the owner's manual for the digital set-top box.) 4 Select HDMI1/DVI input source using the INPUT button on the remote control. 17
... set-top box. (Refer to the owner's manual for the digital set-top box.) 4 Select HDMI1/DVI input source using the INPUT button on the remote control. 17
Owner's Manual
Page 20
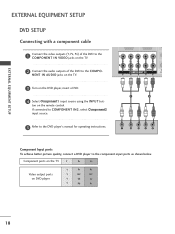
... picture quality, connect a DVD player to the component inHpDuMt Ip/DoVrI tINs as shoHwDnMbI IeNlow. NENT IN AUDIO jacks on the TV. 3 Turn on the remote control. ton on the DVD player, insert a DVD. 4 Select Component1 input source using the INPUT but- Component ports on the TV Y PB PR 1 2 Video output...
... picture quality, connect a DVD player to the component inHpDuMt Ip/DoVrI tINs as shoHwDnMbI IeNlow. NENT IN AUDIO jacks on the TV. 3 Turn on the remote control. ton on the DVD player, insert a DVD. 4 Select Component1 input source using the INPUT but- Component ports on the TV Y PB PR 1 2 Video output...
Owner's Manual
Page 21
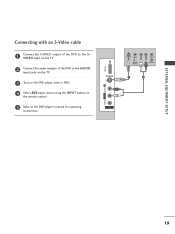
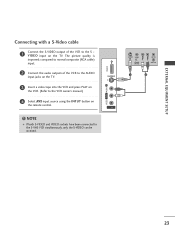
VIDEO L/MONO AUDIO R USB IN S-VIDEO S-VIDEO VIDEO L R ANT IN OUTPUT SWITCH ANT OUT 1 2 AV IN 2 HDMI IN 2 19 EXTERNAL EQUIPMENT SETUP Connecting with an S-Video cable ONENT IN 1 Connect the S-VIDEO output of the DVD to the S VIDEO input on the TV. 2 Connect the audio outputs of the DVD to the AUDIO input jacks on the TV. 3 Turn on the DVD player, insert a DVD. 4 Select AV2 input source using the INPUT button on the remote control. 5 Refer to the DVD player's manual for operating instructions.
VIDEO L/MONO AUDIO R USB IN S-VIDEO S-VIDEO VIDEO L R ANT IN OUTPUT SWITCH ANT OUT 1 2 AV IN 2 HDMI IN 2 19 EXTERNAL EQUIPMENT SETUP Connecting with an S-Video cable ONENT IN 1 Connect the S-VIDEO output of the DVD to the S VIDEO input on the TV. 2 Connect the audio outputs of the DVD to the AUDIO input jacks on the TV. 3 Turn on the DVD player, insert a DVD. 4 Select AV2 input source using the INPUT button on the remote control. 5 Refer to the DVD player's manual for operating instructions.
Owner's Manual
Page 22
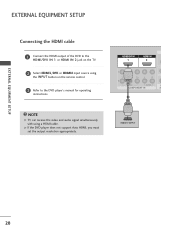
HDMI/DVI IN 1 HDMI IN 2 1 2 VIDEO AUDIO V COMPONENT IN A 1 HDMI-DTV OUTPUT 20 NOTE G TV can receive the video and audio signal simultaneously with using the INPUT button on the remote control. 3 Refer to the DVD player's manual for operating instructions. G If the DVD player does not support Auto HDMI, you must set the output resolution appropriately. EXTERNAL EQUIPMENT SETUP EXTERNAL EQUIPMENT SETUP Connecting the HDMI cable 1 Connect the HDMI output of the DVD to the HDMI/DVI IN 1 or HDMI IN 2 jack on the TV. 2 Select HDMI1/DVI or HDMI2 input source using a HDMI cable.
HDMI/DVI IN 1 HDMI IN 2 1 2 VIDEO AUDIO V COMPONENT IN A 1 HDMI-DTV OUTPUT 20 NOTE G TV can receive the video and audio signal simultaneously with using the INPUT button on the remote control. 3 Refer to the DVD player's manual for operating instructions. G If the DVD player does not support Auto HDMI, you must set the output resolution appropriately. EXTERNAL EQUIPMENT SETUP EXTERNAL EQUIPMENT SETUP Connecting the HDMI cable 1 Connect the HDMI output of the DVD to the HDMI/DVI IN 1 or HDMI IN 2 jack on the TV. 2 Select HDMI1/DVI or HDMI2 input source using a HDMI cable.
Owner's Manual
Page 24
... into the VCR and press PLAY on the VCR. (Refer to the VCR owner's manual.) 3 Select AV1 input source using the INPUT button on the remote control.
... into the VCR and press PLAY on the VCR. (Refer to the VCR owner's manual.) 3 Select AV1 input source using the INPUT button on the remote control.
Owner's Manual
Page 25
compared to normal composite (RCA cable) input. 2 Connect the audio outputs of the VCR to the S VIDEO input on the remote control. ! The picture quality is improved; VIDEO L/MONO AUDIO R USB IN S-VIDEO AV IN 2 S-VIDEO VIDEO L R ANT IN OUTPUT SWITCH ANT OUT 1 2 23 NOTE G If ...
compared to normal composite (RCA cable) input. 2 Connect the audio outputs of the VCR to the S VIDEO input on the remote control. ! The picture quality is improved; VIDEO L/MONO AUDIO R USB IN S-VIDEO AV IN 2 S-VIDEO VIDEO L R ANT IN OUTPUT SWITCH ANT OUT 1 2 23 NOTE G If ...

Owner's Manual
Page 26
If connected to external equipment operating guide. 24 Refer to AV IN1, select AV1 input source. 3 Operate the corresponding external equipment. Match the jack colours. (Video = yellow, Audio Left = white, and Audio Right = red) 2 Select AV2 input source with using the INPUT button on the remote control. EXTERNAL EQUIPMENT SETUP EXTERNAL EQUIPMENT SETUP OTHER A/V SOURCE SETUP Camcorder Video Game Set USB IN VIDEO L/MONO AUDIO R S-VIDEO AV IN 2 VIDEO L R 1 1 Connect the AUDIO/VIDEO jacks between TV and external equipment.
If connected to external equipment operating guide. 24 Refer to AV IN1, select AV1 input source. 3 Operate the corresponding external equipment. Match the jack colours. (Video = yellow, Audio Left = white, and Audio Right = red) 2 Select AV2 input source with using the INPUT button on the remote control. EXTERNAL EQUIPMENT SETUP EXTERNAL EQUIPMENT SETUP OTHER A/V SOURCE SETUP Camcorder Video Game Set USB IN VIDEO L/MONO AUDIO R S-VIDEO AV IN 2 VIDEO L R 1 1 Connect the AUDIO/VIDEO jacks between TV and external equipment.

Owner's Manual
Page 29
... VIDEO 1 2 VIDEO AUDIO COMPONENT IN VARIABLE AUDIO OUT 1 2 RGB OUTPUT AUDIO 1 Connect the RGB output of the PC to the RGB (PC) jack on the remote control. 27 RGB IN 2 ConneHDcMtI1/DtVhI INe PC audio output to the TV's settings. EXTERNAL EQUIPMENT SETUP PC SETUP This TV provides Plug and Play...
... VIDEO 1 2 VIDEO AUDIO COMPONENT IN VARIABLE AUDIO OUT 1 2 RGB OUTPUT AUDIO 1 Connect the RGB output of the PC to the RGB (PC) jack on the remote control. 27 RGB IN 2 ConneHDcMtI1/DtVhI INe PC audio output to the TV's settings. EXTERNAL EQUIPMENT SETUP PC SETUP This TV provides Plug and Play...

Owner's Manual
Page 30
... AUDIO(RGB/DVI) jack on the TV. 3 Turn on the PC and the TV. 4 Select HDMI1/DVI input source using the INPUT button on the remote control. ! EXTERNAL EQUIPMENT SETUP Connecting with a HDMI to DVI cable HDMI/DVI IN 1 HDMI IN 2 RGB IN RGB(PC) AUDIO (RGB/DVI) AV IN 1 AV...
... AUDIO(RGB/DVI) jack on the TV. 3 Turn on the PC and the TV. 4 Select HDMI1/DVI input source using the INPUT button on the remote control. ! EXTERNAL EQUIPMENT SETUP Connecting with a HDMI to DVI cable HDMI/DVI IN 1 HDMI IN 2 RGB IN RGB(PC) AUDIO (RGB/DVI) AV IN 1 AV...

Owner's Manual
Page 36
.... POSITION Moves the sub picture. EXIT Clears all on from standby. WATCHING TV / PROGRAMME CONTROL WATCHING TV / PROGRAMME CONTROL REMOTE CONTROL KEY FUNCTIONS When using the remote control, aim it at the remote control sensor on from standby or off to standby. Brightness Adjusts screen brightness. TV INPUT Returns to the default settings...
.... POSITION Moves the sub picture. EXIT Clears all on from standby. WATCHING TV / PROGRAMME CONTROL WATCHING TV / PROGRAMME CONTROL REMOTE CONTROL KEY FUNCTIONS When using the remote control, aim it at the remote control sensor on from standby or off to standby. Brightness Adjusts screen brightness. TV INPUT Returns to the default settings...

Owner's Manual
Page 37
... Adjusts the volume. UP/DOWN 0~9 number Selects a programme. buttons Selects numbered items in the recorded TV menu. PIP PR+ SWAP PIP INPUT MODE Selects the remote operating modes. 3 TELETEXT These buttons are used batteries with -). Programme Selects a programme. LIST MENU TIME MACHINE LIVE TV EXIT TIME OK TIME SHIFT SHIFT FAV...
... Adjusts the volume. UP/DOWN 0~9 number Selects a programme. buttons Selects numbered items in the recorded TV menu. PIP PR+ SWAP PIP INPUT MODE Selects the remote operating modes. 3 TELETEXT These buttons are used batteries with -). Programme Selects a programme. LIST MENU TIME MACHINE LIVE TV EXIT TIME OK TIME SHIFT SHIFT FAV...

Owner's Manual
Page 38
... 1 Press the P R + / - I In standby mode to turn TV on, press the , INPUT, P R D / E button on the TV or press the POWER, T V, INPUT, P R + / -, Number(0~9 ) button on the remote control and the TV will be able to switch the sound off, press the MUTE button. 3 You can cancel the Mute function by pressing the...
... 1 Press the P R + / - I In standby mode to turn TV on, press the , INPUT, P R D / E button on the TV or press the POWER, T V, INPUT, P R + / -, Number(0~9 ) button on the remote control and the TV will be able to switch the sound off, press the MUTE button. 3 You can cancel the Mute function by pressing the...

Owner's Manual
Page 49
... Menu Prev. 1 Language Input Label SIMPLINK Key Lock ISM Method Low Power Set ID G Off On 23 ! This feature can be set so that the remote control is programmed to remember which option it . This TV is needed to control it was last set to even if you turn the TV... off , press the r / I, INPUT, P R D / E button on the remote control then the TV will be used to normal TV viewing. WATCHING TV / PROGRAMME CONTROL KEY LOCK The TV can be turned on. NOTE G In...
... Menu Prev. 1 Language Input Label SIMPLINK Key Lock ISM Method Low Power Set ID G Off On 23 ! This feature can be set so that the remote control is programmed to remember which option it . This TV is needed to control it was last set to even if you turn the TV... off , press the r / I, INPUT, P R D / E button on the remote control then the TV will be used to normal TV viewing. WATCHING TV / PROGRAMME CONTROL KEY LOCK The TV can be turned on. NOTE G In...


