Owner's Manual (English)
Page 4
... Panel Information 5 Stand Installation 6 Attaching the TV to a Wall 7 Back Cover for PC Mode 25 AV Output Setup 26 ...Digital Audio Output Setup 27 WATCHING TV/PROGRAMME CONTROL Remote Control Key Functions 28 Turning on the TV 30 Initializing Setup 30 Programme Selection 31 Volume ... 2 PSM - User Mode 63 Balance 65 TV Speakers ON/OFF Setup 66 I/II - SSM Mode 62 Sound Setting Adjustment - User Option 53 Colour Tone - Screen Setup for Wire Arrangement 8 Desktop Pedestal Installation 9 Wall Mount: Horizontal installation 10 Antenna Connection 11 EXTERNAL EQUIPMENT...
... Panel Information 5 Stand Installation 6 Attaching the TV to a Wall 7 Back Cover for PC Mode 25 AV Output Setup 26 ...Digital Audio Output Setup 27 WATCHING TV/PROGRAMME CONTROL Remote Control Key Functions 28 Turning on the TV 30 Initializing Setup 30 Programme Selection 31 Volume ... 2 PSM - User Mode 63 Balance 65 TV Speakers ON/OFF Setup 66 I/II - SSM Mode 62 Sound Setting Adjustment - User Option 53 Colour Tone - Screen Setup for Wire Arrangement 8 Desktop Pedestal Installation 9 Wall Mount: Horizontal installation 10 Antenna Connection 11 EXTERNAL EQUIPMENT...
Owner's Manual (English)
Page 9
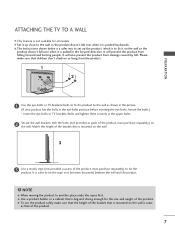
It will prevent the product from damage caused by fall over when it is pushed backwards. Match the height of the bracket that is mounted on the wall. 3 3 Use a sturdy rope (not provided as parts of the product, must purchase separately) to tie the product. G Use a product holder or a ... it up the product, which is to another place undo the ropes first. A Set it becomes horizontal between the wall and the product. ! Please make sure that is mounted on or hang from the product. 1 2 PREPARATION 1 Use the eye-bolts or TV brackets/bolts to fix the product to the...
It will prevent the product from damage caused by fall over when it is pushed backwards. Match the height of the bracket that is mounted on the wall. 3 3 Use a sturdy rope (not provided as parts of the product, must purchase separately) to tie the product. G Use a product holder or a ... it up the product, which is to another place undo the ropes first. A Set it becomes horizontal between the wall and the product. ! Please make sure that is mounted on or hang from the product. 1 2 PREPARATION 1 Use the eye-bolts or TV brackets/bolts to fix the product to the...
Owner's Manual (English)
Page 12
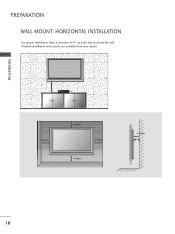
Detailed installation instructions are available from the wall. PREPARATION 4 inches 4 inches 4 inches 4 inches 4 inches 10 PREPARATION WALL MOUNT: HORIZONTAL INSTALLATION For proper ventilation, allow a clearance of 4" on each side and from your dealer.
Detailed installation instructions are available from the wall. PREPARATION 4 inches 4 inches 4 inches 4 inches 4 inches 10 PREPARATION WALL MOUNT: HORIZONTAL INSTALLATION For proper ventilation, allow a clearance of 4" on each side and from your dealer.


